GNC DayLight Manuel D'installation, D'utilisation Et D'entretien

GNC DayLight Manuel D'installation, D'utilisation Et D'entretien

Éclairage à led pour aquarium

Publicité

Les langues disponibles

Les langues disponibles

Liens rapides

IT
DayLight
Aquarium LED lighting system

Publicité

Table des Matières
loading

Sommaire des Matières pour GNC DayLight

  • Page 1 DayLight Aquarium LED lighting system...
  • Page 2 Designed and manufactured in Italy by GNC S.r.l.
  • Page 3: Table Des Matières

    MANUALE D’INSTALLAZIONE, USO E MANUTENZIONE INDICE 1. Introduzione 2. Copyright 3. Presentazione e garanzia 4. Avvertenze per la sicurezza 5. Descrizione dell’apparecchio e componenti 6. Installazione 7. Sincronizzazione di due DAYLIGHT 8. Gestione programmazione AirLink WiFi 9. Manutenzione e pulizia 10. Dati tecnici...
  • Page 4: Introduzione

    . il montaggio, le modifiche e le riparazioni non siano effettuate da un tecnico del servizio di assistenza GNC o da personale autorizzato da GNC, . l’apparecchio non sia utilizzato conformemente alla sua destinazione d’uso e alle norme e istruzioni per l’uso.
  • Page 5: Descrizione Dell'apparecchio E Componenti

    5. DESCRIZIONE DELL’APPARECCHIO E COMPONENTI L’apparecchio è concepito per essere installato sospeso sulla vasca tramite due cavi in acciaio inox ancorati al soffitto. Il montaggio dell’apparec- chio è stato studiato in modo da ridurre i tempi di installazione, I collegamenti elettrici sono tutti su connettore per gestire al meglio l’assemblaggio e l’eventuale assistenza tecnica.
  • Page 6 Applicare le clips fornite alle terminazioni a sfera e inserire l’assemblato nel foro della lente facendo scorrere indietro il cavetto di acciaio e premendo contemporaneamente sulla testa della clip. Inserire il cavetto d’acciaio fissato al soffitto nel cilindretto di regolazione. Premendo la parte superiore del cilindretto si libera il meccanismo di blocco e il cavetto può...
  • Page 7 Inserire il connettore femmina del cavo lampada (2) nel maschio a bordo lampada e serrare la vite presente nel connettore stesso. Inserire il connettore presente all’altra estremità del cavo lampada (2) nell’apposita presa “LED” del Controller AirLink WiFi (4). Il connettore è dotato di levetta a molla per il blocco/sblocco dello stesso.
  • Page 8 Inserire il connettore all’estremità libera del cavo alimentatore (3) nell’apposita presa “IN DC” del Controller AirLink WiFi(4). Il connettore è dotato di un dispositivo a baionetta che va tirato indietro per l’inserimento e poi rilasciato per il bloccaggio. Analogamente, il dispositivo a baionetta tirato indietro, sblocca il connettore per il disinserimento.
  • Page 9: Sincronizzazione Di Due Daylight

    La DAYLIGHY risulta ora completamente assemblata. Possiamo infine inserire la spina del cavo di alimentazione nella presa a parete. N.B. La lampada si accende solo se l‘orario è stato impostato e si trova entro la fascia alba-tramonto Si consiglia il montaggio della lampada ad una distanza minima di 15 cm dalla superficie dell’acqua. Il Controller Airlink WiFi alimenta la lampada in bassa tensione e a corrente costante tramite cavo di rete 230V e presa di sicurezza.
  • Page 10: Gestione Programmazione Airlink Wifi

    8. GESTIONE PROGRAMMAZIONE AirLink WiFi Il controller AirLink viene gestito tramite qualsiasi browser (safari, chrome,…). Procedere accendendo la lampada. Utilizzando il proprio device (smartphone, tablet, PC o Mac), individuare tra le reti dis- ponibili quella denominata DAYLIGHY. Selezionarla ed inserire la password presente sul corpo del modulo AirLink. Una volta attivata la rete, digitare sulla barra URL di navigazione del proprio browser il seguente indirizzo: 192.168.1.3/index.html e premere invio.
  • Page 11 MENU IMPOSTAZIONE DEL GIORNO Mediante tasti per incrementare (+) e diminuire (-), impostare intensità del canale led bianco freddo che si desidera avere nella fase del giorno Mediante tasti per incrementare (+) e diminuire (-), impostare intensità del canale led premiscelato rosso che si desidera avere nella fase del giorno Mediante tasti per incrementare (+) e diminuire (-), impostare intensità...
  • Page 12 MENU IMPOSTAZIONE DELLA NOTTE Impostare ore e minuti dell’orario inizio tramonto mediante tasti per incrementare (+) e diminuire (-) Impostare durata della rampa del tramonto in minuti, mediante tasti per incrementare (+) e diminuire (-) Premere icona salvataggio per memorizzare dati inseriti MENU EFFETTI Funzione demo attivabile mediante switch on/off La funzione demo simula un ciclo completo composto da 3 minuti di alba,...
  • Page 13 SCHEMA CABLAGGIO CON ACCESSORIO POWERMOON SCHEMA CABLAGGIO SINCRONIZZAZIONE MASTER/SLAVE...
  • Page 14: Manutenzione E Pulizia

    9. MANUTENZIONE E PULIZIA L’apparecchio non ha bisogno di particolari manutenzioni. Utilizzare un panno di tessuto non abrasivo bagnato con acqua per la pulizia della plastica trasparente e dell’alluminio di raffreddamento. E’ vietato l’uso di qualsiasi solvente, alcool o sostanza diversa dall’acqua, pena il danneggiamento permanente del prodotto.
  • Page 15 INSTALLATION, OPERATING AND MAINTENANCE MANUAL CONTENTS 1. Introduction 2. Copyright 3. Presentation and warranty 4. Safety precaution 5. Description of the appliance and components 6. Installation 7. Synchronizing two DAYLIGHT 8. AirLink WiFi program management 9. Maintenance and cleaning 10. Technical data...
  • Page 16: Introduction

    The manufacturer declines all responsibility for the product’s defective operation and, therefore, the warranty shall not cover: . assembly, modifications and repairs not carried out by a technician of the GNC technical assistance service or by authorised GNC personnel; . improper use of the product in relation to its intended use, regulations and operating instructions.
  • Page 17: Description Of The Appliance And Components

    5. DESCRIPTION OF THE APPLIANCE AND COMPONENTS The appliance is designed to be installed suspended on the tank through two stainless steel cables anchored to the ceiling. The installation of the device has been designed to reduce installation time. The electrical connections are all on the connector to better manage the assembly and pos- sible technical assistance.
  • Page 18 Apply the clips provided to the ballpoint endings and insert the assembly into the hole of the lens by sliding back the steel cable and pressing on the clip head. Insert the steel cable attached to the ceiling, in the regulator cylinder. Pressing the upper part of the cylinder, the locking mechanism is released and the cable can be positioned at the preferred height.
  • Page 19 Plug the female of the lamp cable connector (2) in the male on the lamp and tighten the screw that is in the connector itself. Insert the connector on the other end of the lamp wire (2) into the "LED" socket of Controller AirLink WiFi (4). The connector is equipped with spring-loaded lever for locking / unlocking the same.
  • Page 20 Insert the connector of the free end of the power supply cable (3) into the jack "DC IN" of the Controller AirLink WiFi (4). The connector has a bayo- net device that must be pulled back to the insertion and then released for locking. Similarly, the bayonet device must be pulled back, to unlock the connector.
  • Page 21: Synchronizing Two Daylight

    DAYLIGHT is now fully assembled. We can finally plug the power cable into the wall socket. NOTICE: The lamp only comes on if the time has been set and is within the range sunrise- sunset. We recommend mounting the lamp at a minimum distance of 15 cm from the water surface. The Airlink WiFi Controller supplies the lamp with low voltage and constant current via a 230V network cable and safety socket.
  • Page 22: Airlink Wifi Program Management

    Proceed by turning on the lamp. Using your own device (smartphone, tablet, PC or Mac), locate the network called DayLight among those available. Select it and enter the password shown on the sticker placed under the AirLink unit. Once the network is enabled, type in the navigation URL bar of your browser, the address 192.168.1.3/...
  • Page 23 DAY SETUP MENU Using keys to increase (+) and decrease (-), set the intensity of the cold white LED chan- nel that you want to have in the phase of the day Using keys to increase (+) and decrease (-), set the intensity of the pre-mixed red LED channel that you want to have in the phase of the day Using keys to increase (+) and decrease (-), set the intensity of the hot white LED chan- nel that you want to have in the phase of the day...
  • Page 24 NIGHT SETUP MENU Set hours and minutes of the sunset start time using keys to increase (+) and decrease (-) Set the duration of the sunset ramp in minutes, using keys to increase (+) and decrease (-) Press save icon to store entered data EFFECTS MENU Demo function activated by on / off switch The demo function simulates a complete cycle consisting of 3 minutes of sunrise,...
  • Page 25 WIRING DIAGRAM WITH POWERMOON ACCESSORY MASTER / SLAVE SYNCHRONIZATION WIRING DIAGRAM...
  • Page 26: Maintenance And Cleaning

    9. MAINTENANCE AND CLEANING The device does not need any special maintenance. Use a non-abrasive Fabric Cloth, wet with water for the cleaning of the transparent plastic and the aluminium cooling. It is forbidden to use any solvent, alcohol or other substance diferrent from the water, to avoid permanent damage to the product.
  • Page 27 INSTALLATIONS-, GEBRAUCHS- UND WARTUNGSANLEITUNG INHALT 1. Einleitung 2. Copyright 3. Präsentation und Garantie 4. Sicherheitsvorkehrungen 5. Beschreibung des Geräts und der Komponenten 6. Installation 7. Synchronisation von zwei DAYLIGHT 8. Verwaltung der AirLink Wi-Fi-Programmierung 9. Wartung und Reinigung 10. Technische Daten...
  • Page 28: Einleitung

    ästhetische und sogar energiesparende Anforderungen erfüllt. Das Gerät wird komplett in Italien mit robusten, hochwertigen Materialien entworfen und hergestellt. Die DAYLIGHT LED-Leuchte wurde entwickelt um die Bedürfnisse Ihres Meerwasseraquariums zu erfüllen. Der Hersteller garantiert seine Produkte für 24 Monate in Übereinstimmung mit den geltenden Rechtsvorschriften. Gewährleistungsarbeiten werden ausschließlich beim Hersteller durchgeführt.
  • Page 29: Beschreibung Des Geräts Und Der Komponenten

    5. BESCHREIBUNG DES GERÄTS UND DER KOMPONENTEN Das Gerät ist so konzipiert, dass es mit zwei an der Decke verankerten Edelstahlseilen über dem Aquarium installiert werden kann. Die Einrichtung des Geräts wurde entwickelt, um die Installationszeit zu reduzieren. Die elektrischen Verbindungen sind alle am Verbinder, um die Montage und eventuelle technische Eingriffe besser zu verwalten.
  • Page 30 Bringen Sie die mitgelieferten Clips an den Kugelkopfenden an und setzen Sie die Baugruppe in das Loch der Linse ein, indem Sie das Stahlkabel zurückschieben und auf den Clip Kopf drücken. Stecken Sie das Stahlkabel in den Einstellzylinder an der Decke. Durch Drücken auf den oberen Teil des Zylinders wird der Verriegelungsmechanis- mus gelöst und das Kabel kann in der gewünschten Höhe positioniert werden.
  • Page 31 Führen Sie den Stecker des Leuchtekabels (2) in den Stecker der Leuchte und ziehen Sie die im Stecker befindliche Schraube fest. Stecken Sie den Stecker am anderen Ende des Leuchtekabels (2) in die Buchse "LED" des AirLink Wi-Fi Controllers (4).Der Stecker ist mit einem Federhebel ausgestattet, um ihn zu verriegeln / entriegeln.
  • Page 32 Stecken Sie den freien Stecker am Ende des Stromversorgungskabels (3) in die Buchse "IN DC" des AirLink Wi-Fi Controllers (4). Der Stecker ist mit einem Bajonettverschluss ausgestattet, der zum Einstecken zurückgezogen und anschließend zum Verriegeln vorgezogen werden muss. Eben- so muss der Bajonettverschluss zurückgezogen werden, um den Stecker zu entriegeln. Stecken Sie nun den Stromkabelstecker in die Stromversorgungsbuchse (3).
  • Page 33: Synchronisation Von Zwei Daylight

    Die DAYLIGHT ist jetzt komplett montiert. Schließlich können wir den Stecker des Stromkabels in die Steckdose stecken. Die Leuchte blinkt kurz auf und beginnt nach einigen Sekunden auf- zuleuchten. ACHTUNG: Die Lampe leuchtet nur auf, wenn die Uhrzeit eingestellt wurde und sich im Bereich zwischen Sonnenaufgang und Sonnen- untergang befindet Wir empfehlen, die Lampe in einem Mindestabstand von 15 cm zur Wasseroberfläche anzubringen.
  • Page 34 Gehen Sie wie folgt vor, indem Sie die Leuchte einschalten. Verwenden Sie Ihr Gerät (Smartphone, Tablet, PC oder Mac) und identifizieren Sie unter den verfügbaren Netz- werken das Netzwerk namens DayLight. Wählen Sie es aus und geben Sie das Pass- wort, das auf dem Aufkleber unter dem AirLink-Modul steht, ein. Sobald das Netzwerk aktiviert ist, geben Sie in die Navigations-URL-Leiste Ihres Browsers die Adresse 192.168.1.3/index.html ein und drücken Sie die...
  • Page 35 TAGEINSTELLUNGSMENÜ Stellen Sie mit den Tasten zum Erhöhen (+) und Verringern (-) die Intensität des kaltes Weiß LED-Kanals ein, den Sie in der Tagesphase haben möchten Stellen Sie mit den Tasten zum Erhöhen (+) und Verringern (-) die Intensität des vorge- mischten Rot LED-Kanals ein, den Sie in der Tagesphase haben möchten Stellen Sie mit den Tasten zum Erhöhen (+) und Verringern (-) die Intensität des Weiß- guss LED-Kanals ein, den Sie in der Tagesphase haben möchten...
  • Page 36 NACHTEINSTELLUNGSMENÜ Stellen Sie Stunden und Minuten der Sonnenuntergangsstartzeit mit den Tasten zum Erhöhen (+) und Verringern (-) ein. Stellen Sie die Dauer der Sonnenuntergangsrampe mit den Tasten zum Erhöhen (+) und Verringern (-) in Minuten ein. Drücken Sie auf das Speichersymbol, um die eingegebenen Daten zu speichern EFFEKTMENÜ...
  • Page 37 SCHALTPLAN MIT POWERMOON-ZUBEHÖR MASTER / SLAVE-SYNCHRONISIERUNGS-SCHALTPLAN...
  • Page 38: Wartung Und Reinigung

    9. WARTUNG UND REINIGUNG Das Gerät benötigt keine spezielle Wartung. Verwenden Sie zum Reinigen des transparenten Kunststoffs und des Aluminiumkühlkörpers ein mit Wasser getränktes, nicht scheuerndes und kratzendes Tuch. Um dauerhafte Schäden am Produkt zu vermeiden, ist es strengstens untersagt Lösungsmittel, Alkohol oder andere Produkten zu verwenden.
  • Page 39 1. Introduction 2. Copyright 3. Présentation et garantie 4. Consignes de sécurité 5. Description de l'appareil et de ses composants 6. Installation 7. Synchronisation de deux DAYLIGHT 8. Gestion de la programmation AirLink WiFi 9. Entretien et nettoyage 10. Données techniques...
  • Page 40: Introduction

    Nous vous remercions d'avoir acheté notre produit, fabriqué conformément aux réglementations et spécifications techniques les plus strictes afin de vous assurer une utilisation sûre et pratique. Le système d’éclairage à LED DAYLIGHT est un produit de haute technologie qui vise à répondre aux exigences fonctionnelles, esthétiques et même d'économie d'énergie. Ce produit est conçu et fabriqué...
  • Page 41: Description De L'appareil Et De Ses Composants

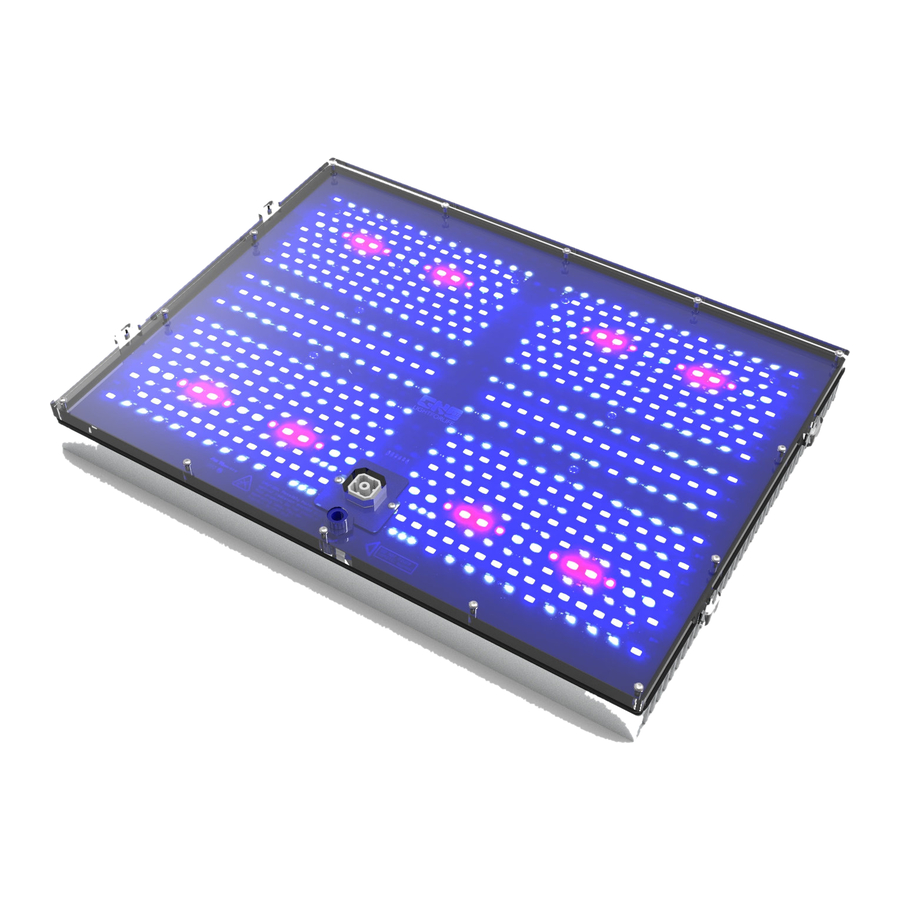
    5. DESCRIPTION DE L'APPAREIL ET DE SES COMPOSANTS L'unité est conçue pour être installée au-dessus de l'aquarium avec deux câbles en acier inoxydable ancrés au plafond. L'assemblage de l'appareil a été étudié afin de réduire le temps d'installation. Les connexions électriques sont toutes sur le connecteur pour faciliter le montage et les interven- tions techniques.
  • Page 42 Fixez les clips fournis sur les embouts sphériques et insérez l’ensemble dans le trou de la lentille en plexiglas en en faisant glisser le câble en acier vers l'arrière et en appuyant simultanément sur la tête du clip. Insérez le câble en acier fixé au plafond dans la goupille de réglage. En appuyant sur la partie supérieure de la goupille, vous libérez le mécanisme de verrouillage et le câble peut être positionné...
  • Page 43 Branchez le connecteur femelle du câble de la lampe (2) dans le connecteur mâle de la lampe et serrez fermement la vis qui se située dans le connecteur femelle. Insérez le connecteur situé à l’autre extrémité du câble de la lampe (2) dans la prise "LED" du contrôleur AirLink WiFi (4). Le connecteur est équipé...
  • Page 44 Insérer le connecteur à l'extrémité du câble d'alimentation (3) dans la prise "IN DC" du contrôleur AirLink WiFi (4). Le connecteur est équipé d'un dispositif à baïonnette qui doit être tiré vers l'arrière pour l'insertion, puis relâché pour le verrouillage. De même, le dispositif à baïonnette doit être tiré...
  • Page 45: Synchronisation De Deux Daylight

    Maintenant le Système d’éclairage LED DAYLIGHT est entièrement assemblé. Vous pouvez enfin brancher le câble d’alimentation dans la prise de courant. La lampe clignotera brièvement et s'allume après quelques secondes. N.B. La lampe ne s'allume que si l'heure a été réglée et se situe entre le lever et le coucher du soleil.
  • Page 46: Gestion De La Programmation Airlink Wifi

    Allumez la lampe. En utilisant votre périphérique (tablette, smartphone, PC ou Mac), localisez le réseau appelé DayLight parmi ceux disponibles. Sélectionnez-le et entrez le mot de passe indiqué sur l'autocollant placé sous l'unité AirLink. Une fois le réseau activé, tapez dans la barre de navigation de votre navigateur l'adresse 192.168.1.3/...
  • Page 47: Menu Réglage Jour

    MENU RÉGLAGE JOUR À l'aide des touches pour augmenter (+) et diminuer (-), réglez l'intensité du canal LED blanc froid que vous souhaitez avoir dans la phase de la journée À l'aide des touches pour augmenter (+) et diminuer (-), réglez l'intensité du canal LED rouge prémélangé...
  • Page 48: Menu De Configuration De Nuit

    MENU DE CONFIGURATION DE NUIT Réglez les heures et les minutes de l'heure de début du coucher du soleil à l'aide des tou- ches pour augmenter (+) et diminuer (-) Réglez la durée de la rampe de coucher du soleil en minutes, en utilisant les touches pour augmenter (+) et diminuer (-) Appuyez sur l'icône d'enregistrement pour stocker les données saisies MENU EFFETS...
  • Page 49: Schéma De Câblage Avec Accessoire Powermoon

    SCHÉMA DE CÂBLAGE AVEC ACCESSOIRE POWERMOON SCHÉMA DE CÂBLAGE DE SYNCHRONISATION MAÎTRE / ESCLAVE...
  • Page 50: Entretien Et Nettoyage

    9. ENTRETIEN ET NETTOYAGE L'appareil ne nécessite aucun entretien particulier. Utilisez un chiffon doux non abrasif imbibé d'eau pour nettoyer le plastique transparent et le dissipateur de chaleur en aluminium. Pour éviter tous dommages permanents au luminaire, il est strictement interdit d'utiliser des solvants, de l'alcool ou d'autres produits.
  • Page 51 Designed and manufactured in Italy by GNC S.r.l.
  • Page 52 Designed and manufactured in Italy by GNC S.r.l.

Table des Matières