
Manuels Connexes pour Weinmann ULM CASE I

Sommaire des Matières pour Weinmann ULM CASE I
- Page 1 ULM CASE I / VALISE ULM I Emergency Case / Valise d'urgence Instructions for use / Mode d'emploi...
- Page 2 English Français...
-
Page 3: Table Des Matières
Contents Overview ................ 4 1.1 Special markings on the device ........5 Device Description ............6 2.1 Intended purpose ............6 2.2 Functional description ..........6 Safety Instructions ............7 Assembly ................. 8 4.1 Assembly of wall mounting ........8 Operation ................ -
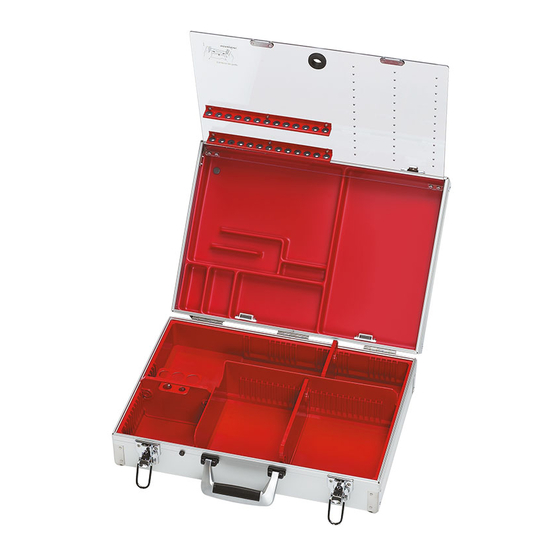
Page 4: Overview
1 Overview Legend 13 Lead seal 14 Medium (147 mm) bottom divider Magnetic closing Cover 15 Tube holder: Case top a) Oropharyngeal tubes, large Upper insert b) Oropharyngeal tubes, small 16 Keys Short (121mm) bottom divider Retaining clamp 17 Set of two belts for oxygen cylinder Oxygen cylinder compartment 18 Laryngoscope bag Lower insert... -
Page 5: Special Markings On The Device
1.1 Special markings on the device Symbol Meaning Device ID plate ULM CASE I Follow instructions for use. Other markings Removing the bars Overview EN... -
Page 6: Device Description
2 Device Description 2.1 Intended purpose ULM CASE I is used to hold and transport emergency medical devices, instruments, medicines, bandages and other parts. 2.2 Functional description ULM CASE I has been perfectly equipped for each time of use. The interior of the case bottom can be set up with dividers to fit your specific needs. -
Page 7: Safety Instructions
3 Safety Instructions Please note the following for your own safety and that of your patients: • Please follow the instructions in this User’s Manual. They are a part of the case and therefore must be available at all times. •... -
Page 8: Assembly
4 Assembly 4.1 Assembly of wall mounting If you would like to mount the case on the wall of a vehicle, use wall mounting WM 15370 (see Section “9 Supply Schedule” on page 14). If you would like to mount the case on the wall of a buil- ding, use the appropriate wall mounting WM 15731 (see Section “9 Supply Schedule”... -
Page 9: Operation
5 Operation 5.1 Space Dividers The interior of the case bottom can be separated as desi- red with the space dividers (5, 12 and 14). See Illustration 1, Device Overview, for an example. Observe the following when using the dividers: •... -
Page 10: Inserting Oxygen Cylinders
5.4 Inserting Oxygen Cylinders Important! Be sure to wash your hands before you insert or change Your hands must be free oxygen cylinders. of grease and products If you want to fasten an oxygen cylinder of 0.8 liters or containing alcohol when 2.0 liters into the case bottom you insert or change (9), use accessory WM 15141, Set of two belts for... -
Page 11: Omnivac Holder
5.6 OMNIVAC holder To fasten the OMNIVAC secretion pump into the case bottom, use the holder for the OMNIVAC (23). Click the holder into the case bottom as shown in the illustration. If the distance between the case and the patient is too great, it may be necessary to remove the collection con- tainer from the holder and take advantage of the length of the extension hose. -
Page 12: Functional Test
8.1 Intervals The emergency cases are maintenance-free. Observe the intervals for regular functional tests (see Section “7 Functional Test” on page 12). We recommend allowing the manufacturer’s ( WEINMANN Emergency) expert personnel to carry out maintenance and repairs. EN Functional Test... -
Page 13: Sending In Parts
1. Remove parts 2. Clean and disinfect parts (“6 Hygiene preparation” on page 11). 3. Send parts to WEINMANN Emergency, or to a technician specifically authorized by WEINMANN Emergency. 8.3 Disposal Do not dispose of the therapy device in domestic waste. -
Page 14: Supply Schedule
1 Holder for oropharyngeal tubes, large* WM 15143 1 Ampoule holder, 260 mm, set of two* WM 15586 ULM CASE I can also be delivered with other equipment variations. * includes fastening elements 9.2 Accessories The following accessories are not included in the Supply... -
Page 15: Replacement Parts
• Bi-Lok pull seal, length 215 mm, sealing tape Ø 1.9 mm 9.3 Replacement Parts Standard symbol stickers: Oxygen WM 0900 Wear protective gloves WM 0970 Bandage case WM 0971 Needles WM 1040 WM 1041 Intubation WM 1042 Infusion WM 1043 Medicines CIRCULATION WM 1044 Medicines RESPIRATION WM 1045... - Page 16 (for adults, juveniles and children) WM 15143 Case handle* WM 15145 Lead seal, set of two* WM 15147 Ampoule holder, 260 mm, set of two* WM 15586 Ampoule holder, 200mm* WM 15587 Ampoule holder, 200mm, set of three WM 15588 User’s Manual WM 16794 To replace the following fittings, it is necessary to rebore...
-
Page 17: Technical Specifications
10 Technical Specifications Emergency Case Standards applied DIN 13232 EN 1789 Dimensions (LxBxH) 526 x 400 x 170 mm (outer measurements including projecting ends such as case corners, footings, handle, etc.) Weight, empty 6.5 kg Temperature range - Operation 20 °C to + 50 °C - Storage - 30 °C to + 70° C Material:... -
Page 18: Warranty
11 Warranty WEINMANN Emergency gives the customer a limited manufacturer warranty on new original WEINMANN Emergency products and any replacement part fitted by WEINMANN Emergency in accordance with the warran- ty conditions applicable to the product in question and in accordance with the warranty periods from date of purchase as listed below. - Page 20 Sommaire Vue d’ensemble ............21 1.1 Marquage spécifique de l'appareil ......22 Description de l’appareil ..........23 2.1 Destination .............. 23 2.2 Description fonctionnelle ......... 23 Consignes de sécurité ..........24 Montage ............... 25 4.1 Montage d’un support mural ........25 Utilisation ..............
-
Page 21: Vue D'ensemble
1 Vue d’ensemble Légende 13 Plombage Verrouillage magnétique 14 Cloison séparatrice pour le fond, longue (147 mm) Abattant 15 Porte-tubes: Partie supérieure de la valise a) Tubes oro-pharyngés, grands b) Tubes oro-pharyngés, petits Plateau supérieur Cloison séparatrice pour le fond, courte 16 Clés (121 mm) 17 Set, 2 tendeurs pour la bouteille d‘oxygène... -
Page 22: Marquage Spécifique De L'appareil
1.1 Marquage spécifique de l'appareil Symbole Signification Plaque signalétique VALISE ULM I Respecter le mode d’emploi. Autres repères Enlèvement des entretoises FR Vue d’ensemble... -
Page 23: Description De L'appareil
2 Description de l’appareil 2.1 Destination La VALISE ULM I est destinée à recevoir et à transporter des appareils, instruments, médicaments, pansements et autres éléments de médecine d’urgence. 2.2 Description fonctionnelle La VALISE ULM I a été équipée de manière optimale pour les différents domaines d’intervention. -
Page 24: Consignes De Sécurité
3 Consignes de sécurité Pour assurer votre propre sécurité ainsi que celle de vos patients, veuillez observer les consignes suivantes : • Veuillez observer les instructions de ce mode d’emploi. Il fait partie intégrante de la valise et doit être disponible à tout moment. •... -
Page 25: Montage
• Veillez toujours à ce que les bouteilles d’oxygène soient suffisamment remplies. Il est recommandé de tenir en réserve une bouteille d’oxygène pleine. 4 Montage 4.1 Montage d’un support mural Si vous désirez fixer la valise à la paroi d’un véhicule, utili- sez le support mural WM 15370 (voir paragraphe « 9 Gamme de produits »... -
Page 26: Utilisation
5 Utilisation 5.1 Cloisons séparatrices La partie inférieure de la valise peut être compartimentée à volonté grâce aux cloisons séparatrices (5, 12 et 14). La vue d’ensemble de l’appareil (fig. 1) montre un exemple d’agencement. Respectez les points suivants en mettant en place les cloisons séparatrices : •... -
Page 27: Mise En Place De La Bouteille D'oxygène
5.4 Mise en place de la bouteille d’oxygène Important ! Veuillez absolument vous laver les mains avant de mettre Vous ne devez avoir sur en place ou de remplacer la bouteille d’oxygène ! les mains ni graisse, ni Pour fixer des bouteilles d’oxygène de 0,8 l ou de produits à... -
Page 28: Support Pour Omnivac
5.6 Support pour OMNIVAC Si vous désirez fixer l’aspirateur de mucosités OMNIVAC dans la partie inférieure de la valise, utilisez à cet effet le support pour OMNIVAC (23). Enclenchez le support dans la partie inférieure de la valise conformément à la figure. Si la distance entre la valise et le patient est trop grande, il peut être nécessaire de sortir le container de récupéra- tion des sécrétions du support et d’utiliser la longueur du... -
Page 29: Contrôle Fonctionnel
Veuillez respecter les délais pour les contrôles fonction- nels réguliers (voir paragraphe « 7 Contrôle fonctionnel » à la page 29). Nous recommandons de faire réaliser la maintenance et les réparations par le fabricant WEINMANN Emergency ou par un personnel expérimenté. Contrôle fonctionnel FR... -
Page 30: Expédition De Pièces
1. Démontage de pièces 2. Nettoyer et désinfecter les pièces (« 6 Procédures d’hygiène » à la page 28). 3. Envoyez les pièces à WEINMANN Emergency ou à des techniciens expressément agréés par WEINMANN Emergency. 8.3 Elimination Ne pas éliminer l'appareil avec les ordures ménagè- res ! Pour assurer son élimination dans les règles de... -
Page 31: Gamme De Produits
9 Gamme de produits 9.1 Livraison standard Valise ULM I, vide WM 8840 Valise montée avec : 1x cloison séparatrice pour le fond, longue (211 mm) WM 8741 1x cloison séparatrice pour le fond, moyenne (147 mm) WM 8742 1x cloison séparatrice pour le fond, courte (121 mm) WM 8743 1x porte-tube pour tubes... -
Page 32: Pièces De Rechange
Trousse à ampoules WM 8427 * éléments de fixation inclus Fermoirs à traction disponibles sur www.ESTO.de • Fermoir à traction Pull Tight, longueur utile 176 mm, bandelette de scellement Ø 2,3 mm • Fermoir à traction Pull Fly, longueur utile 65 mm, bandelette de scellement Ø 1,8 mm •... - Page 33 Cloison séparatrice pour le fond, moyenne (147 mm) WM 8742 Cloison séparatrice pour le fond, courte (121 mm) WM 8743 Support pour OMNIVAC WM 8845 Support pour MEDUMAT WM 8850 Set, 2 tendeurs pour bouteille d’oxygène WM 15141 Porte-tube pour tubes oro-pharyngés, petit* (pour enfants en bas âge et nourrissons) WM 15142 Porte-tube pour tubes oro-pharyngés,...
-
Page 34: Caractéristiques Techniques
Plateau inférieur, variable* WM 15591 * éléments de fixation inclus 10 Caractéristiques techniques Valise d’urgence Normes appliquées DIN 13232 EN 1789 Dimensions (LxHxP) 526 x 400 x 170 mm (dimensions externes, y compris éléments en saillie, comme coins, pieds, poignée, etc.) Poids, vide 6,5 kg Plage de température... -
Page 35: Garantie
11 Garantie WEINMANN Emergency accorde aux acheteurs d'un nouveau produit WEINMANN Emergency original et d'une pièce de rechange mise en place par WEINMANN Emergency une garantie limitée du fabricant conformé- ment aux conditions de garantie s'appliquant au produit considéré et aux durées de garantie à compter de la date d'achat, indiquées ci-après. - Page 36 Center for Production, Logistics, Service Manufacturer WEINMANN Emergency WEINMANN Emergency Medical Technology GmbH + Co. KG Medical Technology GmbH + Co. KG Siebenstücken 14 Frohbösestraße 12 24558 Henstedt-Ulzburg 22525 Hamburg GERMANY GERMANY T: +49 40 88 18 96-120 E: customerservice@weinmann-emt.de...