OVE ADENA Mode D'emploi
Table des Matières
Les langues disponibles
Les langues disponibles
Liens rapides
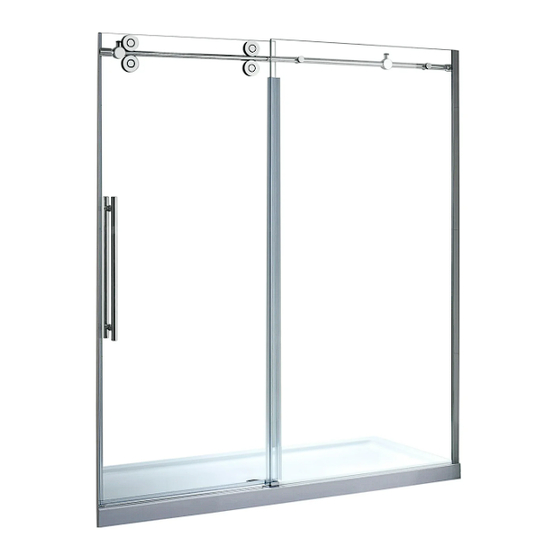
Measures: inch [millimeter]
Purchase date : _________________ Product Tracking Reference : _____________________________
Before returning to your retailer, call our customer service department
2017-01-19
TM
Questions, problems, missing parts?
at 1-866-839-2888, 9 a.m. – 5 p.m., EST, Monday – Friday.
78 3/4"
[2000]
81 1/2"
[2070]
1
39 13/16"
[1011]
32 5/8"
[829]
Opening
25 9/16"
CSA Markings
2800 Etienne Lenoir, Laval
Québec H7R 0A3 Canada
[650]
Table des Matières

Manuels Connexes pour OVE ADENA


Sommaire des Matières pour OVE ADENA
-
Page 19: Contenu De L'emballage
Contenu de l’emballage... - Page 20 Contenu de l’emballage Pièce # Description Quantité Code 99SG10059-WM Panneau de verre fixe 99SGD0045-WM Porte de douche Barre de support horizontale 99SGS3602-WM Butée de la porte de douche 99SDS3604-WM Support de la barre 99SGC3602-WM Roulette de glissement de la porte 99SWE3601-WM Poignée de la porte de douche 99SHA3602-WM...
- Page 21 Contenu de l’emballage Attache pour Ancrage mural panneau de verre ST 4 x 20 ø8 x 30 ST 5 x 30 Capuchon Raccord ST 4 x 12 ST 5 x 40 Clé Allen Capuchon 2.5 / 5 mm...
-
Page 22: Préparation
Préparation - Mesurez l’épaisseur de vos tuiles. Une tuile plus épaisse limitera l’espace requis pour installer votre douche. - Assurez vous d’avoir une distance tuile à tuile entre 70 3/16 po (1783mm) Min et 71 3/4 po (1823mm) Max (voir image). Prévoir une distance (D) entre la tuile du mur coté... -
Page 23: Instructions D'installation
Instructions d’installation Étape A 1. Marquez la position du rail d'aluminium (L) sur le mur. 2. Percez les trous selon l'illustration. 3. Insérez les ancrages (CC) dans les trous. 4. Installez le rail (L) à l'aide des vis (DD). - Page 24 Instructions d’installation Étape B 1. Coupez la bande de caoutchouc inférieure (K) à la bonne taille et la placer sous le panneau de verre fixe (B). 2. Insérez le panneau (B) dans la rail (L). 3. Placez le panneau (B) sur le guide (M). 4.
- Page 25 Instructions d’installation Étape C 1. Glissez les deux butées (E) sur la barre (D), puis montez les deux supports de barre (F) sans serrer. 2-3. Installez temporairement la barre (D) sur le panneau de verre (B) à l'aide de verre support (AA) et marquez la position.
- Page 26 Instructions d’installation Étape D 1-2. Installez les supports de barre (F) sur le mur à l'aide des ancrages (CC) et des vis (HH). Note: Avant de continuer, placez la porte (C) à l’intérieur de l’enclave de la douche. Cela facilitera les étapes suivantes! 3-4.
- Page 27 Instructions d’installation Étape E 1. Montez les roulettes (G) sur le panneau de porte (C), comme indiqué dans l'illustration. 2. Placez le joint d'étanchéité (P) sous la porte (C). 3. Placez le panneau de porte (C) sur la barre (D). 4.
- Page 28 Instructions d’installation Étape F 1. Placez les joints verticaux d'étanchéités (I) sur les panneaux (B & C). 2. Coupez les joints d'étanchéités (I) pour s'ajuster aux roulettes. 3. Placez le joint vertical de la porte (J) sur la porte (C). 4.
- Page 29 Instructions d’installation Étape G Installez la poignée (H) comme illustré. Assurez vous que la porte ouvre et ferme convenablement et que tout soit bien assemblé entre le panneau de retour, le rail ainsi que la barre de support. Ajuster les roulettes si c’est nécessaite. Appliquez un silicone clair sur tout le perimètre intérieur et extérieur de toutes les composantes fixes de la douche (Horizontalement entre le bas des panneaux fixes et la base et verticalement entre les rails et les murs.
-
Page 30: Garantie
Garantie limitée: OVE garantit à l’acheteur original que dans un délai raisonnable après réception d’un avis de sa part, OVE réparera ou remplacera le produit, ou toute partie ou composante du produit visé, distribué par OVE, dont la défectuosité de matériel ou de fabrication est établie à la satisfaction d’OVE, et qui est survenue pendant l’utilisation normale et pendant la période couverte par la garantie.