Table des Matières
Publicité
Les langues disponibles
Les langues disponibles
Liens rapides
Publicité
Table des Matières

Manuels Connexes pour Fanaway Evora


Sommaire des Matières pour Fanaway Evora
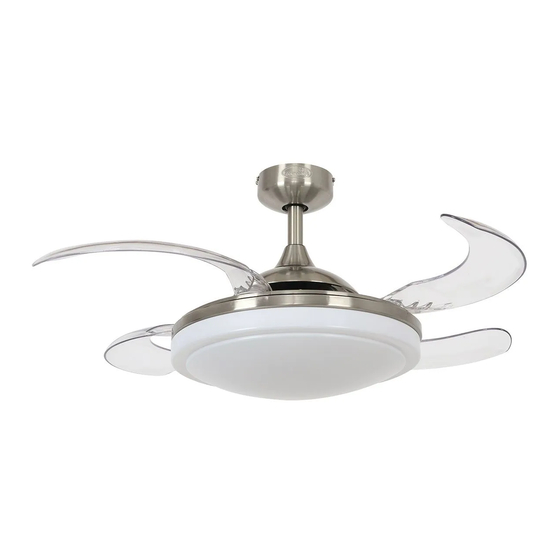
- Page 1 FANAWAY EVORA RETRACTING BLADE CEILING FAN WITH IR REMOTE INSTALLATION OPERATION MAINTENANCE WARRANTY INFORMATION CAUTION READ INSTRUCTIONS CAREFULLY FOR SAFE INSTALLATION AND FAN OPERATION. V1.0 – MUTI – Published on 11.2017...
- Page 2 Fanaway Evora Installation Instructions CONTENTS Installation instruction manual ..................3 Installationsanleitung ......................14 Guide d’installation......................24 Manual de instrucciones de instalación................34 Manuale delle istruzioni di installazione................44 Installatiehandleiding......................54 2 | P a g e...
-
Page 3: Safety Precautions
Fanaway Evora Installation Instructions THANK YOU FOR PURCHASING Thankyou for purchasing this quality Fanaway product. To ensure correct function and safety, please read all instructions before using the product and keep the instructions for future reference. SAFETY PRECAUTIONS In Europe: This appliance can be used by children aged from 8 years and above and persons with... - Page 4 Fanaway Evora Installation Instructions accordance with the wiring rules. Example: If a fan is connected to a circuit that can be isolated via an all-pole safety switch at the switchboard, then this is considered to be an all-pole disconnection to the ceiling fan electrical circuit, meeting the requirements of clause 7.12.2 of AS/NZS 60335.1.
-
Page 5: Before Installation
Fanaway Evora Installation Instructions BEFORE INSTALLATION Unpack the fan and carefully identify the parts. Please refer to Fig 1. Fig. 1 5 | P a g e... -
Page 6: Installing The Mounting Bracket
Fanaway Evora Installation Instructions Mounting bracket x 1 Blades x 4 Canopy screws x 4 Retraction mechanism x 1 Canopy x 1 Lamp base x 1 Down rod x 1 Cover x 1 Bolt & pin cover x 1 Screws for cover x 3... -
Page 7: Hanging The Fan
Fanaway Evora Installation Instructions INSTALLING THE FAN Installing the down rod 1) Feed the down rod (5) through the canopy (4) and the coupling cover (6). 2) Remove the ball joint by loosening the set screw (3), insert the plug (1) and the motor wires (2) through the down rod then secure the ball joint back to the down rod. - Page 8 Fanaway Evora Installation Instructions LIGHT KIT INSTALLATION 1. Remove the lamp shade (5) from the lamp base (4) by turning it anti-clockwise. 2. Loosen the screw (1) from the base bracket (3). Align the two slot screws (2) with the keyhole slots of the lamp base (4).
-
Page 9: Electrical Wiring Diagram
Fanaway Evora Installation Instructions Fig. 6 ELECTRICAL WIRING DIAGRAM WARNING: FOR YOUR SAFETY ALL ELECTRICAL CONNECTIONS MUST BE UNDERTAKEN BY A LICENSED ELECTRICIAN. NOTE: AN ADDITIONAL ALL POLE DISCONNECTION SWITCH MUST BE INCLUDED IN THE FIXED WIRING. Connect “LIVE” supply wire to the “L” of terminal block on the mounting bracket. -
Page 10: Finishing The Installation
Fanaway Evora Installation Instructions FINISHING THE INSTALLATION After completing the electrical connection at the mounting bracket terminal block, connect the ceiling fan wiring via the quick connector plug. Cover the mounting bracket with the canopy. Ensure all electrical wiring is tucked inside the canopy and that the wires are not damaged during this step. - Page 11 Fanaway Evora Installation Instructions OPERATING THE REMOTE: Before you start using the remote, take the time to read through this section and get familiar with the buttons and function of each button (Fig. 10). 1. IR TRANSMITTER 2. HI button: Press the button to set fan running at High speed.
-
Page 12: After Installation
Fanaway Evora Installation Instructions REVERSING SWITCH Your ceiling can operate either summer or winter mode. SUMMER Mode: The reverse switch shall be in the “down” (SUMMER) position to make the fan rotate in an anticlockwise direction. The airflow will be directed downwards, for cooling in summer. -
Page 13: Technical Information
Fanaway Evora Installation Instructions a new fan disappear during this time. Please note that this is not a product fault and as such is not covered under warranty – All electric motors are audible to some extent. CARE AND CLEANING: ... - Page 14 Fanaway Evora Installation Instructions WIR GRATULIEREN ZUM KAUF DIESES PRODUKTES Wir gratulieren zum Kauf dieses Qualitätsproduktes von Fanaway. Bitte lesen Sie die Sicherheitshinweise vollständig und sorgfältig durch, um den ordnungsgemäßen und sicheren Einsatz des Gerätes zu gewährleisten. SICHERHEITSMASSREGELN Die nachfolgenden Informationen auf dieser Seite dienen dazu einen störungsfreien und vor allem sicheren Betrieb Ihres neuen Deckenventilators sicher zu stellen.
-
Page 15: Vor Der Installation Zu Beachten
Fanaway Evora Installation Instructions VOR DER INSTALLATION ZU BEACHTEN Versandpackung enthalten sind. Bitte beachten Sie hierzu Abb. 1. Abb. 1 15 | P a g e... - Page 16 Fanaway Evora Installation Instructions Halterung x 1 Ventilatorflügel x 4 Baldachinschrauben x 4 Rückzugmechanismus x 1 Baldachin x 1 Lampensockel x 1 Hängestange x 1 Abdeckung x 1 Abdeckung für Bolzen und Stift x 1 Schrauben für die Abdeckung x 3...
-
Page 17: Installation Des Ventilators
Fanaway Evora Installation Instructions INSTALLATION DES VENTILATORS Installation der Hängestange 1) Führen Sie die Hängestange (5) durch den Baldachin (4) und die Kupplungsabdeckung (6). 2) Entfernen Sie das Kugelgelenk, indem Sie die Feststellschraube (3) lösen; stecken Sie den Stecker (1) und die Motorkabel (2) durch die Hängestange. Befestigen Sie dann das Kugelgelenk wieder an der Hängestange. - Page 18 Fanaway Evora Installation Instructions INSTALLATION DER LAMPE 1. Entfernen Sie den Lampenschirm (5) vom Lampensockel (4), indem Sie ihn gegen den Uhrzeigersinn drehen. 2. Lösen Sie die Schraube (1) aus der Sockelhalterung (3). Richten Sie die zwei Schlitzschrauben (2) auf die Langlöcher des Lampensockels (4) aus.
- Page 19 Fanaway Evora Installation Instructions ELEKTRISCHES SCHALTDIAGRAMM WARNHINWEIS: INTERESSE IHRER PERSÖNLICHEN SICHERHEIT MÜSSEN ALLE ELEKTRISCHEN ANSCHLÜSSE VON EINEM ZUGELASSENEN ELEKTRIKER AUSGEFÜHRT WERDEN. HINWEIS: EIN ZUSÄTZLICHER, ALLPOLIGER TRENNSCHATER MUSS IN DER INSTALLATION DER WANDVERKABELUNG ENTHALTEN SEIN. Das “LIVE”-Stromversorgungskabel an “L” der Klemmenleiste am Montagewinkel anschließen.
-
Page 20: Abschluss Der Installation
Fanaway Evora Installation Instructions ABSCHLUSS DER INSTALLATION Nach Abschluss der elektrischen Anschlüsse am Kabelblock der Halterung schließen Sie die Verkabelung des den Deckenventilator über den Verbindungsstecker an der Netzstromversorgung Decken Sie die Halterung mit der Abdeckung ab. Die Verkabelung befindet sich nun unter der Abdeckung und Sie sollten darauf achten, dass diese in diesem Schritt nicht beschädigt wird. - Page 21 Fanaway Evora Installation Instructions BENUTZUNG DER FERNBEDIENUNG: Vor der Benutzung des Fernbedienungsgeräts nehmen Sie sich bitte Zeit, diesen Abschnitt durchzulesen und mit den Tasten und deren Funktionen vertraut zu werden (Abb. 10). 1. IR SENDER 2. HI Taste: Auf die Taste drücken, um den Ventilator mit hoher Geschwindigkeit laufen zu lassen.
-
Page 22: Nach Der Installation
Fanaway Evora Installation Instructions RÜCKLAUFFUNKTION Der Ventilator kann sowohl im Vorlauf als auch im Rücklauf betrieben werden. SOMMERBETRIEB: Wenn der Schalter für die Rücklauffunktion auf “down” (SOMMER) steht, dreht der Ventilator sich gegen den Uhrzeigersinn. Die Luftbewegung wird nach unten gelenkt und bringt im Sommer den gewünschten Abkühlungseffekt. -
Page 23: Technische Daten
Fanaway Evora Installation Instructions HINWEIS: Dieser Ventilator wurde im Werk feinjustiert, und muss nicht wieder ausgewuchtet werden. BETRIEBSGERÄUSCHE: In einer sehr stillen Betriebsumgebung (besonders während der Nachtstunden) kann es vorkommen, dass Sie gelegentlich leise Geräusche hören. Geringfügige Schwankungen in der Stromversorgung und Frequenzsignale von anderen Geräten, z.B. -
Page 24: Consigne De Sécurité
MERCI POUR VEOTRE ACHAT Félicitations! Vous venez d’acquérir votre ventilateur de plafond à onde lumineuse à faible consummation électrique de Fanaway. Pour un fonctionnement approprié et sûre, lire attentivement et intégrer toutes les consignes avant l’utilisation du produit. CONSIGNE DE SÉCURITÉ... -
Page 25: Avant L'installation
Fanaway Evora Installation Instructions AVANT L’INSTALLATION Déballez le ventilateur et identifiez avec prudence les composants. Regardez Fig.1. Fig. 1 25 | P a g e... -
Page 26: Installer Le Support De Fixation
Fanaway Evora Installation Instructions Support de fixation x 1 Pales x 4 Vis pour cache x 4 Mécanisme de rétractation Cache x 1 Base de la lampe x 1 Tige descendante x 1 Couvercle x 1 Couvercle pour écrous et goujons x 1 Vis pour couvercle x 3 Écrou x 1... -
Page 27: Installation Du Ventilateur
Fanaway Evora Installation Instructions INSTALLATION DU VENTILATEUR Installation de la tige descendante 1) Introduisez la tige descendante (5) dans le cache (4) et le couvercle de couplage (6). 2) Enlevez le joint sphérique en desserrant la vis de réglage (3), insérez la fiche (1) et les fils du moteur (2) dans la tige descendante, puis fixez le joint sphérique à... -
Page 28: Installation Du Kit D'éclairage
Fanaway Evora Installation Instructions INSTALLATION DU KIT D’ÉCLAIRAGE 1. Enlevez l’abat-jour (5) de la base de la lampe (4) en le tournant dans le sens inverse des aiguilles d’une montre. 2. Desserrez la vis (1) du support de la base (3). Alignez les deux vis à fente (2) avec les trous en forme de trou de serrure de la base de la lampe (4). -
Page 29: Schéma De Câblage Électrique
Fanaway Evora Installation Instructions SCHÉMA DE CÂBLAGE ÉLECTRIQUE AVERTISSEMENT: POUR VOTRE SÉCURITÉ Les branchements électriques doivent être effectuées par un électricien agréé. NOTE: UNE supplémentaires Toutes POLE DECONNEXION interrupteur doit être incluse dans le câblage fixe. Branchez le câble d'alimentation " LIVE " au bornier " L " sur le support de montage. -
Page 30: Complètement De L'installation
Fanaway Evora Installation Instructions COMPLÈTEMENT DE L’INSTALLATION Après avoir complété la connexion électrique au bornier du support de montage, connecter le câblage de ventilateur au plafond en utilisant le connecteur libre. Couvrir le support de montage avec la voile. Assurer que tous les câblages électriques soient dans la voile et qui ne soient pas endommagés pendant cette procédure. - Page 31 Fanaway Evora Installation Instructions UTILISATION DE LA TELECOMMANDE : Avant de commencer à utiliser la télécommande, prenez le temps de lire cette section et de vous familiariser avec les boutons et la fonction de chaque bouton (Fig. 10). 1. IR EMETTEUR 2.
-
Page 32: Apres L'installation
Fanaway Evora Installation Instructions FONCTIONNEMENT INVERSÉ Votre ventilateur peut être opéré en mode ventilateur et en mode ventilateur inversé. Mode ÉTÉ: Positionner l'interrupteur inverseur sur “down” (SUMMER) afin de faire tourner le ventilateur dans le sens inverse des aiguilles du montre. Le jet d'air orienté vers le bas crée un courant d'air frais. -
Page 33: Information Technique
Fanaway Evora Installation Instructions VIS QUI FIXENT LE SUPPORT DE MONTAGE ET BAS SONT ROD SECURE. NOTE: Ce ventilateur a été équilibré avec précision à l'usine et n'aura pas besoin d'être équilibré à nouveau. BRUIT: Quand il est calme (surtout la nuit), vous entendrez peut-être des petits bruits occasionnels. Les fluctuations de puissance légères et des signaux de fréquences superposées en électricité... -
Page 34: Felicitaciones Por Su Compra
Fanaway Evora Installation Instructions FELICITACIONES POR SU COMPRA Felicitaciones por la compra de este producto de calidad de Fanaway. Para garantizar el funcionamiento y seguridad, por favor antes de utilizar el producto, lea detalladamente todas las instrucciones y guárdelas para futura referencia. -
Page 35: Antes De La Instalación
Fanaway Evora Installation Instructions ANTES DE LA INSTALACIÓN Desembale el ventilador y cuidadosamente identifique las piezas. Por favor refiérase a la Fig 1. Fig. 1 35 | P a g e... - Page 36 Fanaway Evora Installation Instructions Soporte de pared x 1 Aspas x 4 Tornillos del florón x 4 Mecanismo de retracción x 1 Florón x 1 Base de la lámpara x 1 Tija x 1 Cubierta x 1 Cubierta de perno y pasador x 1...
-
Page 37: Instalación Del Ventilador
Fanaway Evora Installation Instructions INSTALACIÓN DEL VENTILADOR Instalación de la tija 1) Pase la tija (5) a través del florón (4) y el embellecedor del acoplamiento (6). 2) Quite la junta esférica aflojando los tornillos (3). A continuación, inserte el conector (2) y los cables del motor (1) por la tija y vuelva a asegurar la junta esférica a la tija. - Page 38 Fanaway Evora Installation Instructions INSTALACIÓN DE LA LUMINARIA 1. Retire la pantalla (5) de la base de la lámpara (4) girándola en sentido antihorario. 2. Afloje el tornillo (1) del soporte de la base (3). Alinee los dos tornillos de cabeza ranurada (2) con los agujeros en forma de cerrojo de la base (4) de la lámpara.
- Page 39 Fanaway Evora Installation Instructions DIAGRAMA DE CABLEADO ELÉTRICO ADVERTENCIA: PARA SU SEGURIDAD TODAS LAS CONEXIONES ELÉCTRICAS DEBEN SER REALIZADAS POR UN ELECTRICISTA AUTORIZADO. NOTA: DEBE INCLUIRSE UN INTERRUPTOR ADICIONAL DE DESCONEXIÓN DE TODOS POLOS EN EL CABLEADO FIJO. Conecte el cable de alimentación “LIVE” al bloque de terminales “L” en la abrazadera de montaje.
- Page 40 Fanaway Evora Installation Instructions FINISHING THE INSTALLATION Después de finalizar la conexión eléctrica en le bloque de terminales del soporte de montaje, conecte el cableado del ventilador de techo a través del enchufe de conexión rápida. Cubra el soporte de montaje con el dosel. Asegúrese de que todo el cableado eléctrico está dentro del dosel y de que no ha sido dañado durante esta operación.
- Page 41 Fanaway Evora Installation Instructions FUNCIONAMIENTO DEL MANDO A DISTANCIA: Antes de empezar a usar el mando a distancia, tómese cierto tiempo para leerse esta sección y familiarizarse con los botones y las funciones de cada botón (Figura 10). 1. TRANSMISOR IR 2.
-
Page 42: Después De La Instalación
Fanaway Evora Installation Instructions Funcionamiento reversible Su ventilador puede girar en dirección de reloj o en la contraria. Modo VERANO: Si el interruptor para dirección del giro está hacia “abajo” (SUMMER) el ventilador girará en dirección de reloj. El flujo de aire estará dirigido hacia abajo para enfriar con una brisa directa. -
Page 43: Información Técnica
Fanaway Evora Installation Instructions RUIDO: Cuando todo está tranquilo (especialmente por la noche) puede que oiga pequeños ruidos ocasionales. Las fluctuaciones leves y las señales de frecuencia superpuestas en la electricidad para el control del agua caliente, pueden causar un cambio en el ruido del motor del ventilador. Esto es normal. Por favor, espere un perí... -
Page 44: Precauzioni Di Sicurezza
Fanaway Evora Installation Instructions VI RINGRAZIAMO PER IL VOSTRO ACQUISTO Congratulazioni per l'acquisto di questo prodotto di qualità Fanaway. Per assicurare la corretta funzionalità e la sicurezza, si prega di leggere con attenzione e salvare tutte le istruzioni prima di utilizzare il prodotto. - Page 45 Fanaway Evora Installation Instructions PRIMA L’INSTALLAZIONE Disimballare il ventilatore e identificare accuratamente le parti. Si prega di fare riferimento alla Figura 1. Fig. 1 45 | P a g e...
- Page 46 Fanaway Evora Installation Instructions Staffa di montaggio x 1 Pale x 4 Viti per calotta x 4 Meccanismo di retrazione x 1 Calotta x 1 Base della lampada x 1 Asta x 1 Copertura x 1 Copertura per bullone e perno x 1...
-
Page 47: Installazione Del Ventilatore
Fanaway Evora Installation Instructions INSTALLAZIONE DEL VENTILATORE Installazione dell'asta 1) Inserire l'asta (5) attraverso la calotta (4) e la copertura del raccordo (6). 2) Rimuovere il giunto sferico allentando la vite (3), inserire la spina (1) e i fili del motore (2) attraverso l'asta e fissare nuovamente il giunto sferico sull'asta. - Page 48 Fanaway Evora Installation Instructions INSTALLAZIONE DEL KIT LUCE 1. Rimuovere il paralume (5) dalla base della lampada (4) ruotandolo in senso antiorario. 2. Allentare la vite (1) dal supporto della base (3). Allineare le due viti (2) con i fori sulla base della lampada (4).
-
Page 49: Schema Elettrico
Fanaway Evora Installation Instructions SCHEMA ELETTRICO ATTENZIONE: PER LA VOSTRA SICUREZZA TUTTI I COLLEGAMENTI ELETTRICI DEVONO ESSERE EFFETTUATI DA UN ELETTRICISTA QUALIFICATO NOTA: UN SUPPLEMENTARE ALL POLE SEZIONATORE DEVE ESSERE INCLUSO NEL CABLAGGIO FISSO Collegare il cavo di alimentazione “FASE” al blocco terminale “L” del supporto per il montaggio. -
Page 50: Completamento Dell'installazione
Fanaway Evora Installation Instructions COMPLETAMENTO DELL’INSTALLAZIONE Dopo aver completato il collegamento elettrico al blocco terminale della staffa di montaggio, collegare il cavo del ventilatore a soffitto tramite il connettore rapido. Coprire la staffa di montaggio con la calotta. Assicurarsi che tutti i cavi elettrici siano nascosti all'interno della calotta e che non siano stati danneggiati durante questa operazione. - Page 51 Fanaway Evora Installation Instructions UTILIZZO DEL TELECOMANDO: Prima di iniziare a utilizzare il telecomando si prega di leggere la seguente sezione e di familiarizzare con i tasti e le relative funzioni (Fig. 10). 1. TRASMETTITORE IR 2. Pulsante HI: premere questo pulsante per impostare il ventilatore su una velocità alta.
-
Page 52: Dopo L'installazione
Fanaway Evora Installation Instructions FUNZIONE DI RITORNO Il ventilatore può essere azionato in senso orario e antiorario. MODO ESTIVO: se l'interruttore della funzione di ritorno si trova su “down” (ESTATE), significa che ventilatore gira in senso antiorario. In questo caso l'aria viene deviata in basso rinfrescando il locale in estate. -
Page 53: Informazioni Tecniche
Fanaway Evora Installation Instructions RUMORE: Quando è tranquillo (soprattutto di notte) si può sentire occasionali piccoli rumori. Lievi fluttuazioni di potenza e segnali di frequenza sovrapposti in elettricità per off-peak controllo dell'acqua calda, può provocare un cambiamento di rumore della ventola del motore. Questo è normale. Si prega di consentire un periodo di 24 ore "rottura-in", la maggior parte dei rumori associati con un nuovo ventilatore... -
Page 54: Veiligheidsvoorschriften
Fanaway Evora Installation Instructions GEFELICITEERF MET UW AANKOOP Gefeliciteerd met de aankoop van dit kwaliteitsproduct van Fanaway. Lees en bewaar alle instructies aandachtig voordat u het product gebruikt, om een juiste werking en veiligheid te garanderen. VEILIGHEIDSVOORSCHRIFTEN De informatie op de volgende pagina’s is gericht om een veilig gebruik van uw ventilator te verzekeren. -
Page 55: Voor De Installatie
Fanaway Evora Installation Instructions VOOR DE INSTALLATIE Pak de ventilator uit en controleer alle onderdelen. Zie Fig 1. Fig. 1 55 | P a g e... - Page 56 Fanaway Evora Installation Instructions Montagebeugel Bladen x 4 Dopschroeven x 4 Intrekmechanisme x 1 Dop x 1 Lampvoet x 1 Stang x 1 Afdekking x 1 Bout & pinafdekking x 1 Schroeven voor afdekking x 3 Bout x 1 Lampenkap x 1...
-
Page 57: Ventilator Ophangen
Fanaway Evora Installation Instructions DE VENTILATOR INSTALLEREN De stang installeren 1) Steek de stang (5) door de dop (4) en de koppeling afdekking (6). 2) Verwijder het kogelscharnier door het schroevenset (3) los te maken. Steek de stekker (1) en de motorbedrading (2) door de stang en bevestig vervolgens het kogelscharnier weer op de stang. - Page 58 Fanaway Evora Installation Instructions INSTALLATIE VAN HET VERLICHTINGSSET 1. Verwijder de lampenkap (5) van de lampvoet (4) door hem naar links te draaien. 2. Maak de schroef (1) van de beugel van de voet (3) los. Breng de twee schroefsleuven (2) in één lijn met de gaten van de lampvoet (4).
-
Page 59: Elektrische Bedrading
Fanaway Evora Installation Instructions ELEKTRISCHE BEDRADING WAARSCHUWING: VOOR UW VEILIGHEID, MOETEN ALLE ELEKTRISCHE AANSLUITINGEN MOETEN DOOR EEN GEKWALIFICEERDE ELEKTRICIEN UITGEVOERD WORDEN.. OPMERKING: EEN EXTRA TWEEPOLIGE ONTKOPPLINGSSCHAKELAAR MOET OP DE VAST BEDRADING WORDEN TOEGEVOEGD. Sluit de “PLUS” voedingsdraad aan op de “L” van het aansluitpunt op de bevestigingsbeugel. - Page 60 Fanaway Evora Installation Instructions DE INSTALLATIE AFRONDEN Sluit de plafondventilator-bedrading aan via de snelaansluitingsplug na voltooiing van de elektrische aansluiting bij het montagebeugel-aansluitblok. Bedek de montagebeugel met de overkapping. Zorg ervoor dat alle elektrische bedrading onder de overkapping gestopt is en dat ze niet beschadigd raken tijdens deze stap. Bevestig de overkapping aan de hangbeugel met de bijgesloten schroeven.
- Page 61 Fanaway Evora Installation Instructions BEDIENING VAN DE AFSTANDSBEDIENING: Voordat u de afstandsbediening gebruikt, kunt u het beste dit hoofdstuk lezen en vertrouwd te raken met de knoppen en de functie van elke toets (Afb. 10). 1. IR- ZENDER 2. HI- knop: Druk op deze knop om de ventilator met Hoog toerental te laten draaien.
- Page 62 Fanaway Evora Installation Instructions OMKEERFUNCTIE De ventilator kan zowel voorwaarts als ook achterwaarts worden toegepast. ZOMER-toepassing: Wanneer de schakelaar voor de omkeerfunctie op “down” (ZOMER) staat, draait de ventilator tegen de klok in. De luchtbeweging wordt naar beneden gericht en zorgt in de zomer voor het gewenste koelende effect.
-
Page 63: Technische Informatie
Fanaway Evora Installation Instructions LAWAAI: Als het zeer rustig is (met name ‘s nachts) kan men af en toe kleine geluiden waarnemen. Het lawaai dat de ventilatormotor maakt kan meer of minder zijn, afhankelijk van frequentiesignalen, schommelingen in stroomtoevoer. Dit is normaal. De eerste 24 uur kan de ventilator meer lawaai maken maar deze geluiden verdwijnen als de ventilator wat langer in gebruik is.