Table des Matières
Publicité
Les langues disponibles
Les langues disponibles
Liens rapides
Publicité
Chapitres
Table des Matières

Manuels Connexes pour Zehnder ComfoSense CH


Sommaire des Matières pour Zehnder ComfoSense CH
- Page 1 Handleiding ComfoSense Manual ComfoSense Betriebsanleitung ComfoSense Manuel ComfoSense Manuale ComfoSense Podręcznik ComfoSense Manual ComfoSense Heating Cooling Fresh Air Clean Air ComfoSense CH ComfoSense 55 ComfoSense 67...
- Page 2 NL: Alle rechten voorbehouden. Bij de samenstelling van deze handleiding is uiterste zorg betracht, de uitgever kan echter niet verantwoordelijk worden gehouden voor enige schade ontstaan door het ontbreken of onjuist vermelden van informatie in deze handleiding. In geval van onenigheid is de Engelse tekst leidend.
-
Page 3: Table Des Matières
Inhoudsopgave 1 Inleiding ....................4 1.1 Garantie ..................... 4 1.2 Veiligheid .................... 4 2 Gebruik van de ComfoSense ..............5 2.1 AUTO mode ..................6 2.2 MAN mode ..................6 2.3 Menu ....................7 2.4 ComfoHood ..................7 2.5 ComfoHood Timer ................7 2.6 PARTY TIMER .................. -
Page 4: Inleiding
Inleiding 1.1 Garantie De ComfoSense (vanaf hier "het apparaat" De fabrikant levert garantie op het apparaat genoemd) besturingsapparaat voor een periode van 24 maanden na voor woonhuisventilatie-units (vanaf hier de installatie tot een maximum van 30 “ventilatie-unit” “HRU” genoemd). maanden na de productiedatum. Het apparaat is geschikt voor gebruik De garantie vervalt indien: in combinatie met een ComfoAir Luxe,... -
Page 5: Gebruik Van De Comfosense
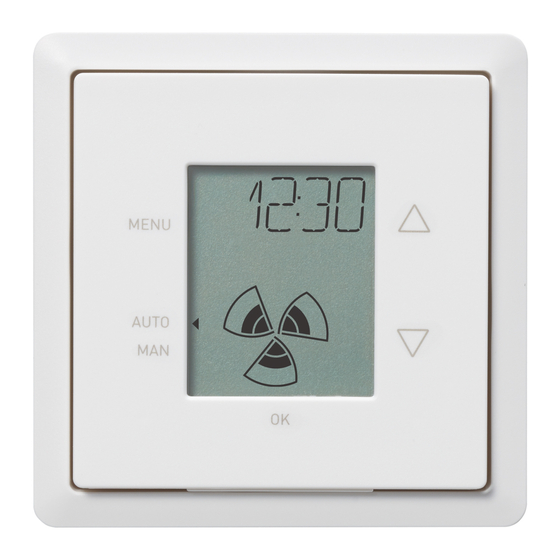
Gebruik van de ComfoSense Toetsen: Display: ■ Tekst; ■ Waarde verhogen; ■ Tijd. ■ Naar volgende menu-item. Waarde (programma, parameter, temperatuur, tijd). ■ Waarde verlagen; ■ Graden Celsius/Fahrenheit**; ■ Naar vorige menu- ■ Percentage. item. ComfoHood*. ■ Toevoerventilator aan/uit; ■ Shift; ■ Afvoerventilator aan/uit. -
Page 6: Auto Mode
2.1 AUTO mode Betekenis symbolen: Als het apparaat in AUTO mode staat, Bezig met kalibreren. stuurt het de ventilatie-unit automatisch WAIT Wacht tot de teller op een bericht over de gewenste instelling. 0 staat. Standaard staat ventilatie-unit De tweede functie van ingesteld op "middelhoog"... -
Page 7: Menu
2.3 Menu 2.5 ComfoHood Timer Het menu openen Deze functie is alleen zichtbaar als een Druk op MENU om het gebruikersmenu te ComfoHood (afzuigkap sensor) openen. is aangesloten en in PARAM P20 een Dit menu bevat de volgende opties: vertragingstijd is ingesteld. HOOD*, TIMER HOOD*, PARTY TIMER*, PROG, CLOCK en BACK. -
Page 8: Ventilatieprogramma (Prog)
3. Druk op OK. In het display staat TIMER: TIMER ON. 1. Druk op MENU. In het display staat 3. Bevestig met OK. In het display staat HOOD of PARTY, TIMER. 2 seconden lang OK. 2. Staat er HOOD in het display, druk De tekst TIMER is zichtbaar in het dan op om PARTY, TIMER... - Page 9 kiezen. De volgende snelheden zijn Er kunnen 8 programma´s beschikbaar: worden geprogrammeerd. ■ AWAY = Zeer laag; Als alle 8 programma´s zijn ■ LOW = Laag; ingesteld, staat in het display ■ MED = Middelhoog; PROG 8 in plaats van SET. ■ HIGH = Hoog.
-
Page 10: Clock Instellen
Huidige programma weergeven De comforttemperatuur kan 1. Druk op OK. In het display staat 8 het beste worden ingesteld op seconden lang SHIFT. dezelfde temperatuur als de 2. Druk op AUTO voordat de tekst kamerthermostaat (van het CV- SHIFT weer verdwijnt. In het display systeem). -
Page 11: Param Instellen (Parameters)
unit zelf. Dat gebeurt in de winter, om te De betekenis en de mogelijke voorkomen dat de ventilatie-unit bevriest. waarden in de P-menu's zijn te Als de toevoerlucht (IN) te koud is voor de vinden in de handleiding bij de ventilatie-unit, wordt de toevoerventilator ventilatie-unit. -
Page 12: Clock Back-Up
2.13 CLOCK back-up SHIFT weer verdwijnt. In het display staat nu COMF. Bij een stroomstoring blijft de klok nog 3. Druk op om STATE te minimaal een uur lopen. U moet de kiezen. klok vervolgens wel opnieuw instellen. 4. Bevestig met OK om het STATE menu De back-up werkt pas volledig als het te openen. -
Page 13: Installatie
Foutmeldingen resetten Gebruik bij vervanging een 1. Druk op MENU. van de volgende schroeven: 2. Bevestig met OK. In het display ■ PT10 bolcil. gehard en staat 2 seconden lang OK. Het menu verzinkt staal, schroef 2,2 wordt automatisch gesloten. x12 PT10 ■... -
Page 14: Inregelbedrijf In- Of Uitschakelen (Init)
5.2 Inregelbedrijf in- of 5. Druk twee keer op om een PASSW te kiezen. uitschakelen (INIT) 6. Bevestig met OK. Het INIT inschakelen wachtwoordnummer 0 verschijnt. 1. Druk op OK. In het display staat 8 7. Druk op om 14 te selecteren. seconden lang SHIFT. -
Page 15: Zelftest Ventilatiesysteem Inschakelen (Test)
Lijst met specifieke ComfoSense parameters (niet aanwezig in de ventilatie-unit). min. max. Standaard Beschrijving Standaard starttijd van nieuwe weekprogramma. Standaard eindtijd van nieuwe weekprogramma. Standaard ventilatorsnelheid: ■ 0 = zeer laag ■ 1 = laag ■ 2 = middelhoog ■ 3 = hoog ■ 4 = sensor* ■ RF ingeschakeld (1) ■ RF uitgeschakeld (0) ■ Clock zichtbaar in Standaard scherm (1) - Page 16 Table of contents 1 Introduction ................... 17 1.1 Warranty ..................17 1.2 Safety ....................17 2 Use of the ComfoSense ................ 18 2.1 AUTO operation ................19 2.2 MAN operation .................. 19 2.3 Menu access ..................20 2.4 Switching the ComfoHood ............... 20 2.5 Switching the ComfoHood Timer ............
-
Page 17: Introduction
Introduction 1.1 Warranty ComfoSense (henceforth called The manufacturer provides warranty for a “device”) is a control device for residential period of 24 months after installation to a ventilation units (henceforth called maximum of 30 months after production “ventilation unit” or “HRU”). The device date of the device. -
Page 18: Use Of The Comfosense
Use of the ComfoSense Buttons: Display: ■ Text; ■ Time. ■ Increase value; ■ Select next item. Value (program, parameter, temperature, time). ■ Degree Celsius/Fahrenheit**; ■ Decrease value; ■ Percentage. ■ Select previous item. ComfoHood*. ■ Supply fan on/off; ■ Shift; ■ Exhaust fan on/off. -
Page 19: Auto Operation
2.1 AUTO operation Meaning symbols: In Automatic operation mode the device Busy calibrating. Wait till WAIT can tell the ventilation unit automatically counter reaches 0. which ventilation setting is wanted. The The second function of default ventilation setting of the ventilation SHIFT the buttons is active. -
Page 20: Menu Access
2.3 Menu access 2.5 Switching the Entering User menu ComfoHood Timer To enter the User menu, press MENU. This function is only visible if a ComfoHood In the User menu, you can choose the (cooker hood with sensor) is connected following options: HOOD*, TIMER HOOD*, and a delay time is programmed in PARAM PARTY... -
Page 21: Ventilation Program (Prog)
Turning off the PARTY TIMER 3. Press OK. The display shows TIMER The PARTY TIMER will automatically turn OFF. off after the set time in PARAM P27. 4. Confirm with OK. The display shows To directly switch off the PARTY TIMER: OK for 2 seconds. -
Page 22: Setting The Clock
program. 6. Press to choose the day period. The following day period can Deleting a program be chosen: 1. Press MENU. ■ MON = Monday; ■ TUE = Tuesday; 2. Press to choose PROG. 3. Press OK to confirm. SET is blinking. ■ WED = Wednesday;... -
Page 23: Setting The Comf (Comfort Temperature)
temporarily immobilize your dwelling’s ■ WED = Wednesday; balanced ventilation system, so do not ■ THU = Thursday; forget to turn the fans on again. ■ FRI = Friday; ■ SAT = Saturday; When can the FAN not be switched? ■ SUN = Sunday. -
Page 24: Setting Param (Parameters)
The switched off fan will not Or go back to step 7 to set another automatically turn back on. Do program. not forget to turn the fan back on later on. 2.12 Requesting status 2.11 Setting PARAM (STATE) (Parameters) Opening the status menu 1. -
Page 25: Clock Back-Up
Exiting the status menu manual the malfunction code will reset itself automatically. 6. Press to select BACK. Resetting error messages 7. Confirm with OK. 1. Press MENU. 8. Press MENU to return to the main 2. Press OK to confirm. The text says menu. -
Page 26: Commissioning
for 8 seconds. When replacing use any of 2. Press MENU before the SHIFT text the following screws: disappears. The display now shows ■ PT10 bolcil. hardened and COMF. galvanized steel screw 2.2 3. Press to select INIT. x12 PT10 4. - Page 27 10. Press OK to confirm. A second parameter value. number next to the chosen number is Only a parameter value that is blinking. blinking can be changed. 11. Press to choose the sub 16. Press OK to confirm. The text says parameter menu number.
-
Page 28: Activating Ventilation System Self-Test (Test)
5.4 Activating ventilation system self-test (TEST) Activating TEST 1. Press OK. The display shows SHIFT for 8 seconds. 2. Press MENU before the SHIFT text disappears. The display now shows COMF. 3. Press to select TEST. 4. Press OK. The display flashes the text TEST ON. - Page 29 Inhaltsverzeichnis 1 Einleitung ....................30 1.1 Garantie ................... 30 1.2 Sicherheit ..................30 2 Bedienung von ComfoSense ..............31 2.1 Automatikbetrieb (AUTO) ..............32 2.2 Manueller Betrieb (MAN) ..............32 2.3 Menüzugriff ..................33 2.4 Ein-/Ausschalten der ComfoHood ........... 33 2.5 Ein-/Ausschalten des ComfoHood-Timers ........
-
Page 30: Einleitung
Einleitung 30 Monaten ab Produktionsdatum des Geräts. Bei ComfoSense (nachfolgend “Gerät” Die Garantie erlischt, wenn: genannt) handelt sich ■ Der Einbau nicht gemäß den Steuergerät für Wohnraumlüftungsanlagen geltenden Bestimmungen (nachfolgend “Lüftungsgerät” oder “WRE” durchgeführt wurde; genannt). Das Gerät eignet sich für den ■ Die Mängel auf einen Einsatz mit ComfoAir Luxe, ComfoD Luxe, unsachgemäßen Anschluss, die... -
Page 31: Bedienung Von Comfosense
Bedienung von ComfoSense Tasten: Anzeige: ■ Text; ■ Wert erhöhen; ■ Zeit. ■ Zum nächsten Eintrag. Wert (Programm, Parameter, Temperatur, Zeit). ■ Wert verringern; ■ Grad Celsius/Fahrenheit**; ■ Zum vorherigen ■ Prozent. Eintrag. ComfoHood*. ■ Zuluftventilator ein/aus; ■ Shift; ■ Abluftventilator ein/aus. ■ Bestätigen;... -
Page 32: Automatikbetrieb (Auto)
2.1 Automatikbetrieb Bedeutung der Symbole: (AUTO) Kalibriert. Warten Sie, bis WAIT der Zähler auf 0 steht. Automatikbetrieb übermittelt Die zweite Tastenfunktion Gerät des Lüftungsgeräts automatisch Shift ist aktiv. die gewünschte Lüftungseinstellung. Die Die Timerfunktion voreingestellte Lüftungseinstellung für die TIMER hat Vorrang vor der Lüftungsanlage ist “Mittel”... -
Page 33: Menüzugriff
2.4 Ein-/Ausschalten der Das Symbol zeigt auf MAN. Gerät bleibt erneuten ComfoHood Betätigung von AUTO MAN im manuellen Diese Funktion ist nur sichtbar, wenn Betriebsmodus. eine ComfoHood (Dunstabzugshaube mit Sensor) angeschlossen ist. 2.3 Menüzugriff Einschalten der ComfoHood Benutzermenü öffnen 1. Drücken Sie die Taste MENU. Die Drücken Sie die Taste MENU, um das Anzeige HOOD erscheint. -
Page 34: Ein-/Ausschalten Des Party Timer
Ablauf der unter PARAM P20 eingestellten 2. Wenn die Anzeige HOOD erscheint, Zeit automatisch ab. drücken Sie die Taste oder Den ComfoHood-Timer sofort ausschalten: um PARTY, TIMER auszuwählen. 1. Drücken Sie auf MENU. Im Display 3. Drucken Sie die Taste OK. Die erscheint der Text HOOD. - Page 35 Programme können sich überschneiden. 6. Drücken Sie die Taste oder Das kürzestes Programm ist dabei stets , um einen Zeitraum auszuwählen. maßgeblich setzt alle längeren Folgende Zeiträume stehen zur Programme außer Kraft. Auswahl: Das Programm mit der geringsten Anzahl ■ MON = Montag;...
-
Page 36: Einstellen Der Uhrzeit (Clock)
Aktuell aktives Programm anzeigen ■ HIGH = Hoch; 1. Drücken Sie auf OK. Die Anzeige 17. Drücken Sie auf OK, um Ihre Auswahl zu bestätigen. Die Anzeige SAVED SHIFT erscheint für die Dauer von 8 Sekunden. erscheint für die Dauer von 2 2. -
Page 37: Einstellen Der Komforttemperatur (Comf)
2.9 Einstellen der Wann ein Ein-/Ausschalten des Venti- lators (FAN) nicht möglich ist Komforttemperatur Belüftungsanlage verfügt über ein Programm für offene Kamine, um (COMF) verhindern, dass Luft über Das Lüftungsgerät ist bestrebt, auf Basis Schornstein eines Kamins wieder einer eingestellten Komforttemperatur angesaugt wird. -
Page 38: Einstellen Von Parametern (Param)
SAVED erscheint für die Dauer wird angezeigt. von 2 Sekunden. Das Menü wird 9. Wenn der angezeigte Wert blinkt, automatisch geschlossen. Das drücken Sie die Taste oder Symbol für die ausgewählte Option um den Parameterwert zu ändern. wird angezeigt. Nur ein blinkender Parameterwert kann geändert Der ausgeschaltete Ventilator werden. -
Page 39: Pufferversorgung Für Uhr (Clock)
Unter dem Text GEO HEAT* ist Im Falle einer Störung am Lüftungsgerät angegeben, ob die Pumpe des erscheint die Anzeige ERROR und ein ComfoFond-L (EWT) eingeschaltet entsprechender Störungscode. (1) oder ausgeschaltet (0) ist. Bedeutung angezeigten Störungscodes Hinweise Menü PRE HEAT* Störungsbehebung finden Handbuch des Lüftungsgeräts. -
Page 40: Inbetriebnahme
Beachten Sie stets die vor Ort ■ M2.2x 12 geltenden Sicherheitsvorschriften. Kreuzschlitzschraube Achten Sie darauf, dass bei der flach Plas-Fix 45° Montage ALLE Schrauben handfest angezogen sind. 6. Setzen Sie die Abdeckung C auf. Die in diesem Kapitel Zum Entfernen der Abdeckung genannten Buchstaben fest daran ziehen. -
Page 41: Einstellen Der P-Menüs (Parameter)
8 Sekunden lang SHIFT. zu bestätigen. Die Parameternummer 2. Drücken Sie auf MENU, bevor der blinkt. Text SHIFT wieder verschwindet. Im 5. Drücken Sie zweimal die Taste Display erscheint der Text COMF. um PASSW auszuwählen. 3. Drücken Sie auf oder auf 6. -
Page 42: Selbsttest Des Lüftungssystems Einschalten (Test)
Das Passwort (14) bleibt für ca. zu bestätigen. Die Anzeige SAVED erscheint. 5 weitere Minuten aktiv. 18. Drücken Sie die Taste MENU, um Kehren Sie andernfalls zu Schritt 9 zurück, zum Hauptmenü zurückzukehren. um ein weiteres Programm einzurichten. Liste spezifischer ComfoSense-Parameter (am Lüftungsgerät nicht vorhanden) Standard Beschreibung Standardstartzeit des neuen Wochenprogramms. - Page 43 Table des matières 1 Introduction ................... 44 1.1 Garantie ................... 44 1.2 Sécurité ..................... 44 2 Utilisation du ComfoSense ..............45 2.1 Mode AUTO (automatique) ..............46 2.2 Mode MAN (manuel)................46 2.3 Accès au menu ................. 47 2.4 Commande du ComfoHood ............. 47 2.5 Commande de la minuterie du ComfoHood ........
-
Page 44: Introduction
Introduction une période allant de 24 mois après l'installation à un maximum de 30 mois ComfoSense (ci-après dénommé après la date de fabrication de l'appareil. “appareil”) est un appareil de commande La garantie est annulée si: pour les unités de ventilation résidentielle ■ l'installation n'a pas été... -
Page 45: Utilisation Du Comfosense
Utilisation du ComfoSense Touches : Écran : ■ Texte ; ■ A ugmentation de ■ Horloge. valeur; ■ S élection de Valeur (programme, paramètre, l'élément suivant. température, heure). ■ D iminution de valeur; ■ Degré Celsius/Fahrenheit**; ■ S élection de ■ Pourcentage. -
Page 46: Mode Auto (Automatique)
2.1 Mode AUTO Explication des symboles : (automatique) Calibrage en cours. Patientez jusqu'à En mode automatique, l'appareil peut WAIT ce que le compteur communiquer le réglage de ventilation indique 0. souhaité à l'unité de ventilation. Le La seconde réglage de ventilation par défaut de l'unité SHIFT fonction des de ventilation est “Moyen”... -
Page 47: Accès Au Menu
2.3 Accès au menu Mise sur arrêt du ComfoHood Accéder au menu User (utilisateur) 1. Appuyez sur MENU. Le texte HOOD Pour accéder au menu User, appuyez sur est affiché. MENU. 2. Appuyez sur OK pour confirmer. Dans menu User, vous pouvez Le texte OFF est affiché... -
Page 48: Commande Du Party Timer
2.6 Commande du Le texte OK est affiché pendant 2 secondes. Le texte TIMER est visible PARTY TIMER a l’ecran principal. réglage ventilation peut être augmenté pour une durée préprogrammée. Mise sur arrêt du PARTY TIMER Ceci peut être utile lorsqu'une ventilation La minuterie PARTY TIMER se mettra plus importante est nécessaire pendant automatiquement sur arrêt après la durée... - Page 49 Lorsqu'il existe plusieurs programmes ■ SA – SU = Samedi et dimanche ; avec le même nombre de jours, le ■ WEEK = Tous les jours de la programme prioritaire sera celui avec la semaine. durée la plus courte. Dans l'exemple ci- 7.
-
Page 50: Réglage De L'horloge (Clock)
est visible. suivants peuvent être sélectionnés : ■ MON = Lundi ; 4. Appuyez sur pour ■ TUE = Mardi ; sélectionner le programme à ■ WED = Mercredi ; supprimer. PROG clignote. Le ■ THU = Jeudi ; numéro du programme est visible. ■ FRI = Vendredi ;... -
Page 51: Commande Du Ventilateur (Fan)
pendant 2 secondes. Le menu est 1. Appuyez sur OK. Le texte SHIFT est automatiquement fermé. affiché pendant 8 secondes. 2. Appuyez sur MENU avant que le texte SHIFT ne disparaisse. Le texte 2.10 Commande du COMF est affiché. ventilateur (FAN) 3. -
Page 52: Affichage De L'état (State)
1. Appuyez sur OK. Le texte SHIFT est nouveau. L’écran affiche maintenant affiché pendant 8 secondes. COMF. 2. Appuyez sur MENU avant que le 3. Appuyez sur pour texte SHIFT ne disparaisse. Le texte sélectionner STATE. COMF est affiché. 4. Validez en appuyant sur OK pour ouvrir le menu STATE. -
Page 53: Messages D'erreur
l'horloge (CLOCK) automatiquement réinitialisé. L'appareil peut maintenir Réinitialisation des messages fonctionnement de l'horloge pendant au d'erreur moins une heure sans alimentation. Après 1. Appuyez sur MENU. ce délai, l'horloge devra de nouveau être 2. Appuyez sur OK pour confirmer. réglée. Pour que la fonction de sauvegarde Le texte OK est affiche pendant puisse fonctionner totalement, l'appareil 2 secondes. -
Page 54: Mise En Service
Mise en service ■ Conseil Ø: 0,60mm ■ Minimum Ø: 0,25mm 5.1 Mise sous tension ■ Maximum Ø: 1,00mm Lorsque dispositif sauvegarde 5. Vissez l'appareil B (avec le cadre de l'horloge est vide, l'appareil affiche une séquence d'écrans de démarrage design X et l'adaptateur de directement après la mise sous tension. -
Page 55: Réglage Des Menus P
affiche OK pendant 2 secondes. sélectionner le numéro de menu Le texte INIT est visible dans l’écran principal de paramètre. principal. 10. Appuyez sur OK pour confirmer. Un deuxième numéro clignote à Désactiver INIT proximité du numéro sélectionné. mode réglage (INIT) 11. -
Page 56: Activation De L'autotest Du Système De Ventilation (Test)
Liste des paramètres spécifiques au ComfoSense (non présents dans l'unité de ventilation) P n° Min. Max. Description défaut Heure de début par défaut de nouveau programme de semaine. Heure de fin par défaut de nouveau programme de semaine. Régime par défaut : ■ 0 = away ;... - Page 57 Sommario 1 Introduzione ................... 58 1.1 Garanzia ................... 58 1.2 Sicurezza ..................58 2 Utilizzo del ComfoSense ............... 59 2.1 Funzionamento AUTO ............... 60 2.2 Funzionamento MAN ................. 60 2.3 Accesso menù .................. 61 2.4 Attivazione del ComfoHood ............. 61 2.5 Attivazione del timer del ComfoHood ..........
-
Page 58: Introduzione
Introduzione 1.1 Garanzia Il ComfoSense (di seguito “dispositivo”) La validità della garanzia rilasciata dal costruttore copre un periodo di 24 mesi è un dispositivo di controllo per unità di dall'installazione fino a un massimo di 30 ventilazione residenziali (di seguito “unità mesi dalla data di fabbricazione. -
Page 59: Utilizzo Del Comfosense
Utilizzo del ComfoSense Tasti: Display: ■ Testo; ■ Aumento valore; ■ Tempo. ■ S elezione elemento successivo. Valore (programma, parametro, temperatura, tempo). ■ Riduzione valore; ■ Gradi Celsius/Fahrenheit**; ■ S elezione elemento ■ Percentuale. precedente. ComfoHood*. ■ Ventilatore di immissione spento; ■ Shift;... -
Page 60: Funzionamento Auto
2.1 Funzionamento Significato simboli: AUTO Calibrazione in corso. WAIT Attendere fino a quando In modalità di funzionamento automatico l'indicatore sarà su 0. dispositivo può comunicare automaticamente all'unità di ventilazione É attiva la seconda SHIFT funzione dei tasti. l'impostazione di ventilazione desiderata. L'impostazione di ventilazione predefinita L'impostazione della dell'unità... -
Page 61: Accesso Menù
2.3 Accesso menù Spegnimento del ComfoHood 1. Premere MENU Viene visualizzato il Ingresso menù Utente testo HOOD. Per accedere al menù Utente, premere 2. Premere OK per confermare. Viene MENU. visualizzato il testo OFF per 2 Nel menù Utente è possibile scegliere le secondi. -
Page 62: Attivazione Del Party Timer
2.6 Attivazione del Viene visualizzato il testo OK per 2 secondi. PARTY TIMER Il testo TIMER e visibile nella È possibile aumentare l'impostazione della schermata principale. ventilazione per un periodo preimpostato. Questo può essere utile quando è Spegnimento del PARTY TIMER necessaria ventilazione aggiuntiva per un PARTY TIMER... - Page 63 programmi possono sovrapporsi. ■ SAT = Sabato; Il programma più breve sarà sempre ■ SUN = Domenica; quello prevalente e annullerà tutti gli altri ■ MO – FR = Da lunedì a venerdì; programmi più lunghi. ■ SA – SU = Sabati e domeniche; Il programma prevalente sarà...
-
Page 64: Impostazioni Del Clock
3. Premere OK per confermare. SET 4. Premere per scegliere lampeggia. Il numero del programma il giorno. È possibile scegliere i è visibile. seguenti giorni: 4. Premere per scegliere il ■ MON = Lunedì; programma da cancellare. PROG ■ TUE = Martedì;... -
Page 65: Attivazione Del Fan
5. Premere OK per confermare. Viene SHIFT scompaia. Viene visualizzato il visualizzato il testo SAVED per testo COMF. 2 secondi. Il menù viene chiuso 3. Premere una volta. Viene automaticamente. visualizzato il testo FAN. 4. Premere OK per confermare. Viene 2.10 Attivazione del FAN visualizzato il testo IN, OFF. -
Page 66: Richiesta Stato (State)
Il menu di stato contiene le seguenti 3. Premere per scegliere opzioni: FLTR CHECK, GEO HEAT*, PRE PARAM. HEAT* e FROST PROT. 4. Premere OK per confermare. L'indicatore del parametro P1 Menu FLTR CHECK lampeggia. Sotto il testo FLTR CHECK è indicato fra 5. -
Page 67: Messaggi Di Errore
Messaggi di errore Installazione Quando occorre pulire o sostituire i filtri, viene visualizzato il testo FLTR Staccare l'unità di ventilazione o FLTR, EXT*. Pulire o sostituire i filtri dalla corrente prima di come descritto nel manuale dell'unità di installare il dispositivo. ventilazione. -
Page 68: Messa In Opera E Collaudo
In caso di sostituzione lampeggia. Ora è possibile impostare l'ora utilizzare una delle seguenti giusta. (vedere: Impostazione CLOCK dal viti: punto 4). ■ vite in acciaio zincato e indurito PT10 bolcil. 2.2 5.2 Attivazione o x12 PT10 disattivazione ■ M2.2x 12 a croce piana plas-fix45°... -
Page 69: Impostazione Menù P
5.3 Impostazione menù 11. Premere per scegliere il numero del sottomenù parametro. 12. Premere OK per confermare. ■ Q uando il primo numero di parametro scelto è 8: Accanto al L'impostazione dei parametri è numero scelto lampeggia un terzo un'operazione molto specifica. -
Page 70: Attivazione Autodiagnosi Del Sistema Di Ventilazione (Test)
Elenco dei parametri specifici per il ComfoSense (non presenti nell'unità di ven- tilazione) Default Descrizione Ora predefinita di avvio di un nuovo programma settimanale. Ora predefinita di fine di un nuovo programma settimanale. Livello predefinito di velocità: ■ 0 = assente; ■ 1 = bassa;... - Page 71 Spis treści 1 Wprowadzenie ..................72 1.1 Gwarancja ..................72 1.2 Bezpieczeństwo ................72 2 Korzystanie z urządzenia ComfoSense ..........73 2.1 Tryb automatyczny (AUTO) ............... 74 2.2 Tryb sterowania ręcznego (MAN) ............74 2.3 Dostęp do menu ................75 2.4 Sterowanie okapem ComfoHood .............
-
Page 72: Wprowadzenie
Wprowadzenie miesięcy daty produkcji urządzenia. Urządzenie ComfoSense dalszej Gwarancja traci ważność w następujących części dokumentu nazywane przypadkach: „urządzeniem”) jest urządzeniem ■ instalacja nie została wykonana sterującym centralami wentylacyjnymi zgodnie z obowiązującymi w budynkach mieszkalnych (w dalszej przepisami; części podręcznika zwanymi „centralami ■ usterki wystąpiły na skutek wentylacyjnymi”... -
Page 73: Korzystanie Z Urządzenia Comfosense
Korzystanie z urządzenia ComfoSense Przyciski: Wyświetlacz: ■ Tekst ■ Zwiększenie wartości ■ Godzina ■ W ybór następnej pozycji Wartość (program, parametr, temperatura, godzina) ■ Z mniejszenie ■ Stopnie Celsjusza/Fahrenheita** wartości ■ Procent ■ W ybór poprzedniej pozycji ComfoHood* ■ Wyłączenie wentylatora wlotowego ■ Shift... -
Page 74: Tryb Automatyczny (Auto)
2.1 Tryb automatyczny Znaczenie symboli: (AUTO) Trwa kalibrowanie. WAIT Zaczekaj, aż licznik W trybie pracy automatycznej urządzenie osiągnie wartość 0. automatycznie komunikuje centrali wentylacyjnej, jakie ustawienie wentylacji Aktywowanie drugiej SHIFT funkcji przycisku jest pożądane. Domyślne ustawienie centrali wentylacyjnej Medium Anulowanie ustawienia (Średnie) (pozycja 2). -
Page 75: Dostęp Do Menu
2.3 Dostęp do menu Włączanie okapu ComfoHood 1. Naciśnij przycisk MENU. Wyświetla Dostęp do menu użytkownika się wyraz HOOD. Dostęp do menu użytkownika umożliwia 2. Naciśnij OK, aby potwierdzić. Na przycisk MENU. ekranie przez 2 sekundy wyświetla W menu użytkownika można wybrać się... -
Page 76: Sterowanie Regulatorem Czasowym Party Timer
opcje HOOD, TIMER. naciśnij , aby wybrać 3. Naciśnij przycisk OK. Na ekranie PARTY, TIMER. wyświetla się komunikat TIMER OFF. 3. Naciśnij przycisk OK. Wyświetla się 4. Potwierdź przyciskiem OK. Na wyraz TIMER ON. ekranie przez 2 sekundy wyświetla 4. Naciśnij OK, aby potwierdzić. Na się... - Page 77 Programy mogą się pokrywać. Najkrótszy ■ MO – FR = Poniedziałek – Piątek; program zawsze ma pierwszeństwo i ■ SA – SU = Sobota i Niedziela; anuluje dowolny dłuższy program. ■ WEEK = Wszystkie dni Program obejmujący mniejszą liczbę dni tygodnia.
-
Page 78: Ustawianie Zegara (Clock)
jest także numer programu. ■ MON = Poniedziałek; ■ TUE = Wtorek; 4. Naciśnij , aby wybrać ■ WED = Środa; program do usunięcia. Na ekranie ■ THU = Czwartek; pulsuje wyraz PROG. Widoczny jest ■ FRI = Piątek; także numer programu. ■ SAT = Sobota;... -
Page 79: Sterowanie Wentylatorem (Fan)
się wyraz SAVED. Menu zostaje 2. Naciśnij przycisk MENU zanim automatycznie zamknięte. zniknie wyraz SHIFT. Wyświetla się wyraz COMF. 2.10 Sterowanie 3. Naciśnij raz przycisk . Wyświetla się wyraz FAN. wentylatorem (FAN) 4. Naciśnij przycisk OK, aby W razie konieczności istnieje możliwość potwierdzić. -
Page 80: Stan Składania Żądania (State)
2. Naciśnij przycisk MENU zanim W menu stanu można wybrać następujące zniknie wyraz SHIFT. Wyświetla się opcje: FLTR CHECK, GEO HEAT*, PRE wyraz COMF. HEAT* i FROST PROT. 3. Naciśnij i wybierz PARAM. Menu FLTR CHECK 4. Naciśnij OK, aby potwierdzić. Pulsuje Pod tekstem FLTR CHECK wyświetla numer parametru P1. -
Page 81: Zasilanie Awaryjne Zegara (Clock)
2.13 Zasilanie awaryjne automatycznie zamknięte. zegara (CLOCK) Resetowanie filtra zewnętrznego Urządzenie jest w stanie podtrzymywać (FLTR EXT) zasilanie zegara przez najmniej czyszczeniu wymianie filtra godzinę. Po upływie tego czasu należy zewnętrznego zgodnie z opisem w jego ponownie ustawić zegar. Aby zasilanie instrukcji obsługi awarii... -
Page 82: Pierwsze Uruchomienie
■ OK: komunikacja prawidłowa; Wymagania kablowe są: ■ ERROR: brak prawidłowej ■ M aksymalna długość: 50m komunikacji z instalacją wentylacyjną ■ L iczba rdzeni: 4 przez dłużej niż 10 sekund. Wyrazy ■ P orady Ø: 0,60mm COMM, ERROR są wyświetlane bez ■ M inimalna Ø: 0,25mm przerwy. -
Page 83: Ustawianie Menu P
5.3 Ustawianie menu P Zmieniać można wyłącznie pulsującą wartość parametru. Ustawianie parametrów jest 16. Naciśnij OK, aby potwierdzić. Na skomplikowanym zadaniem. ekranie przez 2 sekundy wyświetla Nie zaleca się samodzielnego się wyraz SAVED. Pulsuje główny ustawiania parametrów w numer parametru w menu. przypadku braku dokładnej 17. -
Page 84: Aktywowanie Testu Automatycznego Systemu
Lista parametrów urządzenia ComfoSense (niedostępnych w centrali wentylacyjnej) Nr P maks Domyślne Opis Domyślne ustawienie godziny rozpoczęcia nowego programu tygodniowego Domyślne ustawienie godziny zakończenia nowego programu tygodniowego Domyślna prędkość: ■ 0 = poza domem; ■ 1 = niska; ■ 2 = średnia; ■ 3 = wysoka; ■ 4 = czujnik*. - Page 85 Índice 1 Introducción ................... 86 1.1 Garantía ................... 86 1.2 Seguridad ..................86 2 Uso de ComfoSense ................87 2.1 Operación AUTO ................88 2.2 Operación MAN ................88 2.3 Acceso al menú................. 89 2.4 Activación/desactivación del dispositivo ComfoHood ..... 89 2.5 Activación/desactivación del temporizador de ComfoHood .....
-
Page 86: Introducción
Introducción 1.1 Garantía El ComfoSense (en adelante "dispositivo") El fabricante otorga una garantía por un período de 24 meses tras la instalación, es un dispositivo de control para unidades hasta un máximo de 30 meses tras la de ventilación de uso residencial (en fecha de producción del dispositivo. -
Page 87: Uso De Comfosense
Uso de ComfoSense Botones: Pantalla: ■ Texto; ■ Aumentar valor; ■ Tiempo. ■ S eleccionar punto siguiente. Valor (programa, parámetro, temperatura, tiempo). ■ Disminuir valor; ■ Grados en Celsius/Fahrenheit**; ■ S eleccionar punto ■ Porcentaje. anterior. ComfoHood*. ■ Ventilador de suministro apagado; ■ Shift;... -
Page 88: Operación Auto
2.1 Operación AUTO Significado de símbolos: En el modo de operación automática Calibración en curso. el dispositivo puede indicar a la unidad WAIT Espere a que el contador ventilación automáticamente llegue a 0. qué configuración es la deseada. La La segunda función de configuración de ventilación por defecto SHIFT los botones está... -
Page 89: Acceso Al Menú
2.3 Acceso al menú 2. Pulse OK para confirmar. El texto dice ON durante 2 segundos. Acceder al menú de usuario es visible en la pantalla principal. Para acceder al menú de usuario pulse MENU. Apagar el ComfoHood En el menú de usuario podrá seleccionar 1. -
Page 90: Activación/Desactivación Del Party Timer
2.6 Activación/ 4. Pulse OK para confirmar. El texto dice OK. durante 2 segundos. El desactivación del texto TIMER es visible en la pantalla principal. PARTY TIMER configuración ventilación Apagar el PARTY TIMER puede incrementar para un periodo de PARTY TIMER apagará... - Page 91 Los programas se pueden solapar entre ■ FRI = Viernes; sí. El programa más corto será siempre ■ SAT = Sábado; el programa principal y primará sobre cualquier programa más largo. ■ SUN = Domingo; El programa con el menor número de días ■ MO –...
-
Page 92: Configurar El Clock
3. Pulse OK para confirmar. SET ■ TUE = Martes; parpadea. El número de programa es ■ WED = Miércoles; visible. ■ THU = Jueves; 4. Pulse para seleccionar el ■ FRI = Viernes; programa a borrar. PROG parpadea. ■ SAT = Sábado;... -
Page 93: Activación/Desactivación Del Fan (Ventilador)
2.10 Activación/ 3. Pulse una vez. El texto dice FAN. desactivación del 4. Pulse OK para confirmar. El texto dice IN, OFF. FAN (ventilador) 5. Pulse para seleccionar Cuando se desee se puede apagar qué ventilador se debe encender o manualmente el ventilador de suministro apagar. -
Page 94: Consulta Del Estado (State)
Menú FLTR CHECK el número de parámetro P1. Bajo el texto FLTR CHECK se indica 5. Pulse para seleccionar cuántas semanas faltan para que aparezca el número de menú de parámetro el aviso de filtro sucio. principal. 6. Pulse OK para confirmar. Parpadea Menú... -
Page 95: Mensajes De Error
Mensajes de error Instalación Cuando sea necesario limpiar o cambiar los filtros, aparecerá el texto FLTR o FLTR, EXT*. Limpie o cambie los filtros Desconecte la unidad de tal y como se describe en el manual de la ventilación de la fuente de unidad de ventilación. -
Page 96: Puesta En Servicio
5.2 Activación o Al sustituir la utilización desactivación del de uno de los siguientes tornillos: modo de ajuste (INIT) ■ Tornillo de acero galvanizado y endurecido Activación de INIT PT10 bolcil. 2.2 x12 PT10 1. Pulse OK. En la pantalla se ve SHIFT ■... -
Page 97: Configuración De Menús P
5.3 Configuración de 12. Pulse OK para confirmar. ■ S i el primer número de parámetro menús P elegido es un 8: Parpadea un tercer número junto a los Configurar los parámetros es números seleccionados. un trabajo muy específico. ■ D e lo contrario: Aparece el valor Le recomendamos que no de parámetro. -
Page 98: Activación Del Autodiagnóstico Del Sistema De Ventilación (Test)
Lista de parámetros específicos ComfoSense (no presentes en la unidad de ventilación) Descripción defecto Tiempo de inicio por defecto del nuevo programa de semana. Tiempo de finalización por defecto del nuevo programa de semana. Nivel de velocidad por defecto: ■ 0 = away (fuera de casa); ■ 1 = low (baja);... -
Page 99: Rysunki
Afbeeldingen, Figures, Abbildungen, Figure, Rysunki, Figuras NL: Wanddoos en schroeven F zijn niet meegeleverd. EN: Wall box and its screws F are not supplied. DE: Wanddose und Schrauben F gehören nicht zum Lieferumfang. FR: Le boîtier mural et les vis F ne sont pas fournis La scatola di montaggio e relative viti F non vengono fornite in dotazione. - Page 100 Afb., Fig., Abb., Rys. 1: ComfoSense 55 Afb., Fig., Abb., Rys. 2: ComfoSense 67...
- Page 101 Afb., Fig., Abb., Rys. 3: ComfoSense 67 incl. mounting box Afb., Fig., Abb., Rys. 3: ComfoSense CH...
- Page 102 Aansluitschema Afb. 4: Fig. 4: Connection scheme wiring Abb. 4: Schaltplan Fig. 4 : Schema de raccordement electrique Fig. 4: Schema di collegamento dei fili Rys. 4: Schemat połączeń przewodow Fig. 4: Esquema de cableado de conexion 1 (Rx) 2 (Tx) ComfoSense ComfoSense NL: Ventilatiesysteem...
- Page 103 België (Belgium) España (Spain) Zehnder Group Belgium NV/SA Zehnder Group Iberica IC, S.A. Stephenson Plaza, Blarenberglaan 3C/001 Argenters, 7 B - 2800 Mechelen Parque Tecnológico del Vallés Tel.: +32 (0)15-28 05 10 08290-Cerdanyola Fax: +32 (0)15-28 05 11 Tel.: (+34) 902 106 140 Internet: www.zehnder.be...
- Page 104 Tel.: 04227.22130 E-mail: info@zehnder-comfosystems.ch Fax: 04227/3564 Internet: www.wernig.at United Kingdom E-mail: office@wernig.at Zehnder Comfosystems A division of Zehnder Group UK Ltd Polska (Poland) Unit 1, Brookside Avenue Zehnder Polska Sp. z o.o. Rustington, West Sussex ul. Kurpiów 14a BN16 3LF, UK 52-214 Wrocław...