Télécharger Imprimer la page

Publicité

Les langues disponibles
  • FR

Les langues disponibles

Liens rapides

Operator's Manual
Bedienungsanleitung
Manuel d'utilisation
Istruzioni per l'operatore
Instrucciones para el uso
Face Down
Seitenrichtige Ablage
Récepteur papier
face en dessous
Vassolo carta – parte
stampante verso il basso
Depósito de papie – cara
impresa hacia abajo
T2045
T2055
T2060
T2070

Publicité

loading

Sommaire des Matières pour Tally T2045

  • Page 1 T2045 Operator’s Manual Face Down Bedienungsanleitung Seitenrichtige Ablage T2055 Manuel d’utilisation Récepteur papier face en dessous T2060 Istruzioni per l’operatore Vassolo carta – parte stampante verso il basso Instrucciones para el uso Depósito de papie – cara T2070 impresa hacia abajo...
  • Page 2 Important Information This device fulfils the European standards requirements by complying with the Directive of the Commission dated May 3, 1989 (89/336/EEC) relating to electro-magnetic compability and the This equipment generates and uses radio frequency energy and if Directive dated February 19, 1973 (73/23/EEC) relating to low-voltage electrical equipment. not installed and used properly, that is, in strict accordance with the Conformity with the above mentioned Directives is indicated by the CE symbol attached to the device.
  • Page 3 Face Down Option Operator’s Manual...
  • Page 4 Explanation of the symbols in this manual: If your printer has an operating panel ↓ ↑ ↑ ↓ with 9 buttons: Read in particular the paragraphs with the symbol If your printer has an operating panel ↑ ↓ ↑ ↓ with 6 buttons: Read in particular the paragraphs with the symbol Paragraphs marked with both symbols at once apply to both printer versions.
  • Page 5: General View

    Introduction Introduction The face down option is an additional module which can be used in con- nection with the automatic sheet feeder as well as with the manual paper insertion at the front of the printer. It offers the advantage that sorting of a multiple page document is not necessary, as the printed sheets are deposited in the correct order from the bottom to the top.
  • Page 6 Unpacking the face down option Unpacking the face Remove the contents from the packing. down option Remove the packing material and styrofoam safety blocks. Transportation unit Paper depot Cover (necessary for some models) Please check that the contents of the packing are complete and have not been damaged during transportation.
  • Page 7 Installing the face down option Installing the face down option Remove the protection cap on the printer housing first. For reasons of design, this cap is not present on certain models. ↑ ↓ ↑ ↓ Loosen the cover on the printer housing by means of a small screwdriver ↑...
  • Page 8 Installing the face down option Insure that the deviation plate is tilted forward and locked befor the trans- porting unit of the face down option is placed on the printer housing. wrong right First remove the back cover from your printer by tilting it at a 45 degree ↓...
  • Page 9 Installing the face down option Now place the cover supplied on the printer. This cover replaces the ↑ ↓ ↓ ↑ front cover previously removed and serves as a support for the feed mechanism. Holding the cover at a 45 degree angle place it on the printer as shown in the diagram.
  • Page 10 Installing the face down option Tilt the transporting unit backward and place it on the top cover. ↑ ↓ ↑ ↓ ↑ ↓ ↓ ↑ Lock the transporting unit to the top cover of the printer. Place the paper depot into the notches of the face down option and tilt the paper depot to the front (depot rests on the front part of the printer housing).
  • Page 11 Removing the face down option Removing the face down option The face down option can only be removed, when the paper guide is tilted downward (position: FACE DOWN). Before removing the transportation unit, the paper depot must be re- moved first. Press the two front levers to the outside and lift off the face down option.
  • Page 12 Operating the face down option Operating the face No settings or adjustments are necessary for operation the face down option. down option The face down option can be switched on and off at any time, just by pressing the two top levers to the outside and tilting the paper guide upward.
  • Page 13 Seitenrichtige Ablage Bedienungsanleitung...
  • Page 14 Erklärung der Symbole in dieser Anleitung: Wenn Ihr Drucker ein Bedienfeld ↓ ↑ ↑ ↓ mit 9 Druckknöpfen besitzt: Lesen Sie besonders die Abschnitte mit dem Symbol Wenn Ihr Drucker ein Bedienfeld ↑ ↓ ↑ ↓ mit 6 Druckknöpfen besitzt: Lesen Sie besonders die Abschnitte mit dem Symbol Abschnitte mit beiden Symbolen gleichzeitig gelten für beide Drucker- versionen.
  • Page 15 Einleitung Einleitung Die seitenrichtige Ablage ist ein Zusatzmodul, das sowohl mit automati- schem Einzelblatteinzug, als auch mit manueller Papierzufuhr von vorne, verwendet werden kann. Sie bietet Ihnen den Vorteil, daß ein Sortieren bei mehrseitigen Dokumen- ten entfällt, weil die bedruckten Blätter von unten nach oben in der richti- gen Reihenfolge abgelegt werden.
  • Page 16 Auspacken der seitenrichtigen Ablage Auspacken der sei- Entnehmen Sie den Inhalt der Verpackung. tenrichtigen Ablage Entfernen Sie Verpackungsmaterialien und die Transportsicherung. Fördermechanik Papierablage Abdeckung Überprüfen Sie bitte den Verpackungsinhalt auf Vollständigkeit und auf Transportschäden. Sollte ein Teil fehlen oder beschädigt sein, benachrichtigen Sie bitte Ihren Händler.
  • Page 17 Aufsetzen der seitenrichtigen Ablage Aufsetzen der seiten- richtigen Ablage Entfernen Sie zuerst die Abdeckkappe am Druckergehäuse. Konstruktionsbedingt ist diese Abdeckkappe bei manchen Modellen ↑ ↓ ↑ ↓ nicht vorhanden! Hebeln Sie mit Hilfe eines kleinen Schraubendrehers oder eines anderen ↑ ↓...
  • Page 18 Aufsetzen der seitenrichtigen Ablage Achten Sie darauf, daß das Umlenkprofil nach vorne gekippt und verrie- gelt ist, bevor Sie die Fördermechanik der Einzelblattablage auf das Druckergehäuse setzen. falsch richtig Entfernen Sie an Ihrem Drucker den hinteren Deckel, indem Sie ihn in ↑...
  • Page 19 Aufsetzen der seitenrichtigen Ablage Setzen Sie nun die mitgelieferte Abdeckung in Ihren Drucker ein. ↑ ↓ ↓ ↑ Diese Abdeckung ersetzt den zuvor abgenommenen vorderen Deckel und dient zur Auflage der Fördermechanik. Stellen Sie die mitgelieferte Abdeckung in einem 45-Grad-Winkel von oben auf den Drucker, wie unten im Bild gezeigt.
  • Page 20 Aufsetzen der seitenrichtigen Ablage Kippen Sie die Fördermechanik nach hinten an und setzen Sie sie auf ↑ ↓ ↑ ↓ ↑ ↓ ↓ ↑ die obere Abdeckung des Druckers. Verriegeln Sie die Fördermechanik an der oberen Abdeckung des Druckers. Hängen Sie die Papierablage in die Aussparung der seitenrichtigen Ein- zelblattablage ein und schwenken Sie die Ablage nach vorne (Ablage liegt auf dem vorderen Teil des Druckergehäuses).
  • Page 21 Abnehmen der seitenrichtigen Ablage Abnehmen der sei- tenrichtigen Ablage Die seitenrichtige Ablage kann nur dann abgenommen werden, wenn die Papierführung nach unten geschwenkt ist (Stellung: FACE DOWN). Bevor Sie den Fördermechanismus abnehmen, hängen Sie bitte zuerst die Papierablage aus. Drücken Sie dann die vorderen beiden Hebel nach außen und heben die seitenrichtige Ablage nach oben ab.
  • Page 22 Arbeiten mit der seitenrichtigen Ablage Arbeiten mit der sei- Zum Arbeiten mit der Einzelblattablage brauchen Sie keine Einstellung am Drucker vornehmen. tenrichtigen Ablage Die Ablage kann jederzeit zu- und abgeschaltet werden, drücken Sie dazu die beiden oberen Hebel nach außen und schwenken Sie die Pa- pierführung nach oben.
  • Page 23 Récepteur papier face en dessous Manuel d’utilisation...
  • Page 24: Explication Des Symboles Figurant Dans Cette Instruction

    Explication des symboles figurant dans cette instruction: Si votre imprimante possède un pupitre opérateur ↓ ↑ ↑ ↓ avec 9 boutons-poussoirs: Lisez avec une attention particulière les paragraphes munis du symbole Si votre imprimante possède un pupitre opérateur ↑ ↓ ↑...
  • Page 25: Vue D'ensemble

    Introduction Introduction Le récepteur papier face en dessous est un module supplémentaire pou- vant être utilisé tant avec le chargeur automatique feuille à feuille qu’en in- troduction manuelle frontale. Lorsque l’on fait imprimer des documents composés de plusieurs pages, cette unité offre l’avantage de déposer les feuilles imprimées de façon à ce que celles-ci se retrouvent dans le bon ordre.
  • Page 26: Déballage

    Déballage Déballage Retirer le récepteur papier face en dessous hors de son emballage. Mécanisme de transport Plaque de réception Couvercle (est nécessaire pour certains modèles) S’assurer que le contenu de l’emballage est bien complet et qu’il n’a pas été endommagé au cours du transport. Au cas où...
  • Page 27: Installation Du Récepteur Papier Face En Dessous

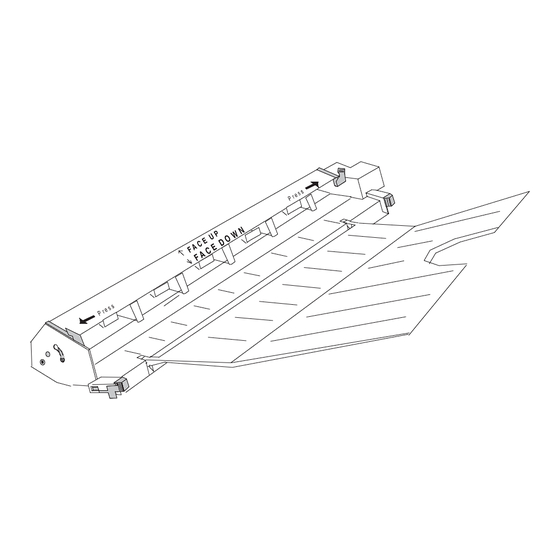
    Installation du récepteur papier face en dessous Installation du récep- teur papier face en dessous Retirer tout d’abord le cache du carter de l’imprimante. Pour de raisons constructives, ce cache de protection est inexistant ↑ ↓ ↓ ↑ chez certains modèles! A l’aide d’un petit tournevis ou de tout autre objet pointu (ciseaux, etc.) ↑...
  • Page 28 Installation du récepteur papier face en dessous Avant d’installer le mécanisme de transport sur le carter de l’imprimante, s’assurer que le profil de renvoi est bien basculé vers l’avant et verrouillé. faux correct Retirer tout d’abord le capot arrière de votre imprimante en le positionnant ↓...
  • Page 29 Installation du récepteur papier face en dessous Installez maintenant sur l’imprimante le couvercle qui vous a été livré. ↑ ↓ ↓ ↑ Ce couvercle remplace le capot avant précédemment enlevé et sert de support au mécanisme d’entraîment. Positionnez ce couvercle sur l’imprimante sous un angle de 45 degrès vers le haut, comme indiqué...
  • Page 30 Installation du récepteur papier face en dessous Faire basculer le mécanisme de transport légèrement vers l’arrière et le ↑ ↓ ↑ ↓ ↑ ↓ ↓ ↑ mettre en place sur le capot supérieur. Verrouiller le mécanisme au niveau du capot supérieur de l’imprimante. Introduire la plaque de réception papier dans l’encoche prévue à...
  • Page 31: Démontage Du Récepteur Papier Face En Dessous

    Démontage du récepteur papier face en dessous Démontage du récepteur papier face en dessous Le récepteur papier face en dessous ne peut être démontée que si le guide papier est basculé vers le bas (position "face down"). Avant de démonter le mécanisme de transport, déposer d’abord la plaque de réception papier.
  • Page 32: Utilisation Du Récepteur Papier Face En Dessous

    Utilisation du récepteur papier face en dessous Utilisation du récep- L’utilisation du récepteur papier face en dessous ne nécessite aucun réglage au niveau de l’imprimante. teur papier face en L’unité peut être mise en ou hors circuit à tout moment. Pour cela, il suffit dessous de pousser les deux leviers supérieurs vers l’extérieur, et de faire bascu- ler le guide papier vers le haut.
  • Page 33 Vassolo carta – parte stampante verso il basso Istruzioni per l’operatore...
  • Page 34 Spiegazione dei simboli della presente guida all’uso: Se la Vostra stampante dispone di ↓ ↑ ↑ ↓ un pannello di comando a 9 pulsanti: leggete specialmente i capitoli col simbolo Se la Vostra stampante dispone di ↑ ↓ ↑ ↓ un pannello di comando a 6 pulsanti: leggete specialmente i capitoli col simbolo I capitoli con entrambi i simboli sono da considerare validi per tutti e due i tipi di stampanti.
  • Page 35 Introduzione Introduzione Il raccoglitore di fogli a lati non invertiti (il vassolo carta – parte stampante verso il basso) è un modulo supplementare che può essere utilizzato sia con l’alimentatore automatico di fogli singoli che con l’inserimento a mano della carta dalla parte anteriore. Offre il vantaggio che si può...
  • Page 36 Montaggio del raccoglitore di fogli a lati non invertiti Montaggio del racco- Estarre il contenuto dall’imballaggio. glitore di fogli a lati non invertiti Togliete i materiali di imballaggio e la protezione per il trasporto. Meccanismo di trasporto Raccoglitore di carta Copertura (necessario per alcuni modelli)
  • Page 37 Montaggio del raccoglitore di fogli a lati non invertiti Montaggio del racco- glitore di fogli a lati non invertiti Togliete prima il coperchio della stampante. Per ragioni di contruzione, certuni modelli non dispongo di questo ↑ ↓ ↓ ↑ coperchio ribaltabile. Con un piccolo cacciavite e con un altro oggetto appuntito (forbici ecc.) ↑...
  • Page 38 Montaggio del raccoglitore di fogli a lati non invertiti Fate attenzione che il profilato di rinvio sia ribaltato in avanti e bloccato prima che montate il meccanismo di trasporto del raccoglitore di fogli sin- goli sulla carcassa della stampante. posizione sbagliata posizione giusta Allontanate anzitutto il coperchio posteriore della Vostra stampante, e prima ↓...
  • Page 39 Montaggio del raccoglitore di fogli a lati non invertiti Mettete ora la copertura in dotazione nella stampante. Codesta copertura ↑ ↓ ↓ ↑ protettiva sostituisce il coperchio anteriore precedentemente allontanato, e serve da appoggio per il dispositivo convogliatore di trasporto. Formare con questa copertura un angolo di 45°...
  • Page 40 Montaggio del raccoglitore di fogli a lati non invertiti Inclinate adesso il meccanismo di trasporto all’indietro e mettetelo sul ↑ ↓ ↑ ↓ ↑ ↓ ↓ ↑ coperchio superiore. Bloccate il meccanismo di trasporto sul coperchio superiore della stam- pante. Agganciate il raccoglitore carta nell’incavo del raccoglitore di fogli singoli a lati non invertiti e girate il raccoglitore in avanti (il raccoglitore appoggia sulla parte anteriore della carcassa della stampante).
  • Page 41 Prelevamento del raccoglitore di fogli a lati non invertiti Prelevamento del raccoglitore di fogli a lati non invertiti Il raccoglitore di fogli a lati non invertiti può essere tolto soltanto se la guidacarta è inclinata in giù (posizione FACE DOWN). Prima di togliere il meccanismo di trasporto sganciate il raccoglitore di carta.
  • Page 42 Operando con fogli a lati non invertiti Operando con fogli Non occorre fare una regolazione alla stampante per poter utilizzare il rac- coglitore di fogli singoli. Il raccoglitore può essere messo in o fuori funzio- a lati non invertiti ne in qualsiasi momento. Il raccoglitore di fogli a lati non invertiti ha una capacità...
  • Page 43 Depósito de paple – cara impresa hacia abajo Instrucciones para el uso...
  • Page 44 Explicación de los símbolos de este manual: Si su impresora posee un ↓ ↑ ↑ ↓ panel de mando de 9 botones: Lea especialmente las secciones con este símbolo Si su impresora posee un ↑ ↓ ↑ ↓ panel de mando de 6 botones: Lea especialmente las secciones con este símbolo Las secciones con ambos símbolos valen simultáneamente para ambas versiones de impresora.
  • Page 45 Introducción Introducción El depósito de páginas es un modulo suplementario que se puede usar tanto con la alimentación automática de hojas sueltas como con el ar- rastre manual desde delante. La ventaja es que es superfluo clasificar las páginas en caso de docu- mentos de varias hojas ya que las páginas impresas se depositan desde abajo hacia arriba en orden cronológico.
  • Page 46 Quitar el contendio del embalaje Quitar el contendio Retire el contenido del paquete. del embalaje Quitar los materiales de embalaje y el seguro de transporte. Mecanismo transportador Depósito de papel Cubierta (necesario para algunos modelos) Comprobar que el contenido del embalaje está completo y no ha sufrido daños durante el transporte.
  • Page 47 Instalar el depósito Instalar el depósito Quitar primero la cubierta de la caja de la impresora. Esta tapa no existe en algunos modelos, por motivos de construción. ↑ ↓ ↑ ↓ Con ayuda de un pequeño destornillador u otro objeto agudo (tijeras etc.) ↑...
  • Page 48 Instalar el depósito Asegurar que el perfil de reenvio esté abatido hacia delante y bloqueado antes de instalar el mecanismo transportador del depósito en la caja de la impresora. incorrecto correcto Retirar primeramente la tapa posterior de la impresora. Para ello, ↑...
  • Page 49 Instalar el depósito Seguidamente, introducir en la impresora la cubierta que se incluye con el ↑ ↓ ↓ ↑ suministro. Esta cubierta sustituye a la cubierta delantera que se acaba de retirar y sirve como apoyo de la mecánica de avance. Apoyar la cubierta sobre la impresora formando un ángulo de 45 grados desde arriba tal cual se indica en la ilustración más abajo.
  • Page 50 Instalar el depósito Volcar ahora el mecanismo transportador hacia atrás y colocarlo en la ↑ ↓ ↑ ↓ ↑ ↓ ↓ ↑ cubierta superior. Bloquear el mecanismo transportador en la cubierta superior de la impresora. Suspender el apoyo en el rebajo del depósito y abatirlo hacia delante (el apoyo descansa en la parte delantera de la caja de la impresora).
  • Page 51 Retirar el depósito de papel en dirección Retirar el depósito de papel en direc- ción El depósito de papel se puede quitar solamente después de volcar la guía de papel hacia abajo (posición Face down). Antes de quitar el mecanismo transportador, descolgar primero el apoyo del papel.
  • Page 52 Trabajar con el depósito de papel Trabajar con el Para trabajar con el depósito de hojas sueltas no se requiere ajuste alguno en la impresora. depósito de papel El depósito se puede conectar y desconectar en cualquier momento. Para ello empujar las dos palancas superiores hacia fuera y abatir la guía de papel hacia arriba.
  • Page 53 “All rights reserved. Translations, reprinting or copying by any means of this manual complete or in part or in any different form requires our explicit approval. We reserve the right to make changes to this manual without notice. All care has been taken to ensure accuracy of information contained in this manual. However, we cannot accept responsibility for any errors or damages resulting from errors or inaccuracies of information herein.”...
  • Page 54 U3-4-multi.fm Seite 2 Dienstag, 15. September 2009 1:42 13 DASCOM SUPPORT The Printer Place +1 (800) 243-3338 www.theprinterplace.com © September 2009 DASCOM Europe GmbH 059821d...

Ce manuel est également adapté pour:

T2055T2060T2070