Hansgrohe AXOR ShowerSelect Round 36722 1 Série Instructions De Montage / Mode D'emploi / Garantie
Masquer les pouces
Voir aussi pour AXOR ShowerSelect Round 36722 1 Série:
Table des Matières

Manuels Connexes pour Hansgrohe AXOR ShowerSelect Round 36722 1 Série


Sommaire des Matières pour Hansgrohe AXOR ShowerSelect Round 36722 1 Série
- Page 1 EN Installation / User Instructions / Warranty FR Instructions de montage / Mode d'emploi / Garantie ES Instrucciones de montaje / Manejo / Garantía ShowerSelect Round 36722xx1 ShowerSelect Square 36714xx1 ° 1 0 0 ShowerSelect Soft Cube 36705xx1...
-
Page 2: Technical Information
176°F* d'eau chaude Flow rate @ 44 PSI 6.8 GPM Température maximum d'eau chaude 176°F* Capacité nominale @ 44 PSI 6.8 GPM *Please know and follow all applicable local plumbing codes when setting the temperature on the water heater. * Vous devez connaître et respecter tous les codes de plom- berie locaux applicables pour le réglage de la température Installation Considerations du chauffe-eau. À prendre en considération pour • For best results, Hansgrohe recommends that l’installation this unit be installed by a licensed, professional plumber. • Pour de meilleurs résultats, Hansgrohe recom- • Please read over these instructions thoroughly be- mande que ce produit soit installé par un plom- fore beginning installation. Make sure that you bier professionnel licencié. have all tools and supplies needed to complete the installation • Veuillez lire attentivement ces instructions avant de procéder à l’installation. Assurez-vous de dis- • This trim is for use with iBox Universal Plus model poser de tous les outils et du matériel nécessaires 01850181 (not included). -
Page 3: Datos Tecnicos
Español Datos tecnicos Tools Required / Outiles Utiles / Herramientas Útiles Presión recomendada en servicio 15 - 75 PSI Presión en servicio max. 145 PSI Temperatura recomendada del 120° - 140° F* agua caliente Temperatura del agua caliente max. 176°F* Caudal máximo @ 44 PSI 6.8 GPM *Debe conocer y cumplir todos los códigos locales apli- cables para ajustar la temperatura del calentador de agua. Consideraciones para la instalación • Para obtener mejores resultados, la instalación debe estar a cargo de un plomero profesional ¼" / 7 mm matriculado. • Antes de comenzar la instalación, lea estas This unit meets or exceeds the following: instrucciones detenidamente. Asegúrese de tener •... - Page 4 ShowerSelect Soft Cube Service Stops / Butées d’arrêt 36705xx1 d’isolation / Cierres de servicio ¾" 6¾" 4 mm 2¼" - 3⅜" ShowerSelect Square 36714xx1 6¾" ¾" closed open ferme ouvert 2⅜"-3½" cerrado abierto ShowerSelect Round 36722xx1 ¾" 2⅜"-3½"...
- Page 5 Installation / Installation / Instalación closed ferme cerrado English Français Español Turn off the water at the main or Coupez l'arrivée d'eau au niveau Cierre el paso del agua en la at the stops on the iBox Universal de la conduite principale ou entrada del suministro o en las Plus rough. des vannes d'arrêt de la boîte llaves de paso en la pieza interior d'encastrement iBox Universal iBox Universal Plus. Remove the cover. Plus. Retire la tapa. Enlevez le couvercle. Cut the plaster shield so that it ex- Coupez la coque de protection Corte el protector de yeso de tends ¹⁄₁₆" - ⅛" outside the surface de façon à ce qu’elle dépasse modo que sobresalga ¹⁄₁₆" - ⅛" of the finished wall. de ¹⁄₁₆ à ⅛ po à l'extérieur de la de la superficie de la pared surface du mur fini. terminada.
- Page 6 Armaturenfett Grease Nr. 10476220 4 mm 5 mm 3.7 ft-lb 5 Nm English Français Español Remove the flush insert and the Retirez le module encastré et les Retire el inserto de lavado y los flush insert seals. joints d'étanchéité du module sellos del inserto de lavado. encastré. Lightly lubricate the function block Lubrifiez légèrement les joints Lubrique levemente los retenes o-rings. toriques de le bloc fonction. anulares del bloque de funciÓn. Install the function block. Installez le bloc fonction. Instale el bloque de función.
- Page 7 4 mm English Français Español Lower the spacer. Abaissez l'entretoise. Baje el separador. Remove the backing from the Retirez la pellicule protectrice des Retire la parte posterior de las al- adhesive pads on the fitting aid. plaquettes adhésives sur l'aide au mohadillas adhesivas de la ayuda montage. de montaje.
- Page 8 English Français Español Position the fitting aid over the Positionnez l'aide au montage sur Posicione la ayuda de montaje shutoff stem. le tige d'arrêt. sobre el vástago de cierre. Cut the shutoff stem so that it is Coupez le tige d'arrêt afin qu'elles Corte el vástago de cierre de even with the front of the fitting soient de niveau avec le devant de modo que esté parejo con el aid. l'aide au montage. frente de la ayuda de montaje.
- Page 9 4 mm English Français Español File the shutoff stem so that it is Limez le tige d'arrêt afin qu'elles Lime el vástago de cierre de modo straight and even. soient droites et égales. que estén rectos y parejos. Reposition the fitting aid so that Repositionnez l'aide au montage Vuelva a colocar la ayuda de one of the small holes is over the afin que l'un des petits trous se montaje de modo que uno de los spacer. trouve au-dessus de l'entretoise. orificios pequeños quede sobre el separador. Raise the spacer so that it is even Remontez l'entretoise afin qu'elle with the back of the fitting aid. soit de niveau avec l'arrière de Eleve el separador para que l'aide au montage. quede parejo con la parte trasera de la ayuda de montaje.
- Page 10 0 " ¹ ⁄ ₁ ₆ " English Français Español Remove the fitting aid. Retirez l'aide au montage. Retire la ayuda de montaje. Seal the wall around Scellez le mur autour Selle la pared alred- the plaster shield using de la coque de pro- edor del protector de waterproof sealant. tection à...
- Page 11 ¹ ⁄ ₁ ₆ " ⅛ " English Français Español Install the nut on the shutoff valve Installez les écrous sur le tige des Instale las tuercas en el vástago stem so that it is ¹⁄₁₆" in front of the vannes d'arrêt afin qu'ils soient de de la válvula de cierre de modo front of the stem. niveau avec l'avant des tiges. que queden parejos con el frente de el vástago. If the homeowner would like Si le propriétaire de la maison Si el propietario desea los bo- the Select button to stand souhaite que le bouton de sélec- tones de seleccionar a aproxima- approximately ¹⁄₁₆" in front tion dépasse d'environ ¹⁄₁₆ po damente ¹⁄₁₆" frente al escudo en of the escutcheon in the off devant l'écusson dans la position la posición de apagado, selec- position,select the cap. d'arrêt, sélectionnez le capuchon. cione la tapa.
- Page 12 English Français Español Install the cap on the shutoff stem. Installez le capuchon sur le tige Instale la tapas en el vástago de d'arrêt. cierre. Measure the distance between the Mesurez la distance entre le Mida la distancia entre el borde outside edge of the plaster shield bord extérieur de la coque de externo del protector de yeso y la and the screw flange (X). protection et la collerette de la vis brida del tornillo ("X"). (« X »).
- Page 13 ⁷ ⁄ ₁ ₆ " ⁷ ⁄ ₁ ₆ " English Français Español Add ⁷⁄₁₆" to X. Ajoutez ⁷⁄₁₆ po à X. Agregue ⁷⁄₁₆" a X. Cut the retainer plate screws so Coupez les vis de la plaque Corte los tornillos de la placa de that they are X + ⁷⁄₁₆" long. d'arrêt afin que leur longueur soit sujeción de modo que el largo de X + ⁷⁄₁₆ po. sea X + ⁷⁄₁₆". Install the retainer plate. Installez la plaque d'arrêt. Instale la placa de sujeción.
- Page 14 open ouvert abierto English Français Español Place a small amount of caulk at Placez une petite quantité de pâte Coloque una pequeña cantidad the top and side grout joints. d'étanchéité au niveau des joints de calafate en la parte superior y de coulis en haut et sur les côtés. uniones de lechada de cemento Make sure that the stops are laterales. open. Assurez-vous que les vannes d'arrêt soient ouvertes. Asegúrese de que las llaves de paso estén abiertas. Turn the water on at the main. Ouvrez l'eau au niveau de la Abra el paso del agua en la conduite principale. entrada del suministro. Remove the safety guard from the shutoff valve. Retirez les pièces de protection Retire las protecciones de seguri- des vannes d'arrêt. dad de las válvulas de cierre. Press the shutoff stem to test the shower function. Appuyez sur le tige d'arrêt pour Presione el vástago de cierre para ouvrir l'eau afin de tester le encender el agua y probar la fonction. funciÓn.
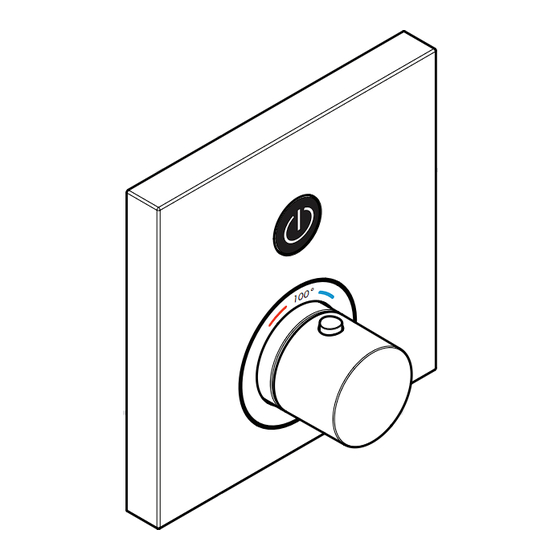
- Page 15 0 ° English Français Español Install the thermostatic mixer Installez la douille du mitigeur Instale el manguito del mezclador sleeve. thermostatique. termostático. Install the escutcheon. Installez l'écusson. Instale el escudo.
- Page 16 0 ° 2 mm English Français Español Press the shutoff button. Poussez le bouton d'arrêt. Pulse el botÓn de cierre. Turn the thermostatic mixer stem Tournez la tige du mitigeur thermo- Gire el vástago del mezclador until the output water is 104° F. statique jusqu’à ce que l’eau de termostático hasta que el agua de sortie soit à une température de salida esté en 104º F. 104 °F. Install the handle so that the safety Installez la manette afin que le Instale la manija de modo que el stop override button is next to bouton se trouve à côté de la botón esté al lado de la marca the indexing mark on the sleeve marque de positionnement sur la indicadora en el manguito y la and the 100° marking on the douille et de la marque 100° sur marca 100° en el escudo. escutcheon. l'écusson. Apriete el tornillo de la manija. Tighten the handle screw. Serrez la vis de poignée.
- Page 17 max. 5° 0 ° English Français Español Make sure that the escutcheon is Assurez-vous que l'écusson est de Asegúrese de que el escudo level. niveau. quede nivelado. If it is not, turn to page 18. Si ce n'est pas le cas, référez-vous Si no lo está, vaya a la página 18. à la page 18.
- Page 18 ¼"/7mm 4 mm English Français Español If the escutcheon is tilted 5° or Si l'écusson est incliné de 5° ou Si el escudo está inclinado 5° o menos, siga estos pasos. less, follow these steps. moins, suivez ces étapes. Turn the water off at the main or at Coupez l’eau au niveau de la Cierre el paso del agua en la the stops. conduite principale ou des vannes entrada del suministro o en las d'arrêt. llaves de paso. Remove the function block. Enlevez le bloc fonction. Retire el bloque de función. Use a ¼" drill bit to slightly Utilisez une mèche de ¼ po pour Use una broca de ¼" para enlarge the screw holes on the légèrement agrandir les trous de agrandar levemente los orificios function block. vis du bloc fonction. para los tornillos en el bloque de función.
- Page 19 0 ° 4 mm 3.7 ft-lb 5 Nm English Français Español Replace the function block in the Replacez le bloc fonction dans la Instale el bloque de función en la pieza interior. rough. boîte d'encastrement. Rotate the function block so that it Faites tourner le bloc fonction afin Rote el bloque de función de is straight. qu'il soit droit. modo que esté recto. Install the screws. Installez les vis. Instale los tornillos.
- Page 20 Set the high temperature limit stop, Justify the handle / Réglez la butée de limite d’eau chaude, Réglez la poignée / Fije el tope de límite de alta temperatura, Ajuste la manija 0 ° **Follow all applicable local plumbing codes when setting the high temperature limit stop. To prevent scald injury, the maximum output temperature of the shower valve must be no higher than 120°F. In Massachusetts, the maximum output temperature can be no higher than 112° F. **Pour empêcher des blessures par ébouillantement, la température de sortie maximale du robinet de douche ne doit pas excéder 120°F. Au Massachusetts, la température de sortie maximale du robinet de douche ne doit pas excéder...
- Page 21 0 ° f t - l 0 ° 2 mm 3 ft-lb / 4 Nm...
- Page 22 Replacement Parts / Pièces détachées / Repuestos 96525000 97980000 98133000 (M5x20) 92594000 98133000 (16x2) 4 mm (16x2) 98368000 95758000 (M28x1.5) 92540000 19 mm 94073000 92219000 98156000 92696000 96454000 (36x2) 98197000 (M5x55) (20x1.5) 95521000 98282001 98146000 (1°) 92544610 (25x1.5) 98414000 98913000 92146000 (48x4) (M34x1.5) (25x2.5) 27 mm...
- Page 23 Replacement Parts / Pièces détachées / Repuestos 96454000 (M5x55) 92544610 92540000 98414000 (48x4) 96447000 (Ø 165 mm ) 13595000 97334000 (25 mm) 92546xx0 92544610 92534xx0 92641xx1 98701000 M4x16 3 mm 2 mm 98133000 (16x2) 13596xx0 (22 mm) 95521000 (1°) xx = Colors / Couleurs / Acabados 00 = Chrome 82 = Brushed Nickel...
- Page 24 User Instructions / Instructions de service / Manejo ouvert abierto fermé cerrar > 100°F >40° C cold chaud froid frío caliente...
- Page 25 Cleaning / Nettoyage / Limpieza 4 mm 27 mm...
- Page 26 27 mm 4 mm 5.9 ft-lb / 8 Nm 3.7 ft-lb / 5 Nm 0.07 ft-lb /0.1 Nm 2 mm 0.7 ft-lb / 1 Nm...
- Page 27 Troubleshooting Problem Possible Cause Solution - Supply pressure inadequate - Check water pressure (If a pump Insufficient water has been installed check to see if the pump is working). - Regulator filter dirty - Clean filters - Handshower filter seal dirty - Clean filter seal between handshower and hose - Backflow preventers dirty or worn - Clean backflow preventers, replace Crossflow, hot water being forced into cold water pipe, or vice versa, when if necessary mixer is closed - Thermostat has not been adjusted - Adjust thermostat S p o u t t e m p e r a t u r e d o e s n o t correspond with temperature set - Hot water temperature too low - Increase hot water temperature...
-
Page 28: Dépannage
Dépannage Dysfonctionnement Origine Solution - Pression d´alimentation insuffisante - Contrôler la pression Pas assez d´eau - Filtre de l´élément thermostatique - Nettoyer les filtres encrassé - Joint-filtre de douchette encrassé - Nettoyer le joint-filtre entre la douchette et le flexible - Clapet anti-retour encrassé ou - Nettoyer le clapet anti-retour ou le Circulation opposée, l´eau chaude est comprimée dans l´arrivée d´eau froide défectueux changer éventuellement et vice versa avec robinet fermé - Le thermostat n´a pas été réglé - Régler le thermostat La température à la sortie ne correspond pas à la température de réglage - Température d'eau chaude trop - Augmenter la température d´eau... -
Page 29: Localización De Fallas
Localización de fallas Problema Causa Solución - presión insuficiente - comprobar presión Sale poca agua - filtro del termoelemento sucio - limpiar filtro - Filtro de la teleducha sucio - Limpiar / Cambiar filtro entre flexo y teleducha - válvula antirretorno sucia o pierde - limpiar / cambiar válvula Flujo de agua cruzada agua caliente entra en la tubería del agua fría o al revés - termostato no ha sido ajustado - ajustar termostato Temperatura del agua no corresponde a lo marcado - Temperatura del agua caliente - aumentar temperatura del agua demasiado baja caliente a 42º - 65º C. -
Page 30: For Best Results
• Damage to the product caused by improper care or the use of improper cleaning agents is not covered by the warranty. • If a component of the product is damaged, replace it, as there is risk of injury. Conseil de nettoyage pour les produits Hansgrohe Les robinets pour les salles de bains et les cuisines modernes ainsi que les produits récents pour les douches se composent de matériaux différents afin de satisfaire aux besoins du marché en termes de conception et de fonctionnalité. Afin d'éviter d'endommager le produit, il est nécessaire d'en prendre soin. - Page 31 Les dommages au produit causés par un mauvais entretien ou par l'utilisation de produits de net- toyage inadéquats ne sont pas couverts par la garantie. • Si un composant du produit est endommagé, remplacez-le, car il existe un risque de blessure. Recomendación de limpieza para los productos de Hansgrohe Hoy en día, las griferías de baño y de cocina así como duchas modernas se componen de materiales muy distintos para satisfacer las exigencias del mercado respecto al diseño y la funcionalidad. Para evitar daños y reclamaciones hay que tener en cuenta ciertos aspectos tanto en el uso como en su limpieza.
- Page 32 WHAT IS COVERED BY THE WARRANTY The warranty covers only your Hansgrohe manufactured product. Hansgrohe warrants this product against defects in material or workmanship as follows: Hansgrohe will replace at no charge for parts only or, at its option, replace any product or part of the product that proves defective because of improper workmanship and/or material, under normal installation, use, service and maintenance. If Hansgrohe is unable to provide a replacement and repair is not practical or cannot be made in timely fashion, Hansgrohe may elect to refund the purchase price in exchange for the return of the product. LENGTH OF WARRANTY Replacement or repaired parts of products will be covered for the term of this warranty, as stated in the following two sentences. If you are a consumer who purchased the product for use primarily for personal, family or household purposes, this warranty extends for as long as you own the product and the home in which the product is originally installed. If you purchased the product for use primarily for any other purpose, including, without limitation, a commercial purpose, this warranty extends only (i) for 1 year, with respect to Hansgrohe & Commercial products, and (ii) for 5 years, with respect to Axor products. THIS WARRANTY DOES NOT COVER, AND HANSGROHE WILL NOT PAY FOR: A. Conditions, malfunctions or damage not resulting from defects in material or workmanship. B. Conditions, malfunctions or damage resulting from (1) normal wear and tear, improper installation, improper maintenance, misuse, abuse, negligence, accident or alteration; (2) the use of abrasive or caustic cleaning agents or “no-rinse” cleaning products, or the use of the product in any manner contrary to the product instructions; or (3) conditions in the home such as excessive water pressure or corrosion. C. Labor and other expenses for disconnection, deinstallation, or return of the product for warranty service (including but not limited to proper packaging and shipping costs), or for installation or reinstallation of the product. D. Accessories, connected materials and products, or related products not manufactured by Hansgrohe.
- Page 33 NOR AUTHORIZES ANY PERSON TO CREATE FOR IT ANY OTHER OBLIGATION OR LIABILITY IN CONNECTION WITH THIS PRODUCT. HANSGROHE SHALL NOT BE LIABLE TO PURCHASER OR ANY OTHER PERSON FOR ANY INCIDENTAL,SPECIAL OR CONSEQUENTIAL DAMAGES,ARISING OUT OF BREACH OF THIS WARRANTY OR ANY IMPLIED WARRANTY (INCLUDING BUT NOT LIMITED TO ANY IMPLIED WARRANTY OF MERCHANTABILITY).
- Page 36 Hansgrohe, Inc. • 1490 Bluegrass Lakes Parkway • Alpharetta, GA 30004 Tel. 800-334-0455 • Fax 770-889-1783 www.hansgrohe-usa.com...