
Manuels Connexes pour AEG IKB64443IB


Sommaire des Matières pour AEG IKB64443IB
- Page 1 IKB64443IB User Manual Notice d'utilisation Table de cuisson Benutzerinformation Kochfeld Istruzioni per l’uso Piano cottura Manual de instrucciones Placa de cocción USER MANUAL...
-
Page 2: Table Des Matières
FOR PERFECT RESULTS Thank you for choosing this AEG product. We have created it to give you impeccable performance for many years, with innovative technologies that help make life simpler – features you might not find on ordinary appliances. Please spend a few minutes reading to get the very best from it. -
Page 3: Children And Vulnerable People Safety
1.1 Children and vulnerable people safety This appliance can be used by children aged from 8 years • and above and persons with reduced physical, sensory or mental capabilities or lack of experience and knowledge if they have been given supervision or instruction concerning the use of the appliance in a safe way and understand the hazards involved. -
Page 4: Safety Instructions
CAUTION: The cooking process has to be supervised. A • short term cooking process has to be supervised continuously. WARNING: Danger of fire: Do not store items on the • cooking surfaces. Metallic objects such as knives, forks, spoons and lids •... -
Page 5: Electrical Connection
• Protect the bottom of the appliance from Centre or an electrician to change a steam and moisture. damaged mains cable. • Do not install the appliance next to a door • The shock protection of live and insulated or under a window. This prevents hot parts must be fastened in such a way that cookware from falling from the appliance it cannot be removed without tools. -
Page 6: Installation
2.4 Care and cleaning induction cooking zones when the appliance is in operation. • Clean the appliance regularly to prevent • When you place food into hot oil, it may the deterioration of the surface material. splash. • Switch off the appliance and let it cool WARNING! down before cleaning. - Page 7 3.2 Built-in hobs CAUTION! Do not drill or solder the wire Only use the built-in hobs after you assemble ends. It is forbidden. the hob into correct built-in units and work surfaces that align to the standards. CAUTION! 3.3 Connection cable Do not connect the cable without cable end sleeve.
- Page 8 ON-TOP INSTALLATION www.youtube.com/electrolux www.youtube.com/aeg How to install your AEG Induction Hob - Worktop installation www.youtube.com/electrolux www.youtube.com/aeg How to install your AEG induction hob flush installation ENGLISH...
-
Page 9: Product Description
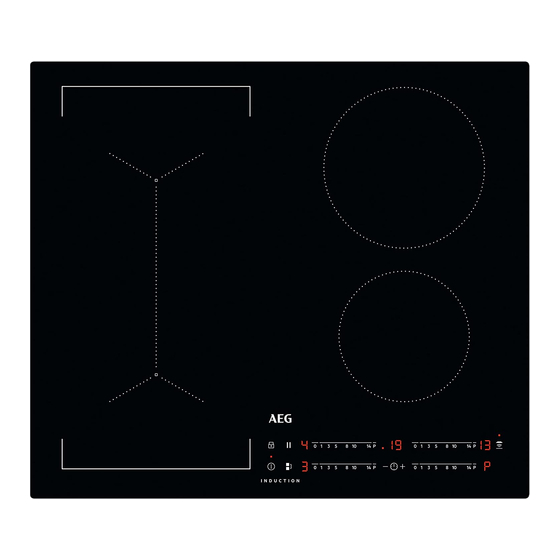
4. PRODUCT DESCRIPTION 4.1 Cooking surface layout Induction cooking zone Control panel 180 mm 145 mm 4.2 Control panel layout Use the sensor fields to operate the appliance. The displays, indicators and sounds tell which functions operate. Sensor Function Comment field ON / OFF To activate and deactivate the hob. -
Page 10: Daily Use
Sensor Function Comment field To select the cooking zone. To increase or decrease the time. PowerBoost To activate the function. Control bar To set a heat setting. 4.3 Heat setting displays Display Description The cooking zone is deactivated. The cooking zone operates. Pause operates. -
Page 11: Automatic Switch-Off
5.2 Automatic Switch Off You can cook with large cookware placed on two cooking zones at the same time. The The function deactivates the hob cookware must cover the centres of both automatically if: zones but not go beyond the area marking. If the cookware is located between the two •... -
Page 12: Powerboost
To activate the function for a cooking When the countdown ends, an zone: touch comes on). Immediately acoustic signal sounds and 00 touch a desired heat setting. After 3 seconds flashes. The cooking zone deactivates. comes on. To deactivate the function: change the To stop the sound: touch heat setting. -
Page 13: Child Safety Device
Touch to activate the function. of the timer to choose one of the following: comes on. The heat setting is lowered to • - the sounds are off To deactivate the function, touch . The • - the sounds are on previous heat setting comes on. - Page 14 The hob controls heat settings to protect the fuses of the house installation. • Cooking zones are grouped according to the location and number of the phases in the hob. Each phase has a maximum electricity loading (3700 W). If the hob reaches the limit of maximum available power within one phase, the power of the cooking zones will be automatically...
-
Page 15: Hints And Tips
Operating the fan speed manually You can also operate the function manually. Automat‐ Boiling 1) Frying 2) ic light To do that touch when the hob is active. This deactivates automatic operation of the Mode H5 Fan speed Fan speed function and allows you to change the fan speed manually. -
Page 16: Examples Of Cooking Applications
• correct: cast iron, steel, enamelled steel, • crack noise: cookware is made of different stainless steel, multi-layer bottom (with a materials (a sandwich construction). correct marking from a manufacturer). • whistle sound: you use a cooking zone • not correct: aluminium, copper, brass, with a high power level and the cookware glass, ceramic, porcelain. -
Page 17: Care And Cleaning
• Do not interrupt the signal between the work with this function refer to our consumer hob and the hood (e.g. with the hand, a website. The AEG cooker hoods that work cookware handle or a tall pot). See the with this function must have the symbol picture. -
Page 18: Cleaning The Hob
7.2 Cleaning the hob stains, shiny metallic discoloration. Clean the hob with a moist cloth and a non- • Remove immediately: melted plastic, abrasive detergent. After cleaning, wipe plastic foil, sugar and food with sugar, the hob dry with a soft cloth. otherwise, the dirt can cause damage to •... -
Page 19: Technical Data
9. TECHNICAL DATA 9.1 Rating plate Model IKB64443IB PNC 949 597 830 00 Typ 61 B4A 01 AD 220 - 240 V / 400 V 2N 50 - 60 Hz Induction 7.2 kW... -
Page 20: Energy Efficiency
It changes with the material and dimensions of the cookware. 10. ENERGY EFFICIENCY 10.1 Product information* Model identification IKB64443IB Type of hob Built-In Hob Number of cooking zones Heating technology Induction Diameter of circular cooking zones (Ø) -
Page 21: Environmental Concerns
11. ENVIRONMENTAL CONCERNS appliances marked with the symbol with Recycle materials with the symbol . Put the household waste. Return the product to the packaging in relevant containers to your local recycling facility or contact your recycle it. Help protect the environment and municipal office. -
Page 22: Pour Des Résultats Parfaits
POUR DES RÉSULTATS PARFAITS Merci d’avoir choisi ce produit AEG. Nous l’avons conçu pour qu’il vous offre des performances irréprochables pendant de nombreuses années, en intégrant des technologies innovantes vous simplifiant la vie – fonctions que vous ne trouverez peut- être pas sur des appareils ordinaires. -
Page 23: Sécurité Des Enfants Et Des Personnes Vulnérables
instructions dans un lieu sûr et accessible pour vous y référer ultérieurement. 1.1 Sécurité des enfants et des personnes vulnérables Cet appareil peut être utilisé par des enfants âgés d'au • moins 8 ans et par des personnes ayant des capacités physiques, sensorielles ou mentales réduites ou dénuées d’expérience ou de connaissance, s'ils sont correctement surveillés ou si des instructions relatives à... - Page 24 N'essayez JAMAIS d'éteindre un feu avec de l'eau. • Éteignez l'appareil puis couvrez les flammes, par exemple avec un couvercle ou une couverture ignifuge. ATTENTION : L'appareil ne doit pas être branché à • l'alimentation en utilisant un appareil de connexion externe comme un minuteur, ou branché...
-
Page 25: Consignes De Sécurité
2. CONSIGNES DE SÉCURITÉ 2.1 Installation 2.2 Branchement électrique AVERTISSEMENT! AVERTISSEMENT! L'appareil doit être installé Risque d'incendie ou uniquement par un professionnel d'électrocution. qualifié. • Tous les raccordements électriques doivent être effectués par un électricien AVERTISSEMENT! qualifié. Risque de blessure corporelle ou •... -
Page 26: Utilisation
• Ne tirez pas sur le câble secteur pour AVERTISSEMENT! débrancher l'appareil. Tirez toujours sur la Risque d'incendie et d'explosion. fiche de la prise secteur. • N'utilisez que des systèmes d'isolation • Les graisses et l'huile chaudes peuvent appropriés : des coupe-circuits, des dégager des vapeurs inflammables. -
Page 27: Mise Au Rebut
• Mettez à l'arrêt l'appareil et laissez-le température, les vibrations, l’humidité, ou refroidir avant de le nettoyer. sont conçues pour signaler des • Ne pulvérisez pas d'eau ni de vapeur pour informations sur le statut opérationnel de nettoyer l'appareil. l’appareil. Elles ne sont pas destinées à •... -
Page 28: Assemblage
3. Appliquez un nouveau manchon Coupe transversale du câble d’extrémité de 1,5 mm² sur une extrémité du câble commun (outil spécial requis). 230V~ 400V 2~N Raccordement monophasé - 230 V~ Raccordement biphasé (400 V 2 ~ N ) Vert - jaune Vert - jaune Bleu et bleu Bleu et bleu... -
Page 29: Installation Superposée
How to install your AEG Induction Hob - Worktop installation www.youtube.com/electrolux www.youtube.com/aeg How to install your AEG induction hob flush installation 4. DESCRIPTION DE L'APPAREIL 4.1 Agencement des zones de cuisson Zone de cuisson à induction Bandeau de commande... -
Page 30: Description Du Bandeau De Commande
4.2 Description du bandeau de commande Les touches sensitives permettent de faire fonctionner l'appareil. Les affichages, les voyants et les signaux sonores indiquent les fonctions activées. Touche Fonction Commentaire sensiti‐ MARCHE/ARRÊT Pour allumer et éteindre la table de cuisson. Touches Verrouil. / Dispositif de Pour verrouiller ou déverrouiller le bandeau de com‐... -
Page 31: Optiheat Control (Indicateur De Chaleur Résiduelle En 3 Étapes)
Afficheur Description Montée en température automatique est activé. PowerBoost est activé. Une anomalie de fonctionnement s'est produite. + chiffre OptiHeat Control (indicateur de chaleur résiduelle en 3 étapes): continuer la cuis‐ son / maintien au chaud / chaleur résiduelle. Touches Verrouil. / Dispositif de sécurité enfant est activée. Le récipient est inapproprié... -
Page 32: Niveau De Cuisson
Niveau de cuisson La table de cuisson s'éteint au bout de 6 heures , 1 - 3 4 - 7 5 heures 8 - 9 4 heures 10 - 14 1,5 heure 5.5 Bridge 5.3 Niveau de cuisson Pour régler ou modifier le niveau de cuisson : La fonction s'active lorsque le récipient recouvre le centre des Appuyez sur le niveau de cuisson souhaité... -
Page 33: Powerboost
5.7 PowerBoost Lorsque le compte à rebours est terminé, un signal sonore retentit Cette fonction vous permet d'augmenter la et 00 clignote. La zone de puissance des zones de cuisson à induction. cuisson se désactive. La fonction peut être activée pour la zone de cuisson à... -
Page 34: Dispositif De Sécurité Enfant
5.9 Pause s'allume. Éteignez la table de cuisson en appuyant sur Cette fonction sélectionne le niveau de cuisson le plus bas pour toutes les zones de Pour désactiver la fonction le temps d'une cuisson activées. cuisson : activez la table de cuisson avec Lorsque la fonction est en cours, tous les s'allume. - Page 35 sélectionnée. Les zones de cuisson 5. Appuyez sur du minuteur pour continueront de fonctionner avec le régler le niveau de puissance. niveau de cuisson réduit. Modifiez Niveaux de puissance manuellement les niveaux de cuisson des Reportez-vous au chapitre « Caractéristiques zones de cuisson si nécessaire.
- Page 36 du mode et de la température du récipient le plus chaud se trouvant sur la table de Éclairage Faire Faire fri‐ cuisson. Vous pouvez également activer le automati‐ bouillir 1) re 2) ventilateur manuellement depuis la table de cuisson. Mode H6 Marche Vitesse du Vitesse du...
-
Page 37: Conseils
vitesse du ventilateur est augmentée d'un Activation de l'éclairage palier. Lorsque vous atteignez un niveau Vous pouvez régler la table de cuisson pour l'éclairage s'allume automatiquement dès intensif et que vous appuyez sur la touche que la table de cuisson est allumée. Pour ce à... -
Page 38: Öko Timer (Minuteur Éco)
• sifflement, bourdonnement : le ventilateur cuisson n'est pas linéaire. Lorsque vous fonctionne. augmentez le niveau de cuisson, cela n'est Ces bruits sont normaux et n'indiquent pas proportionnel avec l'augmentation de la pas une anomalie de l'appareil. consommation d'énergie. Cela veut dire qu'une zone de cuisson avec le niveau de 6.3 Öko Timer (Minuteur Éco) cuisson moyen utilise moins de la moitié... -
Page 39: Entretien Et Nettoyage
Pour trouver la gamme complète des hottes dotées de cette fonction, consultez notre site web destiné aux consommateurs. Les hottes AEG dotées de cette fonction doivent porter le symbole 7. ENTRETIEN ET NETTOYAGE les aliments contenant du sucre car la AVERTISSEMENT! saleté... -
Page 40: Dépannage
8. DÉPANNAGE AVERTISSEMENT! Reportez-vous aux chapitres concernant la sécurité. 8.1 Que faire si... Problème Cause possible Solution Vous ne pouvez pas activer la ta‐ La table de cuisson n’est pas bran‐ Vérifiez que la table de cuisson est ble de cuisson ni la faire fonction‐ chée à... -
Page 41: Caractéristiques Techniques
à 3 lettres et chiffres pour la de garantie. vitrocéramique (située dans un des coins de la surface en verre) et le message d'erreur 9. CARACTÉRISTIQUES TECHNIQUES 9.1 Plaque signalétique Modèle IKB64443IB PNC 949 597 830 00 FRANÇAIS... -
Page 42: Caractéristiques Des Zones De Cuisson
Elle change en fonction du matériau et des les diamètres indiqués dans le tableau. dimensions du récipient. 10. RENDEMENT ÉNERGÉTIQUE 10.1 Informations produits* Identification du modèle IKB64443IB Type de table de cuisson Table de cuisson encastra‐ Nombre de zones de cuisson Technologie de chauffage Induction Diamètre des zones de cuisson circulaires (Ø) -
Page 43: Économie D'énergie
10.2 Économie d'énergie • Activez toujours la zone de cuisson après avoir posé le récipient dessus. Vous pouvez économiser de l'énergie au • Placez les plus petits récipients sur les quotidien en suivant les conseils suivants. plus petites zones de cuisson. •... -
Page 44: Kundendienst Und Service
FÜR PERFEKTE ERGEBNISSE Danke, dass Sie sich für dieses AEG Produkt entschieden haben. Wir haben es geschaffen, damit Sie viele Jahre von seiner ausgezeichneten Leistung und den innovativen Technologien, die Ihnen das Leben erleichtern, profitieren können. Es ist mit Funktionen ausgestattet, die in gewöhnlichen Geräten nicht vorhanden sind. Bitte nehmen Sie sich ein paar Minuten Zeit, um das Beste aus ihm herauszuholen. -
Page 45: Sicherheit Von Kindern Und Schutzbedürftigen
Bewahren Sie die Anleitung zum Nachschlagen an einem sicheren und zugänglichen Ort auf. 1.1 Sicherheit von Kindern und schutzbedürftigen Personen Das Gerät kann von Kindern ab 8 Jahren und Personen mit • eingeschränkten physischen, sensorischen oder geistigen Fähigkeiten oder mit mangelnder Erfahrung und/oder mangelndem Wissen nur dann verwendet werden, wenn sie durch eine für ihre Sicherheit zuständige Person beaufsichtigt werden oder in die sichere Verwendung des... - Page 46 Versuchen Sie NIEMALS, ein Feuer mit Wasser zu löschen, • sondern schalten Sie das Gerät aus und decken Sie die Flamme ab, z.B. mit einem Deckel oder einer Feuerlöschdecke. VORSICHT: Das Gerät darf nicht durch ein externes • Schaltgerät, wie einer Zeitschaltuhr, mit Strom versorgt oder an einen Schaltkreis angeschlossen werden, der vom einem Programm regelmäßig ein- und ausgeschaltet wird.
-
Page 47: Sicherheitsanweisungen
Schutzabdeckung. Es besteht Unfallgefahr durch die Verwendung ungeeigneter Schutzabdeckungen. 2. SICHERHEITSANWEISUNGEN 2.1 Montage • Entfernen Sie Trennplatten, die im Küchenmöbel unter dem Gerät installiert sind. WARNUNG! Die Montage des Geräts darf nur 2.2 Elektrischer Anschluss von einer qualifizierten Fachkraft durchgeführt werden. WARNUNG! Brand- und Stromschlaggefahr. - Page 48 müssen so befestigt werden, dass sie • Benutzen Sie das Gerät nicht als Arbeits- nicht ohne Werkzeug entfernt werden oder Abstellfläche. können. • Hat die Geräteoberfläche einen Sprung, • Stecken Sie den Netzstecker erst nach trennen Sie das Gerät umgehend von der Abschluss der Montage in die Steckdose.
-
Page 49: Entsorgung
• Dieses Gerät ist nur zum Kochen • Bezüglich der Lampe(n) in diesem Gerät bestimmt. Jeder andere Gebrauch ist als und separat verkaufter Ersatzlampen: bestimmungsfremd anzusehen, zum Diese Lampen müssen extremen Beispiel das Beheizen eines Raums. physikalischen Bedingungen in Haushaltsgeräten standhalten, wie z.B. 2.4 Reinigung und Pflege Temperatur, Vibration, Feuchtigkeit, oder sollen Informationen über den... - Page 50 2. Entfernen Sie die Isolierung der braunen Kabelquerschnitt und schwarzen Adern. 3. Bringen Sie am gemeinsamen Kabelende eine neue Aderendhülse mit 1,5 mm² an (Spezialwerkzeug erforderlich). 230V~ 400V 2~N Einphasiger Anschluss – 230 V~ Zweiphasiger Anschluss – 400 V 2 ~ N Grün –...
-
Page 51: Aufliegende Montage
Kochfeldbelüftung die in der www.youtube.com/electrolux Schublade aufbewahrten Gegenstände www.youtube.com/aeg während des Garvorgangs aufwärmen. How to install your AEG AUFLIEGENDE MONTAGE Induction Hob - Worktop installation www.youtube.com/electrolux www.youtube.com/aeg How to install your AEG induction hob flush installation INTEGRIERTE MONTAGE DEUTSCH... -
Page 52: Gerätebeschreibung
4. GERÄTEBESCHREIBUNG 4.1 Anordnung der Kochflächen Induktionskochzone Bedienfeld 180 mm 145 mm 4.2 Bedienfeldanordnung Bedienen Sie das Gerät über die Sensorfelder. Die Anzeigen, Kontrolllampen und akustischen Signale informieren Sie über die aktiven Funktionen. Sen‐ Funktion Kommentar sorfeld EIN/AUS Ein- und Ausschalten des Kochfeldes. Verriegelung / Kindersicherung Verriegeln/Entriegeln des Bedienfelds. - Page 53 Sen‐ Funktion Kommentar sorfeld Auswählen der Kochzone. Erhöhen oder Verringern der Zeit. PowerBoost Einschalten der Funktion. Einstellskala Einstellen der Kochstufe. 4.3 Anzeige der Kochstufen Display Beschreibung Die Kochzone ist ausgeschaltet. Die Kochzone ist eingeschaltet. Pause ist eingeschaltet. Automatisches Aufheizen ist eingeschaltet. PowerBoost ist eingeschaltet.
-
Page 54: Täglicher Gebrauch
5. TÄGLICHER GEBRAUCH 5.3 Kochstufe WARNUNG! Siehe Kapitel Einstellen oder Ändern der Kochstufe: Sicherheitshinweise. Berühren Sie die Einstellskala auf der gewünschten Kochstufe oder fahren Sie mit 5.1 Ein- und Ausschalten dem Finger entlang der Skala bis zur gewünschten Kochstufe. Berühren Sie 1 Sekunde lang, um das Kochfeld ein- oder auszuschalten. -
Page 55: Automatisches Aufheizen
5.5 Bridge Einschalten der Funktion für eine Kochzone: Berühren Sie leuchtet Die Funktion wird eingeschaltet, auf. wenn der Topf die Mitten beider Ausschalten der Funktion: Ändern Sie die Kochzonen bedeckt. Kochstufe. Diese Funktion verbindet zwei linke 5.8 Timer Kochzonen, sie funktionieren dann wie eine Kochzone. - Page 56 Auswählen der Kochzone: Berühren Sie leuchtet.Die Kochstufe verringert sich auf wiederholt, bis die Anzeige der gewünschten Kochzone erscheint. Berühren Sie zum Ausschalten der Funktion . Es erscheint die vorherige Einschalten der Funktion: Berühren Sie Kochstufe . des Timers. erscheint. Wenn die Kontrolllampe der Kochzone anfängt zu 5.10 Verriegelung blinken, wird die Zeit hochgezählt.
-
Page 57: Offsound Control (Ein- Und Ausschalten Der Signaltöne)
5.12 OffSound Control (Ein- und • P25 — 2500 W • P30 — 3000 W Ausschalten der Signaltöne) • P35 — 3500 W Schalten Sie das Kochfeld aus. Berühren Sie • P40 — 4000 W • P45 — 4500 W 3 Sekunden lang. - Page 58 Automatikbetrieb der Funktion Stellen Sie für den automatischen Betrieb den Modus auf H1 – H6. Das Kochfeld ist standardmäßig auf H5 gestellt.Die Dunstabzugshaube schaltet sich ein, wenn Sie das Kochfeld bedienen. Das Kochfeld misst die Temperatur des Kochgeschirrs automatisch und passt die Geschwindigkeit des Lüfters an.
-
Page 59: Tipps Und Hinweise
erhöht sich die Lüftergeschwindigkeit um 5. Berühren Sie des Timers, um einen eine Stufe. Wenn Sie die Intensivstufe Automatikmodus zu wählen. gewählt haben und erneut drücken wird Schalten Sie den die Geschwindigkeit auf 0 gesetzt und die Automatikbetrieb aus, um die Dunstabzugshaube ausgeschaltet. - Page 60 • Verwenden Sie aus Sicherheitsgründen • Klicken: Elektrisches Umschalten . und für optimale Kochergebnisse nicht • Zischen, Surren: Der Ventilator läuft. mehr Kochgeschirr als in der Die Geräusche sind normal und weisen „Spezifikation der nicht auf eine Störung hin. Kochzonen“ angegeben. Vermeiden Sie 6.3 Öko Timer (Öko-Timer) es, Kochgeschirr während des Kochvorgangs in der Nähe des...
-
Page 61: Reinigung Und Pflege
Dunstabzugshauben, die mit dieser Funktion nicht ab. ausgestattet sind, finden Sie auf unserer • Unterbrechen Sie den Signalfluss Verbraucher-Website. Die AEG zwischen dem Kochfeld und der Dunstabzugshauben, die mit dieser Funktion Dunstabzugshaube nicht (z.B. mit der ausgestattet sind, sind mit dem Symbol Hand, einem Kochgeschirrgriff oder gekennzeichnet. -
Page 62: Fehlersuche
• Verwenden Sie stets Kochgeschirr mit Den speziellen Reinigungsschaber schräg sauberen Böden. zur Glasfläche ansetzen und über die • Kratzer oder dunkle Flecken auf der Oberfläche bewegen. Oberfläche beeinträchtigen die • Folgendes kann nach ausreichender Funktionsfähigkeit des Kochfelds nicht. Abkühlung des Kochfelds entfernt •... - Page 63 Störung Mögliche Ursache Problembehebung Das Kochfeld wird ausgeschaltet. Sie haben etwas auf das Sensorfeld Entfernen Sie den Gegenstand von dem Sensorfeld. gestellt. Die Restwärmeanzeige funktio‐ Die Kochzone ist nicht heiß, da sie Wenn die Kochzone lange genug be‐ niert nicht. nur kurze Zeit in Betrieb war oder trieben wurde, um heiß...
-
Page 64: Technische Daten
Garantieheft. Glaskeramik (befindet sich in der Ecke der Glasfläche) und die angezeigte 9. TECHNISCHE DATEN 9.1 Typenschild Modell IKB64443IB Produkt-Nummer (PNC) 949 597 830 00 Typ 61 B4A 01 AD 220–240 V/400 V 2N ~ 50–60 Hz Induktion 7.2 kW Hergestellt in Deutschland Ser.-Nr. -
Page 65: Energie Sparen
Durchmesser der kreisförmigen Kochfelder (Ø) Vorne links 21,0 cm Hinten links 21,0 cm Vorne rechts 14,5 cm Hinten rechts 18,0 cm Energieverbrauch pro Kochfeld (EC electric cooking) Vorne links 178,4 Wh/kg Hinten links 178,4 Wh/kg Vorne rechts 183,2 Wh/kg Hinten rechts 184,9 Wh/kg Energieverbrauch des Kochfelds (EC electric hob) 181,2 Wh/kg... -
Page 66: Informazioni Di Sicurezza
PER RISULTATI PERFETTI Grazie per aver scelto di acquistare questo prodotto AEG. Lo abbiamo creato per fornirvi prestazioni impeccabili per molti anni, grazie a tecnologie innovative che vi semplificheranno la vita - funzioni che non troverete sulle normali apparecchiature. Vi invitiamo di dedicare qualche minuto alla lettura per sapere come trarre il massimo dal vostro elettrodomestico. -
Page 67: Avvertenze Di Sicurezza Generali
uso scorretti. Conservare sempre le istruzioni in un luogo sicuro e accessibile per poterle consultare in futuro. 1.1 Sicurezza dei bambini e delle persone vulnerabili Questa apparecchiatura può essere usata da bambini a • partire dagli 8 anni e da adulti con limitate capacità fisiche, sensoriali o mentali o con scarsa esperienza o conoscenza sull'uso dell'apparecchiatura, solamente se sorvegliati o se istruiti relativamente all'uso dell'apparecchiatura e se hanno... - Page 68 Non tentare MAI di spegnere un incendio con dell'acqua; • spegnere l'apparecchiatura e coprire le fiamme ad es. con un coperchio o una coperta di protezione dal fuoco. ATTENZIONE: L'apparecchiatura non deve essere • alimentata tramite dispositivi esterni, ad esempio timer, o collegata a un circuito regolarmente acceso e spento da un'azienda.
-
Page 69: Istruzioni Di Sicurezza
incorporate nell'apparecchiatura. L'uso inadeguato delle protezioni può causare incidenti. 2. ISTRUZIONI DI SICUREZZA 2.1 Installazione • Togliere gli eventuali pannelli separatori installati nel mobiletto sotto all'apparecchiatura. AVVERTENZA! L’installazione 2.2 Collegamento elettrico dell'apparecchiatura deve essere eseguita da personale AVVERTENZA! qualificato. Rischio di incendio e scossa elettrica. - Page 70 Verificare che la spina di alimentazione dall'alimentazione. per evitare scosse rimanga accessibile dopo l'installazione. elettriche. • Nel caso in cui la spina di corrente sia • I portatori di pacemaker, devono allentata, non collegarla alla presa. mantenere una distanza di almeno 30 cm •...
-
Page 71: Pulizia E Cura
2.4 Pulizia e cura separatamente: Queste lampade sono destinate a resistere a condizioni fisiche • Pulire regolarmente l'apparecchiatura per estreme negli elettrodomestici, come evitare il deterioramento dei materiali che temperatura, vibrazioni, umidità, o sono compongono la superficie. destinate a segnalare informazioni sullo •... - Page 72 Sezione cavo 230V~ 400V 2~N Collegamento a una fase - 230 V~ Collegamento a due fasi - 400 V 2 ~ N Verde-giallo Verde-giallo Blu e blu Blu e blu Nero e marrone Nero Marrone 3.4 Fissaggio della guarnizione - 4.
-
Page 73: Descrizione Del Prodotto
How to install your AEG Induction Hob - Worktop installation www.youtube.com/electrolux www.youtube.com/aeg How to install your AEG induction hob flush installation 4. DESCRIZIONE DEL PRODOTTO 4.1 Disposizione del piano di cottura Zona di cottura a induzione Pannello dei comandi... - Page 74 4.2 Disposizione del pannello dei comandi Utilizzare i tasti sensore per mettere in funzione l'apparecchiatura. I display, gli indicatori ed i segnali acustici mostrano quali funzioni sono attive. Tasto Funzione Commento senso‐ ON / OFF Per attivare e disattivare il piano di cottura. Blocco / Dispositivo di sicurezza Per bloccare/sbloccare il pannello dei comandi.
-
Page 75: Utilizzo Quotidiano
Display Descrizione Riscaldamento automatico è attiva. PowerBoost è attiva. È presente un malfunzionamento. + numero OptiHeat Control (indicatore di calore residuo su 3 livelli):: proseguire la cottura/tenere in caldo/calore residuo. Blocco / Dispositivo di sicurezza bambini è attiva. Pentola non adeguata o troppo piccola; oppure manca la pentola sulla zona di cottura. Spegnimento automatico è... -
Page 76: Livello Di Potenza
Livello di potenza Il piano di cottura si disattiva dopo 4 - 7 5 ore 8 - 9 4 ore 10 - 14 1,5 ora 5.3 Livello di potenza 5.5 Bridge Per impostare o modificare il livello di potenza: La funzione opera quando la Sfiorare la barra di controllo per impostare il pentola copre il centro delle due livello di potenza corretto o spostare il dito... -
Page 77: Powerboost
5.7 PowerBoost Al termine del conto alla rovescia, verrà emesso un Questa funzione aumenta la potenza fornita segnale acustico e 00 alle zone di cottura a induzione. Questa lampeggerà. La zona di cottura funzione si può attivare per la zona di cottura si disattiva. - Page 78 5.9 Sospendi Per disabilitare la funzione per una sola operazione di cottura: attivare il piano di Questa funzione imposta tutte le zone di cottura con si accenderà. Sfiorare il cottura che funzionano al livello di calore più basso. tasto per 4 secondi Impostare il livello di calore entro 10 secondi.
- Page 79 Fare riferimento al capitolo "Dati tecnici". Gestione energia con Limitazione potenza Quando s’imposta la Limitazione potenza ATTENZIONE! funzione a 6.000 W o meno, la potenza del Assicurarsi che la potenza piano cottura è distribuita tra tutte le zone di selezionata sia idonea ai fusibili cottura.
- Page 80 4. Sfiorare alcune volte finché si Per la maggior parte della cappe, il sistema remoto è accende disattivato all'origine. Attivarlo 5. Sfiorare del Timer per selezionare prima di utilizzare la funzione. una modalità automatica. Per maggiori informazioni fare riferimento al manuale per Per mettere in funzione la cappa l'utente della cappa.
-
Page 81: Consigli E Suggerimenti Utili
6. CONSIGLI E SUGGERIMENTI UTILI indicate nelle "Specifiche delle zone di AVVERTENZA! cottura". Evitare di tenere le pentole vicino Fare riferimento ai capitoli sulla al pannello dei comandi durante la sicurezza. sessione di cottura. Ciò potrebbe influire sul funzionamento del pannello dei 6.1 Pentole comandi o attivare accidentalmente le funzioni piastra. - Page 82 Livello di po‐ Usare per: Tempo Suggerimenti tenza (min.) Tenere in caldo le pietanze cotte. secondo Mettere un coperchio sulla pentola. necessità 1 - 3 Salsa olandese: fondere burro, ciocco‐ 5 - 25 Mescolare di tanto in tanto. lata, gelatina. 1 - 3 Solidificare: omelette morbide, uova 10 - 40...
-
Page 83: Manutenzione E Pulizia
Cappe da cucina con la funzione riferimento al sito web del nostro cliente. Le Hob²Hood cappe da cucina AEG compatibili con questa funzione devono riportare il simbolo Per scoprire l'intera gamma di cappe da cucina compatibili con questa funzione fare 7. - Page 84 Problema Causa possibile Soluzione Sono stati toccati 2 o più tasti senso‐ Toccare solo un tasto sensore. re contemporaneamente. Sospendi è in funzione. Consultare la sezione "Utilizzo quoti‐ diano". C'è acqua o macchie di grasso sul Pulire il pannello dei comandi. pannello dei comandi.
-
Page 85: Dati Tecnici
Assicurarsi 9. DATI TECNICI 9.1 Targhetta identificativa Modello IKB64443IB PNC 949 597 830 00 Tipo 61 B4A 01 AD 220 - 240 V / 400 V 2N 50 - 60 Hz Induzione 7.2 kW... -
Page 86: Efficienza Energetica
Cambia con il materiale e le quello riportato in tabella. dimensioni delle pentole. 10. EFFICIENZA ENERGETICA 10.1 Informazioni sul prodotto* Identificazione modello IKB64443IB Tipo di piano cottura Piano cottura a incasso Numero di zone di cottura Tecnologia di riscaldamento Induzione Diametro delle zone di cottura circolari (Ø) -
Page 87: Información Sobre Seguridad
PARA UNOS RESULTADOS PERFECTOS Gracias por elegir este producto AEG. Lo hemos creado para brindarle un rendimiento impecable durante muchos años, con tecnologías innovadoras que lo ayudan a simplificar la vida, características que quizás no encuentre en los electrodomésticos comunes. Dedique unos minutos a leer este documento para sacarle el máximo partido. -
Page 88: Seguridad De Niños Y Personas Vulnerables
estas instrucciones en lugar seguro y accesible para futuras consultas. 1.1 Seguridad de niños y personas vulnerables Este aparato puede ser utilizado por niños de 8 años en • adelante y personas cuyas capacidades físicas, sensoriales o mentales estén disminuidas o que carezcan de la experiencia y conocimientos suficientes para manejarlo, siempre que cuenten con las instrucciones o la supervisión sobre el uso del electrodoméstico de forma segura y... - Page 89 NUNCA intente apagar un fuego con agua; apague el • aparato y cubra la llama con una tapa o una manta ignífuga. ATENCIÓN: El aparato no se debe alimentar a través de un • dispositivo de conmutación externo, como un temporizador, ni conectarse a un circuito que se encienda y apague regularmente por un servicio público.
-
Page 90: Instrucciones De Seguridad
2. INSTRUCCIONES DE SEGURIDAD 2.1 Instalación • El aparato debe conectarse a tierra. • Antes de efectuar cualquier tipo de operación, compruebe que el aparato ADVERTENCIA! esté desenchufado de la corriente Solo un técnico cualificado eléctrica. puede instalar el aparato. •... -
Page 91: Uso Del Aparato
del soporte), dispositivos de fuga a tierra las llamas u objetos calientes alejados de y contactores. grasas y aceites cuando cocine con ellos. • La instalación eléctrica debe tener un • Los vapores que liberan los aceites muy dispositivo de aislamiento que permita calientes pueden provocar combustiones desconectar el aparato de todos los polos imprevistas. -
Page 92: Asistencia Tecnica
2.5 Asistencia tecnica aplicaciones y no son adecuadas para la iluminación de estancias domésticas. • Para reparar el aparato, póngase en contacto con el centro de servicio 2.6 Eliminación autorizado. Utilice solamente piezas de recambio originales. ADVERTENCIA! • En cuanto a la(s) bombilla(s) de este Existe riesgo de lesiones o producto y las de repuesto vendidas por asfixia. - Page 93 Sección transversal del cable 230V~ 400V 2~N Conexión monofásica - 230 V~ Conexión bifásica - 400 V 2 ~ N Verde - amarillo Verde - amarillo Azul y azul Azul y azul Negro y marrón Negro Marrón 3.4 Colocación del sello - 3.6 Montaje Instalación integrada Si instala la placa debajo de una campana,...
-
Page 94: Instalación Integrada
How to install your AEG Induction Hob - Worktop installation www.youtube.com/electrolux www.youtube.com/aeg How to install your AEG induction hob flush installation 4. DESCRIPCIÓN DEL PRODUCTO 4.1 Disposición de las zonas de cocción Zona de cocción por inducción Panel de mandos... - Page 95 4.2 Disposición del panel de control Utilice el aparato con los sensores. Las pantallas, indicadores y señales acústicas indican qué funciones están en funcionamiento. Sensor Función Comentario ENCENDIDO/APAGADO Para activar y desactivar la placa. Bloqueo / Dispositivo de seguri‐ Para bloquear y desbloquear el panel de control. dad para niños Pausa Para activar y desactivar la función .
-
Page 96: Uso Diario
Pantalla Descripción PowerBoost está en funcionamiento. Hay un fallo de funcionamiento. + número OptiHeat Control (indicador de calor residual de 3 pasos): seguir cocinando / mantener caliente / calor residual. Bloqueo / Dispositivo de seguridad para niños está en funcionamiento. El recipiente es inadecuado o demasiado pequeño, o no se ha colocado ningún reci‐... -
Page 97: Ajuste De Temperatura
5.3 Ajuste de temperatura La función conecta dos zonas de cocción izquierdas de forma que funcionen como si Para ajustar o cambiar la temperatura: fueran una. Toque la barra de control en el ajuste de Seleccione primero el ajuste de temperatura temperatura adecuado o desplace el dedo a de una de las zonas de la izquierda. - Page 98 Puede utilizar esta función para establecer la seleccionar la zona de cocción. El indicador duración de una sola sesión de cocción. de la zona de cocción comienza a parpadear. La pantalla muestra cuánto Ajuste primero temperatura para la zona de tiempo ha estado funcionado la zona.
-
Page 99: Dispositivo De Seguridad Para Niños
• el Avisador baja Para desactivar la función: toque . Se • el Temporizador de cuenta atrás baja enciende el ajuste de calor anterior. • se coloca algo en el panel de control. La función también se desactiva 5.13 Limitación de energía cuando se apaga la placa. - Page 100 en una fase, la potencia de las zonas de cocción se reduce automáticamente. • El ajuste de temperatura de la zona de cocción seleccionada siempre se prioriza. La potencia restante se divide entre las zonas de cocción previamente activadas en orden inverso de selección. •...
-
Page 101: Consejos
Cuando termine de cocinar y Luz auto‐ Hervir 1) Freír 2) apague la placa de cocción, la mática campana puede seguir funcionando un breve período Modo H3 Encendido Apagado Velocidad de tiempo. Tras ese tiempo, el del ventila‐ sistema desactiva el ventilador dor 1 automáticamente y evita la Modo H4... - Page 102 6.2 Ruidos durante la utilización • La base de los recipientes debe ser lo más gruesa y plana posible. Es posible que escuche los ruidos • Asegúrese de que las bases de los siguientes: utensilios están limpias y secas antes de colocarlas sobre la placa de cocción.
- Page 103 Ajuste del ni‐ Utilícelo para: Tiempo Sugerencias vel de calor (min) 1 - 3 Cuajar: tortilla, huevos revueltos. 10 - 40 Cocinar con tapa. 3 - 5 Arroces y platos cocinados con leche, 25 - 50 Añadir al menos el doble de líquido calentar comidas preparadas.
-
Page 104: Mantenimiento Y Limpieza
Las campanas extractoras AEG que usan esta función deben tener el símbolo 7. MANTENIMIENTO Y LIMPIEZA azúcar y alimentos que contengan ADVERTENCIA! azúcar, la suciedad puede dañar la placa. Consulte los capítulos sobre Tenga cuidado para evitar quemaduras. seguridad. - Page 105 Problema Posible causa Solución Hay agua o grasa en el panel de Limpie el panel de control. control. Se emite una señal acústica y la Ha colocado uno o varios sensores. Retire el objeto de los sensores. placa se apaga. Se emite una señal acústica cuando la placa se apaga.
-
Page 106: Datos Técnicos
Asegúrese de que 9. DATOS TÉCNICOS 9.1 Placa de datos técnicos Modelo IKB64443IB Número de producto (PNC) 949 597 830 00 Tipo 61 B4A 01 AD 220-240 V / 400 V 2N 50-60 Hz Inducción 7.2 Kw... -
Page 107: Ahorro De Energía
Diámetro de las zonas de cocción circulares (Ø) Anterior izquierda 21 cm Posterior izquierda 21 cm Anterior derecha 14,5 cm Posterior derecha 18 cm Consumo energético por zona de cocción (EC elec‐ Anterior izquierda 178,4 Wh / kg tric cooking) Posterior izquierda 178,4 Wh / kg Anterior derecha... - Page 108 www.aeg.com/shop...