ARDES AR5W40R Mode D'emploi
Table des Matières
Les langues disponibles
Les langues disponibles
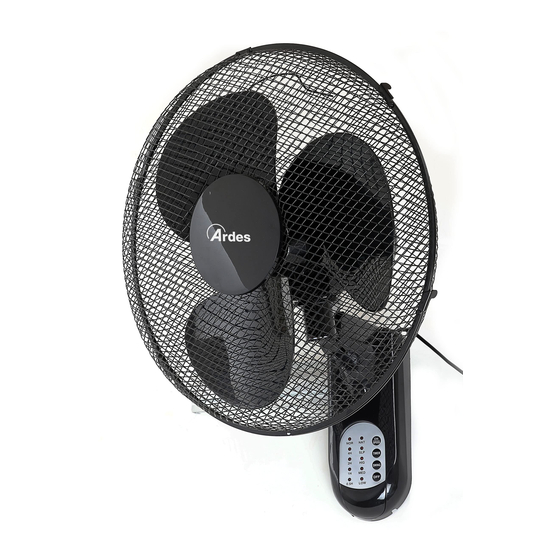
VENTILATORE DA PARETE CON TELECOMANDO
WALL FAN WITH REMOTE CONTROL
VENTILADOR DE PARED CON TELEMANDO
VENTILATEUR MURAL AVEC TÉLÉCOMMANDE
VENTILÁTOR NA STĚNU S DÁLKOVÝM OVLADAČEM
VENTILÁTOR NA STENU S DIAĽKOVÝM OVLÁDAČOM
IT
ISTRUZIONI PER L'USO
EN
INSTRUCTIONS FOR USE
ES
INSTRUCCIONES PARA EL USO
FR
MODE D'EMPLOI
DE
BEDIENUNGSANLEITUNG
CZ
NÁVOD K POUŽITÍ
SK
NÁVOD NA OBSLUHU
WANDVENTILATOR
AR5W40R
Table des Matières

Manuels Connexes pour ARDES AR5W40R

Sommaire des Matières pour ARDES AR5W40R
- Page 1 BEDIENUNGSANLEITUNG NÁVOD K POUŽITÍ NÁVOD NA OBSLUHU VENTILATORE DA PARETE CON TELECOMANDO WALL FAN WITH REMOTE CONTROL VENTILADOR DE PARED CON TELEMANDO VENTILATEUR MURAL AVEC TÉLÉCOMMANDE WANDVENTILATOR VENTILÁTOR NA STĚNU S DÁLKOVÝM OVLADAČEM VENTILÁTOR NA STENU S DIAĽKOVÝM OVLÁDAČOM AR5W40R...
- Page 35 Mises en garde L’appareil peut être utilisé par les enfants de plus de 8 ans et par des personnes aux capacités physiques, sensorielles ou mentales réduites ou sans l’expérience ni les connaissances nécessaires, à condition d’être surveillées ou après avoir reçu les instructions relatives à l’utilisation sûre de l’appareil et avoir compris les risques inhérents.
- Page 36 pas moins qu’il ne soit complètement assemblé (voir les instructions de montage). ATTENTION : lire attentivement cette notice car elle contient d’importantes instructions pour la sécurité en matière d’installation, usage et entretien. Instructions importantes à conserver pour des références futures. Les enfants NE doivent PAS jouer avec l’appareil.
- Page 37 Il NE faut PAS utiliser ni conserver le dispositif à proximité des sources de chaleur localisées (radiateurs, poêles, etc.). Il NE faut PAS plonger l’appareil dans l’eau ou d’autres liquides ; s’il devait tomber accidentellement dans l’eau, il NE faut PAS le récupérer avant d’avoir débranché...
- Page 38 assemblé d’après les instructions de ce manuel. Positionner l’appareil à une distance adéquate des objets ou des murs autours pour que le fonctionnement ne puisse pas provoquer de dommages accidentels. Il NE faut PAS utiliser le dispositif à proximité de fourneaux à gaz ou de flammes nues en général.
- Page 39 15.Ne pas capsuler ou modifier les piles. 16. Ranger les piles non utilisées dans leur emballage d’origine, à l’écart des objets métalliques. Si elles ont été déjà retirées de l’emballage, ne pas mélanger les piles. 17. Si l’on ne souhaite utiliser l’appareil pendant une longue période, retirer les piles.
- Page 40 Instructions d’utilisation Dévisser la bague de fixation de la grille postérieure (5) de l’arbre moteur (7) en la tournant dans le sens inverse des aiguilles d’une montre. Insérer la grille postérieure (6) sur l’arbre moteur (7) et la fixer avec la bague de fixation prévue à...
- Page 41 Panneau de commande Télécommande Boutons A.Off B.On/Speed C.Mode (uniquement sur la télécommande) D.Minuteur E.Swing Piles La télécommande est fournie sans piles ; avant l’utilisation, ouvrir le compartiment situé au dos de la télécommande et insérer les deux piles LR03 1,5V AAA en respectant la polarité indiquée. Pour enlever les piles, ouvrir le compartiment situé...
-
Page 42: Entretien
Touche MINUTEUR (D) : Appuyer sur cette touche quand le ventilateur est allumé pour programmer l’arrêt différé du ventilateur à un intervalle compris entre 0,5 heure et 7,5 heures à partir du moment de la programmation. À chaque pression le temps augmente de 0,5 heure et les voyants relatifs au minuteur (indiqués par 0,5H - 0,5 heure ;... -
Page 43: Élimination
Élimination PILES - Retirer les piles de l’appareil avant de l’éliminer. Ne pas jeter les piles avec les ordures ménagères. Les piles doivent être éliminées dans des conteneurs spéciaux ou dans des points de collecte spécifiques. Une collecte séparée adéquate permet d’éviter d’éventuels effets négatifs sur l’environnement et la santé. -
Page 44: Garantie
GARANTIE Conditions La garantie a une durée de 24 mois à compter de la date d’achat. Cette garantie est valable seulement si correctement compilée et accompagnée du ticket de caisse qui confirme la date d’achat. L’appareil doit être remis exclusivement à notre SAV agréé. La garantie couvre la substitution ou la réparation des composants de l’appareil défectueux à... - Page 56 UPOZORNĚNÍ TENTO SPOTŘEBIČ MOHOU POUŽÍVAT DĚTI STARŠÍ 8 LET A OSOBY SE SNÍŽENÝMI FYZICKÝMI, SMYSLOVÝMI NEBO DUŠEVNÍMI SCHOPNOSTMI NEBO NEDOSTATEČNÝMI ZKUŠENOSTMI A VĚDOMOSTMI JEN TEHDY, POKUD SE NACHÁZEJÍ POD DOZOREM ODPOVĚDNÉ OSOBY NEBO POKUD BYLY SEZNÁMENY SPRÁVNÝM BEZPEČNÝM POUŽÍVÁNÍM SPOTŘEBIČE A ROZUMÍ PŘÍPADNÝM RIZIKŮM S TÍM SPOJENÝM.
- Page 68 UPOZORNENIA TENTO SPOTREBIČ MÔŽU POUŽÍVAŤ DETI STARŠIE AKO 8 ROKOV A OSOBY SO ZNÍŽENÝMI FYZICKÝMI, ZMYSLOVÝMI ALEBO DUŠEVNÝMI SCHOPNOSŤAMI ALEBO NEDOSTATOČNÝMI SKÚSENOSŤAMI VEDOMOSŤAMI LEN VTEDY, AK SA NACHÁDZAJÚ POD DOZOROM ZODPOVEDNEJ OSOBY ALEBO BOLI OBOZNÁMENÉ SPRÁVNYM BEZPEČNÝM POUŽÍVANÍM SPOTREBIČA A CHÁPU PRÍPADNÝM RIZIKÁM S TÝM SPOJENÉ.