Table des Matières
Publicité
Les langues disponibles
Les langues disponibles
Liens rapides
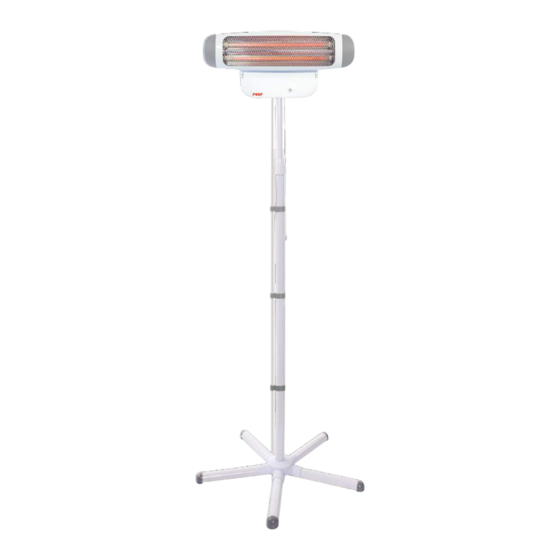
2in1 FeelWell Wickeltisch-Wärmestrahler
Gebrauchsanleitung // Art.Nr.: 1928
GB
2in1 FeelWell - changing table heater
Instructions for use
ES
radiador térmico de cambiador - 2en1 FeelWell
Manual de uso
IT
radiatore per fasciatoio - 2in1 FeelWell
Istruzioni per l' u so
FR
2en1 FeelWell - pour table à langer
Notice d'utilisation
2in1 FeelWell - Warmtelamp voor luiertafel
NL
Gebruiksaanwijzing
DK
2in1 FeelWell - puslebord-varmestråler
Brugsvejledning
GR
2σε1 FeelWell - Θερμοπομπός αλλαξιέρας
ΟΔΗΓΙΕΣ
PL
2w1 FeelWell - Promiennik ciepła do przewijaka dla niemowląt
Instrukcja obsługi
CZ
2v1 FeelWell - tepelný zářič na přebalovací stůl
Návod k použití
- 1 -
Publicité
Table des Matières

Manuels Connexes pour Reer 1928


Sommaire des Matières pour Reer 1928
- Page 1 2in1 FeelWell Wickeltisch-Wärmestrahler Gebrauchsanleitung // Art.Nr.: 1928 2in1 FeelWell - changing table heater Instructions for use radiador térmico de cambiador - 2en1 FeelWell Manual de uso radiatore per fasciatoio - 2in1 FeelWell Istruzioni per l‘ u so 2en1 FeelWell - pour table à langer Notice d‘utilisation...
- Page 2 Montage mit Standfuß Assembly with pedestal Montaje con pie Montaggio con piedistallo GR Συναρμολόγηση με βάση Radiateur sur pied Montage op de staander Montering på fod PL Montaż na podstawie CZ Montáž se stojánkem TIM ER ON /O 35 cm 20 cm 100 cm Montage an der Wand...
-
Page 4: Table Des Matières
Allgemeine Sicherheitshinweise ... . . 05 Inhaltsverzeichnis Sicherheitshinweise bei Wandmontage ....07 Technische Daten ......06 Inbetriebnahme . -
Page 5: Allgemeine Sicherheitshinweise
Wir freuen uns, dass Sie sich für dieses Produkt entschieden haben und bedanken uns für Ihr Vertrauen. Damit Sie viel Freude an Ihrem neuen Wickeltisch-Wärmestrahler haben, bitten wir Sie, die nachfolgenden Hinweise sorgfältig zu beachten und diese Gebrauchsanleitung gut aufzubewahren und an den jeweiligen Benutzer weiterzugeben. Der Wickeltisch-Wärmestrahler erzeugt behagliche Sofortwärme im Bereich von Wickeltischen. -
Page 6: Technische Daten
Technische Daten • Nennspannung: 230 V • integrierte Kipp-Abschalt-Funktion: Gerät schaltet beim Kippen • Leistung: 400 / 800 W automatisch ab (Kippwinkel von ca. 25°) • Montageart: Netzleitung • Kabellänge: 185 cm (mit Schutzkontaktstecker) • Schutzklasse: 1 • Wärmestrahlung und Temperaturverteilung nach Medizinprodukt- standards (IEC601-2-21) geprüft Lieferumfang Teilebezeichnung... -
Page 7: Montage
Montage Bitte klappen Sie für die graphische Darstellung der Montage die Innenseite des Deckblattes Ihrer Gebrauchsanleitung heraus. Montage des Wickeltisch-Wärmestrahlers mit Standfuß 1. Stecken Sie die 5 Füße (B) in das Fußstecksystem (A) wie in Abb. A1 dargestellt. 2. Legen Sie die Fußabdeckung (C) darüber (Abb. A2). 3. - Page 8 Inbetriebnahme 1. Stecken Sie den Netzstecker in die Steckdose (Abb. 1). 2. Ziehen Sie an der Zugschnur (Abb. 2) um den Wärmestrahler einzuschalten. Der Wärmestrahler ist in zwei Heizstufen einstellbar, 400 W (Stufe „1“) und 800 W (Stufe „2“). TIMER ON Durch erneutes Ziehen an der Zugschnur kann die Heizstufe verändert oder das Gerät wieder ausgeschaltet werden (Stufe „0“).
- Page 9 Wissen zusammengestellt und entsprechen dem Stand bei Veröffentlichung. Die von reer bereitgestellten Informationen sollten korrekt und zuverlässig sein. Die Firma reer übernimmt dennoch keinerlei Haftung für mögliche Fehler in diesem Dokument und behält sich das Recht vor, ohne vorherige Ankündigung, Änderungen am Produktdesign beziehungsweise an den Spezifikationen vorzunehmen.
-
Page 10: General Safety Instructions
We are pleased that you have chosen this product and would like to thank you the trust you are showing in us. To enjoy the changing table heater to the full, we would ask you to read the following instructions carefully, store this instruction manual in a safe place and pass it on to the relevant user. -
Page 11: Technical Specification
Technical specification • rated voltage: 230 V AC • integrated switch-off function if tilted (tilt angle: 25°) • output: 400 / 800 W • lead length: 185 cm (incl. safety plug) • mounting style: Power lead • heat radiation and temperature distribution tested in accordance •... -
Page 12: Assembly
Assembly Please fold out the inside cover of your user manual for a graphic illustration of the assembly process. Assembly of changing table heater with pedestal 1. Insert the 5 feet (B) into the foot connector system (A) as shown in fig. A1. 2. - Page 13 Putting into operation 1. Insert the mains plug into the power socket (fig. 1). 2. Pull the pull cord (fig. 2) to switch the heater on. The heater has two heat settings: 400 W (level „1“) and 800 W (level „2“). TIMER ON Pull the cord again to change the heat setting or switch the unit off (level „0“).
- Page 14 The technical specification, information and characteristics of the product described herein have been compiled to the best of our knowledge and belief and are correct at the time of printing. Any information provided by reer should be correct and authoritative. Nevertheless, reer does not accept liability for potential errors in this document and reserves the right to make changes to the product design and/or specifications without prior notice.
- Page 15 Es un placer para nosotros que haya escogido este producto y le agradecemos su confianza. Para que pueda disfrutar por mucho tiempo de su radiador térmico para cambiador, le pedimos que lea atentamente estas instrucciones, que guarde cuidadosamente el manual y que se lo entregue a otro posible usuario. El radiador térmico para cambiador genera un agradable calor instantáneo en el entorno de los cambiadores de bebés.
-
Page 16: Datos Técnicos
Datos técnicos • tensión nominal: 230 V • función integrada de desconexión por basculación (ángulo de bascu- • potencia: 400 / 800 W lación: 25°) • tipo de montaje: Cable de red • longitud de cable: 185 cm (con clavija de puesta a tierra) •... -
Page 17: Montaje
Montaje Para consultar el esquema gráfico despliegue la parte interior de la portada de su manual. Montaje del radiador térmico de cambiador con pie 1. Introduzca los 5 pies (B) en el sistema de inserción (A) tal como se muestra en la fig. A1. 2. - Page 18 Puesta en funcionamiento 1. Introduzca el enchufe (fig. 1). 2. Tire del cordón (fig. 2) para encender el radiador térmico. El radiador térmico dispone de dos niveles de calenta- miento, 400 W (nivel „1“) y 800 W (nivel „2“). TIMER ON Volviendo a tirar del cordón se puede modificar el nivel o apagar el equipo (nivel „0“) 230 V 400 W...
- Page 19 (también a modo de extractos) exigen la previa autorización por escrito de la empresa reer. Indicaciones de protección medioambiental: Este producto no se debe eliminar depositar con la basura doméstica, sino que tiene que ser ent-...
-
Page 20: Avvertenze
Siamo lieti che abbia scelto questo prodotto e la ringraziamo per la sua fiducia. Per godersi appieno il suo nuovo radiatore scalda fasciatoio, la preghiamo di osservare scrupolosamente le seguenti avvertenze, di conservare con cura le presenti istruzioni per l‘utilizzo. Il radiatore produce immediatamente un piacevole calore nella zona del fasciatoio. -
Page 21: Dati Tecnici
Dati tecnici • tensione nominale: 230 V • funzione integrata di spegnimento in caso di ribaltamento • potenza: 400 / 800 W (angolo di inclinazione: 25°) • installazione: Cavo di rete • lunghezza cavo: 185 cm (spina con messa a terra) •... -
Page 22: Montaggio
Montaggio Per la rappresentazione grafica del montaggio, aprire la parte interna della copertina delle istruzioni per l‘uso. Montaggio del radiatore scalda fasciatoio con piedistallo 1. Inserire i 5 piedini (B) nel sistema di inserimento piedini (A), come illustrato nella figura A1. 2. - Page 23 Messa in funzione 1. Inserire la spina nella presa di corrente (Fig. 1). 2. Tirare il cordino (Fig. 2) per accendere il radiatore. Il radiatore è regolabile su due gradi di riscaldamento, 400 W (grado „1“) e 800 W (grado „2“). TIMER ON Tirando una seconda volta il cordino si può...
- Page 24 Tutti i dati tecnici, le informazioni e le caratteristiche del prodotto descritto in questo testo sono stati elaborati nel miglior modo possibile e corrispondono allo stato attuale al momento della pubblicazione. Le informazioni fornite dalla reer do- vrebbero essere corrette ed affidabili. Reer non si assume comunque alcuna responsabilità per eventuali errori contenuti in questo documento e si riserva il diritto di modificare senza preavviso il design del prodotto e le sue specifiche.
-
Page 25: Consignes Générales De Sécurité
Nous nous réjouissons de votre choix et vous remercions de votre confiance. Veuillez observer les informations suivantes et conserver ce mode d‘emploi afin de pouvoir le remettre à l‘utilisateur suivant. Le radiateur thermique plonge immédiatement toute la table à langer dans une douce chaleur très agréable. Il peut également réchauffer rapidement les salles de bains, les ateliers de bricolage, les couloirs et les espaces abrités de terrasses et balcons. -
Page 26: Caractéristiques Techniques
Caractéristiques techniques • Tension nominale: 230 V • Arrêt automatique intégré en cas de basculement • Puissance: 400 / 800 W (Angle de basculement : 25°) • Type de montage: Câble secteur • Longueur du câble secteur : 185 cm •... -
Page 27: Montage
Montage Pour la représentation graphique du montage, veuillez déplier l‘intérieur de la couverture de votre mode d‘emploi. Montage du piètement de l‘appareil 1. Mettez les 5 branches (B) dans la pièce centrale (A) du piètement comme représenté sur la fig. A1. 2. - Page 28 Mise en service 1. Mettez la fiche dans la prise secteur (fig. 1). 2. Pour allumer le radiateur, tirez la tirette (fig.2). Le radiateur peut fonctionner à mi- puissance de 400 W (position „1“) ou à pleine puissance de 800 W (position „2“). Le radiateur peut fonctionner à mi- puissance de 400 W (positi- TIMER ON on „1“) ou à...
- Page 29 écrite préalable de la société REER. Remarque concernant la protection de l‘environnement: A la fin de sa durée de service, cet appareil ne doit pas être éliminé...
-
Page 30: Algemene Veiligheidsaanwijzingen
Wij zijn blij dat u dit product gekozen hebt en danken u voor uw vertrouwen. Om te kunnen genieten van uw nieuwe warmtelamp voor de luiertafel, vragen wij u om de volgende aanwijzingen zorgvuldig in acht te nemen en deze gebruiksaanwijzing goed te bewaren en aan de respectievelijke gebruiker door te geven. -
Page 31: Technische Gegevens
Technische gegevens • nominale spanning: 230 V • geïntegreerde uitschakelfunctie bij kantelen (kantelhoek: 25 °) • vermogen: 400 / 800 W • kabellengte: 185 cm (met randaardestekker) • montagewijze: Netkabels • warmtestraling en temperatuurverdeling getest volgens de norm • beschermingsklasse: 1 voor medische elektrische toestellen (IEC601-2-21) Omvang van de levering Onderdelenomschrijving... -
Page 32: Montage
Montage Klap a.u.b. voor de grafische weergave van de montage de binnenzijde van het voorblad van uw gebruiksaanwijzing open. Montage van de warmtelamp voor luiertafel met staander 1. Schuif de 5 voeten (B) in het middelste deel (A) zoals afgebeeld in afb. A1. 2. - Page 33 Inbedrijfstelling 1. Steek de stekker in het stopcontact (afb. 1). 2. Trek aan de trekkoord (afb. 2) om de warmtelamp in te schakelen. De warmtelamp kan in twee warmteposities ingesteld worden: 400 W (stand „1“) en 800 W (stand „2“). TIMER ON Door opnieuw aan de trekkoord te trekken kan de warmtestand gewijzigd of het toestel opnieuw uitgeschakeld (stand „0“) worden.
- Page 34 - vereisen een op voorhand gegeven schriftelijk akkoord van de firma reer. Aanwijzingen voor de milieubescherming: Dit product mag op het einde van zijn levensduur niet met het gewone huisafval verwijderd worden, maar moet bij een inzamelpunt voor de recyclering van elektrische toestellen ingeleverd worden.
-
Page 35: Generelle Sikkerhedshenvisninger
Vi er glade for at du har valgt dette produkt og takker for din tillid. For at du får størst mulig glæde af din nye pusle- bord-varmestråler, beder vi dig at følge de nedenstående oplysninger omhyggeligt og opbevare denne brugsvejled- ning og videregive den til den pågældende bruger. -
Page 36: Tekniske Data
Tekniske data • strømspænding: 230 V • integreret vippe/slukkefunktion (væltevinkel: 25°) • effekt: 400 / 800 W • kabellængde: 185 cm (med sikkerhedsstik) • monteringsmåde: strømkabel • varmestråling og temperaturfordeling kontrolleret iht. standard for • Sikkerhedsklasse: 1 elektromedicinsk udstyr (IEC601-2-21)I Delebetegnelse Komponentbetegnelse 1 varmestråler med 2 rør... -
Page 37: Montering
Montering Fold forsidens indvendige side på din brugsanvisning ud for at se den grafiske fremstilling af monteringen. Montering af puslebord-varmestråleren med fod 1. Sæt de 5 fødder (B) ind i fodstiksystemet (A) som vist på billedet A1. 2. Læg fodafdækningen (C) henover (billede A2). 3. - Page 38 Ibrugtagning 1. Sæt strømstikket ind i stikdåsen (billede 1). 2. Træk i træksnoren (billede 2) for at starte varmestråleren. Varmestråleren kan indstilles på to varmetrin, 400 W (trin „1“) og 800 W (trin „2“). TIMER ON Når der igen trækkes i træksnoren, kan varmetrinnet ændres eller varmestråleren slukkes igen (trin „0“). 230 V 400 W 800 W...
- Page 39 Alle tekniske data, oplysninger samt egenskaber af det i denne publikation beskrevne produkt er fremstillet efter bedste viden og i henhold til vidensstanden ved udgivelsen. De af reer givne oplysninger anses for at være korrekte og pålidelige. reer hæfter dog ikke for mulige fejl i nærværende dokument og forbeholder sig retten uden varsel at foretage ændringer ved produktdesignet eller specifikationerne.
- Page 40 Χαιρόμαστε που επιλέξατε αυτό το προϊόν και σας ευχαριστούμε για την εμπιστοσύνη σας . Για να έχετε τη δυνατότητα να απολαύσετε το νέο θερμοπομπό αλλαξιέρας, σας παρακαλούμε όπως λάβετε σοβαρά υπόψη τις παρακάτω υποδείξεις και να αποθηκεύσετε αυτές τις οδηγίες χρήσης και να τις παραδώσετε στο μελλοντικό χρήστη . Ο...
-
Page 41: Τεχνικά Δεδομένα
Τεχνικά δεδομένα • Τάση δικτύου: 230 V • Ενσωματωμένη λειτουργία απενεργοποίησης ανατροπής • Ισχύς: 400 / 800 W (Γωνία ανατροπής: 25°) • Είδος συναρμολόγησης: Αγωγός ισχύος • Μήκος καλωδίου: 185 cm (με το βύσμα ασφαλείας) • Κλάση προστασίας: 1 • Ακτινοβολία... -
Page 42: Συναρμολόγηση
Συναρμολόγηση Ανατρέξτε στη γραφική απεικόνιση για τη συναρμολόγηση στην εσωτερική σελίδα του εξώφυλλου των οδηγιών χρήσης . Συναρμολόγηση θερμοπομπού αλλαξιέρας με βάση Συνδέστε τα 5 πόδια (B) μέσα στο σύστημα βάσης (A) όπως φαίνεται στην Εικ . A1 . Τοποθετήστε το κάλυμμα βάσης (C) από πάνω (Εικ . A2) . Συνδέστε... - Page 43 Θέση σε λειτουργία Συνδέστε το βύσμα μέσα στην πρίζα (Εικ . 1) . Τραβήξτε το διακόπτη σκοινί (Εικ . 2) για να ενεργοποιήσετε το θερμοπομπό . Ο θερμοπομπός μπορεί να ενεργοποιηθεί σε δύο βαθμίδες θερμότητας, 400 W (βαθμίδα «1») και 800 W (βαθμίδα «2») . TIMER ON Με...
- Page 44 Όλα τα τεχνικά δεδομένα, οι πληροφορίες και οι ιδιότητες του προϊοντος που περιγράφεται εδώ έχουν συνταχθεί με καλή πρόθεση και σύμφωνα με τη δημοσιοποιημένη έκδοση . Οι πληροφορίες που διαθέτει η reer πρέπει να είναι ορθές και αξιόπιστες . Η εταιρεία reer ωστόσο δεν αναλαμβάνει καμία ευθύνη για τυχόν σφάλματα μέσα σε αυτή την τεκμηρίωση και διατηρεί το...
-
Page 45: Ogólne Przepisy Bezpieczeństwa
Cieszymy się bardzo za zdecydowanie się na zakup tego produktu i dziękujemy za zaufanie . Aby byli Państwo zadowo- leni z promiennika ciepła do przewijaka dla niemowląt, prosimy o staranne przeczytanie niniejszych wskazówek oraz o staranne przechowywanie instrukcji użytkownia w celu przekazania jej kolejnemu właścicielowi . Promiennik ciepła do przewijaka dla niemowląt wytwarza w strefie przewijaków natychmiastowo przyjemne ciepło . -
Page 46: Dane Techniczne
Dane techniczne • napięcie znamionowe: 230 V • zintegrowana funkcja wyłączania po przechyleniu • moc: 400 / 800 W (kąt przechylenia: 25°) • rodzaj montażu: przewód • długość przewodu: 185 cm (wtyczka ze stykiem uziemiającym) przyłączeniowy • promieniowanie cieplne oraz rozkład temperatury sprawdzone •... -
Page 47: Montaż
Montaż W celu zapoznania się z prezentacją graficzną montażu otwórz stronę wewnętrznąstrony tytułowej instrukcji użytkowania . Montaż promiennika ciepła do przewijaka dla niemowląt na podstawie Wetknij 5 stopek (B) w system wtykowy mocowania stopek (A) w sposób przedstawiony na rys . A1 . Połóż... - Page 48 Uruchomienie Włóż wtyczkę sieciową do gniazdka (rys . 1) . Pociągnij za sznurek (rys . 2) w celu włączenia promiennika ciepła . Promiennik ciepła można ustawić na dwa stopnie grzania, na 400 W (stopień „1”) oraz na 800 W (stopień „2”) . TIMER ON Ponownie pociągając za sznurek przełącznika można zmieniać...
- Page 49 Wszelkie dane techniczne, informacje oraz właściwości produktu opisane w niniejszym opracowaniu zostały sporządzone we- dług najlepszej wiedzy oraz według stanu na dzień publikacji . Podane informacje przez firmę reer są prawidłowe i wiarygodne . Firma reer nie ponosi jednak w żaden sposób odpowiedzialności za możliwe błędy występujące w tym dokumencie i zastrzega sobie prawo, bez konieczności wcześniejszego powiadomienia, do wprowadzania zmian w konstrukcji produktu lub w jego...
-
Page 50: Všeobecné Bezpečnostní Pokyny
Těší nás, že jste se rozhodli pro tento výrobek a děkujeme vám za důvěru . Abyste se mohli ze svého nového tepelného zářiče na přebalovací stůl dlouho těšit, prosíme vás, abyste pečlivě dodržovali následující pokyny . Tento návod k použití si dobře uschovejte a předejte ho případnému dalšímu uživateli . Tepelný... -
Page 51: Technické Údaje
Technické údaje • síťové napětí: 230 V • integrovaná funkce vypnutí při překlopení (úhel klopení: 25°) • příkon: 400/800 W • délka kabelu: 185 cm (s chráněnou vidlicí) • způsob montáže: přívodní kabel • vyzařování tepla a rozložení teploty bylo testováno podle standardů • třída ochrany: 1 platných pro zdravotnické... -
Page 52: Montáž
Montáž Grafické znázornění montáže najdete na vnitřní straně obálky návodu k použití . Montáž tepelného zářiče se stojánkem Zasuňte 5 nožek (B) do hvězdice (A) tak, jak vidíte na obr . A1 . Navrch položte kryt nožek (C), viz obr . A2 . Do otvoru zasuňte spodní... -
Page 53: Uvedení Do Provozu
Uvedení do provozu Zapojte síťovou zástrčku do síťové zásuvky (obr . 1) . Zatáhněte za šňůru (obr . 2) a tepelný zářič zapněte . Na tepelném zářiči lze nastavit dva stupně vytápění – 400 W (stupeň „1“) a 800 W (stupeň „2“) . TIMER ON Opakovaným zatáhnutím za šňůru lze přepnout stupeň... -
Page 54: Čištění, Údržba
Všechny technické údaje, informace a vlastnosti výrobku popsaného v tomto návodu byly sestaveny v souladu s našemi ne- jlepšími poznatky a v době jeho zveřejnění jsou správné . Informace poskytnuté firmou reer by měly být správné a spolehlivé . Přesto firma nepřebírá odpovědnost za případné chyby vyskytující se v tomto dokumentu a vyhrazuje si právo změnit design výrobku, resp .