Table des Matières
Publicité
Les langues disponibles
Les langues disponibles
Liens rapides
I DO IT Co., Ltd.
#637, Smart-Hub Industry-University Convergence Center, 237 Sangidaehak-ro, Siheung-si, Gyeonggi-do, Korea
TEL : +82 31 8041 1500
FAX : +82 31 8041 1550
I DO IT France
10 Rue du Platine – Parc d'Activité Zone 3 77176 Savigny-le-Temple – FRANCE
TEL : +33 1 75 18 15 16
FAX : +33 9 57 32 37 20
E-MAIL : sales@selfsat.com
E-mail : sales@selfsat.com
Automatic Flat Satellite Camping Antenna
ENGLISH : User's manual
DEUTSCH : Bedienungsanleitung
FRANÇAIS : Manuel utilisateur
www.selfsat.com
Publicité
Chapitres
Table des Matières
Dépannage

Manuels Connexes pour SELFSAT CARAVAN PLUS


Sommaire des Matières pour SELFSAT CARAVAN PLUS
- Page 1 #637, Smart-Hub Industry-University Convergence Center, 237 Sangidaehak-ro, Siheung-si, Gyeonggi-do, Korea TEL : +82 31 8041 1500 FAX : +82 31 8041 1550 E-MAIL : sales@selfsat.com I DO IT France 10 Rue du Platine – Parc d’Activité Zone 3 77176 Savigny-le-Temple – FRANCE...
-
Page 2: Table Des Matières
Contents 1. General Information 1-1. Proper use and operation ................1-2. -
Page 3: General Information
1. General Information 1-1. Proper use and operation These instructions describe the functions and operation of CARAVAN PLUS, auto search satellite system. Please read the user manual carefully before starting the installation. Correct and safe operation of the system can only be ensured by following instructions. -
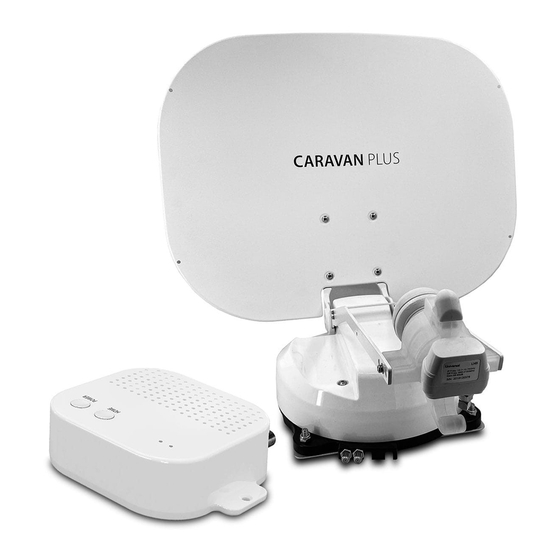
Page 4: Package
1-2. Package Main Unit Cable holder/gland Mounting plate PI cable PI Box Signal cable (x2 for twin output) M4x20 screw (10) Power input cable M8 locking nut (4) User Manual WARNING Open the box and remove the packaging material. When taking the main unit from the box, hold it by the body, not the reflector, and lift it straight up. -
Page 5: Operating Instruction
2. Operating Instruction 2-1. Connection Diagram Main Unit Signal Cable (12m) PI Box Battery 12V DC adapter (over 40W) ※ For twin output model ENGLISH - 4... -
Page 6: How To Use
2-2. How to Use 1. Search satellites HOME LED When powered on by pressing the PI BOX's POWER LED power button, after about 10 seconds, the antenna starts searching for pre-programmed HOME button or most recently received satellite. POWER button ※... -
Page 7: How To Use App
2-3. How to Use APP Download the app from the App Store (Android/iOS) Search for SELFSAT on the App Store and download "SAT CONNECT" app Before using this app, need to activate BT and GPS ※ function on your smart device. - Page 8 Basic Features Setting button Firmware version, language setting can be checked Status display window Indicates the current status of the antenna Satellite selection window Select a satellite to search. The pre-programmed satellite is ASTRA1, which can be changed to the desired satellite via the APP Used to move the antenna to the HOME position The orange lamp blinks while moving to the HOME, and the green lamp turns on after it has completely moved to the HOME position...
-
Page 9: Skew Adjustment
3. Skew adjustment All LNBs require their rotational angle (skew) to be set within certain limits in order to the best signal quality received. The actual "skew angle" depends on the satellite and your location. Refer to the satellites you want to receive and your location in the image below and adjust the skew accordingly. - Page 10 HotBird @ 13.0°E Eutelsat 9 @ 9.0°E Astra4 @ 4.9°E Thor @ 0.8°W Eutelsat 5W @ 5.0°W Hispasat @ 30.0°W ENGLISH - 9...
-
Page 11: Troubleshooting
4. Troubleshooting There are a number of common issues that can affect the signal reception quality or the operation of the unit. The following sections address these issues and potential solutions. A. No function when power on the antenna Check again all the cable connections have been made correctly. Connection between the power and the PI box. -
Page 12: Specifications
5. Specifications 5-1. Dimension Main Unit MAX 540 mm MIN 149 mm 573 mm 149 mm 280 mm 316 mm 508 mm PI box 129 mm 34 mm 105 mm 28 mm 102 mm 35 mm 102 mm 85mm ENGLISH - 11... -
Page 13: Specifications
5-2. Specifications CARAVAN PLUS Model Input Frequency 10.7 ~ 12.75 GHz Polarization Vertical & Horizontal Antenna Gain 35.0 dBi @ 12.7 GHz Dish Size (W x D) 573 mm x 450 mm (with edge) Size (W x D x H) -
Page 14: Caravan/Motorhome Installation
6. Caravan/Motorhome Installation 6-1 . Required space for installation Take care, that there is enough space for the fold CARAVAN PLUS, just as for the operation range (cruising radius). 508 mm 450 mm 797 mm 573 mm 369 mm 465 mm... -
Page 15: Equipment For Installation
6-2. Equipment for installation Mounting plate PI BOX M4× 20 screw (10), M8 locking nut (4) Cable gland / Cable holder PI cable Signal cable (x2 for twin output) Power input cable Silicone Masking tape Spanner 2mm drill bit, 16mm drill bit Power drill Cleaner Installation of direction... -
Page 16: Instruction For Installation
6-3. Instruction for installation FRONT Locate a suitable location to place the mount- Clean the surface where will place the ing plate on the vehicle roof mounting plate with a cleaner Attach masking tape outside of the mounting Put aside the mounting plate to apply silicone plate by 5mm away from the plate edges within the attached tape line but leave 2cm inward gap from the line... - Page 17 Apply silicone around mounting plate edge Clean away the excess silicone Remove masking tape and allow to dry Prepare to place the antenna on to the four upright bolts Parts required, spanner, four(4) nuts After checking the driving direction, place the antenna on the mounting plate Fit the nuts on each of the 4 bolts on the Tighten the four nuts with a spanner to secure...
- Page 18 approx. 30cm Connect the signal cable to the antenna port, place the bottom of the cable holder in a position that does not interfere with the operation of the antenna, and apply masking tape 5 mm from the outside of the bottom of the cable holder Drill a hole that the minium size for the cable Pass the signal cable through the hole (two can pass through in the center of the tape...
- Page 19 Apply silicone around cable holder and on the Connect cables to the ports of the antenna, top of screws for waterproof remove masking tape and tidy silicone before Ignition 12V DC Prepare the power input cable to connect the Match the power input cables polarities to the battery and PI BOX battery polarities, red to red / black to black and white cable to ignition port of vehicle...
- Page 21 Inhaltsverzeichnis 1. Allgemeine Informationen 1-1. Bestimmungsgemäße Verwendung ..............1-2.
-
Page 22: Allgemeine Informationen
1. Allgemeine Informationen 1-1. Bestimmungsgemäße Verwendung Diese Anleitung beschreibt die Funktionen und die Bedienung von CARAVAN PLUS, der automatischen Satellitensuchanlage. Bitte lesen Sie die Bedienungsanleitung vor Beginn der Installation sorgfältig durch. Nur wenn Sie die Anweisungen befolgen, kann ein korrekter und sicherer Betrieb der Anlage gewährleistet werden. -
Page 23: Lieferumfang
1-2. Lieferumfang Haupteinheit Kabelhalter / Kabelverschraubung Montageplatte PI-Kabel - 1,5 m PI Box Signalkabel - 12m (x2 für 2 Ausgänge) Schraube M4x20 (10) Stromversorgungskabel M8 Sicherungsmutter (4) Bedienungsanleitung WARNUNG Öffnen Sie den Karton und entfernen Sie das Verpackungsma- terial. Wenn Sie das Hauptgerät aus der Verpackung nehmen, halten Sie es am Körper, nicht am Reflektor, und heben Sie es gerade nach oben. -
Page 24: Verpackungsinhalt
2. Verpackungsinhalt 2-1. Anschlussplan Haupteinheit Signalkabel (12 m) PI Box Zweite STB Fernseher STB (Empfänger) Auto Batterie oder 12V DC-Adapter (über 40W) Fernseher ※ Bei der Twinantenne GERMAN- 4... -
Page 25: Bedienungsanweisungen
2-2. Bedienungsanweisungen 1. Suche die Satelliten HOME LED Nach dem Einschalten durch Drücken der Power-Taste der PI BOX beginnt die Antenne POWER LED nach ca. 10 Sekunden mit der Suche nach HOME-Taste vorprogrammierten oder zuletzt empfangenen Satelliten. POWER-Taste ※ Der vorprogrammierte Satellit ist ASTRA1, der über die APP auf den gewünschten Satelliten geändert werden kann. -
Page 26: Wie Benutzt Man Die App
2-3. Wie benutzt man die App Laden Sie die App aus dem App Store herunter (Android/iOS) Suchen Sie im App Store nach "SELFSAT" und laden Sie die App "SAT CONNECT" herunter ※ Bevor Sie diese App verwenden, müssen Sie die BT- und GPS-Funktion auf Ihrem Smart-Gerät aktivieren. - Page 27 Grundfunktionen Einstelltaste Firmware-Version, Spracheinstellung kann überprüft werden Statusanzeigefenster Zeigt den aktuellen Status der Antenne an Satellitenauswahlfenster Wählen Sie einen Satelliten zum Suchen aus. Der vorprogram- mierte Satellit ist ASTRA1, der über die APP auf den gewünschten Satelliten geändert werden kann Wird verwendet, um die Antenne in die Ausgangsposition zu bewegen Die orangefarbene Lampe blinkt während der Fahrt zur Home-Po-...
-
Page 28: Skeweinstellung
3. Skeweinstellung Bei allen LNBs muss der Drehwinkel (Skew) innerhalb bestimmter Grenzen eingestellt werden, um die beste Signalqualität zu erhalten. Der tatsächliche "Skew winkel" hängt vom Satelliten und Ihrem Standort ab. Beziehen Sie sich auf die Satelliten, die Sie empfangen möchten, und Ihren Standort im Bild unten und passen Sie den Skew entsprechend an. - Page 29 HotBird @ 13.0°E Eutelsat 9 @ 9.0°E Astra4 @ 4.9°E Thor @ 0.8°W Eutelsat 5W @ 5.0°W Hispasat @ 30.0°W Deutsch - 9...
-
Page 30: Fehlerbehebung
4. Fehlerbehebung Es gibt eine Reihe von häufigen Problemen, die die Signalempfangsqualität oder den Betrieb des Geräts beeinträchtigen können. Wenn ein Problem mit dem Caravan Plus auftritt, lesen Sie zuerst diese Anleitung zur Fehlerbehebung. A. Keine Funktion beim Einschalten der Antenne Überprüfen Sie noch einmal, ob alle Kabelverbindungen richtig hergestellt wurden. -
Page 31: Technische Daten
5. Technische Daten 5-1. Abmessungen Haupteinheit MAX 540 mm MIN 149 mm 573 mm 149 mm 280 mm 316 mm 508 mm PI box 129 mm 34 mm 105 mm 28 mm 102 mm 35 mm 102 mm 85mm Deutsch - 11... - Page 32 5-2. Haupteinheit CARAVAN PLUS Modell Eingangsfrequenz 10.7 ~ 12.75 GHz Polarisation Horizontal / Vertikal Antennengewinn 35.0 dBi @ 12.7 GHz Reflektorgröße (W x D) 573 mm x 450 mm (mit Kanten) Abmessungen (W x D x H) 573 x 508 x 149 mm Gewicht 5.5 kg...
-
Page 33: Wohnwagen / Wohnmobil Installationsanleitung
Installationsanleitung Wohnwagen / Wohnmobil 6-1 . Platzbedarf für die Installation Achten Sie darauf, dass für den klappbaren CARAVAN PLUS ebenso wie für den Aktionsradius (Reichweite) ausreichend Platz vorhanden ist. 508 mm 450 mm 797 mm 573 mm 369 mm 465 mm... -
Page 34: Ausrüstung Für Die Installation
6-2. Ausrüstung für die Installation Montageplatte PI BOX Schraube M4× 20 (10), Mutter M8 (4) Kabelverschraubung / Kabelhalter PI-Kabel Signalkabel (x2 für Doppelausgang) Stromeingangskabel Silikon Abdeckband Schraubenschlüssel 2mm Bohrer, 16mm Bohrer Bohrmaschine Reiniger Installation der Richtung Deutsch - 14... -
Page 35: Installationsanleitung
6-3. Installationsanleitung FRONT Suchen Sie einen geeigneten Ort, um die Reinigen Sie die Oberfläche, auf der die Montageplatte auf dem Fahrzeugdach zu Montageplatte platziert wird, mit einem platzieren Reiniger Bringen Sie das Abdeckband außerhalb der Legen Sie die Montageplatte beiseite, um Silikon Montageplatte mit einem Abstand von 5 mm innerhalb der angebrachten Klebebandlinie von den Plattenkanten an... - Page 36 Silikon um die Kante der Montageplatte Entfernen Sie überschüssiges Silikon auftragen Abdeckband entfernen und trocknen lassen Bereiten Sie vor, die Antenne auf die vier aufrechten Schrauben zu setzen Benötigte Teile, Schraubenschlüssel, vier (4) Nachdem Sie die Fahrtrichtung überprüft Muttern haben, legen Sie die Antenne auf die Montageplatte Bringen Sie die Muttern an jeder der 4 Ziehen Sie die vier Muttern mit einem...
- Page 37 ca. 30cm Schließen Sie das Signalkabel an den Antennenanschluss an, platzieren Sie die Unterseite des Kabelhalters in einer Position, die den Betrieb der Antenne nicht beeinträchtigt, und bringen Sie Abdeckband 5 mm von der Außenseite der Unterseite des Kabelhalters entfernt an Bohren Sie ein Loch, durch das die Mindest- Führen Sie die Signalkabel durch die Löcher größe für das Kabel in der Mitte der Bandmark-...
- Page 38 Tragen Sie Silikon um den Kabelhalter und auf Schließen Sie die Kabel an die Anschlüsse der die Oberseite der Schrauben auf, um Antenne an, entfernen Sie das Abdeckband wasserdicht zu sein und reinigen Sie das Silikon vor dem Trocknen Zündung 12V DC Bereiten Sie das Stromeingangskabel vor, um Passen Sie die Polaritäten der Stromeingang-...
- Page 40 Table des matières 1. Informations générales 1-1. Utilisation et fonctionnement ............... . . 1-2.
-
Page 41: Informations Générales
1. Informations générales 1-1. Utilisation et fonctionnement Ces instructions décrivent les fonctions et le fonctionnement de CARAVAN PLUS, système de recherche automatique par satellite. Veuillez lire attentivement le manuel d'utilisation avant de commencer l'installation. Le fonctionnement correct et sûr du système ne peut être garanti que par les instructions suivantes. -
Page 42: Accessoires Inclus
1-2. Accessoires Inclus Unité principale Support de câble/ presse-étoupe Plaque de montage Câble de PI - 1,5m Boîtier PI Câble de signal - 12m (x2 pour double sortie) Vis M4x20 (10) Câble d'entrée d'alimentation Écrou de blocage M8 (4) Manuel d'utilisation AVERTISSEMENT Ouvrez la boîte et retirez le matériel d'emballage. -
Page 43: Instructions De Fonctionnement
2. Instructions de fonctionnement 2-1. Diagramme de Connection Unité principale Câble de signal (12 m) Boîtier PI 2ème STB Télé STB (Récepteur) batterie du véhicule adaptateur 12V DC (plus de 40W) Télé ※ Pour le modèle à double sortie Français - 4... -
Page 44: Comment Utiliser
2-2. Comment utiliser? 1. Rechercher le satellites Voyant LED de HOME Lorsqu'elle est allumée en appuyant sur le Voyant LED de POWER bouton d'POWER de la Boîtier PI, après environ 10 secondes, l'antenne commence à rechercher Bouton HOME le satellite préprogrammé ou le plus récem- ment reçu. -
Page 45: Comment Utiliser L'app
étape3. Sélectionnez celle qui correspond à l'adresse MAC de votre antenne (L'adresse MAC de CARAVAN PLUS est GS-xx:xx:xx ) étape4. Cliquez sur le bouton « connecter » pour terminer la connexion BT entre votre antenne et votre appareil intelligent Français - 6... - Page 46 Fonctionnalités de base Bouton de réglage Version du micrologiciel, le réglage de la langue peut être vérifié Fenêtre d'affichage d'état Indique l'état actuel de l'antenne Fenêtre de sélection des satellites Sélectionnez un satellite à rechercher. Le satellite préprogrammé est ASTRA1, qui peut être remplacé par le satellite souhaité via l'APP Utilisé...
-
Page 47: Réglage De L'inclinaison
3. Réglage de l'inclinaison Tous les LNB nécessitent que leur angle de rotation (skew) soit défini dans certaines limites afin d'obtenir la meilleure qualité de signal reçu. L'« angle d'inclinaison » réel dépend du satellite et de votre emplacement. Repor- tez-vous aux satellites que vous souhaitez recevoir et à... - Page 48 HotBird @ 13.0°E Eutelsat 9 @ 9.0°E Astra4 @ 4.9°E Thor @ 0.8°W Eutelsat 5W @ 5.0°W Hispasat @ 30.0°W Français - 9...
-
Page 49: Dépannage
Il existe un certain nombre de problèmes courants qui peuvent affecter la qualité de réception du signal ou le fonctionnement de l'appareil. Si un problème survient avec le Caravan Plus, reportez-vous d'abord à ce guide de dépannage. A. Aucune fonction lors de la mise sous tension de l'antenne Vérifiez à... -
Page 50: Spécifications
5. Spécifications 5-1. Dimension Unité principale MAX 540 mm MIN 149 mm 573 mm 149 mm 280 mm 316 mm 508 mm Boîtier PI 129 mm 34 mm 105 mm 28 mm 102 mm 35 mm 102 mm 85mm Français - 11... -
Page 51: Spécifications
5-2. Spécifications CARAVAN PLUS Modèle Fréquence d'entrée 10.7 ~ 12.75 GHz Polarisation Horizontale/ Vericale Gain de l'antenne 35.0 dBi @ 12.7 GHz Taille du réflecteur (W x D) 573 mm x 450 mm (avec bord) Dimensions (W x D x H) -
Page 52: Installation De Caravane/Camping-Car
6. Installation de caravane/camping-car 6-1. Espace requis pour l'installation Veillez à ce qu'il y ait suffisamment d'espace pour le pli CARAVAN PLUS, tout comme pour la plage de fonctionnement (rayon de croisière). 508 mm 450 mm 797 mm 573 mm... -
Page 53: Matériel Pour L'installation
6-2. Matériel pour l'installation Plaque de montage Boîtier PI Vis M4×20 (10), Écrou de blocage M8 (4) Presse-étoupe / Support de câble Câble PI Câble de signal (x2 pour double sortie) Câble d'alimentation Silicone Ruban de masquage Clé Foret de 2 mm, Foret de 16 mm Perceuse électrique Nettoyeurr Installation de direction... -
Page 54: Instructions Pour L'installation
6-3. Instructions pour l'installation FRONT Trouvez un endroit approprié pour placer la Nettoyez la surface où va placer la plaque de plaque de montage sur le toit du véhicule montage avec un nettoyant Fixez le ruban de masquage à l'extérieur de la Mettez de côté... - Page 55 Appliquer du silicone autour du bord de la Nettoyez l'excès de silicone plaque de montage Retirer le ruban de masquage et laisser sécher Préparez-vous à placer l'antenne sur les quatre boulons verticaux Pièces requises, clé, quatre (4) écrous Après avoir vérifié le sens de la marche, placez l'antenne sur la plaque de montage Monter les écrous sur chacun des 4 boulons Serrez les quatre écrous avec une clé...
- Page 56 environ 30 cm Connectez le câble de signal au port d'antenne, placez le bas du support de câble dans une position qui n'interfère pas avec le fonctionnement de l'antenne et appliquez du ruban de masquage à 5 mm de l'extérieur du bas du support de câble Percez un trou que la taille minimale du câble Faites passer les câbles de signal à...
- Page 57 Appliquez du silicone autour du support de Connectez les câbles aux ports de l'antenne, câble et sur le dessus des vis pour imperméa- retirez le ruban de masquage et rangez le biliser silicone avant de sécher allumage 12V DC Préparez le câble d'entrée d'alimentation pour Faites correspondre les polarités des câbles connecter la batterie et la Boîtier PI d'alimentation aux polarités de la batterie,...