Chapitres
Table des Matières

Manuels Connexes pour Zehnder ComfoFond-L Eco 350 L


Sommaire des Matières pour Zehnder ComfoFond-L Eco 350 L
- Page 1 ComfoFond-L Eco Instrukcja obsługi dla instalatora Installer Manual Manuel de l’installateur Manuale installatore Installatie handleiding Manual del instalador Heating Cooling Fresh Air Clean Air...
- Page 2 Przedmowa Przed rozpoczęciem eksploatacji urządzenia należy dokładnie zapoznać się z treścią niniejszej instrukcji obsługi. Niniejsza instrukcja zawiera wszystkie informacje potrzebne dla bezpiecznego i prawidłowego montażu, obsługi i konserwacji urządzenia ComfoFond-L Eco. Urządzenie jest rozwijane i ulepszane w sposób ciągły. Dlatego też, urządzenie ComfoFond-L Eco może nieco różnić...
-
Page 3: Table Des Matières
8.1 Wymiary wymiennika glikolowego ....................... 14 8.2 Mieszanka cieczy ............................14 9. Deklaracja zgodności we i gwarancja ..............15 Wymiary urządzenia ComfoFond-L Eco 350 L ............87 II Wymiary urządzenia ComfoFond-L Eco 350 R ............87 III Wymiary urządzenia ComfoFond-L Eco 550 L ............88 IV Wymiary urządzenia ComfoFond-L Eco 550 R ............ -
Page 4: Wprowadzenie I Bezpieczeństwo
ComfoFond-L Eco należy zachować ostrożność. Urządzenie ComfoFond-L Eco jest zaprojektowane do współpracy z urządzeniami wentylacyjnymi Należy się upewnić, że materiał opakowaniowy Zehnder typu ComfoAir 350 Luxe, ComfoAir 450 jest utylizowany w sposób nieszkodliwy dla Luxe, ComfoAir 550 Luxe, ComfoD 350 Luxe, środowiska naturalnego. -
Page 5: Warunki Instalacji
4. Montaż Objaśnienie oznaczeń: ComfoFond-L Eco = cieczowy gruntowy wymiennik ciepła; 4.1 Podłączanie kanałów wentylacyjnych 350 = przystosowany do pracy z urządzeniem Podczas montażu kanałów wentylacyjnych ComfoAir/ComfoD 350 Luxe lub WHR930 Luxe; należy uwzględnić następujące kwestie: 550 = przystosowany do pracy z urządzeniem Do wykonania połączeń... -
Page 6: Montaż Naścienny
(patrz dodatek: Wall- Zehnder (jest ona dostępna jako opcja). Zmniejsza mounting pictures). ona w możliwie największym stopniu przenoszenie 2. Załóż urządzenie ComfoFond-L Eco na wspornik. -
Page 7: Podłączanie Wymiennika Glikolowego (Kolektora Gruntowego)
Właściwą długość rury można określić na podstawie specyfikacji urządzenia 4.5 Podłączenie elektryczne ComfoFond-L Eco. Firma Zehnder udostępnia Urządzenie ComfoFond-L Eco jest sterowane i specjalne oprogramowanie, które umożliwia zasilane przez centralę wentylacyjną . Dlatego obliczenie wymaganej długości rury. -
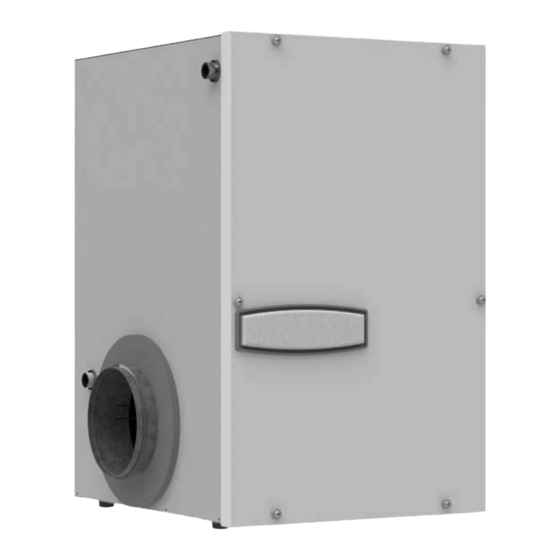
Page 8: Pierwsze Uruchomienie
5. Pierwsze uruchomienie Filtr powietrza Wylot powietrza ComfoFond-L Eco 350: z boku, Ø 160 mm Przed pierwszym uruchomieniem urządzenia ComfoFond-L Eco 550: z boku u góry, ComfoFond-L Eco należy usunąć z niego Ø 180 mm wszystkie luźne części, w tym karton i materiały Pompa cieczy opakowaniowe. -
Page 9: Regulacja Pompy Cieczy
16. Sprawdź ponownie ciśnienie w układzie i w razie Na końcu instrukcji znajduje się formularz potrzeby dolej roztworu w celu zwiększenia raportu z instalacji, w którym można zapisać ciśnienia. dane szczegółowe na temat zastosowanej 17. Zamknij zawór napełniania V3 i odłącz przewód nastawy. -
Page 10: Konserwacja Urządzenia
6.1 Wymiana filtrów Eco zmierzy temperaturę niższą niż temperatura, która jest ustawiona w opcji P63 w trybie Częstotliwość wymiany filtrów zależy od letnim. miejscowych warunków. Zalecamy wymianę filtra wraz z wymianą filtra urządzenia ComfoAir Luxe. Na końcu instrukcji znajduje się formularz raportu z instalacji, w którym można zapisać... -
Page 11: Sprawdzenie Wymiennika Glikolowego
6.3 Sprawdzenie wymiennika 6.4 Czyszczenie syfonu wewnętrznego glikolowego Syfon wewnętrzny urządzenia ComfoFond-L Eco należy sprawdzać co najmniej raz na rok. Pętlę źródła dolnego należy sprawdzać co najmniej raz na rok. 1. Zdejmij przedni panel urządzenia Sprawdź ciśnienie w układzie przy użyciu ComfoFond-L Eco w sposób opisany w manometru. -
Page 12: Konserwacja Baterii Urządzenia Comfofond-L Eco
6.6 Konserwacja baterii urządzenia 6.9 Wymiana zaworu napełniania ComfoFond-L Eco 1. Zdejmij przedni panel urządzenia ComfoFond-L Eco w sposób opisany w rozdziale poświęconym konserwacji wymiennika glikolowego. Baterię urządzenia ComfoFond-L Eco należy 2. Zamknąć tylko zawór kulowy V4. sprawdzać co 2 lata. 3. -
Page 13: Usterki
7. Usterki Urządzenie ComfoFond-L Eco nie posiada cyfrowego panelu sterowania, pokazującego kody usterek. Urządzenie ComfoAir Luxe posiada cyfrowy panel sterowania, który wyświetla kody usterek. W instrukcji ComfoAir Luxe opisano znaczenie kodów usterek oraz sposób ich usuwania. Nie wszystkie usterki są wyświetlane w cyfrowym układzie sterowania urządzenia ComfoAir Luxe, choć... -
Page 14: Dane Techniczne
8. Dane techniczne Opis ComfoFond-L Eco 350 ComfoFond-L Eco 550 Ciężar urządzenia ComfoFond-L Eco 46 kg 47 kg Wymiary jednostki (dł. x szer. x wys.) 476 x 551 x 760 mm 476 x 551 x 760 mm Wymiary wlotu powietrza 180 mm 180 mm Wymiary wylotu powietrza... -
Page 15: Deklaracja Zgodności We I Gwarancja
Używane są części, które nie zostały dostarczone przez producenta; Dokonano zmian i modyfi kacji urządzenia bez odpowiedniego zezwolenia. Deklaracja zgodności WE Zehnder Group Nederland B.V. Lingenstraat 2 NL - 8028 PM Zwolle Tel.: +31 (0)38-4296911 Faks: +31 (0)38-4225694 Rejestr sądowy Zwolle 05022293 Deklaracja zgodności WE... - Page 16 Foreword Read this manual carefully before use. This manual contains all information required for safe and optimal installation, operation and maintenance of the ComfoFond-L Eco. The unit is subjected to continual development and improvement. There is therefore a possibility that the ComfoFond-L Eco differs slightly from the descriptions given.
- Page 17 8.1 Brine loop dimensions ............................ 28 8.2 Brine mixture ..............................28 9. CE certification and warranty ................. 29 Dimensional sketch ComfoFond-L Eco 350 L ............87 II Dimensional sketch ComfoFond-L Eco 350 R ............87 III Dimensional sketch ComfoFond-L Eco 550 L ............88 IV Dimensional sketch ComfoFond-L Eco 550 R ............
-
Page 18: Introduction And Safety
Take care when transporting and unpacking the ComfoFond-L Eco. The ComfoFond-L Eco is specially developed to operate in combination with a Zehnder ventilation Make sure the packing material is disposed of in system of type ComfoAir 350 Luxe, ComfoAir an environmentally friendly manner. -
Page 19: Installation
3. Installation conditions 4. Installation In order to determine whether the ComfoFond-L 4.1 Connection of the air ducts Eco can be installed in a certain area, the following Take account of the following factors when mounting aspects must be taken into account: air ducting: The system must be fitted to allow sufficient room Only use the supplied connecting material... -
Page 20: Mounting On The Wall
Mount the ComfoFond-L Eco against a wall with a the unit to the wall, ensuring it is level. The minimum mass of 200 kg/m . The Zehnder support suspension bracket should be fitted at the frame (available as an optional extra) must be used same height as that of the ventilation unit (see for other walls. -
Page 21: Connecting The Brine Loop (Terrestrial Heat Collector)
The correct length of pipe can be determined using the ComfoFond-L Eco specifications. 4.5 Electrical connections Zehnder has special software available for The ComfoFond-L Eco is controlled and fed by the calculating the required pipe length. ventilation unit. To do so, the temperature sensor and circulation pump of the ComfoFond-L Eco must The pipe can be laid in any random form. -
Page 22: Commissioning
5. Commissioning ComfoFond-L Eco 550: 180 mm Ø upper side 8. circulation pump 9. expansion vessel All loose parts, including cardboard and 10. detachable air partition packaging materials must be removed from the 11. temperature sensor ComfoFond-L Eco before commissioning. 12. -
Page 23: Adjusting The Circulation Pump
5.3 Registering the ComfoFond-L Eco on More information about this is available in the ‘Adjusting the circulation pump’ section. the ComfoAir Luxe 19. Install all parts in reverse order (from point 4 back The control for the ComfoFond-L Eco is not activated to point 1). -
Page 24: Maintenance
6. Maintenance 6.1 For replacing filters The replacement period of the filter depends on local circumstances. We recommend replacing the filter Failure to carry out (periodic) maintenance on when replacing the ComfoAir Luxe filter. the ComfoFond-L Eco ultimately compromises the performance of the system. Replace the filter (at least) once every six months. -
Page 25: Inspecting Brine Loop
6.3 Inspecting brine loop 6.4 Cleaning internal siphon Inspect the brine loop at least once a year. Inspect the ComfoFond-L Eco internal siphon at least once a year. Check the system pressure on the pressure meter. Top-up the system if required. 1. -
Page 26: Maintenance Of Comfofond-L Eco Battery
6.6 Maintenance of ComfoFond-L Eco 6.9 Replacing filling valve battery 1. Remove the front panel of the ComfoFond-L Eco as described in the brine loop maintenance section. Inspect the ComfoFond-L Eco battery once 2. Close only ball valve V4. every 2 years. 3. -
Page 27: Malfunctions
7. Malfunctions Not all malfunctions are displayed on the digital control system of the ventilation unit, even though The ComfoFond-L Eco does not have a digital there may be malfunctions (or problems). Below is a control system that indicates malfunction codes. list of the malfunctions (or problems) that may occur The ventilation unit has a digital control system that without a malfunction code being displayed on the... -
Page 28: Technical Specifications
8 Technical specifications Description ComfoFond-L Eco 350 ComfoFond-L Eco 550 Mass ComfoFond-L Eco 46 kg 47 kg Unit dimensions (l x b x h) 476 x 551 x 760 mm 476 x 551 x 760 mm Air inlet dimensions 180 mm 180 mm Air outlet dimensions 160 mm... -
Page 29: Ce Certification And Warranty
24 months incorporating Zehnder heat recovery systems. Any after fitting up to a maximum of 30 months after the other application is seen as inappropriate use and date of manufacture. - Page 30 Avant-propos Lisez attentivement le manuel avant utilisation. Le manuel contient toutes les informations nécessaires pour une installation, utilisation et maintenance sûres et optimales du ComfoFond-L Eco. L’appareil est soumis à un développement et une amélioration continue. De ce fait, il se peut que le ComfoFond-L Eco diffère quelque peu des descriptions.
- Page 31 8.1 Dimensions du circuit à fluide ........................42 8.2 Mélange de fluide ............................42 9. Marquage CE et garantie ..................43 Croquis cotes ComfoFond-L Eco 350 L ..............87 II Croquis cotes ComfoFond-L Eco 350 R ..............87 III Croquis cotes ComfoFond-L Eco 550 L ..............88 IV Croquis cotes ComfoFond-L Eco 550 R ..............
-
Page 32: Introduction Et Sécurité
Le ComfoFond-L Eco a été conçu spécialement et du déballage du ComfoFond-L Eco. pour fonctionner en combinaison avec un système de ventilation Zehnder de type ComfoAir 350 Luxe, Assurez-vous que l’emballage est jeté sans ComfoAir 450 Luxe, ComfoAir 550 Luxe, ComfoD contaminer l’environnement. -
Page 33: Installation
4. Installation L = Indique un modèle montage à gauche pour un système de ventilation montage à gauche; R = Indique un modèle montage à droite pour un 4.1 Raccordement des gaines système de ventilation montage à droite. Lors du montage des gaines, il faut tenir compte des aspects suivants: 3. -
Page 34: Montage Mural
200 kg/m . Pour les autres 4. Raccordez les deux raccords coudés à 90º à murs, le châssis de Zehnder (disponible en option) l’aide du manchon de raccordement en EPP (B). doit être utilisé. Ceci permet d’éviter le plus possible 5. -
Page 35: Raccordement Du Circuit À Fluide (Collecteur Géothermique)
à fluide qui a été installé peuvent être notées. nécessaire est disponible auprès de Zehnder. 4.5 Branchements électriques Le conduit peut être posé suivant n’importe quelle Le ComfoFond-L Eco est commandé... -
Page 36: Mise En Service
5. purge (intégrée dans le groupe de sécurité du 5. Mise en service chauffe-eau) 6. filtre à air Avant la mise en service, tous les composants 7. sortie d’air qui ne font pas partie de l’appareil, par exemple ComfoFond-L Eco 350 : Ø 160 mm face latérale le carton et le matériel d’emballage, doivent être ComfoFond-L Eco 550 : Ø... -
Page 37: Réglage De La Pompe À Fluide
si nécessaire, une pompe de compression. La position sur laquelle la pompe à fluide doit 16. Vérifiez à nouveau la pression du système et être réglée est indiquée dans ajoutez si nécessaire du liquide pour augmenter les spécifications du ComfoFond-L Eco. la pression. -
Page 38: Maintenance
supérieure à celle réglée au menu P62; 1. Mettez le système de ventilation hors tension. En mode Été, lorsque le capteur de température 2. Retirez la poignée de filtre (A) du du ComfoFond-L Eco mesure une température ComfoFond-L Eco. inférieure à celle réglée au menu P63. À... -
Page 39: Inspection Du Circuit À Fluide
6.3 Inspection du circuit à fluide 6.4 Nettoyage du siphon interne Inspectez le siphon interne du ComfoFond-L Inspectez le circuit à fluide au moins une fois Eco au moins une fois par an. par an. 1. Retirez le panneau avant du ComfoFond-L Eco Vérifiez la pression du système sur le manomètre. -
Page 40: Entretien De La Batterie Du Comfofond-L Eco
3. S’il n’y a plus d’opérations de maintenance à choisie jusqu’à ce que le système ne soit plus effectuer: sous pression. Remontez toutes les pièces en suivant la 5. Remplacez la vanne de remplissage. procédure inverse et remettez le système de ventilation sous tension (Comme décrit au Le siphon interne est un composant vulnérable. -
Page 41: Défauts
7. Défauts Il arrive dans certains cas qu’aucun message de défaut n’apparaisse sur la commande numérique Le ComfoFond-L Eco lui-même n’est pas équipé du système de ventilation, alors qu’il y a bien un d’une commande numérique indiquant les codes de défaut (ou un problème). -
Page 42: Specifications Techniques
8. Spécifications techniques Description ComfoFond-L Eco 350 ComfoFond-L Eco 550 Poids du ComfoFond-L Eco 46 kg 47 kg Dimensions de l’armoire (l x L x h) 476 x 551 x 760 mm 476 x 551 x 760 mm Dimension de la prise d’air 180 mm 180 mm Dimension de la sortie d’air... -
Page 43: Marquage Ce Et Garantie
Le fabricant garantit le ComfoFond-L Eco pour une une utilisation dans un système de ventilation période allant de 24 mois après l’installation jusqu’à équilibrée avec récupération de chaleur de Zehnder. un maximum de 30 mois après la date de fabrication Tout autre usage est considéré comme usage du ComfoFond-L Eco. - Page 44 Premessa Leggere attentamente il presente manuale prima dell’utilizzo del prodotto. Il manuale contiene tutte le informazioni necessarie ad assicurare un’installazione, un funzionamento e una manutenzione sicuri e ottimali del ComfoFond-L Eco. L’unità è soggetta a sviluppo e a miglioramenti continui. Pertanto, esiste la possibilità...
- Page 45 8.1 Dimensioni circuito del liquido ........................... 56 8.2 Miscela liquida ................................56 9. Marcatura CE e garanzia ..................57 Disegno quotato ComfoFond-L Eco 350 L ............. 87 II Disegno quotato ComfoFond-L Eco 350 R ............. 87 III Disegno quotato ComfoFond-L Eco 550 L ............. 88 IV Disegno quotato ComfoFond-L Eco 550 R .............
-
Page 46: Introduzione E Sicurezza
Il ComfoFond-L Eco è stato progettato appositamente per funzionare abbinato a un sistema Prestare particolare cura durante il trasporto e la di ventilazione Zehnder del tipo ComfoAir 350 Luxe, rimozione dell’imballo del ComfoFond-L Eco. ComfoAir 450 Luxe, ComfoAir 550 Luxe, ComfoD 350 Luxe, ComfoD 450 Luxe, ComfoD 550 Luxe, Assicurarsi che i materiali usati per l’imballo... -
Page 47: Installazione
4 Installazione oppure WHR930 Luxe; 550 = ComfoAir 450/550 Luxe, ComfoD 450/550 Luxe oppure WHR950/960 Luxe; 4.1 Collegamento dei condotti dell’aria L = si riferisce a un modello a sinistra per un Durante il montaggio dei condotti dell’aria occorre modello di sistema di ventilazione a sinistra; tenere conto dei seguenti aspetti: R = si riferisce a un modello a destra per un Per collegare il ComfoFond-L Eco e il sistema di... -
Page 48: Montaggio A Parete
200 kg/m . Per altre pareti occorre sistema di ventilazione. utilizzare il supporto di Zehnder (disponibile su 4. Collegare i due raccordi ad angolo da 90º al richiesta). Questo accorgimento consente di ridurre manicotto di collegamento in EPP (B). -
Page 49: Collegamento Del Circuito Del Liquido (Collettore Di Calore Geotermico)
è possibile del ComfoFond-L Eco. È possibile richiedere a annotare i dati del circuito del liquido Zehnder un software speciale per il calcolo della installato. lunghezza necessaria per il tubo. 4.5 Collegamenti elettrici Il tubo può... -
Page 50: Messa In Funzione
5. Messa in funzione 7. uscita aria ComfoFond-L Eco 350: laterale 160 mm Ø ComfoFond-L Eco 550: parte superiore Prima di azionare l‘unità è necessario rimuovere 180 mm Ø tutti i componenti staccati, come cartone e 8. pompa del liquido materiali da imballaggio dal ComfoFond-L Eco. -
Page 51: Impostazione Della Pompa Del Liquido
necessario, un’ulteriore pompa a pressione. Per verificare la posizione a cui impostare la 16. Controllare nuovamente la pressione del sistema pompa del liquido si rimanda alle specifiche ed eventualmente rabboccare per aumentare la tecniche del ComfoFond-L Eco. pressione. 17. Chiudere la valvola di riempimento V3 e sganciare In fondo a questo manuale è... -
Page 52: Manutenzione
6.1 Sostituzione filtro inferiore a quella impostata nel menu P63. La frequenza di sostituzione del filtro dipende dalle In fondo a questo manuale è disponibile un condizioni. La soluzione migliore è quella di sostituire rapporto di installazione su cui è possibile il filtro contemporaneamente a quello del ComfoAir annotare le temperature impostate. -
Page 53: Controllo Circuito Del Liquido
6.4 Pulizia del sifone interno 6.3 Controllo circuito del liquido Controllare almeno una volta l’anno il sifone Controllare almeno una volta l’anno il circuito interno del ComfoFond-L Eco. del liquido. 1. Rimuovere il pannello anteriore del ComfoFond-L Controllare la pressione del sistema sul manometro. Eco come descritto nel capitolo sulla Se necessario, riempire il sistema. -
Page 54: Manutenzione Batteria Comfofond-L Eco
6.6 Manutenzione batteria ComfoFond-L 6.9 Sostituzione valvola di riempimento 1. Rimuovere il pannello anteriore del ComfoFond-L Eco come descritto nel capitolo sulla manutenzione del circuito del liquido. Controllare almeno una volta ogni due anni la 2. Chiudere unicamente il rubinetto a sfera V4. batteria del ComfoFond-L Eco. -
Page 55: Guasti
7. Guasti Il ComfoFond-L Eco non è dotato di un dispositivo Non sempre il dispositivo di controllo digitale del di controllo digitale che visualizza i codici dei guasti. sistema di ventilazione visualizza messaggi di errore Questo dispositivo digitale di visualizzazione dei nel caso in cui vi siano guasti (o problemi). -
Page 56: Dati Tecnici
8. Dati tecnici Descrizione ComfoFond-L Eco 350 ComfoFond-L Eco 550 Massa ComfoFond-L Eco 46 kg 47 kg Dimensioni cassa (l x b x h) 476 x 551 x 760 mm 476 x 551 x 760 mm Dimensioni presa d'aria 180 mm 180 mm Dimensioni bocchetta di ventilazione 160 mm... -
Page 57: Marcatura Ce E Garanzia
24 mesi di ventilazione bilanciata’ con recupero di dall’installazione, fino ad un massimo di 30 mesi calore Zehnder. Qualsiasi altra applicazione dalla data di fabbricazione. Le richieste d’inter-vento verrà considerata come uso improprio e potrà... - Page 58 Voorwoord Lees de handleiding vóór gebruik zorgvuldig door. De handleiding bevat alle informatie die bijdraagt aan een veilige en optimale installatie, bediening en onderhoud van de ComfoFond-L Eco. Het apparaat is onderworpen aan voortdurende ontwikkeling en verbetering. Hierdoor bestaat er de mogelijkheid dat de ComfoFond-L Eco enigszins afwijkt van de omschrijvingen.
- Page 59 8.1Afmetingen vloeistofcircuit ..........................70 8.2 Vloeistofmengsel ............................70 9. CE-markering en Garantie ..................71 Maatschets ComfoFond-L Eco 350 L ..............87 II Maatschets ComfoFond-L Eco 350 R ..............87 III Maatschets ComfoFond-L Eco 550 L ..............88 IV Maatschets ComfoFond-L Eco 550 R ..............88 V Plaatjes montage aan de wand ................
-
Page 60: Inleiding En Veiligheid
De ComfoFond-L Eco is speciaal ontwikkeld om in de levering. combinatie met een Zehnder ventilatiesysteem te werken van het type ComfoAir 350 Luxe, ComfoAir De meeste onderdelen bevinden zich aan de 450 Luxe, ComfoAir 550 Luxe, ComfoD 350 Luxe, binnenzijde van de ComfoFond-L Eco. -
Page 61: Installatie
3. Installatievoorwaarden 4. Installatie Om vast te stellen of de installatie van de ComfoFond-L Eco in een bepaalde ruimte mogelijk 4.1 Aansluiting van de luchtkanalen is, moet er rekening gehouden worden met de Tijdens het monteren van de luchtkanalen moet volgende aspecten: er rekening gehouden worden met de volgende De plaats van de installatie moet zodanig... -
Page 62: Montage Aan De Wand
De ophangbeugel dient een massa van minimaal 200 kg/m . Voor andere op dezelfde hoogte te worden gemonteerd als die wanden moet het onderstel van Zehnder (optioneel van het ventilatietoestel (zie bijlage Wall mountig te verkrijgen) worden gebruikt. Hiermee wordt pictures). -
Page 63: Aansluiting Van Het Vloeistofcircuit (Aardwarmtecollector)
4.5 Elektrische aansluitingen uitrekenen van de benodigde buis lengte is te De ComfoFond-L Eco wordt bestuurd en gevoed verkrijgen bij Zehnder. door het ventilatietoestel. Hiervoor moet de temperatuursensor en vloeistofpomp van de De buis kan in elke willekeurige vorm gelegd worden. -
Page 64: In Bedrijf Nemen
veiligheidsgroep) 5. In bedrijf nemen luchtfilter luchtuitgang Voor het in bedrijf nemen dienen alle ComfoFond-L Eco 350: 160 mm Ø zijkant losse onderdelen, zoals karton en ComfoFond-L Eco 550: 180 mm Ø bovenzijde verpakkingsmateriaal, uit de ComfoFond-L Eco vloeistofpomp te worden verwijderd. expansievat 10. -
Page 65: De Vloeistofpomp Instellen
16. Controleer nogmaals de systeemdruk en vul Achterin deze handleiding bevindt zich een eventueel bij om de druk te verhogen. installatierapport waarop de ingestelde stand 17. Sluit vulventiel V3 en koppel de vulslang los. kan worden genoteerd. 18. Stel de vloeistofpomp op de juiste stand in. Meer hiervoor is te vinden in het hoofdstuk ‘De 5.3 De ComfoFond-L Eco aanmelden op vloeistofpomp instellen’. -
Page 66: Onderhoud
lager is dan de temperatuur die is ingesteld in 1. Verwijder de voedingsspanning van het menu P63. ventilatietoestel. 2. Trek de filtergreep (A) uit de ComfoFond-L Eco. Achterin deze handleiding bevindt zich een installatierapport waarop de ingestelde temperaturen kunnen worden genoteerd. 6. -
Page 67: Vloeistofcircuit Inspecteren
6.3 Vloeistofcircuit inspecteren 6.4 Interne sifon reinigen Inspecteer minimaal één maal per jaar het Inspecteer minimaal één maal per jaar de vloeistofcircuit. interne sifon van de ComfoFond-L Eco. Controleer de druk van het systeem op de 1. Verwijder het frontpaneel van de ComfoFond-L drukmeter. -
Page 68: Comfofond-L Eco Batterij Onderhouden
6.6 ComfoFond-L Eco batterij 6.9 Vulventiel vervangen onderhouden 1. Verwijder het frontpaneel van de ComfoFond-L Eco zoals staat omschreven in het onderhoudshoofdstuk van het vloeistofcircuit. Inspecteer de batterij van de ComfoFond-L 2. Sluit alleen kogelkraan V4. Eco één maal per 2 jaar. 3. -
Page 69: Storingen
7. Storingen De ComfoFond-L Eco zelf beschikt niet over een digitale besturing die storingscodes weergeeft. Het ventilatiesysteem heeft een digitale besturing die storingscodes weergeeft. In de handleiding van het ventilatiesysteem is terug te vinden wat de storingscodes inhouden en hoe deze kunnen worden opgelost.. -
Page 70: Technische Specificaties
8. Technische specificaties Omschrijving ComfoFond-L Eco 350 ComfoFond-L Eco 550 Massa ComfoFond-L Eco 46 kg 47 kg Kastafmeting (l x b x h) 476 x 551 x 760 mm 476 x 551 x 760 mm Luchtinlaat afmeting 180 mm 180 mm Luchtuitlaat afmeting 160 mm 180 mm... -
Page 71: Ce-Markering En Garantie
De fabrikant garandeert de ComfoFond-L Eco voor voor toepassing in een ‘balansventilatiesysteem’ met een periode van 24 maanden na installatie tot een warmteterugwinning van Zehnder. Elk ander gebruik maximum van 30 maanden na productiedatum wordt gezien als onbedoeld gebruik en kan leiden van de ComfoFond-L Eco. -
Page 72: Prólogo
Prólogo Lea atentamente este manual antes de usar el dispositivo. Este manual contiene toda la información necesaria para ofrecer un funcionamiento y mantenimiento óptimos y seguros del dispositivo ComfoFond-L Eco. La unidad está sometida a una mejora y a un desarrollo ininterrumpidos Así, existe la posibilidad de que el ComfoFond-L Eco difiera levemente de las descripciones aquí... - Page 73 8.2 Mezcla de agua glicolada ..........................85 9. Garantía y certificado CE ..................86 Desenho dimensional ComfoFond-L Eco 350 L ............. 87 II Desenho dimensional ComfoFond-L Eco 350 R ............. 87 III Desenho dimensional ComfoFond-L Eco 550 L ............. 88 IV Desenho dimensional ComfoFond-L Eco 550 R .............
-
Page 74: Introducción Y Seguridad
Transporte y desembale con cuidado el dispositivo diseñado para funcionar junto con un sistema de ComfoFond-L Eco. ventilación Zehnder de tipo ComfoAir 350 Luxe, ComfoAir 450 Luxe, ComfoAir 550 Luxe, ComfoD 350 Asegúrese de desechar el material de Luxe, ComfoD 450 Luxe, ComfoD 550 Luxe, WHR930 desembalaje de forma ecológica. -
Page 75: Condiciones De Instalación
4. Instalación 350 Luxe o WHR930 Luxe; 550 = Apto para una unidad ComfoAir 450/550 Luxe, ComfoD 450/550 Luxe o WHR950/960 4.1 Conexión de los conductos de aire Luxe; Tenga en cuenta los siguientes factores al montar los L = Relativo a un modelo de lado izquierdo conductos de aire: para una unidad sistema de ventilación de lado Utilice únicamente el material de conexión... -
Page 76: Montaje En Pared
2. Coloque el dispositivo ComfoFond-L Eco en el . Para otras paredes, debe utilizarse el marco soporte de montaje. de soporte Zehnder (disponible como accesorio 3. Coloque la junta de manguito de metal (A) en el opcional). Este reduce el ruido por contacto tanto conducto del nicho (aire exterior) de la unidad como sea posible. -
Page 77: Conexión Del Circuito De Agua Glicolada (Colector De Calor Terrestre)
Puede determinar la longitud correcta del conducto utilizando las especificaciones de 4.5 Conexiones eléctricas la unidad ComfoFond-L Eco. Zehnder dispone El dispositivo ComfoFond-L Eco está controlado de software específico para el cálculo de la y alimentado por la unidad sistema de ventilación. -
Page 78: Puesta En Marcha
5. Puesta en marcha de la caldera) 6. filtro de aire 7. entrada de aire Para la puesta en marcha, todos los elementos ComfoFond-L Eco 350: lado de 160 mm de sueltos, como el cartón y el material de diámetro embalaje, se deben apartar del dispositivo ComfoFond-L Eco 550: lado superior de 180 mm ComfoFond-L Eco. -
Page 79: Ajuste De La Bomba De Circulación
13. Cierre la válvula de llenado V1. terrestre; 14. Abra la llave V2. El diámetro interno del colector de calor terrestre; 15. Aumente la presión en el dispositivo a 1,5 bar. La composición de la mezcla de agua glicolada; Con este fin, utilice la manguera de llenado La temperatura de la mezcla de agua glicolada. -
Page 80: Mantenimiento
6. Mantenimiento La bomba de circulación del dispositivo ComfoFond-L Eco se desactivará si: El sensor de temperatura del dispositivo El incumplimiento en la realización de las tareas ComfoFond-L Eco mide una temperatura superior de mantenimiento (periódicas) del dispositivo a la ajustada en el menú P62 en modo Invierno; ComfoFond-L Eco comprometerá... -
Page 81: Limpieza Del Drenaje De Condensación
6.3 Inspección del circuito de agua glicolada Inspeccione el circuito de agua glicolada al menos una vez al año. Compruebe la presión del sistema en el ComfoFond-L Eco 350 ComfoFond-L Eco 550 manómetro. En caso necesario, rellene el sistema. 3. Extraiga el filtro antiguo (B) del dispositivo La presión en el circuito de agua glicolada ComfoFond-L Eco. -
Page 82: Mantenimiento De La Carcasa Del Dispositivo Comfofond-L Eco
6.4 Limpieza del sifón interno sección de mantenimiento para el circuito de agua glicolada) Inspeccione el sifón interno del dispositivo 6.6 Mantenimiento de la batería del ComfoFond-L Eco al menos una vez al año. dispositivo ComfoFond-L Eco 1. Retire el panel frontal del dispositivo ComfoFond-L Eco según las indicaciones Inspeccione la batería del dispositivo descritas en la sección de mantenimiento del... -
Page 83: Sustitución De La Válvula De Llenado
6.9 Sustitución de la válvula de llenado 6.10 Sustitución del grupo de seguridad de la caldera 1. Retire el panel frontal del dispositivo ComfoFond-L Eco según las indicaciones 1. Retire el panel frontal del dispositivo descritas en la sección de mantenimiento del ComfoFond-L Eco según las indicaciones circuito de agua glicolada descritas en la sección de mantenimiento del... -
Page 84: Fallos De Funcionamiento
7. Fallos de funcionamiento El sistema de control digital de la unidad sistema de ventilación no muestra todos los fallos de funcionamiento, aunque se estén produciendo El dispositivo ComfoFond-L Eco no dispone de un fallos (o problemas). A continuación se muestra una sistema de control digital que indique códigos de lista de los fallos de funcionamiento (o problemas) fallo de funcionamiento. -
Page 85: Especificaciones Técnicas
8. Especificaciones técnicas Descripción ComfoFond-L Eco 350 ComfoFond-L Eco 550 Masa, ComfoFond-L Eco 46 kg 47 kg Dimensiones de la unidad (l x a x al) 476 x 551 x 760 mm 476 x 551 x 760 mm Dimensiones de la entrada de aire 180 mm 180 mm Dimensiones de la salida de aire... -
Page 86: Garantía Y Certificado Ce
30 meses tras la fecha de fabricación. ventilación equilibrados que incorporen sistemas Sólo pueden presentarse reclamaciones de garantía de recuperación de calor Zehnder. Cualquier otro por defectos materiales o fallos de construcción uso se considerará no apropiado y puede conllevar originados durante el período de garantía. - Page 87 Dimensional sketch ComfoFond-L Eco 350 L G 3/4`` G 3/4`` 1152 II Dimensional sketch ComfoFond-L Eco 350 R G 3/4`` 160 G 3/4`` 1152...
- Page 88 III Dimensional sketch ComfoFond-L Eco 550 L G 3/4`` G 3/4`` 32 1210 IV Dimensional sketch ComfoFond-L Eco 550 R G 3/4`` 286 180 G 3/4`` 32 1210...
- Page 89 V Wall mounting pictures ComfoFond-L Eco 350 ComfoFond-L Eco 550 VI Condensation drain pictures 32mm 32mm 32mm 32mm 1 1/4" 1 1/4" ComfoFond-L Eco 350 ComfoFond-L Eco 550...
- Page 90 Wiring diagram Luxe connection printed circuit board of the ventilation unit. Comm. Base RS232 - PC RS232 - KFB ComfoFond-L pump VIII Air resistance graphs without filters...
- Page 91 IX Circulation pump settings Kolektor gruntowy typ Kolektor gruntowy długość Nastawy pompy cieczy Terrestrial heat collector type Terrestrial heat collector type Circulation pump setting Collecteur géothermique type Collecteur géothermique longueur Réglage de pompe à fluide Collettore di calore geotermico tipe Collettore di calore geotermico lunghezza Impostazione pompa del liquido Aardwarmtecollector type...
- Page 92 X Service parts Numer Część Numer artykułu SAP Numer artykułu MFGpro Number Part Article number SAP Article number MFGpro Numéro Pièce Numéro d’article SAP Numero d’article MFGpro Numero Componente Numero articolo SAP Numero articolo MFGpro Nummer Onderdeel Artikelnummer SAP Artikelnummer MFGpro Número Pieza Número de artículo SAP...
- Page 93 XI Installation report Date Address Work instruction Town/city Commissioning party Residence Installed by ComfoFond-L Eco type*: 350/550 Left/Right *Delete as applicable Settings ventilation unit P-Menu P62 P-Menu P63 Terrestrial heat collector details Circulation Brine volume pump setting Selected glycol % ø...
- Page 94 Maintenance log Data Czynność Inicjały Date Activity Intitials Date Activite Paraphe Data Attivita Sigla Datum Activiteit Paraaf Fecha Actividad Iniciales...
- Page 96 Asia Great Britain (Russia) Zehnder Comfosystems Sevastopolsky Prospect 11G (China) A division of Zehnder Group UK Ltd (2nd Floor) Zehnder (China) Unit 1, Brookside Avenue 117152 Moscow Indoor Climate Co., Ltd. Rustington West Sussex T +7 495 988 50 15...