Publicité

Les langues disponibles

Les langues disponibles

Liens rapides

Notice de montage et d'utilisation
(à conserver précieusement)
Français : page
Instructions for installation and use
(to be kept in a safe place)
English : page
IMontage- und Gebrauchsanleitung
(Bitte sicher aufbewahren)
Deutsch : seite
2
12
22

Publicité

Table des Matières
loading

Sommaire des Matières pour Zodiac O'Clair Pool First

  • Page 1 Notice de montage et d’utilisation (à conserver précieusement) Français : page Instructions for installation and use (to be kept in a safe place) English : page IMontage- und Gebrauchsanleitung (Bitte sicher aufbewahren) Deutsch : seite...
  • Page 2 1-Notice Poolfirst FRA_Mise en page 1 05/01/11 10:59 Page2 Chère Cliente, Cher Client, Vous avez choisi le robot Pool First et nous vous remercions de votre confiance. Votre appareil a été conçu, fabriqué et contrôlé en France avec le plus grand soin afin qu'il vous donne entière satisfaction.
  • Page 3: Table Des Matières

    1-Notice Poolfirst FRA_Mise en page 1 05/01/11 10:59 Page3 SOMMAIRE 1 / VOTRE SÉCURITÉ 2 / MISE EN ŒUVRE DEBALLAGE MONTAGE DU CHARIOT DE TRANSPORT RACCORDEMENT ÉLECTRIQUE IMMERSION DU ROBOT MISE EN ROUTE CONSEILS D'UTILISATION 3 / NETTOYAGE ET ENTRETIEN NETTOYAGE DU SAC - FILTRE NETTOYAGE ET STOCKAGE DU ROBOT 4 / CHANGEMENT DES BROSSES...
  • Page 4: Votre Sécurité

    1-Notice Poolfirst FRA_Mise en page 1 05/01/11 10:59 Page4 1/ VOTRE SÉCURITÉ Votre robot Pool First a été fabriqué en conformité avec les normes les plus rigoureuses. Pour profiter de votre appareil en toute sécurité, respectez les indications suivantes : >...
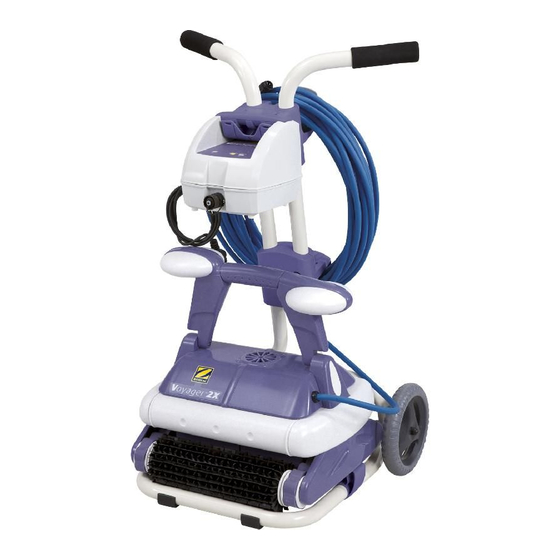
  • Page 5: Montage Du Chariot De Transport

    1-Notice Poolfirst FRA_Mise en page 1 05/01/11 10:59 Page5 MONTAGE DU CHARIOT DE TRANSPORT Montage de la partie haute du chariot. Schéma a) Positionnez les tubes hauts (1) et (2) sur le crochet boîtier (3). b) Posez le crochet câble (4). Les tubes doivent être orientés du côté du crochet câble. c) Mettez la vis (7) en haut du crochet câble et serrez - la à...
  • Page 6: Mise En Route

    1-Notice Poolfirst FRA_Mise en page 1 05/01/11 10:59 Page6 MISE EN ROUTE En fonction de l'état de votre bassin, choisissez le cycle à effectuer : > Cycle 3 h pour un nettoyage minutieux de votre bassin et de la ligne d'eau. >...
  • Page 7: Nettoyage Et Entretien

    > Replacez le sac - filtre en positionnant le nœud de l'élastique de maintien au centre de la largeur du porte - filtre et les coins du sac sur les angles des tringles métalliques. L'étiquette Zodiac se trouve le long d'une tringle. > Positionnez les pinces de blocage en plastique sur les tringles.
  • Page 8: Changement Des Brosses

    1-Notice Poolfirst FRA_Mise en page 1 05/01/11 10:59 Page8 4 / CHANGEMENT DES BROSSES LE ROBOT EST ÉQUIPÉ DE BROSSES EN CAOUTCHOUC SEBS (STANDARD) Les brosses en caoutchouc à lamelles sont équipées de témoins d'usure. Pour que votre nettoyeur soit toujours très performant, vous devez remplacer les brosses dès que l'un des témoins d'usure est atteint (même si l'usure des lamelles n'est pas homogène).
  • Page 9: Ajustement Du Lestage

    1-Notice Poolfirst FRA_Mise en page 1 05/01/11 10:59 Page9 5 / AJUSTEMENT DU LESTAGE Il peut être nécessaire d'ajuster le lestage du robot pour améliorer son efficacité. Attention : il est indispensable de s'assurer que le sac - filtre soit propre, que l'eau de la piscine soit convenablement équilibrée et qu'il n'y est pas de présence d'algue sur les parois de votre piscine avant d'ajuster le lestage du robot.
  • Page 10: Conformité

    1-Notice Poolfirst FRA_Mise en page 1 05/01/11 10:59 Page10 7 / CONFORMITÉ Cet appareil a été conçu et construit selon les normes suivantes : Suivant la directive de compatibilité Électromagnétiques : 2004/108/EC et les normes : EN 55014-1: 2000 +A1:2001 +A2:2002 EN 55014-2: 1997 +A1:2002 EN 61000-3-2: 2000 + A2:2005 EN 61000-3-3: 1995 + A1:2001 +A2:2005...
  • Page 11: Votre Garantie

    Les motifs effacés, l'usure ou l'égratignure des revêtements l’usure normale, par une négligence, par une mauvaise installation ou vinyle ne relèvent pas de la responsabilité de Zodiac et ne sont pas couverts une utilisation non conforme aux recommandations figurant sur la notice par la garantie.
  • Page 12 2-Notice Poolfirst ANG_Mise en page 1 05/01/11 11:06 Page12 Dear Customer, Thank you for choosing our Pool First automatic swimming pool cleaner. The robot has been designed, manufactured and controlled in France with great care to ensure that it will satisfy your requirements. Please read this user guide carefully before using it for the first time.
  • Page 13 2-Notice Poolfirst ANG_Mise en page 1 05/01/11 11:06 Page13 USER GUIDE 1 / YOUR SAFETY 2 / FIRST OPERATIONS UNPACKING ASSEMBLING THE TRANSPORT CART ELECTRICAL CONNECTION IMMERSION OF THE ROBOT INITIAL USAGE - FUNCTIONING RECOMMENDATIONS 3 / CLEANING AND MAINTENANCE CLEANING THE FILTER-BAG CLEANING AND STORAGE 4 / CHANGING THE BRUSHES...
  • Page 14: Your Safety

    2-Notice Poolfirst ANG_Mise en page 1 05/01/11 11:06 Page14 1/ YOUR SAFETY The Pool First robot has been manufactured in conformity with the most demanding norms. In order to ensure optimal and safe functioning of your swimming pool cleaner, you must respect the following instructions: >...
  • Page 15: Assembling The Transport Cart

    2-Notice Poolfirst ANG_Mise en page 1 05/01/11 11:06 Page15 ASSEMBLING THE TRANSPORT CART Assembling the upper part of the cart. Figure a) Fit the upper handle tubes (1) and (2) on the control box support hook (3). b) Then place the cable support hook (4) - the tubes must be turned towards the cable hook.
  • Page 16: Initial Usage - Functioning

    2-Notice Poolfirst ANG_Mise en page 1 05/01/11 11:06 Page16 INITIAL USAGE - FUNCTIONING To start the robot, select a cycle on the control unit: > The 3h Cycle, for a meticulous clean of your pooland the waterline. > The 1h30 Cycle, for a rapid clean cycle, if the pool is not very dirty. To start your Pool First robot, press the programme button (3h or 1h30).
  • Page 17: Cleaning And Maintenance

    > Replace the filter-bag by placing the knot in the elastic band at the middle of the length of the filter-support, and the corners of the bag on the angles of the metal rods. The Zodiac label is fitted to one of the metal rods. > Place the plastic locking clips on the rods.
  • Page 18: Changing The Brushes

    2-Notice Poolfirst ANG_Mise en page 1 05/01/11 11:06 Page18 4 / CHANGING THE BRUSHES THE ROBOT IS FITTED WITH SEBS RUBBER PADS (STANDARD) The rubber pads include wear indicators. To ensure that your swimming pool cleaner remains highly efficient, you must change the brushes as soon as one of the wear indicators has Figure been reached (even if the strips are not evenly worn).
  • Page 19: Adjusting The Ballast

    2-Notice Poolfirst ANG_Mise en page 1 05/01/11 11:06 Page19 5 / ADJUSTING THE BALLAST It might be necessary to adjust the ballast in order to enhance the efficiency of the robot. Important: the filter-bag must be clean, the swimming pool water must be properly balanced and there must be no algae on the swimming pool walls before proceeding with adjusting the ballast of the swimming pool cleaner.
  • Page 20: Conformity

    2-Notice Poolfirst ANG_Mise en page 1 05/01/11 11:06 Page20 7 / CONFORMITY This device has been designed and manufactured according to the following norms: According to the directive on Electromagnetic compatibility: 2004/108/EC and norms EN 55014-1: 2000 +A1:2001 +A2:2002 EN 55014-2: 1997 +A1:2002 EN 61000-3-2: 2000 + A2:2005 EN 61000-3-3: 1995 + A1:2001 +A2:2005 According to the directive on low voltage: 2006/95/EC and the norms:...
  • Page 21: Warranty

    Ink used for the printed patterns may also rub off during installation or Note: Using water drawn from a well is forbidden. when in contact with objects in the pool. Zodiac will not be responsible • The present warranty does not apply to visible defects that the retailer for damages to printed patterns, abrasion or markings on vinyl liners, failed to report upon accepting delivery of the Products.
  • Page 22 3-Notice Poolfirst ALL_Mise en page 1 05/01/11 10:59 Page22 Sehr geehrte Kundin, sehr geehrter Kunde, Sie haben den Roboter Pool First ausgewählt und wir danken Ihnen für Ihr Vertrauen. Ihr Gerät ist mit größter Sorgfalt konzipiert, hergestellt und kontrolliert worden in Frankreich, um Sie vollkommen zufrieden zu stellen.
  • Page 23 3-Notice Poolfirst ALL_Mise en page 1 05/01/11 10:59 Page23 BEDIENUNGSANLEITUNG 1 / SICHERHEITSHINWEISE 2 / INBETRIEBNAHME AUSPACKEN MONTAGE DES TRANSPORTWAGENS STROMANSCHLUSS EINTAUCHEN DES ROBOTERS EINSCHALTEN - BETRIEB GEBRAUCHSHINWEISE 3 / REINIGUNG UND PFLEGE REINIGUNG DES FILTERSACKS REINIGUNG UND AUFBEWAHRUNG DES ROBOTERS 4 / WECHSELN DER BÜRSTEN 5 / BALLASTANPASSUNG 6 / IM FALLE VON PROBLEMEN...
  • Page 24: Sicherheitshinweise

    3-Notice Poolfirst ALL_Mise en page 1 05/01/11 11:00 Page24 1/ SICHERHEITSHINWEISE Ihr Pool First Roboter ist in Übereinstimmung mit den strengsten Normen hergestellt worden. Um aus Ihrem Gerät ganz sicher Nutzen zu ziehen, respektieren Sie bitte folgende Anweisungen: > Schließen Sie den Steuerblock nur an eine Steckdose an, die durch eine Fehlerstromschutzein- richtung von höchstens 30 mA geschützt ist.
  • Page 25: Montage Des Transportwagens

    3-Notice Poolfirst ALL_Mise en page 1 05/01/11 11:00 Page25 MONTAGE DES TRANSPORTWAGENS Montage des oberen Teils des Wagens. Abbildung a) Platzieren Sie die oberen Rohre (1) und (2) auf die Steuerboxhalterung (3). b) und setzen Sie dann den Kabelhaken (4) auf- die Rohre müssen zur Seite des Kabelhakens ausgerichtet sein.
  • Page 26: Einschalten - Betrieb

    3-Notice Poolfirst ALL_Mise en page 1 05/01/11 11:00 Page26 EINSCHALTEN - BETRIEB Zum Start des Roboters müssen Sie auf dem Schaltkasten das auszuführende Reinigungsprogramm wählen: > 3h-Reinigung zur besonders gründlichen Reinigung Ihres Beckens und der Wasserlinie. > 1h30-Reinigung zur schnellen Reinigung eines geringverschmutzten Schwimmbeckens.
  • Page 27: Reinigung Und Pflege

    Knoten vom Gummi in der Mitte der Breite vom Filtersack und die Ecken des Sackes sich in den Winkeln der Metallstangen befinden. Das Zodiac Etikett befindet sich an einer Stange. > Platzieren Sie die Blockierklemmen aus Plastik auf den Stangen des Filterhalters.
  • Page 28: Wechseln Der Bürsten

    3-Notice Poolfirst ALL_Mise en page 1 05/01/11 11:00 Page28 4 / WECHSELN DER BÜRSTEN ROBOTER IST MIT SEBS-LAMELLENBÜRSTEN AUSGERÜSTET (STANDARD) Die Lamellenbürsten sind mit Verschleiß-Indikatoren ausgestattet. Sie haben einen Abnutzungsanzeiger. Um die Leistungsfähigkeit Ihres Reinigers stets zu gewährleisten, müssen Sie die Bürsten ersetzen, sobald einer der Abnutzungsanzeiger nicht mehr sichtbar ist (auch wenn die Abnutzung der Lamellen nicht einheitlich ist).
  • Page 29: Ballastanpassung

    3-Notice Poolfirst ALL_Mise en page 1 05/01/11 11:00 Page29 5 / BALLASTANPASSUNG Es kann sich gegebenenfalls als notwendig erweisen, den Ballast des Roboters anzupassen, um seine Effizienz zu verbessern. Achtung: Es ist zwingend notwendig, sich zu vergewissern, dass der Filtersack sauber ist, dass die Wasserwerte des Beckenwassers in Ordnung sind (Chlor und pH) und dass keine Algen auf den Wänden Ihres Schwimmbeckens vorhanden sind, bevor Sie den Ballast von Abbildung 19...
  • Page 30: Konformität

    3-Notice Poolfirst ALL_Mise en page 1 05/01/11 11:00 Page30 7 / KONFORMITÄT Das Gerät ist entsprechend von folgenden Normen konzipiert und gebaut worden: Gemäß der Richtlinie zur elektromagnetischen Verträglichkeit: 2004/108/EC und den Normen: EN 55014-1: 2000 +A1:2001 +A2:2002 EN 55014-2: 1997 +A1:2002 EN 61000-3-2: 2000 + A2:2005 EN 61000-3-3: 1995 +A1:2001 +A2:2005 Gemäß...
  • Page 31: Ihre Garantie

    • Während der oben festgelegten Laufzeit der Garantie, wird jeder von der Filter. Zodiac als defekt anerkannte Teil instandgesetzt oder mit einem neuen Teil • Elektroschäden, die durch Blitzschlag oder unsachgemäßen elektrischen oder Teil in gutem Betriebszustand ersetzt. Diese Garantie gilt für alle Anschluss entstehen.
  • Page 32 9005 rue Blaise Pascal 83310 COGOLIN...

Table des Matières