Table des Matières

Publicité

Les langues disponibles
  • FR

Les langues disponibles

  • FRANÇAIS, page 23

Liens rapides

GUIDA RAPIDA DI MANUTEZIONE E D'USO
MAINTENANCE AND USER'S GUIDE
MANUEL D'ENTRETIEN ET D'UTILISATION
GUÍA RÁPIDA DE USO Y MANTENIMIENTO
BEDIENUNGS- UND INSTALLATIONSANLEITUNG
GUIA RÁPIDO DE MANUTENÇÃO E DE USO
HANDLEIDING VOOR ONDERHOUD EN GEBRUIK
ΓΡΗΓΟΡΟΣ Ο ΗΓΟΣ ΣΥΝΤΗΡΗΣΗΣ ΚΑΙ ΧΡHΣHΣ
KRÓTKA INSTRUKCJA KONSERWACJI I UŻYTKOWANIA
STRUČNÝ NÁVOD PRO POUŽITÍ A ÚDRŽBU
COMBINE FRIGORIFICE MANUAL DE UTILIZARE
NAVODILA ZA UPORABO
IT
EN
FR
ES
DE
PT
NL
EL
PL
CZ
RO
SL

Publicité

Table des Matières
loading

Sommaire des Matières pour Candy CKBBS 172 F

  • Page 1 GUIDA RAPIDA DI MANUTEZIONE E D’USO MAINTENANCE AND USER’S GUIDE MANUEL D’ENTRETIEN ET D’UTILISATION GUÍA RÁPIDA DE USO Y MANTENIMIENTO BEDIENUNGS- UND INSTALLATIONSANLEITUNG GUIA RÁPIDO DE MANUTENÇÃO E DE USO HANDLEIDING VOOR ONDERHOUD EN GEBRUIK ΓΡΗΓΟΡΟΣ Ο ΗΓΟΣ ΣΥΝΤΗΡΗΣΗΣ ΚΑΙ ΧΡHΣHΣ KRÓTKA INSTRUKCJA KONSERWACJI I UŻYTKOWANIA STRUČNÝ...
  • Page 2 σελ. 71--80 ΕΛΛΗΝΙΚΑ ITALIANO pag. 1--10 Συγχαρητήρια για την αγορά αυτού του ψυγείου, το οποίο έχει Grazie per l‘acquisto di questo frigorifero, realizzato con tecnologie κατασκευαστεί ε πρωτοποριακέ τεχνολογίε , που εξασφαλίζουν εύκολη all‘avanguardia, che garantiscono un facile utilizzo nel rispetto della χρήση...
  • Page 3: Table Des Matières

    INDICE INFORMAZIONI PER LA SICUREZZA ........ 2--2 INSTALLAZIONE ..............3--3 USO..................3--3 CONSERVAZIONE ..............4--4 CONGELAMENTO ..............5--5 SBRINAMENTO ..............5--5 MANUTENZIONE E PULIZIA ..........6--6 RISPARMIO ENERGETICO ..........6--6 RIDUZIONE DELLA RUMOROSITÀ ........6--6 SPORTELLO REVERSIBILE ..........6--7 DIMENSIONI DEL PRODOTTO E COMPARTIMENTO INTEGRATO ................
  • Page 4: Informazioni Per La Sicurezza

    Grazie per aver acquistato questo prodotto. Prima di utilizzare il frigorifero, leggere attentamente questo manuale di istruzioni per ottimizzare il funzionamento dell'elettrodomestico. Conservare tutta la documentazione per future consultazioni o per altri proprietari. Questo prodotto è destinato esclusivamente all'uso domestico o applicazioni simili, ad esempio: - area cucina per il personale in negozi, uffici e altri ambienti di lavoro, - aziende agricole, hotel, motel,...
  • Page 5: Installazione

    Smaltimento del vecchio elettrodomestico Avvio dell'elettrodomestico Rimuovere tutti gli imballi presenti all'interno dell'elettrodomestico e pulirlo con acqua e bicarbonato di sodio o sapone neutro. Dopo l'installazione, attendere 2-3 ore che la temperatura del frigorifero/congelatore si stabilizzi prima di collocarvi alimenti freschi o congelati.
  • Page 6: Conservazione

    Ventola del comparto frigo Accertarsi che sia chiaramente visibile l'OK sull'indicatore della (se presente) temperatura (Fig. 5). Se non appare OK, la temperatura è troppo alta, per cui è opportuno La ventola è preimpostata su OFF (spenta). impostare una temperatura più fredda e attendere circa 10 ore. Per attivarla, premere l'interruttore (Fig.
  • Page 7: Congelamento

    CONGELAMENTO SBRINAMENTO • Gli alimenti devono essere freschi. Sbrinamento del comparto frigorifero • Per congelare rapidamente gli alimenti, introdurne piccole quantità per volta. Non superare la quantità massima indicata sulla Durante il normale funzionamento, il frigorifero si sbrina targhetta. automaticamente. Non è necessario eliminare la brina o asciugare le gocce d'acqua sulla parete posteriore (a seconda del funzionamento).
  • Page 8: Risparmio Energetico

    IMPORTANTE: Sbrinamento del comparto congelatore Per evitare incrinature delle superfici interne e delle parti in plastica, (prodotti statici senza tecnologia NO-FROST) attenersi alle seguenti raccomandazioni: • Pulire il grasso degli alimenti depositato sui componenti in plastica. Quando lo strato di ghiaccio nel comparto congelatore è superiore •...
  • Page 9 INVERSIONE DEL SENSO DI APERTURA DEGLI SPORTELLI Rimuovere la cerniera e la piastra Rimuovere lo sportello superiore. Rimuovere la cerniera centrale e il relativo Rimuovere lo sportello inferiore. superiore con un cacciavite. perno di collegamento sottostante. Rimuovere la cerniera inferiore destra e i Utilizzare la cerniera e il coperchio opposti Rimontare sportelli e cerniere dal basso tasselli in plastica a sinistra, quindi...
  • Page 10: Installazione Dell'elettrodomestico A Incasso

    INSTALLAZIONE DELL'ELETTRODOMESTICO A INCASSO Inserire l'elettrodomestico nell'incasso collocandolo sul Accertarsi che lo sportello dell'elettrodomestico sia lato opposto delle cerniere e accertarsi che la distanza allineato all'anta dell'incasso e avvitare la parte tra l'elettrodomestico e l'incasso sia 3-5 mm. superiore dell'elettrodomestico al vano Avvitare la parte inferiore dell'elettrodomestico Applicare la guarnizione all'elettrodomestico e tagliare l'eventuale parte in eccesso.
  • Page 11: Abbinamento Dei Pannelli Della Colonna Di Incasso Agli Sportelli Dell'elettrodomestico

    ABBINAMENTO DEI PANNELLI DELLA PRECAUZIONI PER L'USO COLONNA A INCASSO AGLI CORRETTO SPORTELLI DELL'ELETTRODOMESTICO Una volta incassato il prodotto, collocare la parte posteriore della colonna a contatto con la parete in modo da impedire l'accesso al vano L'elettrodomestico è fornito con gli elementi di giunzione degli sportelli compressore.
  • Page 12: Soluzione Dei Problemi

    SOLUZIONE DEI PROBLEMI PROBLEMA CAUSA SOLUZIONE La lampada per l'illuminazione interna non • Assenza di energia elettrica. • La spina del cavo di alimentazione non è inserita correttamente. si accende. • Controllare se l'elettrodomestico è spento. (vedere Regolazione della temperatura). •...
  • Page 13 CONTENTS SAFETY INFORMATION ............12--12 INSTALLATION ..............13--13 OPERATION ................13--13 CONSERVATION ..............14--14 FREEZING ................15--25 DEFROSTING ................ 15--15 MAINTENANCE AND CLEANING ........16--16 ENERGY SAVINGS .............. 16--16 AVOIDING NOISES .............. 16--16 REVERSIBILITY OF THE DOOR .......... 16--17 PRODUCT DIMENSION AND BUILT-IN COMPARTMENT.. 17--18 INSTALLATION OF THE APPLIANCE IN THE COLUMN..
  • Page 14: Safety Information

    Thank you for purchasing this product. Before using your refrigerator, please carefully read this instruction manual in order to maximize its performance. Store all documentation for subsequent use or for other owners. This product is intended solely for household use or similar applications such as: - the kitchen area for personnel in shops, offi ces and other working environments - on farms, by clientele of hotels, motels and other environments of a residential type - at bed and breakfasts (B &...
  • Page 15: Installation

    Scrapping old appliance Appliance start-up Remove all wrapping/packaging present inside the appliance and clean with water and baking soda or neutral soap. After the installation, wait 2 - 3 hours to allow time for the refrigerator/ freezer to stabilize at normal working temperature, before placing fresh or frozen foods inside.
  • Page 16: Conservation

    Refrigerator Compartment Fan Check that on the indicator of the temperature, the word OK is clearly (if present) shown (Fig. 5). If the word does not appear, this means that the tempera- ture is too high: adjust the temperature to a cooler setting and wait for The fan is preset to OFF.
  • Page 17: Freezing

    FREEZING DEFROSTING • Foods must be fresh. Defrosting the refrigerator compartment • Freeze small amounts of food at a time in order to freeze quickly. Never exceed the maximum amount indicated on the rating label. During normal functioning, the refrigerator is automatically defrosted. •...
  • Page 18: Maintenance And Cleaning

    IMPORTANT: Defrosting the freezer compartment To prevent cracking of the inside surfaces and plastic parts, follow (static products without NO-FROST technology) these suggestions: • Wipe away any food oils adhered to plastic components. When the layer of frost present in the freezer compartment •...
  • Page 19: Product Dimension And Built-In Compartment

    REVERSING THE OPENING OF THE DOORS Remove the upper plate and Remove the upper door. Remove the middle hinge and its Remove the bottom door. hinge by screw driver. connecting pin underneath. Remove the right bottom hinge Use the opposite hinge and cover Reassemble the doors and hinges and left plastic plugs, and refit and fit into the left bottom.
  • Page 20: Installation Of The Appliance In The Column

    INSTALLATION OF THE APPLIANCE IN THE COLUMN Insert the appliance into the column, placing it on After ensuring the match between appliance door the opposite site of the hinges, and make sure 3-5 and column door, then screw the appliance upper mm distance gap.
  • Page 21: Of The Appliance Doors

    COUPLING OF THE PANELS OF THE PRECAUTIONS FOR THE CORRECT BUILT-IN COLUMN OF THE OPERATION APPLIANCE DOORS Once the product has been embedded, place the rear part of the column in contact with the wall so as to prevent access to the compres- The appliance is equipped with coupling devices for the appliance doors sor compartment.
  • Page 22: Troubleshooting

    TROUBLESHOOTING PROBLEM CAUSE REMEDY The inside illumination light bulb does not • Electricity absence. • The power cord is not properly plugged in. turn on. • Check whether the appliance is switched off. (see Temperature Adjustment). • Ensure that there is a current in the house. •...
  • Page 23 CONTENU INFORMATIONS SUR LA SECURITE ........22--22 INSTALLATION ..............23--23 FONCTIONNEMENT.............. 23--23 CONSERVATION ..............24--24 CONGELATION ..............25--25 DEGIVRAGE ................25--25 MAINTENANCE ET NETTOYAGE ........26--26 ECONOMIES D'ENERGIE ............ 26--26 EVITER LES BRUITS ............26--26 OUVERTURE REVERSIBLE DE LA PORTE......26--27 DIMENSIONS DU PRODUIT ET COMPARTIMENT ENCASTRE................
  • Page 24: Informations Sur La Securite

    Merci d'avoir acheté ce produit. Avant d'utiliser votre réfrigérateur, veuillez lire attentivement ce mode d'emploi afin d'optimiser sa performance. Conserver l'ensemble de la documentation pour un usage ultérieur ou pour d'autres propriétaires. Ce produit est conçu uniquement pour une utilisation privée ou des applications similaires comme : - le coin cuisine du personnel dans les magasins, bureaux et autres environnements de travail - dans les fermes, par la clientèle des hôtels, des motels et autres environnements résidentiels...
  • Page 25: Installation

    Mise au rebut d'un appareil usagé Démarrage de l'appareil Retirer tous les matériaux de conditionnement/d'emballage présents à l'intérieur de l'appareil et le nettoyer avec de l'eau et du bicarbonate de soude ou du savon neutre. Après installation, attendre 2 - 3 heures pour laisser le temps au réfrigérateur/congélateur de se stabiliser à...
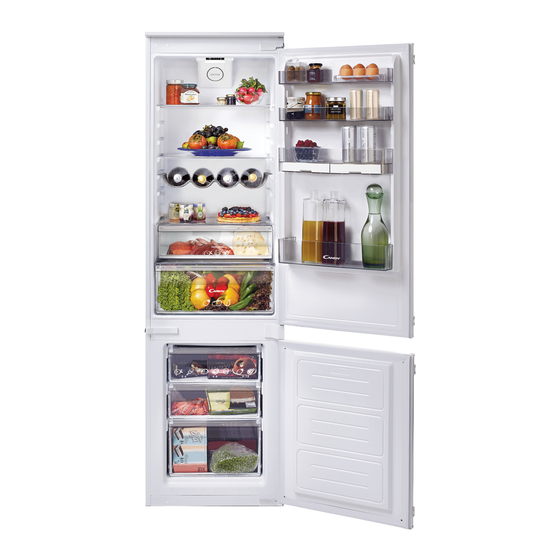
  • Page 26: Conservation

    Ventilateur du compartiment du réfrigérateur Vérifier ce point sur le voyant de la température, le mot OK apparaît (si présent) clairement (Fig. 5). Si ce mot n'apparaît pas, cela signifie que la température est trop élevée : Le ventilateur est préréglé sur OFF. régler la température à...
  • Page 27: Congelation

    CONGELATION DEGIVRAGE • Les aliments doivent être frais. Dégivrage du compartiment du réfrigérateur • Congeler de petites quantités d'aliments en même temps afin de les congeler rapidement. Ne jamais dépasser la quantité maximale Pendant son fonctionnement normal, le réfrigérateur est dégivré d'aliments indiquée sur la plaque signalétique.
  • Page 28: Maintenance Et Nettoyage

    IMPORTANT : Dégivrage du compartiment du congélateur Pour éviter toute fissure sur les surfaces intérieures et les pièces (produits fixes sans technologie NO-FROST) plastiques, suivre ces suggestions : • Essuyer toutes les graisses alimentaires collées sur les composants Lorsque la couche de givre présente dans le compartiment du plastiques.
  • Page 29: Dimensions Du Produit Et Compartiment Encastre

    INVERSER LE SENS D'OUVERTURE DES PORTES Retirer la plaque supérieure Retirer la porte supérieure. Retirer la charnière centrale et sa broche Retirer la porte inférieure. et la charnière à l'aide d'un tournevis. de raccordement située en-dessous. Retirer la charnière inférieure droite Utiliser la charnière opposée et le cache et Assembler de nouveau les mécanismes et les bouchons plastiques de gauche et...
  • Page 30: Installation De L'appareil Dans La Colonne

    INSTALLATION DE L'APPAREIL DANS LA COLONNE Insérer l'appareil dans la colonne, en le plaçant Après avoir vérifié que la porte de l'appareil et celle sur la face opposée des charnières et s'assurer de la colonne coïncident, visser la partie d'un espacement de 3-5 mm. supérieure de l'appareil sur le cabinet.
  • Page 31: Assemblage Des Panneaux De La Colonne

    ASSEMBLAGE DES PANNEAUX DE LA PRECAUTIONS RELATIVES A UN COLONNE ENCASTREE DES FONCTIONNEMENT CORRECT PORTES DE L'APPAREIL Une fois le produit incorporé, placer la partie arrière de la colonne en contact avec le mur de façon à empêcher tout accès au compartiment L'appareil est équipé...
  • Page 32: Depannage

    DEPANNAGE PROBLEME CAUSE CORRECTION L'ampoule d'éclairage intérieur ne • Absence d'électricité. • Le cordon d'alimentation n'est pas correctement inséré. s'allume pas. • Vérifier si l'appareil est éteint. (voir Réglage de la température). • S'assurer qu'il y du courant dans la maison. •...
  • Page 33 ÍNDICE INFORMACIÓN DE SEGURIDAD ........32--32 INSTALACIÓN ..............33--33 FUNCIONAMIENTO .............. 33--33 CONSERVACIÓN ..............34--34 CONGELACIÓN ..............35--35 DESCONGELACIÓN ............35--35 MANTENIMIENTO Y LIMPIEZA .......... 36--36 AHORRO DE ENERGÍA ............36--36 REDUCCIÓN DE RUIDO ............36--36 REVERSIBILIDAD DE LA PUERTA........36--37 DIMENSIONES DEL PRODUCTO Y HUECO DE ENCASTRE..
  • Page 34: Información De Seguridad

    Gracias por haber adquirido este producto. Antes de utilizar el frigorífico, le aconsejamos que lea atentamente este manual de instrucciones para maximizar su rendimiento. Guarde toda la documentación para consultar o futuros propietarios. Este producto deberá destinarse únicamente a usos domésticos u otras aplicaciones similares, como: - la zona de descanso para personal en tiendas, oficinas y otros entornos de trabajo - en granjas, para el uso de la clientela de hoteles, moteles y otros entornos de tipo residencial...
  • Page 35: Instalación

    Eliminación del aparato antiguo Puesta en marcha del aparato Retire todos los materiales de embalaje y envoltorios presentes en el interior del aparato y proceda a lavarlo con agua y bicarbonato sódico o jabón neutro. Una vez realizada la instalación, espere de 2 a 3 horas para que el frigorífico/congelador alcance la temperatura de funcionamiento normal antes de colocar alimentos congelados o frescos en su interior.
  • Page 36: Conservación

    Compruebe que se muestre claramente la palabra OK en el indicador de Ventilador en el compartimento del temperatura (Fig. 5). Si esta palabra no aparece, significa que la frigorífico (según modelo) temperatura es demasiado elevada: configure la temperatura en un ajuste más bajo y espere unas 10 horas. El ventilador está...
  • Page 37: Congelación

    CONGELACIÓN DESCONGELACIÓN • Los alimentos deben estar frescos. Descongelación del compartimento del frigorífico • Congele pequeñas cantidades de alimentos de cada vez para acelerar la congelación. Nunca supere la cantidad máxima Durante un funcionamiento normal, el frigorífico se descongela automáti- indicada en la etiqueta de valores máximos.
  • Page 38: Mantenimiento Y Limpieza

    IMPORTANTE: Descongelación del compartimento del congelador Para evitar grietas en las superficies interiores o los componentes (modelos estáticos sin tecnología NO-FROST) plásticos, siga estas sugerencias: • Elimine las grasas que se queden adheridas a los componentes plásticos. Cuando la capa de escarcha presente en el compartimento del •...
  • Page 39: Dimensiones Del Producto Y Hueco De Encastre

    INVERSIÓN DE LA APERTURA DE LAS PUERTAS Retire la placa superior y Retire la puerta superior. Retire la bisagra intermedia y el pasador Retire la puerta inferior. la bisagra con un destornillador. de conexión situado debajo. Retire la bisagra inferior derecha y Use la bisagra y la cubierta opuestas e Vuelva a montar las puertas y las bisagras los tapones plásticos de la izquierda y...
  • Page 40: Instalación Del Aparato En La Columna

    INSTALACIÓN DEL APARATO EN LA COLUMNA Inserte el aparato en la columna, colocándolo en Después de comprobar la coincidencia entre la el lado opuesto de las bisagras y dejando un puerta del aparato y de la columna, atornille la hueco de 3 a 5 mm. parte superior del aparato al armario.
  • Page 41: Acoplamiento De Los Paneles De La Columna Encastrada De Las Puertas Del Aparato

    ACOPLAMIENTO DE LOS PANELES DE LA PRECAUCIONES PARA UN COLUMNA ENCASTRADA DE LAS FUNCIONAMIENTO CORRECTO PUERTAS DEL APARATO Una vez encastrado el aparato, coloque la parte posterior de la columna en contacto con la pared para evitar el acceso al compartimento del El aparato está...
  • Page 42: Resolución De Problemas

    RESOLUCIÓN DE PROBLEMAS PROBLEMA CAUSA SOLUCIÓN La luz interior • Ausencia de suministro eléctrico. • El cable de alimentación no se ha enchufado correctamente. no se enciende. • Compruebe si el aparato está apagado. (véase Ajuste de la temperatura). • El interruptor de la puerta está bloqueado. •...
  • Page 43 INHALT SICHERHEITSINFORMATIONEN ........42--42 INSTALLATION ..............43--43 BETRIEB................43--43 KONSERVIERUNG..............44--44 GEFRIEREN ................45--45 ABTAUEN ................45--45 WARTUNG UND REINIGUNG ..........46--46 ENERGIE SPAREN .............. 46--46 GERÄUSCHE REDUZIEREN ..........46--46 TÜRANSCHLAGWECHSEL..........46--47 ABMESSUNGEN ..............47--48 INSTALLATION DES GERÄTS IM KORPUS ...... 48--48 BEFESTIGUNG DER KÜHLSCHRANKTÜREN AN DEN KORPUSFRONTEN ..............
  • Page 44: Sicherheitsinformationen

    Vielen Dank für den Kauf dieses Produkts. Bitte lesen Sie vor dem Gebrauch des Kühlschranks diese Anleitung sorgfältig, um das Gerät optimal zu nutzen. Bewahren Sie die gesamte Referenzdokumentation zum Nachschlagen oder für einen eventuellen späteren Besitzer auf. Dieses Gerät ist ausschließlich für den Hausge- brauch und vergleichbare Verwendung bestimmt, wie: - Personalküchen in Geschäften, Büros und anderen Arbeitsumgebungen - in landwirtschaftlichen Betrieben, für die Nutzung durch Gäste von Hotels, Motels und ähnlichen Unterkünften...
  • Page 45: Installation

    Entsorgung des Altgeräts Vor der Inbetriebnahme Die im Inneren des Kühlschranks befindliche Verpackung entfernen und den Innenraum mit Wasser und Natron oder einem neutralen Reinigungsmittel reinigen. Nach der Installation den Kühlschrank nicht sofort befüllen, sondern 2 bis 3 Stunden warten, damit die Kühl- und Gefrierfächer ihre normale Betriebstemperatur erreichen.
  • Page 46: Konservierung

    Kühlfachlüfter Die Temperaturanzeige prüfen, die Anzeige OK muss deutlich erkennbar (sofern vorgesehen) sein (Abb. 5). Ist die Anzeige nicht sichtbar, bedeutet dies, dass die Temperatur zu hoch ist: Der Lüfter ist standardmäßig ausgeschaltet. In diesem Fall die Kühlleistung erhöhen und ca. 10 Stunden warten. Zum Einschalten des Lüfters den Schalter betätigen (Abb.
  • Page 47: Abtauen

    EINFRIEREN ABTAUEN • Die Lebensmittel müssen frisch sein. Abtauen des Kühlraums • Lebensmittel in kleinen Portionen einfrieren, um den Vorgang zu beschleunigen. Niemals die auf dem Typenschild angegebene, Während des Normalbetriebs wird der Kühlraum automatisch abgetaut. zulässige Höchstmenge überschreiten. Die Wassertropfen und der Reif an der Rückwand (je nach Funktionsweise) müssen nicht entfernt werden.
  • Page 48: Wartung Und Reinigung

    WICHTIG: Abtauen des Gefrierfachs Um zu verhindern, dass sich an den Innenseiten und Kunststoffteilen (Modelle mit statischer Kühlung ohne NO-FROST-Technologie) Risse bilden, beachten Sie bitte folgende Hinweise: • Ölrückstände von Lebensmitteln von den Kunststoffteilen stets abwischen. Wenn die Eisschicht an den Innenwänden des Gefrierfachs dicker als •...
  • Page 49: Abmessungen

    WECHSEL DES TÜRANSCHLAGS Die Deckplatte und das Scharnier mit Die obere Tür abnehmen. Das Scharnier in der Mitte und den Die untere Tür abnehmen. einem Schraubendreher lösen und darunter befindlichen abnehmen. Befestigungsstift abnehmen. Das untere Scharnier rechts und die Das Scharnier für die linke Seite und Die Türen und Scharniere von unten Kunststoffkappen links abnehmen und die entsprechende Abdeckung unten...
  • Page 50: Installation Des Geräts Im Korpus

    INSTALLATION DES GERÄTS IM KORPUS Das Gerät in den Korpus stellen, sodass an der Die korrekte Ausrichtung der Gerätetür zur Seite der Scharniere 3 bis 5 mm Freiraum bleiben Korpusfront prüfen und die Oberseite des Geräts am Korpus festschrauben. Den Geräteboden festschrauben. Die Dichtung des Geräts anbringen und bei Bedarf überstehende Teile abschneiden.
  • Page 51: Befestigung Der Kühlschranktüren An Den Korpusfronten

    BEFESTIGUNG DER HINWEISE FÜR DEN KORREKTEN KÜHLSCHRANKTÜREN AN DEN BETRIEB KORPUSFRONTEN Nachdem das Gerät eingebaut wurde, die Rückseite des Korpus an die Wand schieben, damit der Kompressor geschützt ist. Das Gerät ist mit Befestigungselementen ausgestattet, mit denen die Türen an den Korpusfronten fixiert werden können (Schleppscharnier). Für den korrekten Betrieb des Geräts muss eine ausreichende Luftzirkulation gewährleistet sein, damit der Kompressor an der Die Schleppschiene an der Innenseite der Korpusfront in der benötigten Höhe...
  • Page 52: Fehlerbehebung

    FEHLERBEHEBUNG STÖRUNG URSACHE BEHEBUNG Die Kühlraumbeleuchtung schaltet sich • Keine Spannung. • Netzkabel nicht korrekt angeschlossen. nicht ein. • Prüfen, ob das Gerät ausgeschaltet ist (siehe Abschnitt Temperatureinstellung). • Prüfen, ob Netzspannung vorhanden ist. • Türschalter blockiert. • Auf korrekte Funktion prüfen. •...
  • Page 53 CONTEÚDOS INFORMAÇÃO DE SEGURANÇA ........52--52 INSTALAÇÃO ................ 53--53 FUNCIONAMENTO..............53--53 CONSERVAÇÃO ..............54--54 CONGELAMENTO ..............55--55 DESCONGELAMENTO ............55--55 MANUTENÇÃO E LIMPEZA ..........56--56 POUPANÇA DE ENERGIA............ 56--56 EVITAR RUÍDOS ..............56--56 POSSIBILIDADE DE INVERTER A PORTA ......56--57 DIMENSÃO DO PRODUTO E COMPARTIMENTO EMBUTIDO ................
  • Page 54: Informação De Segurança

    Obrigado por comprar este produto. Antes de usar o seu frigorífico, por favor, leia este manual de instruções cuidadosamente para maximizar o seu desempenho. Guarde toda a documentação para uso subsequente ou para outros proprietários. Este produto foi previsto apenas para uso doméstico ou aplicações semelhantes, tais como: - a área da cozinha para pessoal em lojas, escritórios e outros ambientes de trabalho - em quintas, pela clientela de hotéis, motéis e outros ambientes de tipo residencial...
  • Page 55: Instalação

    Eliminação do aparelho velho Arranque do aparelho Remova quaisquer embalagens presentes no interior do aparelho e limpe com água e bicarbonato de sódio ou sabão neutro. Depois da instalação, aguarde 2 - 3 horas para permitir tempo para que o frigorífico/congelador estabilize à temperatura de trabalho, antes de colocar alimentos frescos ou congelados no seu interior.
  • Page 56: Conservação

    Ventilador do compartimento do frigorífico Verifique se o indicador de temperatura apresenta claramente a palavra (se presente) OK (Fig. 5). Caso a palavra não apareça, isto significa que a temperatura está demasiado elevada: ajuste a temperatura para uma configuração mais fria O ventilador está...
  • Page 57: Congelamento

    CONGELAMENTO DESCONGELAMENTO • Os alimentos devem estar frescos. Descongelamento do compartimento do frigorífico • Congele pequenas quantidades de alimentos de cada vez de forma a congelar de forma rápida. Nunca exceda a quantidade Durante o funcionamento normal, o frigorífico é descongelado automati- máxima indicada na etiqueta de classificação.
  • Page 58: Manutenção E Limpeza

    IMPORTANTE: Descongelamento do compartimento do congelador Para evitar rachaduras nas superfícies interiores e peças plásticas, (produtos estáticos sem tecnologia NO-FROST) siga estas sugestões: • Limpe quaisquer gorduras de alimentos que tenham aderido aos Quando a camada de gelo presente no compartimento do componentes plásticos.
  • Page 59: Dimensão Do Produto E Compartimento Embutido

    INVERSÃO DA ABERTURA DAS PORTAS Remova a placa superior e Remova a porta superior. Remova a dobradiça do meio e o seu Remova a porta inferior. dobradiça com a chave de parafusos. pino de ligação por baixo. Remova a dobradiça do fundo à direita Utilize a dobradiça oposta e cobertura Volte a montar as portas e dobradiças e os tampões de plástico da esquerda...
  • Page 60: Instalação Do Aparelho Na Coluna

    INSTALAÇÃO DO APARELHO NA COLUNA Insira o aparelho na coluna, colocando-o no lado Após se assegurar da correspondência entre a oposto das dobradiças, mantendo uma distância porta do aparelho e a porta da coluna, aparafuse a de 3-5mm. parte superior do aparelho ao armário. Aparafuse a parte inferior do aparelho.
  • Page 61: Das Portas Do Aparelho

    PAINÉIS DE ACOPLAMENTO PRECAUÇÕES PARA UM CORRECTO DA COLUNA INCLUÍDA FUNCIONAMENTO NAS PORTAS DO APARELHO Assim que o produto esteja embutido, coloque a parte traseira da coluna em contacto com a parede para prevenir o acesso ao comparti- Este aparelho vem equipado com dispositivos de acoplamento para as mento compressor.
  • Page 62: Resolução De Problemas

    RESOLUÇÃO DE PROBLEMAS PROBLEMA CAUSA SOLUÇÃO A lâmpada de iluminação interior não liga. • Ausência de electricidade. • O cabo de alimentação não está devidamente ligado. • Verifique se o aparelho está desligado. (ver Ajuste de Temperatura). • Certifique-se de que existe corrente eléctrica na casa. •...
  • Page 63 INHOUD VEILIGHEIDSINFORMATIE ..........62--62 INSTALLATIE ................ 63--63 WERKING ................63--63 BEWAREN ................64--64 INVRIEZEN ................65--65 ONTDOOIEN................65--65 ONDERHOUD EN REINIGING ..........66--66 ENERGIEBESPARINGEN ............ 66--66 GELUIDEN VERMIJDEN ............66--66 OMKEERBAARHEID VAN DE DEUR ........66--67 PRODUCTAFMETINGEN EN INBOUWKAST ...... 67--68 INSTALLATIE VAN HET TOESTEL IN DE KAST ....
  • Page 64: Veiligheidsinformatie

    Wij danken u voor de aankoop van dit product. Voordat u de koelkast gebruikt, dient u deze instructiehandleiding zorgvuldig te lezen om de beste resultaten uit het toestel te halen. Bewaar alle documentatie voor toekomstig gebruik of voor andere eigenaars. Dit product is enkel bedoeld voor huishoudelijk gebruik of voor gelijkaardige toepassingen zoals: - de keukenruimte voor personeel in winkels, kantoren en andere werkomgevingen - op boerderijen, door klanten van hotels, motels en andere omgevingen van een residentieel type...
  • Page 65: Installatie

    Oud apparaat slopen Apparaat opstarten Verwijder alle omhulsels/verpakking aan de binnenkant van het apparaat en reinig met water en bicarbonaat of een neutrale zeep. Wacht na de installatie 2-3 uur zodat de koelkast/diepvriezer de tijd krijgt om te stabiliseren bij een normale bedrijfstemperatuur, vóór u er verse of ingevroren levensmiddelen in plaatst.
  • Page 66 Ventilator koelkastgedeelte Controleer dat het woord OK duidelijk wordt weergegeven op de (indien aanwezig) temperatuurindicator (Afb. 5). Als het woord niet wordt weergegeven, betekent dit dat de temperatuur te De ventilatie is vooringesteld op OFF (Uit). hoog is: zet de temperatuur op een koudere instelling en wacht ongeveer Om deze te activeren, druk op de schakelaar (Afb.
  • Page 67: Invriezen

    INVRIEZEN ONTDOOIEN • Het voedsel moet vers zijn. Ontdooien van het koelgedeelte • Vries kleine hoeveelheden voedsel per keer in zodat het invriezen snel gaat. Overschrijd nooit de maximum hoeveelheid Tijdens een normale werking wordt de koelkast automatisch ontdooid. aangegeven op het typeplaatje. Het is niet nodig om de druppels water op de achterwand te drogen of om het ijs te verwijderen (afhankelijk van de werking).
  • Page 68: Onderhoud En Reiniging

    BELANGRIJK: Ontdooien van het diepvriesvak Volg de volgende suggesties om het barsten van de (statisch product met NO-FROST-technologie) binnenoppervlakken en plastic onderdelen te voorkomen: • Wrijf voedselolie af die zich hecht aan de plastic onderdelen. Wanneer de laag ijs in het diepvriesvak meer dan 3 mm dik is, is •...
  • Page 69: Productafmetingen En Inbouwkast

    DE OPENING VAN DE DEUREN OMKEREN Verwijder de bovenplaat en scharnier Verwijder de bovenste deur. Verwijder de middelste scharnier en zijn Verwijder de onderste deur. met behulp van een schroevendraaier. verbindingspen eronder. Verwijder de onderste scharnier rechts en Gebruik de tegenovergestelde scharnier Plaats de deuren en scharnieren opnieuw plastic plugs links en plaats deze en afdekking en plaats linksonder.
  • Page 70 INSTALLATIE VAN HET APPARAAT IN DE KAST Zet het apparaat in de kast en plaats het op de Nadat u ervoor gezorgd hebt dat er een tegenovergestelde kant van de scharnieren en overeenkomst is tussen de deur van het apparaat zorg ervoor dat er een ruimte is van 3-5mm.
  • Page 71: Koppeling Van De Panelen Van De Inbouwkast

    KOPPELING VAN DE PANELEN VAN DE VOORZORGEN VOOR DE JUISTE INBOUWKAST EN DE APPARAATDEUREN WERKING Wanneer het product ingebouwd is, plaats de achterkant van de kast in Het apparaat is voorzien van koppelingsstukken voor de contact met de wand om toegang tot het compressorcompartiment te apparaatdeuren met de kastpanelen (lader slede).
  • Page 72: Problemen Oplossen

    PROBLEMEN OPLOSSEN PROBLEEM OORZAAK OPLOSSING Het licht in de koelkast • Geen elektriciteit. • Het netsnoer zit niet juist in het stopcontact. brandt niet. • Controleer of het apparaat uitgeschakeld is. (zie Temperatuurinstelling). • Zorg ervoor dat er stroom aanwezig is in het huis. •...
  • Page 73 ΠΕΡΙΕΧΟΜΕΝΑ ΠΛΗΡΟΦΟΡΙΕΣ ΑΣΦΑΛΕΙΑΣ ............72--72 ΕΓΚΑΤΑΣΤΑΣΗ ................73--73 ΛΕΙΤΟΥΡΓΙΑ .................. 73--73 ΙΑΤΗΡΗΣΗ .................. 74--74 ΚΑΤΑΨΥΞΗ..................75--75 ΑΠΟΨΥΞΗ..................75--75 ΣΥΝΤΗΡΗΣΗ ΚΑΙ ΚΑΘΑΡΙΣΜΟΣ ..........76--76 ΕΞΟΙΚΟΝΟΜΗΣΗ ΕΝΕΡΓΕΙΑΣ ............76--76 ΑΘΟΡΥΒΗ ΛΕΙΤΟΥΡΓΙΑ ..............76--76 ΑΝΤΙΣΤΡΟΦΗ ΤΗΣ ΠΟΡΤΑΣ ............76--77 ΙΑΣΤΑΣΕΙΣ ΠΡΟΪΟΝΤΟΣ ΚΑΙ ΕΝΣ ΜΑΤ ΜΕΝΟΣ ΘΑΛΑΜΟΣ...
  • Page 74: Πληροφοριεσ Ασφαλειασ

    Ευχαριστού ε που αγοράσατε το προϊόν αυτό. Πριν χρησι οποιήσετε το ψυγείο σα , διαβάστε προσεκτικά το παρόν εγχειρίδιο χρήση για να εγιστοποιήσετε την απόδοση του ψυγείου. Αποθηκεύστε όλο το πληροφοριακό υλικό για επό ενη χρήση από άλλου χρήστε . Το προϊόν αυτό προορίζεται αποκλειστικά για οικιακή χρήση ή παρό οιε εφαρ ογέ , όπω...
  • Page 75: Εγκατασταση

    Απόρριψη παλαιών συσκευών Έναρξη λειτουργία συσκευή Αφαιρέστε όλα τα υλικά συσκευασία που υπάρχουν στο εσωτερικό τη συσκευή και καθαρίστε ε νερό και σόδα του φαγητού ή ουδέτερο σαπούνι. Μετά την εγκατάσταση, περι ένετε 2 - 3 ώρε για να ισορροπήσει το ψυγείο σε...
  • Page 76 Ανε ιστήρα θαλά ου ψύξη Ελέγξτε ότι στον δείκτη θερ οκρασία , η ένδειξη ΟΚ φαίνεται καθαρά (εάν υπάρχει) (Εικ. 5). Εάν δεν ε φανίζεται η λέξη ΟΚ, αυτό ση αίνει ότι η θερ οκρασία είναι πολύ υψηλή: Η εργοστασιακή ρύθ ιση του ανε ιστήρα είναι OFF. ρυθ...
  • Page 77: Καταψυξη

    ΚΑΤΑΨΥΞΗ ΑΠΟΨΥΞΗ • Τα τρόφι α πρέπει να είναι νωπά. Απόψυξη του ψύκτη • Καταψύξτε ικρέ ποσότητε τροφί ων κάθε φορά, για να καταψυχθούν γρήγορα. Μην ξεπερνάτε τη έγιστη ποσότητα που Κατά τη διάρκεια κανονική λειτουργία , το ψυγείο κάνει αυτό ατη απόψυξη. υποδεικνύετε...
  • Page 78: Συντηρηση Και Καθαρισμοσ

    ΣΗΜΑΝΤΙΚΟ: Απόψυξη του καταψύκτη Για να αποφύγετε ρωγ έ στι εσωτερικέ επιφάνειε και στα πλαστικά (στατικά προϊόντα χωρί τεχνολογία NO-FROST) έρη, ακολουθήστε τι παρακάτω συ βουλέ : • Σκουπίστε οποιαδήποτε λάδια είναι τυχόν κολλη ένα στα πλαστικά Όταν το στρώ α πάγου στον καταψύκτη ξεπερνά τα 3mm, συνιστάται εξαρτή...
  • Page 79: Ιαστασεισ Προϊοντοσ Και Ενσ Ματ Μενοσ Θαλαμοσ

    ΑΝΤΙΣΤΡΟΦΗ ΑΝΟΙΓΜΑΤΟΣ ΘΥΡ Ν Αφαιρέστε την κάτω πόρτα. Αφαιρέστε το καπάκι και Αφαιρέστε την πάνω πόρτα. Αφαιρέστε το εσαίο εντεσέ και τον εντεσέ ε ένα κατσαβίδι. τον πείρο σύνδεσή του από κάτω. Αφαιρέστε τον κάτω δεξιά εντεσέ Χρησι οποιήστε τον αντίθετο εντεσέ και Συναρ...
  • Page 80: Τοποθετηση Τησ Συσκευησ Στη Στηλη Εγκαταστασησ

    ΤΟΠΟΘΕΤΗΣΗ ΤΗΣ ΣΥΣΚΕΥΗΣ ΣΤΗ ΣΤΗΛΗ ΕΓΚΑΤΑΣΤΑΣΗΣ Εισάγετε το ψυγείο στο έπιπλο, ε του εντεσέδε Αφού ελέγξετε την αντιστοιχία ανά εσα στι πόρτε στην αντίθετη πλευρά, και εξασφαλίζοντα ένα κενό τη συσκευή και στη θύρα του επίπλου, βιδώστε το 3-5 mm. πάνω...
  • Page 81: Παρατεταμενη Αναστολη Λειτουργιασ

    ΕΝ ΣΗ Τ Ν ΘΥΡ Ν ΤΟΥ ΠΡΟΕΙ ΟΠΟΙΗΣΕΙΣ ΓΙΑ ΤΗ Σ ΣΤΗ ΕΠΙΠΛΟΥ ΜΕ ΤΙΣ ΛΕΙΤΟΥΡΓΙΑ ΘΥΡΕΣ ΤΗΣ ΣΥΣΚΕΥΗΣ Μόλι το προϊόν ενσω ατωθεί, τοποθετήστε το πίσω έρο τη στήλη σε επαφή ε τον τοίχο για να αποκλείσετε πρόσβαση στο δια έρισ α του Η...
  • Page 82: Αντιμετ Πιση Προβληματ Ν

    ΑΝΤΙΜΕΤ ΠΙΣΗ ΠΡΟΒΛΗΜΑΤ Ν ΠΡΟΒΛΗΜΑ ΑΙΤΙΟ ΕΠΑΝΟΡΘ ΣΗ Το εσωτερικό λα πάκι φωτισ ού • ιακοπή ρεύ ατο . • Το καλώδιο ρεύ ατο δεν έχει συνδεθεί. • Ελέγξτε ήπω η συσκευή έχει απενεργοποιηθεί. δεν ανάβει. (βλ. Ρύθ ιση θερ οκρασία ). •...
  • Page 83 SPIS TREŚCI INFORMACJE DOTYCZĄCE BEZPIECZEŃSTWA ....82--82 MONTAŻ ................83--83 OBSŁUGA................83--83 PRZECHOWYWANIE ............84--84 ZAMRAŻANIE................ 85--85 ROZMRAŻANIE ..............85--85 KONSERWACJA I CZYSZCZENIE ........86--86 OSZCZĘDNOŚĆ ENERGII ............ 86--86 UNIKANIE HAŁASU .............. 86--86 ODWRACANIE DRZWI............86--87 WYMIARY URZĄDZENIA I KOMORY DO ZABUDOWY ..87--88 MONTAŻ...
  • Page 84: Informacje Dotyczące Bezpieczeństwa

    Dziękujemy za zakup tego urządzenia. Przed rozpoczęciem użytkowania lodówki prosimy o uważne przeczytanie niniejszej instrukcji obsługi w celu osiągnięcia jak najlepszych parametrów urządzenia. Całą dokumentację należy zachować dla skorzystania z niej w przyszłości lub dla kolejnych właścicieli. Urządzenie jest przeznaczone wyłącznie do użytku domowego lub podobnych zastosowań, takich jak: - kuchenki dla personelu sklepów, biur i innych miejsc pracy, - w gospodarstwach rolnych, dla klientów hoteli, moteli i innych obiektów mieszkalnych,...
  • Page 85: Montaż

    Pozbywanie się starego urządzenia Uruchamianie urządzenia Usunąć wszelkie zabezpieczenia/opakowania znajdujące się wewnątrz urządzenia i wyczyścić je wodą i sodą oczyszczoną lub neutralnym mydłem. Po zamontowaniu i przed umieszczeniem świeżych lub zamrożonych produktów wewnątrz, odczekać 2 do 3 godzin na ustabilizowaniu się lodówki/zamrażarki w normalnej temperaturze roboczej.
  • Page 86: Przechowywanie

    Sprawdzać, czy na wskaźniku temperatury wyświetlony jest komunikat OK Wentylator komory chłodniczej (Rys. 5). Jeżeli komunikat nie pojawia się, oznacza to, że temperatura jest (jeżeli jest w wyposażeniu) zbyt wysoka: ustawić temperaturę na niższą i poczekać przez ok. 10 godzin. Wentylator jest wstępnie ustawiony jako wyłączony.
  • Page 87: Zamrażanie

    ZAMRAŻANIE ROZMRAŻANIE • Produkty spożywcze muszą być świeże. Rozmrażanie komory chłodniczej • Aby zamrażanie odbywało się szybko, jednorazowo należy zamrażać małe ilości produktów. Nigdy nie przekraczać wartości Podczas normalnego działania, lodówka rozmraża się automatycznie. Nie maksymalnej podanej na tabliczce znamionowej. ma potrzeby wycierania kropli wody znajdujących się...
  • Page 88: Konserwacja I Czyszczenie

    WAŻNE: Rozmrażanie komory zamrażarki Aby zapobiec pęknięciom powierzchni wewnętrznych i elementów (urządzenia statyczne bez technologii NO-FROST) plastikowych, stosować się do poniższych zaleceń: • Ścierać wszystkie oleje spożywcze z elementów plastikowych. Jeżeli grubość warstwy szronu w komorze zamrażarki przekracza • Elementy wewnętrzne, uszczelki i elementy zewnętrzne można czyścić 3 mm, zaleca się...
  • Page 89: Wymiary Urządzenia I Komory Do Zabudowy

    ODWRACANIE DRZWI Zdemontować płytę górną Zdjąć drzwi górne. Zdemontować środkowy zawias Zdjąć drzwi dolne. i zawias za pomocą wkrętaka. i jego sworzeń łączący pod spodem. Zdemontować zawias prawy dolny i plastikowe Użyć przeciwnego zawiasu i pokrywy i Zamontować drzwi i zawiasy od dołu zaślepki z lewej strony, a następnie zamontować...
  • Page 90: Montaż Urządzenia W Zabudowie Meblowej

    MONTAŻ URZĄDZENIA W ZABUDOWIE MEBLOWEJ Wsunąć urządzenie do zabudowy meblowej, Po zapewnieniu pasowania między drzwiami ustawiając je na przeciwnej stronie zawiasów i urządzenia a drzwiami zabudowy meblowej, zapewnić odległość 3 – 5 mm. przykręcić górną część urządzenia do szafki. Przykręcić dolną część urządzenia. Założyć...
  • Page 91: Łączenie Paneli Drzwi Zabudowyz Drzwiami Urządzenia

    ŁĄCZENIE PANELI DRZWI ŚRODKI OSTROŻNOŚCI DLA ZAPEWNIENIA ZABUDOWY PRAWIDŁOWEGO DZIAŁANIA Z DRZWIAMI URZĄDZENIA Po zabudowaniu urządzenia, dosunąć tył szafki do ściany tak, by uniemożliwić dostęp do komory sprężarki. Urządzenie jest wyposażone w złącza do połączenia drzwi urządzenia z panelami zabudowy (wkładki ślizgowe). Aby urządzenie działało prawidłowo, konieczne jest umożliwienie odpowiedniego przepływu powietrza w celu schładzania skraplacza Zamocować...
  • Page 92: Usuwanie Usterek

    USUWANIE USTEREK PROBLEM PRZYCZYNA ROZWIĄZANIE Wewnętrzna żarówka nie • Brak prądu. • Kabel zasilania nie jest podłączony prawidłowo. • Sprawdzić, czy urządzenie nie jest wyłączone włącza się. (patrz Regulacja temperatury). • Sprawdzić, czy w domu jest prąd. • Zablokowany przełącznik drzwi. •...
  • Page 93 OBSAH BEZPEČNOSTNÍ INFORMACE ..........92--92 INSTALACE ................93--93 PROVOZ ................93--93 KONZERVACE ..............94--94 ZMRAZOVÁNÍ................ 95--95 ODMRAZOVÁNÍ ..............95--95 ÚDRŽBA A ČIŠTĚNÍ.............. 96--96 ÚSPORA ENERGIE .............. 96--96 POTLAČENÍ HLUKU ............96--96 OTOČENÍ DVEŘÍ ..............96--97 ROZMĚRY SPOTŘEBIČE A SKŘÍNĚ PRO VESTAVĚNÍ ..97--98 INSTALACE SPOTŘEBIČE DO SKŘÍNĚ......
  • Page 94: Bezpečnostní Informace

    Děkujeme vám, že jste si zakoupili tento spotřebič. Před tím, než budete ledničku používat, přečtěte si pozorně pokyny v tomto návodu, abyste maximalizovali její výkon. Uchovejte dokumentaci pro následné použití nebo pro nového vlastníka. Tento spotřebič je určen použití výhradně v domácnosti nebo podobných aplikacích, jako jsou: –...
  • Page 95: Instalace

    Likvidace starého spotřebiče Zapnutí spotřebiče Odstraňte veškerý obalový materiál uvnitř spotřebiče a vyčistěte vodou s jedlou sodou nebo neutrálním mýdlem. Po instalaci vyčkejte 2 až 3 hodiny, aby se chladnička/mraznička stabilizovala na normální provozní teplotu. Teprve poté vložte čerstvé nebo zmrazené potraviny. Pokud odpojíte kabel napájení, počkejte alespoň...
  • Page 96: Konzervace

    Ventilátor chladničky Zkontrolujte, že je na indikátoru teploty jasně zobrazeno OK (Obr. 5). (je-li ve výbavě) Pokud zobrazeno není, znamená to, že je teplota příliš vysoká: upravte nastavení teploty na nižší a vyčkejte asi 10 hodin. Výchozí nastavení ventilátoru je VYPNUTO. Znovu zkontrolujte indikátor.
  • Page 97: Zmrazování

    ZMRAZOVÁNÍ ODMRAZOVÁNÍ • Potraviny musí být čerstvé. Odmrazování chladničky • Aby ke zmrazení došlo rychle, zmrazujte najednou jen malé množství potravin. Nikdy nepoužívejte větší množství, než je Při normální funkci se chladnička odmrazuje automaticky. Není nutné uvedeno na štítku. vysušovat kapky vody na zadní stěně nebo odstraňovat námrazu (v závislosti na funkci).
  • Page 98: Údržba A Čištění

    DŮLEŽITÉ: Odmrazování mrazničky Aby nedošlo k praskání vnitřních povrchů a plastových dílů, dodržujte (statický spotřebič bez technologie NO-FROST) následující doporučení: • Otřete z platových dílů jakoukoliv mastnotu, která tam ulpěla ze Pokud výška námrazy v mrazničce přesáhne 3 mm, zvyšuje se skladovaných potravin.
  • Page 99: Rozměry Spotřebiče A Skříně Pro Vestavění

    OTOČENÍ OTEVÍRÁNÍ DVEŘÍ Šroubovákem odstraňte Odstraňte horní dveře. Odstraňte prostřední závěs a Odstraňte dolní dveře. horní desku a závěs. připojovací kolík pod ním. Odstraňte spodní závěs a plastové Použijte závěs a kryt na druhé straně Smontujte dveře a závěsy postupně vložky a vložte je na druhou stranu.
  • Page 100: Instalace Spotřebiče Do Skříně

    INSTALACE SPOTŘEBIČE DO SKŘÍNĚ Vložte spotřebič do skříně tak, aby závěsy dveří spotřebiče Zkontrolujte zarovnání dveří spotřebiče a skříně a byly na druhé straně, než jsou závěsy dveří skříně. Mezera poté přišroubujte horní část spotřebiče ke skříni. mezi skříní a spotřebičem musí být 3 až 5 mm. Přišroubujte spodní...
  • Page 101: Opatření Pro Správnou Funkci

    PŘIPEVNĚNÍ PANELŮ OPATŘENÍ PRO SPRÁVNOU SKŘÍNĚ KE DVEŘÍM FUNKCI SPOTŘEBIČE Po vestavění spotřebiče přisuňte zadní stranu skříně do kontaktu se zdí. Zabráníte tak přístupu k prostoru kompresoru. Spotřebič je vybaven úchyty pro spárování dveří spotřebiče s panely skříně (kolejničky). Aby spotřebič řádně fungoval, musí být zajištěna dostatečná cirkulace Upevněte kolejničku na vnitřní...
  • Page 102: Řešení Problémů

    ŘEŠENÍ PROBLÉMŮ PROBLÉM PŘÍČINA NÁPRAVA Nerozsvítí se světlo • Není napájení elektrickým proudem. • Kabel napájení je nesprávně připojen. uvnitř spotřebiče. • Zkontrolujte, zda je spotřebič vypnutý. (viz Nastavení teploty). • Zkontrolujte, že v domě funguje elektrický proud. • Zablokovaný spínač dveří. •...
  • Page 103 ......102--102 ............103--103 ............103--103 ............104--104 ............105--105 ............105--105 ....... 106--106 ........106--106 ..............106--106 ....106--107 ............107--108 ...... 108--108 ........109--109 ......109--109 ........109--109 ....110--110...
  • Page 104 (R600a: • • • • • • • • • • • • • • • • • • • •...
  • Page 105 (2-3 2012/19/EC ON / OFF ON/OFF (3) ON/OFF (3) ON / OFF (3) ON/OFF (3) • • +10 +32°C +16 +32°C +16 +38°C +16 +43°C • • led 2 • • • • • 2/2,1/2,3/2,4, • (2).
  • Page 106 . 5) 30 ° C. • (3,4). • 2 - 3 FRIDGE ZONE 4 - 6 6 - 8 10 - 12 • • • • • • • . 4). • • •...
  • Page 107 • • • • • • • • . 6) (1,2). (1,2). . 6) . 6) N.B. (1,2).
  • Page 108 NO-FROST • • ON / OFF (3) • • • • • • • • (NO-FROST • • • • • • • • • • •...
  • Page 112 • • • • • • • • • • • • • • • • • • • • • • • • • • • • • • • • • • • • • • • • •...
  • Page 113 CUPRINS MĂSURI PRIVIND SIGURAN A........112--112 INSTALARE..............113--113 FUNC IONARE..............113--113 CONSERVAREA ALIMENTELOR........114--114 CONGELARE..............115--215 DECONGELARE.............. 115--115 ÎNTRE INERE I CURĂ ARE........116--116 REDUCEREA CONSUMULUI DE ENERGIE....116--116 ZGOMOTE PRODUSE DE APARAT....... 116--116 MODIFICAREA SENSULUI DE DESCHIDERE A U II... 116--117 DIMENSIUNI ALE PRODUSULUI I ALE SPA IULUI DE INCORPORARE............
  • Page 114: Măsuri Privind Siguran A

    Vă mul umim pentru achizi ionarea acestui produs. Înainte de a utiliza frigiderul, vă rugăm să citi i cu aten ie acest manual de utilizare pentru o func ionare cât mai bună a aparatului. Păstra i manualul de utilizare pentru referin e ulterioare. Acest produs este destinat numai pentru uz casnic sau pentru uz în medii similare, cum ar fi: - Bucătăriile personalului din magazine, birouri sau alte medii de lucru - Ferme, hoteluri i moteluri de dimensiuni mici i alte medii de tip reziden ial...
  • Page 115: Instalare

    Reciclare Punerea aparatului în funcţiune Scoate i toate materialele de ambalare de pe exteriorul i din interiorul aparatului i cură a i interiorul aparatului cu o solu ie de apă i bicarbonat de sodiu sau un detergent neutru. După instalare, a tepta i 2-3 ore pentru a lăsa aparatul să se stabilizeze la temperatura normală...
  • Page 116: Conservarea Alimentelor

    Ventilatorul compartimentului de refrigerare Verificaţi dacă pe indicatorul pentru temperatură este vizibil cuvântul OK (Fig. 5). (dacă există) Dacă nu apare cuvântul, înseamnă că temperatura este prea ridicată. Reglaţi temperatura la o valoare mai scăzută şi aşteptaţi circa 10 ore. entilatorul este presetat pe pozi ia OPRIT.
  • Page 117: Congelare

    CONGELARE DECONGELARE • Alimentele trebuie să fie proaspete. Decongelarea compartimentului de refrigerare • Congela i cantită i mici de alimente, pentru a se congela rapid. Nu depă i i cantitatea maximă indicată pe plăcu a cu date tehnice. În timpul func ionării normale, compartimentul de refrigerare se decongelează •...
  • Page 118: Între Inere I Cură Are

    IMPORTANT: Decongelarea compartimentului de congelare Pentru a preveni fisurarea suprafe elor din interiorul aparatului i (aparate independente fără sistemul NO FROST) a pieselor din plastic, vă recomandăm următoarele: • terge i urmele de ulei de pe alimente, rămase pe suprafe ele din plastic. În momentul în care stratul de ghea ă...
  • Page 119: De Incorporare

    MODIFICAREA SENSULUI DE DESCHIDERE A U ILOR Scoateţi plăcuţa de sus şi Scoateţi balamaua de la mijloc Scoateţi uşa de sus. Scoateţi uşa de jos. balamaua cu ajutorul unei şi bolţul de prindere al acesteia şurubelniţe. de sub aceasta. Scoateţi balamaua din partea din Utilizaţi balamaua din partea opusă...
  • Page 120: Instalarea Aparatului În Corp De Mobilier Tip Coloană

    INSTALAREA APARATULUI ÎN CORP DE MOBILIER TIP COLOANĂ Introduce i aparatul în corpul de mobilier tip coloană, După ce a i verificat dacă u a aparatului se prin amplasarea acestuia din partea opusă laturii cu potrive te pe u a corpului de mobilier, fixa i cu balamale i asigura i-vă...
  • Page 121: Aparatului

    FIXAREA PANOURILOR CORPURILOR MĂSURI DE SIGURAN Ă PENTRU DE MOBILIER PE U ILE APARATULUI FUNC IONAREA CORECTĂ A APARATULUI După a ezarea aparatului în spa iul de incorporare, amplasa i partea din spate a mobilierului tip coloană aproape de perete, pentru a împiedica accesul la Acest aparat este prevăzut cu dispozitive pentru fixarea u ilor aparatului compartimentul compresorului.
  • Page 122: Probleme În Func Ionare

    PROBLEME ÎN FUNC IONARE PROBLEMĂ CAUZĂ REMEDIU • techerul cablului de alimentare nu este bine Becul din interiorul aparatului nu se aprinde. • S-a întrerupt curentul. introdus în priză. • Verifica i dacă aparatul este oprit (vezi Reglarea temperaturii) • Verifica i dacă este curent. •...
  • Page 123 VSEBINA NAVODILA ZA VARNO UPORABO........122--122 NAMESTITEV ................ 123--123 DELOVANJE................123--123 HRAMBA ŽIVIL..............124--124 ZAMRZOVANJE ..............125--125 ODTALJEVANJE ..............125--125 VZDRŽEVANJE IN ČIŠČENJE..........126--126 PRIHRANEK ENERGIJE ............126--126 NORMALNI ZVOKI MED DELOVANJEM ......126--126 SPREMINJANJE STRANI ODPIRANJA VRAT ....126--127 SPREMINJANJE STRANI ODPIRANJA VRAT ....
  • Page 124: Navodila Za Varno Uporabo

    Hvala, da ste se odločili za naš izdelek! Prosimo, da pred uporabo vašega hladilnika pozorno preberete ta navodila za uporabo, saj boste lahko tako zagotovili najboljše delovanje. Vse dokumente, ki so bili hladilniku priloženi, shranite, da bodo na voljo tudi morebitnim bodočim lastnikom. Hladilnik je namenjen samo uporabi v gospodinjstvih in podobnih okoljih: - kuhinjah za osebje v pisarnah, delavnicah in drugih delovnih okoljih, - na kmetijah, za stranke v hotelih, motelih ali drugih bivalnih okoljih,...
  • Page 125: Namestitev

    KAM Z ODSLUŽENIM APARATOM Zagon hladilnega aparata Odstranite vso embalažo in notranjosti aparata in ga očistite z vodo in sodo bikarbono ali nevtralnim čistilom. Po vklopu počakajte 2 - 3 ure, da se v notranjosti hladilnika in zamrzovalnika vzpostavi normalna delovna temperature, šele nato vanj postavite sveža ali zamrznjena živila.
  • Page 126: Hramba Živil

    Ventilator v hladilnem delu Preverite, da sta na indikatorju temperature jasno vidni črki OK. (sl. 5) (nekateri modeli) Če črki nista vidni, je temperatura previsoka. Nastavite nižjo temperaturo in počakajte približno 10 ur, nato pa ponovno Ventilator je ob dobavi izklopljen (OFF). preverite indikator in po potrebi znova prilagodite temperaturo.
  • Page 127: Zamrzovanje

    ZAMRZOVANJE ODTALJEVANJE • Zamrzujte samo zelo sveža živila. Odtaljevanje hladilnega dela • Manjša količina svežih živil hitreje zamrzne. Nikoli ne prekoračujte največje dovoljene količine za enkratno zamrzovanje, Med običajnim delovanjem poteka odtaljevanje hladilnega dela ki je navedena na tablici s podatki! samodejno.
  • Page 128: Vzdrževanje In Čiščenje

    POMEMBNO: Odtaljevanje zamrzovalnega dela Da bi preprečili poškodbe površin v notranjosti in plastičnih delov, (statični aparati brez tehnologije NO-FROST) upoštevajte spodnja navodila: • Očistite morebitne ostanke jedilnega olja s plastičnih delov. Ko debelina ledene obloge v zamrzovalnem delu preseže 3mm, •...
  • Page 129 SPREMINJANJE STRANI ODPIRANJA VRAT S pomočjo izvijača snemite zgornjo Snemite zgornja vrata. Odstranite srednji tečaj in zatič pod njim. Snemite spodnja vrata. ploščo in tečaj. Odstranite spodnji tečaj na desni in Namestite tečaj in pokrovček na levo stran Ponovno namestite oboja vrata in tečaje plastične čepe na levi ter jih ponovno spodaj.
  • Page 130: Vgradnja Aparata V Nišo V Kuhinjsko Omaro

    VGRADNJA APARATA V NIŠO V KUHINJSKO OMARO Potisnite aparat v nišo in jo poravnajte s stranico omare Prepričajte se, da se vrata aparata in omarice na strani, na kateri ni tečajev; od stranice omare n aj bo ujemajo, in pritrdite aparat na zgornji strani na oddaljen 3-5 mm.
  • Page 131: Sestavljanje Vrat Omarice In Hladilnega Aparata

    SESTAVLJANJE VRAT OMARICE IN ZA BREZHIBNO DELOVANJE HLADILNEGA APARATA HLADILNEGA APARATA Ko postavite hladilni aparat na ustrezno mesto, ga potisnite ob zid, da onemogočite dostop do kompresorja. Aparatu so priloženi elementi (drsniki in nosilci), ki omogočajo sestavljanje obojih vrat. Kroženje zraka okoli hladilnega aparata ne sme biti ovirano, saj je potrebno za hlajenje kondenzatorja na dnu aparata.
  • Page 132: Odpravljanje Nepravilnosti V Delovanju

    ODPRAVLJANJE NEPRAVILNOSTI V DELOVANJU PROBLEM VZROK REŠITEV Luč v notranjosti se ne prižge. • Ni električnega toka. • Električni kabel ni pravilno priključen. • Preverite, če je aparat morda izklopljen. (gl. Nastavljanje temperature). • Stikalo na vratih je blokirano. • Prepričajte se, da je hišno električno omrežje pod tokom.
  • Page 133 CANDY HOOVER GROUP Strada Eden Fumagalli, 1 20861 Brugherio (MB) 41042401 03/2016 Italy...

Ce manuel est également adapté pour:

Ckbbs 100Rbbs 100

Table des Matières