Télécharger Imprimer la page

Publicité

Les langues disponibles
  • FR

Les langues disponibles

  • FRANÇAIS, page 15

Liens rapides

Instructions manual
Manuel d'utilisation
Bedienungsanleitung
Handboek
Manual de Utilización
Manuale d'uso
SW45
Sewing machine
Machine à coudre
Nähmaschine
Naaimachine
Máquina de coser
Macchina da cucire

Publicité

loading

Sommaire des Matières pour weasy SW45

  • Page 1 Instructions manual Manuel d'utilisation Bedienungsanleitung Handboek Manual de Utilización Manuale d’uso SW45 Sewing machine Machine à coudre Nähmaschine Naaimachine Máquina de coser Macchina da cucire...
  • Page 3 ENGLISH Caution 1. Please read the instruction carefully before operating the machine. 2. To avoid electric shock, please remove the cable before cleaning o after use. 3. Please holds the plug of power cord when pull out the cable, not pull it out. 4.
  • Page 4 12. Never operate the machine if it has a damaged power cord, damaged plug, can not work properly, or drop into water. 13. Do not use outdoors. 14. Do not operate the machine at the place which generate aerosol or oxygen is controlled. 15.
  • Page 5 NAME OF PARTS...
  • Page 6 ACCESSORIES Foot controller ×1 Thread spool ×2 Bobbin ×2 Needle threader ×1 Needle(#14) ×1 Adaptor ×1 CONNECTING THE SEWING MACHINE TO THE MAINS POWER SUPPLY 1. Connect plug “A” to the machine and plug “B” into the main socket. 2. Connect the foot control “C” to the machine 3.
  • Page 7 (Fig.2). WAYS OF THREADING Threading the upper thread as follow: 1. Place full cotton reel on to the large recessed spindle at the top/rear of the machine with the thread to the rear. Push the reel cover over the spindle so that the reel cannot come off.
  • Page 8 3. Leave about 10cm (4inch) of thread on upper bobbin (Fig.3). 4. Raise the presser foot; hold the upper thread with the left hand, use right hand to turn the hand wheel anticlockwise until the needle is raised (Fig.4). 5. When needle reach the bottom, the hook tray will hook the upper thread, ratate the hoof tray to pull the lower thread out (Fig.5).
  • Page 9 NEEDLE REPLACEMENT 1. Turn the hand wheel to raise the needle to its highest position. 2. Hold the old needles and loosen the needle clamp screw. Remove the old needle and discard responsibly. 3. Insert the new needle into the clamp with the flat side toward the right. Be sure to push the needle clamp before tightening the needle clamp screw.
  • Page 10 from the sewing machine. (Fig.21). 7. Cut the thread using the thread cutter. (Fig.22). Warning: When the sewing machine running, please do not touch the pattern selection dial FEATURES SELECTION STITCH PATTERM This machine has 12 kinds of thread stitch patterns, three kinds of straight lines, seven kinds of zigzag stitch, two kind of locking buttonhole stitch.
  • Page 11 FEATURES ADJUSTING STITCHING 1. As shown in the picture A, normal stitching shall have top and bottom threading neither over tight or loose. Top thread Cloth Bottom thread Fig. A 2. If the bottom threading looks like a straight line, which indicates the top thread is too loose.
  • Page 12 REVERSE SEWING [ Reverse sewing is often done for reinforcement at the beginning and end of seam (back stitching) 1. Reverse sewing is suitable for fastening the seam when start seam or finish seam to avoid stitches loose. 2. Stop the machine firstly, the press the reverse button as picture, the machine can sew reverse.
  • Page 13 3. Lower the presser foot and follow the regular sewing instructions. DARWER This drawer is a accessory storage compartment. THRAED CUTTER It has a thread cutter on the central left side of machine; it can cut off the thread after sewing or winging thread.
  • Page 14 Needle bent Remove and re-insert a Thread keeps new needle breaking Needle shank not properly Remove and re-insert a seated new needle Thread tension dial, thread Loosen the thread tension guide or thread pulling bar between 3-5 number too tight Thread blocked by upper Pull out the spool pin and Stitches too loose...
  • Page 15 FRANÇAIS Attention 1. Lisez ces instructions avant d´utiliser la machine. 2. Pour éviter l´électrocution, débranchez la prise avant de nettoyer la machine et après chaque utilisation. 3. Ne pas débrancher la machine en tirant sur le fil. Débrancher en tirant sur la fiche et non sur le fil. Cet appareil n'est pas destiné...
  • Page 16 11. Ne cousez pas de matériaux trop élastiques. 12. Ne jamais utiliser cette machine à coudre si le câble d'alimentation ou la prise sont endommagés ou si son fonctionnement n'est pas normal, si elle est tombée par terre, dans de l'eau ou si elle a subi des dommages.
  • Page 17 20. Vérifier que le voltage indiqué sur la plaque signalétique de l’appareil correspond bien à celui de votre installation électrique. Si ce n’est pas le cas, adressez-vous au revendeur et ne branchez pas l’appareil 21. Ne jamais laisser l’appareil sans surveillance lorsqu’il est en fonctionnement.
  • Page 18 
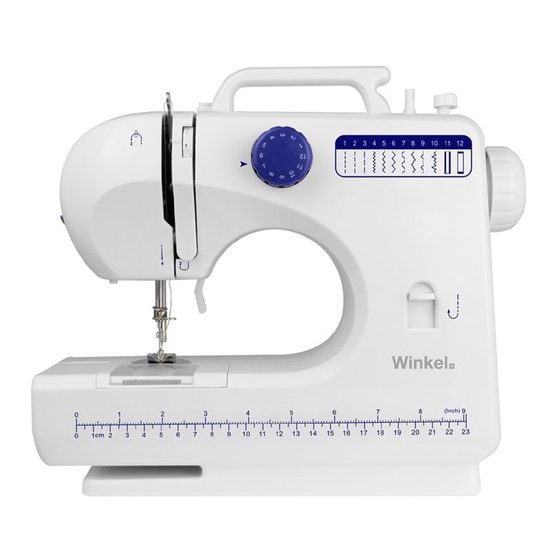
Support de bobine Vue arrière Volant Support de canette Lampe Pied Pressoir Filtre Pédale Tiroir ACCESSOIRES Pédale ×1 Bobine de fil ×2 Canette ×2 Enfileur ×1 Aiguille(#14) ×1 Adaptateur ×1 BRANCHER LA MACHINE À COUDRE 1. CONNECTER le côté “A” à la machine et le côté “B” à la prise. 2.
  • Page 19 Méthode d´enfilage Pour enfiler la machine suivez les instructions suivantes: 1. Placez la bobine de fil sur le débobineur placer sur le dessus de la machine avec le fil sortant vers l´arrière de la machine, puis placez le stoppeur pour l´empêcher de sauter.
  • Page 20 5. Une fois en bas l´aiguille va crocheter le fil du bas et le faire remonter (Img.5). 6. Sortez les deux fils d´environ 10 cm (Img.6). Attention: Il est impératif de bien enfiler le haut et le bas pour que la machine couse correctement, si vous voulez, vous pouvez faire un point de teste avant de commencer votre travail de couture.
  • Page 21 REMPLACEMENT DE L´AIGUILLE 1. Remontez l´aiguille à l´aide du volant. 2. Tenez l´aiguille pendant que vous dévissez l´écrou qui la maintien en place. Enlevez l´aiguille et disposez en convenablement pour éviter toute blessure. 3. Insérez la nouvelle aiguille la surface plate vers la droite avant de la fixer en place. 4.
  • Page 22 CARACTÉRISTIQUES SELECTION DE POINT Cette machine propose 12 points différents, 3 points droits, 7 zigzags et 2 points de resserrage de boutonnière. Référez vous au dessin sur la machine et sélectionnez le type de point souhaité avec la bobine de sélection de point comme montré sur l´image.
  • Page 23 CARACTERISTIQUES AJUSTER LE POINT 1. Comme montré sur l´image A, un point normal ne doit pas avoir de fils relaxés nis sur le dessus ni dessous. Top thread Cloth Bottom thread Img. A 2. Si le point du dessus est plat, le fil supérieur est trop tendu, vous devez tourner la bobine dans le sens des aiguilles d´une montre jusqu´à...
  • Page 24 POINT INVERSE [ Vous pouvez utiliser le point inversé pour renforcer une couture, notamment au début et à la fin de celle-ci. 1. Renverser le point pour éviter que le point se détende. 2. Arrêtez de coudre, renversez le point puis commencez à coudre en point inversé Caractéristiques ZIGZAG 1.
  • Page 25 TIROIR Tiroir pour le rangement des accessoires. COUPE FIL Un cutter est incorporé sur le côté gauche vous permettant de couper le fil. GUIDE DE DÉPANNAGE Problème Cause du Problème Réparation Pas de courant ou Piles installées incorrectement Réinstallez les piles la machine est lente Piles basses Utilisez de nouvelles piles...
  • Page 26 Fil bloqué sur la bobine Débloquez le fil Points relâchés ou supérieure irréguliers Fil trop tendu Aiguille casse Aiguille tordue Remplacez l´aiguille Pied pressoir trop relâché Replacez l´aiguille et resserrez le pied presseur Vous tirez trop sur le tissu Remplacez l´aiguille et renfilez avant de reprendre la couture en tirant le tissue doucement L´aiguille ne s´abaisse pas...
  • Page 27 NEDERLANDS Waarschuwing 1. Lees de instructies aandachtig door voordat u de machine bedient. 2. Om elektrische schokken te voorkomen, verwijder de kabel vóór het reinigen o na gebruik. 3. Gelieve houdt de stekker van het netsnoer bij het uittrekken van de kabel, niet trekken. 4.
  • Page 28 12. Laat de machine als het een beschadigd netsnoer, beschadigde stekker, kan niet goed werken, of laten vallen in het water. 13. Niet buitenshuis gebruiken. 14. Laat de machine op de plaats die het genereren van aerosol of zuurstof wordt geregeld opereren. 15.
  • Page 29 22. Bewaar dit document bij de hand en geef het aan de toekomstige eigenaar in geval van overdracht van uw apparaat. 23. Het apparaat mag niet worden gebruikt als het is gevallen, er zijn duidelijke tekenen van schade zichtbaar. ONDERDELEN...
  • Page 30 ACCESSORIES Voet pedaal ×1 Draadspoel ×2 Spoel ×2 Draadinsteker ×1 Naald(#14) ×1 Adaptor ×1 DE NAAIMACHINE AAN HET STROOMNET BEVESTIGEN 1. Stop stekker “A” in de machine en stop stekker “B” in het stopcontact. 2. Verbind voet pedaal “C” aan de machine. 3.
  • Page 31 MANIEREN OM TE NAAIEN Naaien met de bovenste draad: 1. Plaats volledige rolletje op de grote verzonken spindel aan de boven- / achterzijde van de machine met de draad naar achteren. Duw de haspel kap over de spindel zodat de rol niet kan loskomen. 2.
  • Page 32 5. Als de naald de bodem bereiken, de haak lade zal de bovenste draad haken, ratate de hoef lade om de onderste draad trekken (figuur 5). 6. Trek de onderdraad en bovendraad onder de persvoet, trek 10cm aan de achterkant (Fig.6). Waarschuwing: Het is zeer belangrijk dat de draad zowel boven als onder goed is bevestigd.
  • Page 33 NAALD VERVANGEN 1. Draai het handwiel om de naald omhoog tot de hoogste stand. 2. Houd de oude naalden en draai de naaldklemschroef. Verwijder de oude naald en gooi deze op verantwoorde wijze. 3. Plaats de nieuwe naald in de klem met de platte kant naar rechts. Zorg ervoor dat u de naaldklemschroef te duwen voordat het vastdraaien van de naaldklemschroef.
  • Page 34 Waarschuwing: Wanneer naaimachine loopt, kunt steekkeuzeknop niet aanraken FUNCTIES SELECTIE STEKENPATROON This machine has 12 kinds of thread stitch patterns, three kinds of straight lines, seven kinds of zigzag stitch, two kind of locking buttonhole stitch. See the stitch patterns drawing. Rotating the stitch patterns dial to select the stitch pattern you wanted.
  • Page 35 FUNCTIES STEKEN AANPASSEN 1. Zoals aangegeven in de afbeelding A, wordt de normale stiksels boven- en onderkant threading hebben noch over strakke of losse. Top thread Cloth Bottom thread Fig. A 2. Als de onderste draad ziet eruit als een rechte lijn, wat aangeeft de bovendraad te los.
  • Page 36 ACHTERUIT NAAIEN [ Achteruit naaien wordt vaak gedaan ter versteviging aan het begin en het einde van de naad (back stitching) 1. Reverse naaien is geschikt voor de bevestiging van de naad bij het begin of einde naad naad te voorkomen steken los. 2.
  • Page 37 MAUWEN NAAIEN Deze naaimachine is ontworpen om mouwen of en smalle openingen te naaien in kledingstuk. 1. Ontlast het drukvoet. 2. Plaats het kledingstuk over de naai arm. 3. Zet de drukvoet omlaag en volg de reguliere naai-instructies. LADE De lade is een opbergaccessoire. DRAAD AFSNIJDER Er is een draadafsnijder op de centrale linkerkant van de machine;...
  • Page 38 Spoeldraad kan niet Onderste draad is op Vervangen door nieuwe volle bevestigd worden spoel Draad onjuist bevestigd Herdraad de naald, zorg ervoor dat het schroefdraad van voor naar achter Verwijderen en opnieuw invoegen Draad blijft knappen Naald gebogen nieuwe naald Naald schacht niet goed Verwijderen en opnieuw invoegen geinstalleerd...
  • Page 39 DEUTSCH Vorsicht 1. Bitte lesen Sie die Anleitung sorgfältig durch, bevor die Maschine in Betrieb genommen wird. 2. Um einen elektrischen Schlag zu vermeiden, entfernen Sie bitte vor der Reinigung oder nach dem Gebrauch die Kabel. 3. Bitte halten Sie beim Herausziehen des Netzkabels den Stecker, nicht das Kabel fest.
  • Page 40 11. Flexible und Stoffbespannung, wie Handtuch, Pullover und flexible Maschenware kann nicht genäht werden. 12. Betreiben Sie das Gerät nie, wenn es ein beschädigtes Netzkabel, beschädigte Stecker, es nicht ordnungsgemäß funktioniert oder ins Wasser gefaöllen ist. 13. Nicht im Freien verwenden. 14.
  • Page 41 20. Achten Sie darauf, dass die auf dem Typenschild angegebene Nennspannung mit Ihrer Netzspannung übereinstimmt Ihrer Installation. Wenn dies nicht der Fall ist, wenden Sie sich an den Händler und schließen Sie das Gerät nicht an. 21. Lassen Sie das Gerät während des Betriebs niemals unbeaufsichtigt.
  • Page 42 Spulenwickelspindel Rückansicht Exzenterrad Fadenklemme Licht Nähfuß Nähfuß Heber Fußpedal Aufnahme AC/DC Aufnahme Schublade ZUBEHÖR Fußpedal ×1 Garnrolle ×2 Spule ×2 Einfädler ×1 Nadel (#14) ×1 Adapter ×1 ANSCHLUSS DER NÄHMASCHINE AN DAS STROMNETZ 1. Schließen Sie Stecker "A" an die Maschine an und stecken Sie "B" in die Hauptsteckdose.
  • Page 43 MÖGLICHKEITEN DES EINFÄDELNS Einfädeln des Oberfadens wie folgt: 1. Legen Sie die volle Baumwollrolle auf die große Einbauspindel an der Oberseite / Rückseite der Maschine mit dem Gewinde auf der Rückseite. Schieben Sie die Rollenabdeckung über die Spindel, so dass die Spule nicht abspringt. 2.
  • Page 44 3. Lassen Sie etwa 10 cm (4 Zoll) Faden an der oberen Spule (Abb.3). 4. Heben Sie den Nähfuß; Halten Sie den Oberfaden mit der linken Hand, verwenden Sie die rechte Hand um das Handrad gegen den Uhrzeigersinn zu drehen, bis die Nadel angehoben wird (Bild 4).
  • Page 45 Maschine Nadel ist, und nehmen den Hebel hoch. NADELWECHSEL 1. Drehen Sie das Handrad, um die Nadel in die höchste Position zu bringen. 2. Halten Sie die alte Nadel und lösen Sie die Nadelklemmschraube. Entfernen Sie die alte Nadel und entsorgen Sie sie verantwortungsvoll. 3.
  • Page 46 Sie den Nähfuß und ziehen Sie den Fadenspannungslöser, dann entfernen Sie sanft den Stoff von der Nähmaschine. (Abb.21). 7. Schneiden Sie den Faden mit dem Fadenschneider ab. (Abb.22). Warnung: Wenn die Nähmaschine läuft, bitte das Stichmuster-Einstellrad nicht berühren. Abb. 17 Abb.
  • Page 47 Maschen auf niedriger Geschwindigkeit, dann drücken Sie den Aus-Schalter. (Abb. 26). 6. Wählen Sie die 12. Stich, schalten Sie den Schalter ein und nähen bis das Knopfloch vollständig übernäht wurde, dann stoppen Sie das Nähen (Abb. 27). Abb. 23 Abb. 24 Abb.
  • Page 48 Fig.C Abb. C ARBEITSLAMPE [ Wenn zusätzliche Licht erforderlich ist, drehen Sie den Lichtschalter des Lichtes auf "ON". Drücken Sie den Schalter erneut, um es auszuschalten "OFF". RÜCKWÄRTSNÄHEN [ Rückwärtsnähen wird oft zur Verstärkung am Anfang und am Ende der Naht durchgeführt (Rückstich).
  • Page 49 ÄRMEL NÄHEN Diese Nähmaschine wurde entwickelt, um Hülsen oder schmale Öffnungen in Kleidungsstücke zu nähen. 1. Den Nähfuß runternehmen. 2. Positionieren Sie das Kleidungsstück über den Näharm. 3. Senken Sie den Nähfuß und folgen Sie den regulären Nähanleitungen. SCHUBLADE Diese Schublade ist ein Zubehörstaufach. FADENABSCHNEIDER Es gibt einen Fadenschneider auf der zentralen linken Seite der Maschine;...
  • Page 50 FEHLERBEHEBUNG Problem Problem Ursache Änderung Keine Batterien sind falsch eingelegt Legen Sie die Batterien neu ein Stromversorgung und gehen Sie sicher, das sie oder die Maschine richtig herum liegen läuft langsam Batterien sind schwach Verwenden Sie neue Batterien Adapter Strom ist Verwenden Sie einen kompatiblen unzureichend Adapter...
  • Page 51 UMWELT ACHTUNG : Werfen Sie nicht dieses Produkt, wie es mit anderen Haushaltsprodukten hat. Es gibt eine Mülltrennungs von diesem Produkt in Gemeinden, Sie müssen Ihre lokalen Behörden über die Orte, wo man dieses Produkt zurückgeben können zu informieren. In der Tat enthalten elektrische und elektronische Produkte gefährliche Stoffe, die schädliche Auswirkungen auf die Umwelt oder die menschliche Gesundheit haben und sollte recycelt werden.
  • Page 52 ESPANOL Precaución 1. Lea las instrucciones cuidadosamente antes de utilizar la máquina. 2. Para evitar una descarga eléctrica, por favor retire el cable de alimentación antes de limpiar o después de su uso. 3. Por favor, sostenga el enchufe del cable de alimentación cuando vaya a desenchufar el cable, no tire directamente del cable para evitar daños en el mismo.
  • Page 53 11. Los tejidos flexibles y alargados, como una toalla, suéter, y tejido de punto flexible, no pueden ser cosidos con esta máquina. 12. Nunca opere la máquina si tiene un cable de alimentación dañado, si el enchufe está dañado, si la maquina no puede trabajar correctamente, o si la máquina ha caído en agua o se ha mojado.
  • Page 54 20. Asegúrese de que la tensión nominal de la placa de características corresponde a la tensión de red de su instalación. Si no es así, póngase en contacto con el distribuidor y no conecte la unidad. 21. Por favor, tenga este documento a mano y entréguelo al futuro propietario en caso de transferencia de su dispositivo 22.
  • Page 55 ACCESSORIES Pedal ×1 Carrete de hilo ×2 Bobina ×2 Enhebrador ×1 Aguja (#14) ×1 Adaptador ×1 CONEXIÓN DE LA MÁQUINA DE COSER PARA LA ALIMENTACIÓN DE ENERGÍA ELÉCTRICA 1. Conecte el enchufe "A" a la máquina y enchufe "B" en la toma principal. 2.
  • Page 56 MANERAS DE ROSCADO Enhebrar del hilo superior de la siguiente manera: 1. Coloque el carrete de algodón completo en el eje empotrada en la parte superior / trasera de la máquina con el hilo en la parte trasera. Empuje la tapa del carrete sobre el eje de manera que el carrete no pueda desprenderse.
  • Page 57 3. Deje unos 10 cm (4 pulgadas) de hilo en la bobina superior (figura 3). 4. Levante el prensatelas; sostenga el hilo superior con la mano izquierda, utilice la mano derecha para girar en sentido anti horario la rueda hasta que se levante la aguja (Figura 4).
  • Page 58 REEMPLAZO DE AGUJA 1. Gire la rueda de mano para levantar la aguja a su posición más alta. 2. Sostenga las agujas viejas y aflojar el tornillo de la presilla de la aguja. Retire la aguja vieja y desechar de forma responsable. 3.
  • Page 59 7. Cortar el hilo con el cortador de hilo. (Figura22). Advertencia: Cuando la máquina de coser esté en funcionamiento, por favor, no toque el dial de selección de patrón CARACTERÍSTICAS SELECCIÓN DE PATRÓN DE PUNTADAS Esta máquina cuenta con 12 tipos de patrones de costura de hilo, tres tipos de líneas rectas, siete tipos de puntada en zigzag, dos tipo de bloqueo puntada de ojal.
  • Page 60 cose hacia adelante, si usted quiere coser el ojal, usted tiene que girar la dirección de la costura.) (Figura 25). 5. Elija la puntada número 12, a continuación, encienda el interruptor y cosa 3.4 puntadas a baja velocidad, a continuación, apague el interruptor. (Figura 26). 6.
  • Page 61 Fig.C LÁMPARA DE TRABAJO [ Si se necesita más luz, pulse el interruptor de la luz "ON" para encender la luz. Pulse el interruptor de nuevo para apagar la luz. COSTURA REVERSA [ La costura hacia atrás se hace a menudo de refuerzo al comienzo y al final de la costura (costura hacia atrás) 1.
  • Page 62 COSIDO DE MANGAS Esta máquina de coser ha sido diseñada para coser mangas o aberturas estrechas en prendas de vestir. 1. Levante el prensatelas. 2. Coloque la prenda sobre el brazo de costura. 3. Baje el prensatelas y siga las instrucciones regulares de coser. CAJÓN Este cajón es un compartimiento de almacenamiento de accesorios.
  • Page 63 El ojo de la aguja no está en Saque y vuelva a poner la aguja Puntos sueltos posición con el lado plano de espaldas La aguja está doblada Saque y vuelva a poner una aguja nueva El prensatelas está muy suelto Ajuste el prensatelas La bobina del hilo La función de bobina de hilo...
  • Page 64 ITALIANO Attenzione 1. Si prega di leggere attentamente le istruzioni prima di utilizzare la macchina. 2. Per prevenire rischi di scosse elettriche, accertarsi di staccare la spina di alimentazione immediatamente dopo l’uso e prima della pulizia. 3. Non staccare la spina tirandola per il cavo; per estrarla basta tirare direttamente la spina.
  • Page 65 11. È possibile che i tessuti elastici o flessibili, come asciugamani, maglioni, ecc. non vengano cuciti dalla macchina. 12. Non utilizzare la macchina quando è danneggiata o in seguito a una caduta in acqua o altri liquidi, o quando il cavo di alimentazione o la spina presentano danni non svolgono correttamente le loro funzioni.
  • Page 66 21. Non lasciare mai l'unità incustodita durante il funzionamento. 22. Si prega di tenere questo documento a portata di mano e di consegnarlo al futuro proprietario in caso di trasferimento del dispositivo. 23. Il dispositivo non deve essere utilizzato se è stato lasciato cadere, sono visibili evidenti segni di danneggiamento .
  • Page 67 Bobina di avvolgimento Rotella di supporto Morsetto filo Luce Piedino Filtro del piedino Presa pedale Cassetto Presa alimentatore ACCESSORI Pedale ×1 Rocchetto ×2 Bobina ×2 Infila aghi ×1 Ago (#14) ×1 Alimentatore ×1 COLLEGARE LA MACCHINA ALLA PRESA ELETTRICA 1. Collegare il connettore "A" alla macchina e l’alimentatore "B" alla presa elettrica. 2.
  • Page 68 TIPI DI ALLINEAMENTO DELLA BOBINA Infilare il filo superiore come segue: 1. Posizionare la bobina piena di cotone al grande mandrino nella parte superiore/posteriore della macchina con il filo verso la parte posteriore. Spingere il coperchio del rocchetto sul perno in modo che la bobina non possa venire fuori.
  • Page 69 rialzato (Fig.4). 5. Quando l'ago raggiunge il fondo, il vano del gancio aggancerà il filo superiore; quindi ruotare lo zoccolo del vano per tirare fuori il filo inferiore (Fig.5). 6. Tirare il filo inferiore e superiore sotto il piedino, tenere 10 cm per la parte posteriore (Fig.6).
  • Page 70 COME SOSTITUIRE L’AGO 1. Ruotare il volantino per sollevare l'ago nella posizione più alta. 2. Tenere il vecchio ago e allentare la vite del morsetto. Rimuovere il vecchio ago e gettarlo in modo responsabile. 3. Inserire il nuovo ago nel morsetto con la parte piatta verso destra. Assicurarsi di spingere il morsetto prima di stringere la vite.
  • Page 71 Avvertenza: Quando la macchina da cucire è in esecuzione, si prega di non toccare la manopola di selezione. FUNZIONE COME SELEZIONARE IL PUNTO Questa macchina ha 12 tipi di schemi di punti, tre tipi di linee rette, sette tipi di punto zig-zag, due tipi di punto per asole.
  • Page 72 è completata, quindi arrestare la cucitura (Fig. 27). FUNZIONE COME REGOLARE LA CUCITURA 1. Come mostrato nella figura A, la cucitura normale avrà la filettatura superiore e inferiore né stretta né allentata. Top thread Cucitura superiore Cloth Tessuto Bottom thread Cucitura inferiore Fig.
  • Page 73 nuovo l'interruttore per spegnere "OFF". CUCITURA ALL’INDIETRO [ La cucitura all’indietro viene spesso usata per rinforzare l’inizio e la fine della cucitura (cucitura posteriore) 1. Questa cucitura è adatta per il fissaggio della cucitura per evitare punti sciolti. 2. Prima di tutto, arrestare la macchina, quindi premere il pulsante come mostrato nell’immagine, ora la macchina può...
  • Page 74 CASSETTO Questo cassetto è un vano porta accessori. TAGLIAFILI Questa macchina è dotata di un tagliafili sul lato centrale sinistro; con esso è possibile tagliare il filo dopo aver cucito o quando pende. GUIDA ALLA RISOLUZIONE DEI PROBLEMI Problema Causa del problema Soluzione La macchina non Le batterie sono installate...
  • Page 75 Il gambo dell’ago non è Rimuovere e inserire un continuamente correttamente impostato nuovo ago Manopola di tensione del filo, Allentare la tensione tra 3-5 guida del filo o barra del filo troppo strette. Il filo è bloccato dalla bobina Estrarre il portarocchetto e far in Punti troppo larghi superiore modo che la bobina e il filo...