Publicité

Les langues disponibles

Les langues disponibles

Liens rapides

MODELS / MODELOS / MODÈLES :
DSR114, DSR115
Jump Starter and DC Power Source
Arrancador y Fuente de Poder de CC
Aide de Démarrage et Source d'Énergie CC
OWNERS MANUAL / MANUAL DEL USUARIO / MANUEL D'UTILISATION
DSR114
DSR115
PLEASE SAVE THIS OWNER'S MANUAL AND READ BEFORE EACH USE.
This manual will explain how to use your jump starter safely and effectively. Please
read and follow these instructions and precautions carefully.
POR FAVOR GUARDE ESTE MANUAL DEL PROPIETARIO Y LEER ANTES DE
CADA USO. En este manual se explica cómo utilizar el arrancador con seguridad
y eficacia. Por favor, lea y siga las siguientes instrucciones y precauciones.
ESSAYER DE GARDER LE MANUEL D'INSTRUCTIONS ET LE LIRE AVANT
CHAQUE UTILISATION. Ce manuel explique comment utiliser l'unité d'une façon
sûre et efficace. S'il vous plaît lisez et suivez ces instructions et précautions.
0099001807-02

Publicité

Table des Matières
loading

Sommaire des Matières pour DSR PROSERIES DSR114

  • Page 1 MODELS / MODELOS / MODÈLES : DSR114, DSR115 Jump Starter and DC Power Source Arrancador y Fuente de Poder de CC Aide de Démarrage et Source d’Énergie CC OWNERS MANUAL / MANUAL DEL USUARIO / MANUEL D’UTILISATION DSR114 DSR115 PLEASE SAVE THIS OWNER’S MANUAL AND READ BEFORE EACH USE. This manual will explain how to use your jump starter safely and effectively.
  • Page 2: Table Des Matières

    CONTAINS SEALED, NON-SPILLABLE LEAD-ACID BATTERY. MUST BE DISPOSED OF PROPERLY. CONTIENE UNA BATERÍA SELLADA DE ÁCIDO-PLOMO NO DERRAMABLE QUE DEBE DESECHARSE APROPIADAMENTE. CONTIENT UNE BATTERIE À L’ACIDE QUI DOIT ÊTREDISPOSÉ CORRECTEMENT. WARNING: Possible explosion hazard. Contact with battery acid may cause severe burns and blindness.
  • Page 3 CONTENIDOS INSTRUCCIONES IMPORTANTES DE SEGURIDAD ..........15 PRECAUCIONES PERSONALES ................15 CONECTAR EL ARRANCADOR ................16 CARACTERÍSTICAS ....................17 PARA CARGAR LA BATERIA INTERNA DEL ARRANCADOR ........18 INSTRUCCIONES DE OPERACIÓN ................19 INSTRUCCIONES DE MANTENIMIENTO ..............21 INSTRUCCIONES PARA EL MANEJO Y ALMACENAMIENTO .........21 LOCALIZACIÓN Y SOLUCIÓN DE PROBLEMAS .............21 ANTES DE DEVOLVER A REPARACIONES .............23 ESPECIFICACIONES ....................23 REPUESTOS / ACCESORIOS ...................24...
  • Page 4 TABLE DES MATIÈRES CONSIGNES DE SÉCURITÉ IMPORTANTES ............25 PRÉCAUTIONS PERSONNELLES ................25 CONNECTE LE AIDE AU DÉMARRAGE ..............26 CARACTÉRISTIQUES ....................27 CHARGEMENT DE LA BATTERIE INTERNE DE L’AIDE AU DÉMARRAGE .... 28 CONSIGNES D’UTILISATION ..................29 INSTRUCTIONS D’ENTRETIEN ................31 INSTRUCTIONS DE STOCKAGE ET EMPLACEMENT ..........31 DÉPANNAGE ......................31 AVANT DE RETOURNER POUR LES RÉPARATIONS ..........33 SPÉCIFICATIONS ......................33...
  • Page 5: Important Safety Instructions

    1. IMPORTANT SAFETY INSTRUCTIONS SAVE THESE INSTRUCTIONS. WARNING – RISK OF EXPLOSIVE GASES WORKING IN THE VICINITY OF A LEAD-ACID BATTERY IS DANGEROUS. BATTERIES GENERATE EXPLOSIVE GASES DURING NORMAL OPERATION. IT IS IMPORTANT THAT YOU FOLLOW THESE INSTRUCTIONS EACH TIME YOU USE THE UNIT.
  • Page 6: Connecting The Jump Starter

    protective clothing. Avoid touching your 2.14 Add distilled water to each cell until the eyes while working near the battery. battery acid reaches the level specified by the battery manufacturer. Do not 2.11 If battery acid contacts your skin or overfill.
  • Page 7: Features

    4. FEATURES Jump Starter 1. Heavy-duty battery clamps 2. 12V DC socket 3. Jump starter ON/OFF switch 4. Digital display 5. Display button 6. USB port 7. USB button Charger 1. Charging status LED 2. Bad Battery LED 3. Power LED 4.1 Digital Display DSR115).
  • Page 8: Charging The Internal Battery Of The Jump Starter

    5. CHARGING THE INTERNAL BATTERY OF THE JUMP STARTER IMPORTANT! 5.2 Charging the Jump Starter CHARGE IMMEDIATELY AFTER with included Charger PURCHASE, AFTER EACH USE AND 1. Make sure the charger and jump starter EVERY 30 DAYS, TO KEEP THE UNIT’S are placed on a dry, nonflammable INTERNAL BATTERY FULLY CHARGED surface.
  • Page 9: Operating Instructions

    Maintain Mode (Float Mode Monitoring) CAUSING PROPERTY DAMAGE OR When the internal battery is fully charged PERSONAL INJURY. and the jump starter display shows “100”, 1. Make sure the car is running. the charger has started maintain mode. In 2. Insert one end of the accessory cable this mode, the charger keeps the battery into the 12V DC power outlet.
  • Page 10: Maintenance Instructions

    circuit breaker of the jump starter Electric tool 24 watts 11 hrs. 22 hrs. will trip and disconnect the power to Electric cooler 48 watts 5.5 hrs. 11 hrs. the device. Disconnect the 12V DC Car vacuum, 80 watts 3.3 hrs. 6.6 hrs.
  • Page 11: Troubleshooting

    9. TROUBLESHOOTING Jump Starter PROBLEM POSSIBLE CAUSE SOLUTION The jump starter won’t Clamps are not making a good Check for poor connection to jump start my car. connection to the battery. battery and frame. Make sure connection points are clean. The jump starter’s battery is not Check the battery charge status charged.
  • Page 12: Before Returning For Repairs

    Charger PROBLEM REASON SOLUTION AC outlet is dead. Check for open fuse or circuit The green POWER breaker supplying AC outlet. LED does not light when charger is properly Poor electrical connection. Check power cord and extension connected. cord for a loose fitting plug. The battery is sulfated.
  • Page 13: Specifications

    11. SPECIFICATIONS DSR114 Internal Battery Type ........Sealed, Maintenance Free, AGM, Lead-Acid Nominal Voltage ......................12V DC Capacity ........................22Ah DC Power Output (Maximum Continuous Load)..........12V DC/15A Peak Amps ........................2200 Cranking Amps......................525 Cold Cranking Amps ..................... 350 Battery Hookup Cables ..............4 AWG, 60˝ (152 cm) Dimensions (H x W x D)........
  • Page 14: Limited Warranty

    13. LIMITED WARRANTY SCHUMACHER ELECTRIC CORPORATION, 801 BUSINESS CENTER DRIVE, MOUNT PROSPECT, IL 60056-2179, MAKES THIS LIMITED WARRANTY TO THE ORIGINAL RETAIL PURCHASER OF THIS PRODUCT. THIS LIMITED WARRANTY IS NOT TRANSFERABLE OR ASSIGNABLE. Schumacher Electric Corporation (the “Manufacturer”) warrants this jump starter for one (1) year from the date of purchase at retail against defective material or workmanship that may occur under normal use and care.
  • Page 15: Instrucciones Importantes De Seguridad

    1. INSTRUCCIONES IMPORTANTES DE SEGURIDAD GUARDE ESTAS INSTRUCCIONES. ADVERTENCIA – RIESGO DE GASES EXPLOSIVOS TRABAJAR CERCA DE UNA BATERÍA DE PLOMO-ÁCIDO ES PELIGROSO. LAS BATERÍAS GENERAN GASES EXPLOSIVOS DURANTE SU FUNCIONAMIENTO NORMAL. ES IMPORTANTE QUE SIGA LAS INSTRUCCIONES CADA VEZ QUE UTILICE LA UNIDAD.
  • Page 16: Conectar El Arrancador

    2.7 Tenga especial cuidado para reducir el ADVERTENCIA: RIESGO DE CONTACTO riesgo de dejar caer una herramienta CON EL ÁCIDO DE LA BATERÍA. EL de metal sobre la batería. Esto podría ÁCIDO DE LA BATERÍA ES UN ÁCIDO provocar chispas o un cortocircuito en la SULFÚRICO ALTAMENTE CORROSIVO.
  • Page 17: Características

    3.7 En un vehículo con descarga a tierra combustible o cuerpos metálicos. Conecte por borne positivo, conecte la pinza a una pieza metálica de calibre grueso del NEGATIVO (NEGRO) del arrancador al marco o del bloque motor. borne NEGATIVO (NEG, N, -) sin descarga 3.8 Al desconectar la unidad apague todos a tierra de la batería.
  • Page 18: Para Cargar La Bateria Interna Del Arrancador

    4.2 Indicadores LED de Cargador INDICADOR DE ESTADO DE CARGA: LED (amarillo/ LED ALIMENTACIÓN (verde) naranja) pulsando rápidamente: encendido: El cargador está El cargador ha detectado un conectado a la red eléctrica. problema con la batería. INDICADOR DE ESTADO Consulte Localización y Solución DE CARGA: LED (verde) de Problemas para obtener más pulsando lentamente:...
  • Page 19: Instrucciones De Operación

    5. Cuando la pantalla del arrancador mantiene la batería totalmente cargada muestra 100 (%), la batería interna está mediante una pequeña corriente cuando completamente cargada y el arrancador corresponda. Si el cargador tiene que está listo para usar. La carga completa proporcionar su máxima corriente de puede tardar hasta 24 horas.
  • Page 20 POTENCIA DE USO DE USO sea posible, después de usarse. DISPOSITIVO APROXIMADA ESTIMADO ESTIMADO DSR 114 DSR 115 NOTA: Si los cables están conectados Teléfono celular, a un sistema de 24 voltios cuando 4 vatios 66 hrs. 132 hrs. luz fluorescente el interruptor está...
  • Page 21: Instrucciones De Mantenimiento

    7. INSTRUCCIONES DE MANTENIMIENTO 7.1 Después de usar y antes de realizar cables y carcasa de la unidad. mantenimiento, desenchufe y desconecte 7.3 Asegúrese de que todas las piezas de la la unidad (ver secciones 3 y 4). unidad estén bien instaladas y en buenas 7.2 Utilice un paño seco para limpiar la condiciones para su función.
  • Page 22 PROBLEMA CAUSA POSIBLE SOLUCIÓN La unidad no pone a El aparato de 12V no enciende. Encienda el aparato de 12V. funcionar mi aparato de 12V. La batería de la unidad no está Compruebe el estado de carga cargada. de la batería presionando el botón Display en la parte frontal de la unidad.
  • Page 23: Antes De Devolver A Reparaciones

    PROBLEMA CAUSA POSIBLE SOLUCIÓN El voltaje de la batería todavía La batería puede estar El LED rojo está debajo de 10V después de defectuosa. Asegúrese de que BATERÍA DEFECTUOSA 2 horas de carga. no hay escapes de cargas en se ilumina y la luz LED la batería.
  • Page 24: Repuestos / Accesorios

    Cargador Tensión de entrada ................120V AC @ 60Hz, 0,5A Tensión de salida ....................12V DC Corriente de salida ......................2A 12. REPUESTOS / ACCESORIOS Cable accesorio macho a macho................ 94500109 Caragador DSR2 ..................2299003063CZ Batería de repuesto (DSR115 utiliza dos) ............. 5799000010Z 13.
  • Page 25: Consignes De Sécurité Importantes

    1. CONSIGNES DE SÉCURITÉ IMPORTANTES CONSERVER CES INSTRUCTIONS. AVERTISSEMENT : RISQUE DE GAZ EXPLOSIFS TRAVAILLER À PROXIMITÉ D’UNE BATTERIE AU PLOMB EST DANGEREUX. LES BATTERIES PRODUISENT DES GAZ EXPLOSIFS EN MARCHE NORMALE. POUR CETTE RAISON, IL EST IMPORTANT QUE VOUS SUIVIEZ LES INSTRUCTIONS CHAQUE FOIS QUE VOUS UTILISEZ L’UNITÉ.
  • Page 26: Connecte Le Aide Au Démarrage

    2.7 Ne laissez pas tomber un outil en métal laissez pas les particules de corrosion entrer sur la batterie. Cela pourrait produire une en contact avec vos yeux, votre nez et votre étincelle ou un court-circuit à la batterie bouche. Utilisez du bicarbonate de sodium ou à...
  • Page 27: Caractéristiques

    à la masse. Connectez la pince POSITIVE métal de la carrosserie ou du bloc moteur. (ROUGE) au chassis du véhicule ou au 3.8 Lorsque vous déconnectez le aide de bloc moteur à l’écart de la batterie. Ne démarrage, positionnez tous les sélecteurs pas connecter la pince au carburateur, à...
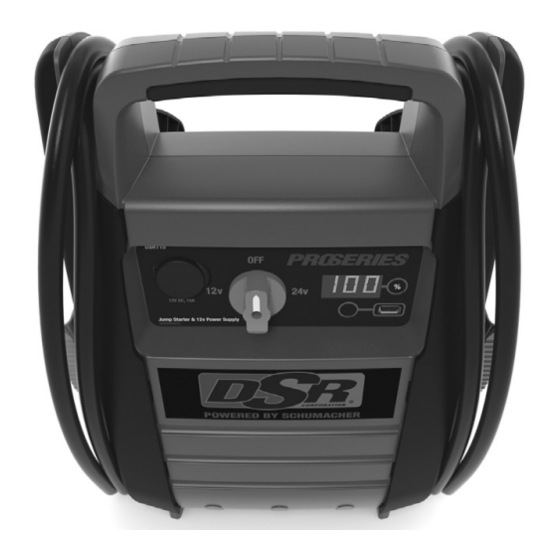
  • Page 28: Chargement De La Batterie Interne De L'aide Au Démarrage

    4.2 Indicateurs de Chargeur LED INDICATEUR LED DE ÉTAT DE CHARGE (jaune / orange) VOYANT D’ALIMENTATION (vert) clignote rapidement : allumée : le chargeur est connecté Le chargeur a détecté un problème à une prise de courant alternatif. avec la batterie. Voir Dépannage INDICATEUR LED DE ÉTAT pour plus d’informations.
  • Page 29: Consignes D'utilisation

    5. Lorsque l’écran du dispositif d’aide au Mode de Maintien démarrage indique 100 (%), la batterie (Surveillance du mode de flottement) interne est complètement chargée et le Lorsque la batterie est complètement dispositif d’aide au démarrage est prêt chargée et que l’écran du dispositif d’aide à...
  • Page 30 Si vous avez raccordé les pinces à 2. S’assurer que les pinces de la batterie l’envers, une alarme audio retentira. soient bien posées sur les supports de NE RÉGLEZ PAS le commutateur stockage. rotatif à 12 V (12 V ou 24 V pour 3.
  • Page 31: Instructions D'entretien

    7. INSTRUCTIONS D’ENTRETIEN 7.1 Après avoir utilisé lunité et avant une 7.3 Assurez-vous que tous les composants opération d’entretien, débranchez et de l’unité soient en bon état et prêts à être déconnectez l’unité. utilisés. 7.2 Utilisez un chiffon sec pour nettoyer toute 7.4 Toutes les réparations doivent être corrosion de la batterie ainsi que la saleté...
  • Page 32 PROBLÈME CAUSE POSSIBLE SOLUTION Le bloc Le dispositif de 12V n’est pas Allumez l’appareil 12V. d’alimentation activé. n’allume pas mon appareil de 12V. La batterie Interne n’est pas Vérifiez l’état de charge de la chargée. batterie en appuyant sur le bouton d’état de la batterie.
  • Page 33: Avant De Retourner Pour Les Réparations

    PROBLÈME CAUSE POSSIBLE SOLUTION Le voyant rouge La tension de la batterie est La batterie pourrait être LED BATTERIE toujours inférieure à 10 V après défectueuse. Assurez-vous qu’il DÉFECTUEUSE est 2 heures de charge. n’y ait aucune source de drainage allumé...
  • Page 34: Pièces De Rechange / Accessoires

    Chargeur DSR2 Tension d'entrée ................120V CA @ 60Hz, 0,5A Tension de sortie .....................12V DC Courant de sortie ......................2A 12. PIÈCES DE RECHANGE / ACCESSOIRES Câble accessoire male à male ................94500109 Chargeur DSR2 ..................2299003063CZ Batterie de rechange (DSR115 utilise deux) ..........5799000010Z 13.
  • Page 35 WARRANTY CARD / TARJETA DE GARANTÍA SAVE ON POSTAGE! ACTIVATE YOUR WARRANTY ONLINE – THE QUICK AND EASY WAY! Go to www.batterychargers.com to register your product online. 1 YEAR LIMITED WARRANTY PROGRAM REGISTRATION MODEL: _____________________ DESCRIPTION: ________________________ This is the only express limited warranty, and the manufacturer neither assumes nor authorizes anyone to assume or make any other obligation.
  • Page 36: Carte De Garantie

    CARTE DE GARANTIE PAS BESOIN DE VOIE POSTAL ! ACTIVEZ VOTRE GARANTIE SUR INTERNET – LA VOIE PLUS RAPIDE ET FACILE! Aller sur www.batterychargers.com pour enregistrer votre produit en ligne. (Pas d’accès internet? Envoyer la carte de garantie par poste.) INSCRIPTION AU PROGRAMME DE GARANTIE LIMITÉE DE UN AN...

Ce manuel est également adapté pour:

Proseries dsr115

Table des Matières