Sony CSS-SA Mode D'emploi

Manuels Connexes pour Sony CSS-SA


Sommaire des Matières pour Sony CSS-SA
- Page 16 Français Avant d’utiliser cet appareil, lisez attentivement ce mode d’emploi et conservez-le pour toute référence ultérieure. AVERTISSEMENT Pour ne pas risquer un incendie ou une décharge électrique, n’exposez pas cet appareil à la pluie ou à l’humidité. Note pour les clients européens Note pour les clients résidant au Etats-Unis et au Canada RECYCLAGE DES BATTERIES NICKEL-HYDRURE METALLIQUE Les batteries nickel-hydrure métallique sont recyclables.
-
Page 17: Caractéristiques
Si vous placez un appareil photo numérique (appelé ci-après « appareil photo ») sur la Cyber-shot Station, vous pouvez utiliser celle-ci de la manière suivante. Lorsque la CSS-SA est raccordée à une imprimante compatible PictBridge, vous pouvez facilement imprimer des images fixes, en appuyant simplement sur la touche PRINT. - Page 18 Index Précautions .......................... 5 Utilisation de la batterie rechargeable ................6 Avant d’utiliser la Cyber-shot Station ................6 Remarques sur l’adaptateur secteur ................6 Identification des différents éléments ................7 Installation ........................... 8 Placement de l’appareil photo sur la Cyber-shot Station ..........8 Retrait de l’appareil photo de la Cyber-shot Station .............
-
Page 19: Précautions
Précautions • La Cyber-shot Station ne doit pas être soumise à la poussière, à l’humidité et à l’eau. • N’utilisez pas et ne rangez pas la Cyber-shot Station dans les endroits suivants : – Endroits soumis à des températures extrêmes La température à... -
Page 20: Utilisation De La Batterie Rechargeable
Utilisation de la batterie rechargeable A propos de la batterie NP-NH25 (batterie nickel-hydrure métallique) fournie Chargement/autonomie de la batterie • Utilisez la batterie rechargeable uniquement lorsqu’elle est chargée. Lorsqu’elle sort d’usine, la batterie rechargeable n’est que faiblement chargée. • Rechargez-la après l’avoir entièrement vidée. •... -
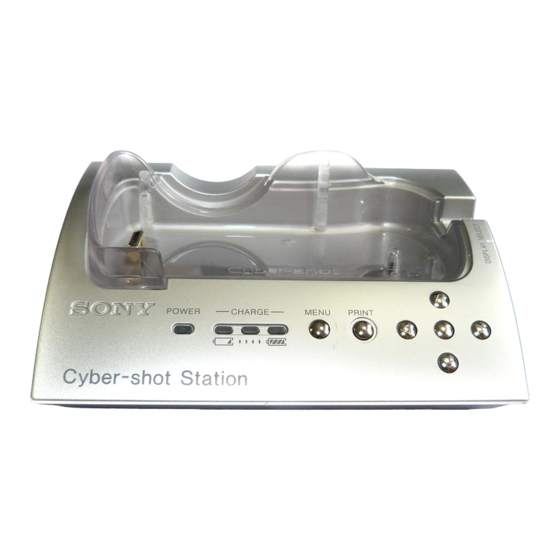
Page 21: Identification Des Différents Éléments
Identification des différents éléments Cyber-shot Station Touches de commande ( / / / / ) Témoins CHARGE Témoin POWER Touche PRINT Touche MENU Multi- connecteur Prise A/V OUT (MONO) Prise (USB) Prise DC IN Commutateur DISPLAY SELECT CAMERA : affiche les images sur un appareil photo numérique. -
Page 22: Installation
Installation Placement de l’appareil photo sur la Cyber-shot Préparation de la Cyber-shot Station Station Raccordez l’adaptateur secteur à la prise DC IN de la Cyber-shot Station. Cyber-shot Station Fiche DC Adaptateur Vers une prise – Insérez la batterie rechargeable NP- secteur murale NH25 dans l’appareil photo. -
Page 23: Recharge De La Batterie
Recharge de la batterie Visualisation d’images sur un écran de téléviseur Insérez la batterie dans l’appareil photo, puis placez-le sur la Cyber-shot Station. Raccordez le câble de liaison audio et La charge commence automatiquement. Les vidéo (fourni) à la prise A/V OUT témoins CHARGE de la Cyber-shot Station (MONO) de la Cyber-shot Station et aux s’allument. -
Page 24: Impression D'images Fixes
Appuyez sur sur les touches de Une fois la connexion établie, l’indicateur commande pour sélectionner l’image de apparaît sur l’écran LCD. votre choix. Ne retirez pas l’appareil photo de la Cyber- – Vous pouvez aussi sélectionner l’image shot Station pendant que celle-ci en appuyant sur les touches de communique avec votre imprimante via le commande... -
Page 25: Raccordement De L'appareil Photo À Votre Ordinateur Via La Cyber-Shot Station
Raccordement de l’appareil Nettoyage et entretien photo à votre ordinateur Nettoyez la Cyber-shot Station avec un chiffon doux légèrement humidifié, puis essuyez sa via la Cyber-shot Station surface avec un chiffon sec. N’utilisez pas de solvants, tels que du diluant, de l’alcool ou de Raccordez la Cyber-shot Station à... -
Page 26: Dépannage
Dépannage Si un problème survient avec vos produits, reportez-vous aux solutions suivantes. Si les problèmes persistent, contactez votre revendeur Sony. Symptôme Cause/Solution • L’appareil photo est sous tension. Impossible de charger la batterie t Mettez-le hors tension. (Si les témoins CHARGE ne s’allument •... - Page 27 Symptôme Cause/Solution • L’appareil photo est hors tension. L’ordinateur ne reconnaît pas votre t Mettez l’appareil photo sous tension. appareil photo • Vous n’utilisez pas le câble USB fourni. t Utilisez le câble USB fourni. • Le câble USB n’est pas raccordé correctement. t Débranchez le câble USB de l’ordinateur et de la Cyber-shot Station et raccordez-le de nouveau fermement.
-
Page 28: Spécifications
Articles inclus Spécifications • Cyber-shot Station (CSS-SA) (1) Cyber-shot Station • Câble de liaison audio/vidéo (1) Connecteurs d’entrée/de sortie • Câble USB (1) Prise A/V OUT (MONO) (monaural) Miniprise • Adaptateur secteur (AC-LS5) (1) : 1 Vp-p, 75 Ω, asymétrique, Vidéo... - Page 32 Printed on 100% recycled paper using VOC (Volatile Organic Compound)-free vegetable oil based ink. Imprimé sur papier 100 % recyclé avec de I’encre á base d’huile végétale sans COV (composés organiques volatils). Printed in Japan...