Table des Matières
Publicité
Les langues disponibles
Les langues disponibles
Liens rapides
Mode d'emploi
NL
FR
Nederlands,13
Français,1
KN6T75 SA/NL
KN6T72 SA/NL
GB
English,25
CUISINIERE ET FOUR
Sommaire
Installation, 2-5
Tableau Caractéristiques des brûleurs et des
injecteurs
Tableau des caractéristiques
Publicité
Chapitres
Table des Matières

Manuels Connexes pour Indesit KN6T75 SA/NL


Sommaire des Matières pour Indesit KN6T75 SA/NL
-
Page 1: Table Des Matières
Tableau de bord Mise en marche et utilisation, 7-10 Utilisation du plan de cuisson Utilisation du four Utiliser le programmateur fin de cuisson KN6T75 SA/NL Programmes de cuisson KN6T72 SA/NL Conseils de cuisson Tableau de cuisson au four Précautions et conseils, 11 Sécurité... -
Page 2: Installation
Installation ! Conserver ce mode d’emploi pour pouvoir le Local adjacent Local à ventiler consulter à tout moment. En cas de vente, de cession ou de déménagement, veiller à ce qu’il suive l’appareil. ! Lire attentivement les instructions : elles contiennent des conseils importants sur l’installation, l’utilisation et la sécurité... -
Page 3: Positionnement Et Nivellement
Positionnement et nivellement En cas de raccordement direct au réseau, il faut ! L’appareil peut être installé à côté de meubles dont intercaler entre l’appareil et le réseau un interrupteur la hauteur ne dépasse pas celle du plan de cuisson. à... -
Page 4: Adaptation Aux Différents Types De Gaz
il devra être installé de manière à pouvoir facilement Raccordement gaz par tuyau flexible en acier le manoeuvrer. Quand l’appareil ne fonctionne pas, il inox, à paroi continue avec raccords filetés est recommandé de fermer le robinet mural du gaz. Pour raccorder l’appareil au réseau de distribution S’assurer que le tuyau et les joints sont bien du gaz ou à... - Page 5 3. vérifier si, en tournant rapidement le robinet du maximum au minimum, le brûleur ne s’éteint pas. ! Les brûleurs du plan de cuisson ne nécessitent pas de réglage de l’air primaire. ! Après avoir procédé au réglage pour le nouveau type de gaz, remplacer la vieille étiquette par celle correspondant au nouveau gaz, disponible dans les centres d’assistance technique agréés.
-
Page 6: Caracteristiques Techniques
à tous les types de gaz Brûleurs indiqués dans la plaque signalétique Tension et fréquence voir plaque signalétique KN6T75 SA/NL d’alimentation KN6T72 SA/NL Directive 2002/40/CE sur l'étiquette des fours électriques Norme EN 50304 Consommation d’énergie convection Naturelle – fonction four ETIQUETTE Traditionnel;... -
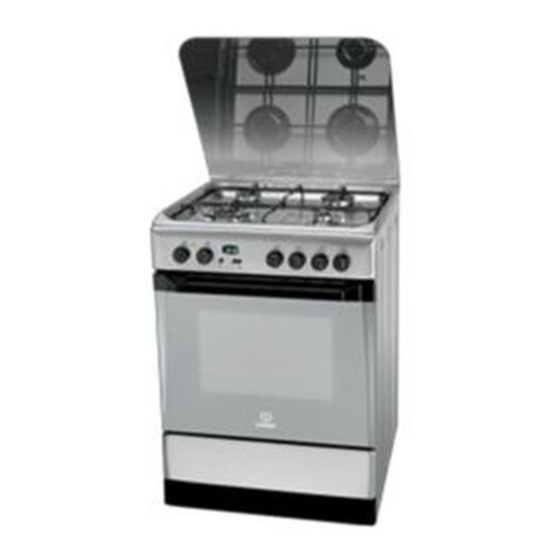
Page 7: Description De L'appareil
Description de l’appareil Vue d’ensemble Couvercle en verre* Brûleur à gaz Plateau du plan de cuisson Grille du plan de cuisson GLISSIERES Tableau de bord de coulissement niveau 5 Support GRILLE niveau 4 niveau 3 Support LECHEFRITE niveau 2 niveau 1 Pied de réglage Pied de réglage Tableau de bord... -
Page 8: Mise En Marche Et Utilisation
Mise en marche et utilisation Utilisation du plan de cuisson Utilisation du four Allumage des brûleurs ! Lors de son premier allumage, faire fonctionner le Un petit cercle plein près de chaque bouton four à vide, porte fermée, pendant au moins une BRULEUR indique le brûleur associé... -
Page 9: Utiliser Le Programmateur Fin De Cuisson
Utiliser le programmateur fin de cuisson* Programme FOUR PIZZA 1. Il faut avant tout remonter la sonnerie en faisant faire un tour Mise en marche de la résistance de sole et de la résistance circulaire presque complet au bouton PROGRAMMATEUR FIN DE CUISSON ainsi que du ventilateur. -
Page 10: Fonction Minuterie
Minuteur électronique* Fonction minuterie Permet d'afficher l'heure et de faire fonctionner la minuterie au compte n n n n n Pour accéder à cette fonction, appuyez sur la touche , l'écran à rebours. n n n n n ! Toutes les fonctions sont activées environ 7 secondes après leur affiche le symbole . -
Page 11: Précautions Et Conseils
Précautions et conseils ! Cet appareil a été conçu et fabriqué conformément de réparer l’appareil. Faire appel au service aux normes internationales de sécurité. d’assistance. Ces consignes de sécurité sont très importantes et • Ne pas poser d’objets lourds sur la porte du four doivent être lues attentivement. -
Page 12: Nettoyage Et Entretien
Nettoyage et entretien Mise hors tension Contrôler les joints du four Avant toute opération de nettoyage ou d’entretien Contrôler périodiquement l’état du joint autour de la couper l’alimentation électrique de l’appareil. porte du four. S’il est abîmé, s’adresser au service après-vente le plus proche de chez soi. - Page 13 Beschrijving van het apparaat, 19 Aanzichttekening Bedieningspaneel Starten en gebruik, 20-22 Gebruik van de kookplaat Gebruik van de oven Gebruik van de timer einde kooktijd KN6T75 SA/NL Kookprogramma’s KN6T72 SA/NL Praktische kooktips Kooktabel oven Voorzorgsmaatregelen en advies, 23 Algemene veiligheid...
-
Page 14: Installatie
Installatie ! Bewaar dit instructieboekje zorgvuldig voor Te ventileren vertrek Aangrenzend vertrek eventuele raadpleging in de toekomst. In het geval u het apparaat verkoopt of u verhuist, moet u het boekje bij het apparaat bewaren. ! Lees de instructies aandachtig door: er staat belangrijke informatie in over installatie, gebruik en veiligheid. -
Page 15: Plaatsen En Waterpas Zetten
Plaatsen en waterpas zetten Wanneer het apparaat rechtstreeks op het elektrische net wordt aangesloten, moet u tussen het apparaat ! Het apparaat kan naast meubels worden geplaatst en het net een meerpolige schakelaar aanbrengen met een afstand tussen de contacten van minstens 3 die niet hoger zijn dan het werkvlak. -
Page 16: Aanpassen Aan De Verschillende Soorten Gas
manoeuvreren is. Als het fornuis niet in gebruik is Controleer of de buis en de afdichtingen wordt aangeraden de hoofdkraan dicht te draaien. overeenkomen met de geldende nationale normen. De aansluiting van het apparaat op de gasleiding of Voordat u de buis monteert verwijdert u de -fles moet worden uitgevoerd m.b.v. - Page 17 3. controleer of door de kraan snel van maximum naar minimum te draaien de branders niet uitgaan. ! De branders hebben geen regeling van de primaire lucht nodig. ! Na de afregeling van een ander soort gas dan het goedgekeurde gas moet u het oude etiket van de gasinstelling vervangen met het etiket dat overeenkomt met het nieuwe gas, verkrijgbaar bij onze Erkende Technische Servicedienst.
-
Page 18: Tabel Eigenschappen Branders En Sproeiers
A 15°C en 1013 mbar-droog gas P.C.S. Natuurlijk gas G25 = 32,49 MJ/m³ BELANGRIJK! De glazen afdekplaat kan breken bij oververhitting. Doe alle bran- ders of eventuele elektrische kookplaten uit voordat u hem dicht doet.*Betreft al- leen modellen met glazen deksel KN6T75 SA/NL KN6T72 SA/NL... -
Page 19: Beschrijving Van Het Apparaat
Beschrijving van het apparaat Aanzichttekening Bedieningspaneel elektronische* Slechts op enkele modellen aanwezig. -
Page 20: Starten En Gebruik
Starten en gebruik Gebruik van de kookplaat ! Op modellen die voorzien zijn van een vlamverspreider moet deze alleen worden gebruikt Aansteken van de branders op de extra brander wanneer men pannen gebruikt Naast elke BRANDER knop wordt met een vol rondje die een doorsnede hebben van minder dan 12 cm. -
Page 21: Praktische Kooktips
Het gebruik van de timer einde kooktijd* Programma PIZZA OVEN De onderste en cirkelvormige verwarmingselementen gaan aan en de 1. U moet allereerst de wekker opladen door de knop TIMER EINDE ventilator gaat draaien. Met deze combinatie wordt de oven snel KOOKTIJD bijna 360°... -
Page 22: Kooktabel Oven
De elektronische timer* seconden. Als u doorgaat met indrukken springt de tijd met een minuut vooruit tot aan een maximum van 10 uren. Hierop ziet u de juiste tijd en de functie van de terugtelelnde timer. s s s s s N.B.: alle functies beginnen te werken na ongeveer 7 seconden vanaf het Met de knop gaat u terug. -
Page 23: Voorzorgsmaatregelen En Advies
Voorzorgsmaatregelen en advies ! Dit apparaat is ontworpen en vervaardigd volgens de geldende • Dit apparaat mag niet worden gebruikt door internationale veiligheidsvoorschriften. personen (kinderen inbegrepen) met een beperkt Deze aanwijzingen zijn geschreven voor uw veiligheid en u dient ze lichamelijk, sensorieel of geestelijk vermogen of derhalve goed door te nemen. -
Page 24: Onderhoud En Verzorging
Onderhoud en verzorging De elektrische stroom afsluiten Het controleren van de afdichtingen van de oven Sluit altijd eerst de stroom af voordat u tot enige Controleer regelmatig de staat van de afdichtingen handeling overgaat. rondom de ovendeur. In het geval de afdichting beschadigd is, dient u zich tot de dichtstbijzijnde Erkende Servicedienst te wenden. - Page 25 Table of burner and nozzle specifications Table of characteristics Description of the appliance, 30 Overall view Control panel Start-up and use, 31-34 Using the hob KN6T75 SA/NL Using the oven KN6T72 SA/NL Cooking modes Practical cooking advice Timer Oven cooking advice table...
-
Page 26: Installation
Installation ! Before operating your new appliance please read Disposing of combustion fumes this instruction booklet carefully. It contains important information concerning the safe installation The disposal of combustion fumes should be and operation of the appliance. guaranteed using a hood connected to a safe and efficient natural suction chimney, or using an electric fan that begins to operate automatically every time ! Please keep these operating instructions for future... -
Page 27: Electrical Connection
• If the cooker is • The socket can withstand the maximum power of the installed underneath a appliance, which is indicated by the data plate. HOOD wall cabinet, there must • The voltage is in the range between the values be a minimum distance indicated on the data plate. -
Page 28: Adapting To Different Types Of Gas
Adapting to different types of gas • Does not come into contact with blades, sharp corners or moving parts and that it is not It is possible to adapt the appliance to a type of gas compressed. other than the default type (this is indicated on the •... -
Page 29: Table Of Burner And Nozzle Specifications
8.5 cm compartment may be adapted for use with any Burners type of gas shown on the data plate Voltage and KN6T75 SA/NL see data plate frequency KN6T72 SA/NL Directive 2002/40/EC on the label of electric ovens. Regulation EN 50304 Energy consumption for Natural convection –... -
Page 30: Description Of The Appliance
Description of the appliance Overall view Glass cover* Gas burner Containment surface for spills Hob grid GUIDE RAILS Control panel for the sliding racks position 5 GRILL rack position 4 position 3 DRIPPING PAN rack position 2 position 1 Adjustable foot Adjustable foot Control panel SELECTOR... -
Page 31: Start-Up And Use
Start-up and use Using the hob ! For models equipped with a reducer grid, the latter must be used only for the auxiliary burner, when Lighting the burners pans with a diameter of less than 12 cm are used. For each BURNER knob there is a complete ring showing the strength of the flame for the relevant burner. -
Page 32: Cooking Modes
Cooking modes GRILL mode GRILL GRILL GRILL GRILL ! A temperature value can be set for all cooking modes The central part of the top heating element is switched on. between 60°C and Max, except for the following modes The high and direct temperature of the grill is recommended for food that requires a high surface •... -
Page 33: Electronic Timer
Electronic timer* This function displays the time and works as a timer which counts down to zero. ! All functions will be implemented approximately 7 seconds after they have been set. Resetting the clock After the appliance has been connected to the power supply, or after a power cut, the clock display will begin to blink, showing the figure: 0:00 0:00... -
Page 34: Oven Cooking Advice Table
Oven cooking advice table Cooking Foods Weight Rack Position Pre-heating Recommended Cooking modes (in kg) time temperature time (minutes) (minutes) Duck 65-75 Roast veal or beef 70-75 Traditional Pork roast 70-80 Oven Biscuits (short pastry) 15-20 Tarts 30-35 Tarts 20-30 Fruit cakes 2 or 3 40-45... -
Page 35: Precautions And Tips
Precautions and tips ! This appliance has been designed and manufactured repairs yourself. Repairs carried out by in compliance with international safety standards. inexperienced persons may cause injury or further The following warnings are provided for safety malfunctioning of the appliance. Contact reasons and must be read carefully. -
Page 36: Care And Maintenance
Care and maintenance 03/2011 - 195045938.00 XEROX FABRIANO Switching the appliance off Inspecting the oven seals Disconnect your appliance from the electricity Check the door seals around the oven regularly. If supply before carrying out any work on it. the seals are damaged, please contact your nearest Authorised After-sales Service Centre.