Table des Matières
Publicité
Les langues disponibles
Les langues disponibles
Liens rapides
Gebrauchsanweisung ................................ 2
EN Electric dual breast pump
Instructions for use .................................. 17
Mode d´emploi ......................................... 35
ES Extractor de leche eléctrico doble
Instrucciones de uso ............................... 51
IT Tiralatte elettrico doppio
Istruzioni per l'uso ................................... 68
TR Elektrikli çift süt pompası
Kullanım kılavuzu ..................................... 84
RU Электрический двойной молокоотсос
Инструкция по применению ................ 100
PL Podwójny laktator elektryczny
Instrukcja obsługi .................................. 116
BY 70
Publicité
Chapitres
Table des Matières

Manuels Connexes pour Beurer BY 70


Sommaire des Matières pour Beurer BY 70
-
Page 1: Table Des Matières
BY 70 DE Elektrische Doppelmilchpumpe IT Tiralatte elettrico doppio Gebrauchsanweisung ........ 2 Istruzioni per l’uso ........68 EN Electric dual breast pump TR Elektrikli çift süt pompası Instructions for use ........17 Kullanım kılavuzu ........84 FR Double tire-lait électrique RU Электрический... -
Page 2: Zum Kennenlernen
Ihr Beurer-Team Zum Kennenlernen Mit dem Beurer Milchpumpen-Set BY 70 können stillende Frauen Ihre Muttermilch einfach und bequem zu Hause abpumpen. Wird die weibliche Brust der stillenden Frau nicht ausreichend entleert, kann dies zu einem schmerzhaften Milchstau führen, welcher sich im schlimmsten Fall zu einer Brustwarzenent- zündung (Mastitis) entwickeln kann. -
Page 3: De Elektrische Doppelmilchpumpe Gebrauchsanweisung
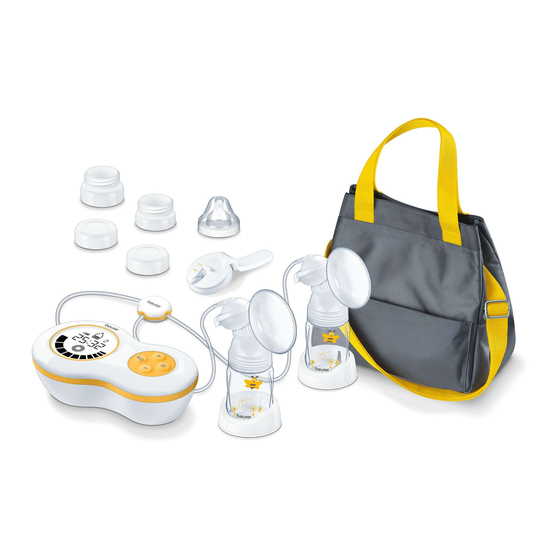
1. Lieferumfang • Elektrische Doppelmilchpumpe (Motoreinheit) • Silikonschläuche mit Verbindungsstück für beidseitiges Abpumpen • Silikonschlauch für einseitiges Abpumpen • 2x Pumpenaufsatz mit Silikonmembran und Silikonventil • 2x Silikonkissen (normale Größe) • 2x Fläschchen • 2x Schraubverschluss für Fläschchen • Silikonsauger •... -
Page 4: Bestimmungsgemäßer Gebrauch
Katalognummer des Herstellers Das Gerät ist doppelt schutzisoliert und entspricht der Schutzklasse 2. Verpackung umweltgerecht entsorgen Zertifizierungszeichen für Produkte, die in die Russische Föderation und in die Länder der GUS exportiert werden. 3. Bestimmungsgemäßer Gebrauch Verwenden Sie die Milchpumpe ausschließlich an der Brust von stillenden Frauen zum Abpumpen von Muttermilch. - Page 5 • Verwenden Sie die Milchpumpe niemals im Bad oder unter der Dusche. • Im Falle einer Fehlfunktion oder Betriebsstörung, öffnen oder schütteln Sie unter keinen Umständen die Milchpumpe. Lesen Sie das Kapitel „Was tun bei Problemen“, sollte Ihr Problem dort nicht beschrieben sein, wenden Sie sich an den Kundendienst oder Ihren Händler.
- Page 6 • Reinigen Sie das Gerät vor jeder Anwendung. • Achten Sie darauf, dass die Flüssigkeit in der Flasche nie heißer als 50°C ist. WARNUNG Hinweise zum Umgang mit Batterien • Wenn Flüssigkeit aus einer Batteriezelle mit Haut oder Augen in Kontakt kommt, die betroffene Stelle mit Wasser auswaschen und ärztliche Hilfe aufsuchen.
-
Page 7: Gerätebeschreibung
5. Gerätebeschreibung 1. Milchpumpe mit Display 10. Sauger 2. Fläschchenhalter 11. Fläschchenkappe 3. Fläschchen (180 ml) 12. Adapter für NUK (Milchpumpe kann auf Wunsch auch mit diesem Fläschchen betrieben werden) 4. Silikonventil 13. Adapter für AVENT (Milchpumpe kann auf Wunsch auch mit diesem Fläschchen betrieben werden) 5. -
Page 8: Inbetriebnahme
Display- und Tastenbeschreibung 10 11 1. Batterie-Status (bei Betrieb ohne Netzstecker) 7. EIN/AUS-Taste 2. Abpump-Modus (Muttermilch wird abgepumpt) 8. - Taste (Stimulation oder Abpumpstufe verringern) 3. Zeit-Anzeige (Countdown Stimulation / Anwen- 9. MODUS-Taste (Wechsel zwischen Abpump- dungsdauer Abpumpmodus) und Stimulation-Modus) 4. -
Page 9: Anwendung
2. Stecken Sie die Silikonschläuche für beidseitiges Ab- pumpen in die 2 Pumpaufsätze und die Milchpumpen 3. Für einseitiges Abpumpen stecken Sie den Silikon- schlauch ohne Verbindungsstück in den Pumpaufsatz und die Milchpumpe. 4. Verbinden Sie die Milchpumpe mit dem Netzkabel und stecken Sie den Netzstecker in die Steckdose. -
Page 10: Milchpumpe Bedienen
• Sollte mit der Milchpumpe nach fünf Minuten immer noch keine Milch aus den Brüsten kommen, brechen Sie die Anwendung ab und versuchen Sie es später erneut. • Wenn Ihnen die Anwendung mit der Milchpumpe starke Schmerzen bereitet, konsultieren Sie einen Arzt. 7.2 Milchpumpe bedienen a) Vorbereitung des beidseitigen Abpumpens: 1. -
Page 11: Milchpumpe Bedienen
3. Abpumpen starten 6. Nach Ablauf der 2 Minuten beginnt im Display zu blinken. Um nun mit dem Abpumpen der Muttermilch zu beginnen, drücken Sie die -Taste. Stellen Sie mit den -Tasten 4. Intensität die Saugstärke so ein, dass es sich für Sie noch angenehm anfühlt. -
Page 12: Handpumpe Bedienen
4. Platzieren Sie die Brusthaube mit Silikonkissen behutsam auf der Brust. Achten sie darauf, dass die Brustwarze vollständig eingeschlossen ist und es keine Luftblasen gibt. Um eine ein- wandfreie Funktion zu gewährleisten, muss die Brusthaube fest an der Brust angesaugt sein. 5. -
Page 13: Aufbewahrung Der Muttermilch
3. Die Stärke des Abpumpens können Sie zwischen den sichtbaren Markierungen MIN/MAX wählen. 7.5 Aufbewahrung der Muttermilch Sie können die abgepumpte Muttermilch für eine bestimmte Zeit auch im Kühlschrank oder Tiefkühlfach aufbewahren. • Wenn Sie Muttermilch aufbewahren wollen, achten Sie darauf, dass die Milchpumpe und die Fläschchen vor der Anwendung desinfiziert wurden. -
Page 14: Reinigung Und Pflege
8. Reinigung und Pflege WARNUNG Sterilisieren und Reinigen Sie die einzelnen Komponenten der Milchpumpe (ausgenommen Motoreinheit und Silikonschlauch), welche in direkten Kontakt mit der Muttermilch kommen, einzeln vor der ersten und jeder weiteren Anwendung! Sterilisieren Sie niemals die Motoreinheit! Um die Milchpumpe korrekt zu sterilisieren, befolgen Sie die folgenden Handlungsschritte: 1. -
Page 15: Ersatz- Und Verschleißteile
Land erfolgen. Entsorgen Sie das Gerät gemäß der Elektro- und Elektronik-Altgeräte EG-Richt- linie – WEEE (Waste Electrical and Electronic Equipment). Bei Rückfragen wenden Sie sich an die für die Entsorgung zuständige kommunale Behörde. 11. Technische Angaben Modell BY 70 Type BY 40 Stromversorgung 4 x 1,5 V AA-Batterien (Alkaline Batterien) - Page 16 Maximale Saugleistung 0.32 bar Zulässige Betriebsbedingungen +5°C bis +40°C; 30% bis 85% relative Luftfeuchtigkeit (nicht kondensierend); 700 –1060 hPa Umgebungsdruck Zulässige Aufbewahrungsbedingungen -20°C bis +60°C; 10% bis 95% relative Luftfeuchtigkeit (nicht kondensierend); 700 –1060 hPa Umgebungsdruck Zu erwartende Laufzeit 500 Stunden Intervallbenutzung 30 Minuten ON / 30 Minuten OFF Schutzklasse...
-
Page 17: Garantie / Service
Falls sich dieses Produkt während der Garantiezeit als unvollständig oder in der Funktionstüchtigkeit als mangelhaft gemäß der nachfolgenden Bestimmungen erweist, wird Beurer gemäß diesen Garantiebe- dingungen eine kostenfreie Ersatzlieferung oder Reparatur durchführen. Wenn der Käufer einen Garantiefall melden möchte, wendet er sich zunächst an den Beurer Kun- denservice: Beurer GmbH, Servicecenter Tel: +49 731 3989-144 Für eine zügige Bearbeitung nutzen Sie bitte unser Kontaktformular auf der Homepage www.beurer.com... - Page 18 - Folgeschäden, welche auf einem Mangel dieses Produktes beruhen (es können für diesen Fall jedoch Ansprüche aus Produkthaftung oder aus anderen zwingenden gesetzlichen Haftungsbestimmungen bestehen). Reparaturen oder ein Komplettaustausch verlängern in keinem Fall die Garantiezeit.
- Page 19 Getting to know your device The Beurer BY 70 breast pump set allows nursing mothers to express their breast milk easily and in the comfort of their own homes. If not enough breast milk is taken from mothers who have recently given birth, this can lead to the painful build-up of milk, which in the worst-case scenario could cause inflam- mation of the nipples (mastitis).
-
Page 20: Instructions For Use
1. Included in delivery • Electric dual breast pump (motor unit) • Silicone tubes with adapter for two-sided pumping • Silicone tube for one-sided pumping • 2x pump attachment with silicone membrane and silicone valve • 2x silicone cushions (normal size) •... -
Page 21: Intended Use
Manufacturer’s catalogue number The device is double protected and corresponds to protection class 2. Dispose of packaging in an environmentally friendly manner Certification symbol for products that are exported to the Russian Federation and mem- bers of the CIS 3. Intended use The breast pump must be used exclusively for pumping breast milk from nursing mothers. -
Page 22: Important
• In the event of a fault, do not open or shake the breast pump under any circumstances. Refer to the "What if there are problems" chapter. If your problem is not described there, please contact Customer Services or your retailer. •... - Page 23 WARNING Notes on handling batteries • If your skin or eyes come into contact with battery fluid, rinse the affected areas with water and seek medical assistance. • Choking hazard! Small children may swallow and choke on batteries. Store the batteries out of the reach of small children.
-
Page 24: Device Description
5. Device description 1. Breast pump with display 10. Teat 2. Small bottle holder 11. Bottle cap 3. Small bottle (180 ml) 12. Adapter for NUK (the breast pump can also be used with this bottle if desired) 4. Silicone valve 13. -
Page 25: Initial Use
Description of display and buttons 10 11 1. Battery status (for operation without mains 7. ON/OFF button plug) 2. Pumping mode (to pump breast milk) 8. – button (to decrease stimulation or pumping level) 3. Time display (timer for stimulation / duration of 9. -
Page 26: Usage
2. Insert the silicone tubes for two-sided pumping into the 2 pump attachments and the breast pumps 3. For one-sided pumping, insert the silicone tube with- out adapter into the pump attachment and the breast pump. 4. Connect the breast pump to the mains cable and in- sert the mains plug into the socket. -
Page 27: Operating The Breast Pump
7.2 Operating the breast pump a) Preparation for two-sided pumping: 1. Before using the breast pump, wash your hands and breasts thoroughly. 2. The breast pump and the 2 small bottles must be connected to the silicone tube for two-sided pumping. 3. - Page 28 7. If you want to switch back to stimulation mode, press the button. The stimulation and the two-minute timer will start from the beginning. The breast pump has a memory function, which recalls the last programmed stimulation or pumping level when 5.
-
Page 29: Using The Manual Pump
5. To switch on the breast pump, press the button. The breast 1. Switch on pump must be connected to the silicone tube for one-sided stimulation pumping and to 1 small bottle. The breast pump will begin au- mode tomatically in stimulation mode ( ) and a two-minute timer will appear on the display. -
Page 30: Storing The Breast Milk
7.5 Storing the breast milk Expressed milk can be stored in the fridge or freezer for a certain period of time. • When storing breast milk, ensure that the breast pump and the bottles are disinfected before usage. Only store breast milk in disinfected containers. •... -
Page 31: What If There Are Problems
5. Clean the motor unit carefully using a slightly damp cloth only. Do not use any cleaning agents or sol- vents. Under no circumstances should you hold the motor unit under water, as this can cause liquid to enter and damage the breast pump. If you do not intend to use the breast pump for a prolonged period of time, remove the batteries. -
Page 32: Disposal
EC Directive – WEEE (Waste Electrical and Electronic Equipment). If you have any questions, please contact the local authorities responsible for waste disposal. 11. Technical specifications Model BY 70 Type BY 40 Power supply 4 x 1.5 V AA batteries (alkaline batteries) -
Page 33: Warranty/Service
During the warranty period, should this product prove to be incomplete or defective in functionality in accordance with the following provisions, Beurer shall carry out a repair or a replacement delivery free of charge, in accordance with these warranty conditions. - Page 34 The buyer will then receive further information about the processing of the warranty claim, e.g. where they can send the product and what documentation is required. A warranty claim shall only be considered if the buyer can provide Beurer, or an authorised Beurer partner, with - a copy of the invoice/purchase receipt, and - the original product.
- Page 35 Familiarisation avec l’appareil Avec l’ensemble de tire-lait BY 70 de Beurer, les femmes qui allaitent peuvent tirer leur lait maternel faci- lement et dans le confort de leur foyer. Si le sein de la femme allaitante n’est pas suffisamment vidé, cela peut entraîner un engorgement douloureux qui peut, dans le pire des cas, évoluer en inflammation des...
-
Page 36: Fr Double Tire-Lait Électrique
1. Contenu • Double tire-lait électrique (moteur) • Tuyaux en silicone avec connecteur pour double pompage • Tuyau en silicone pour pompage simple • 2 embouts de pompe avec membrane en silicone et soupape en silicone • 2 coussinets en silicone (taille normale) •... -
Page 37: Utilisation Conforme Aux Recommandations
Le sigle CE atteste de la conformité aux exigences fondamentales de la directive 93/42/ CEE relative aux dispositifs médicaux. Numéro de catalogue du fabricant L’appareil bénéficie d’une double protection et est conforme à la classe de sécurité 2. Emballage à trier Marque de certification pour les produits, qui sont exportés en Fédération de Russie et dans les pays de la CEI 3. -
Page 38: Consignes Concernant Le Transport Du Biberon
• N’utilisez jamais le tire-lait dans le bain ou sous la douche. • En cas de défaillance ou de dysfonctionnement, vous ne devez en aucun cas ouvrir ou secouer le tire-lait. Consultez le chapitre « Que faire en cas de problèmes ? ». Si votre problème n’y est pas décrit, adres- sez-vous au service client ou à... -
Page 39: Remarques Relatives Aux Piles
• Stérilisez tous les composants entrant en contact avec le lait maternel pendant cinq minutes dans de l’eau bouillante. • Nettoyez l’appareil avant chaque utilisation. • Veillez à ce que la température du liquide dans le biberon ne dépasse jamais 50 °C. AVERTISSEMENT Remarques relatives aux piles •... -
Page 40: Description De L'appareil
5. Description de l’appareil 1. Tire-lait avec écran 10. Tétine 2. Support de biberon 11. Capuchon de biberon 3. Biberon (180 ml) 12. Adaptateur pour biberons NUK (le tire-lait peut également être utilisé avec ces biberons) 4. Soupape en silicone 13. Adaptateur pour biberons AVENT (le tire-lait peut également être utilisé... -
Page 41: Mise En Service
Description de l’écran et des boutons 10 11 1. État de la pile (pour le fonctionnement sans 7. Touche MARCHE/ARRÊT câble d'alimentation) 2. Mode aspiration (pompage du lait maternel) 8. Bouton – (réduire le niveau de stimulation ou d‘aspiration) 3. Affichage du temps (compte à rebours pour 9. -
Page 42: Utilisation
2. Insérez les tuyaux en silicone pour double pompage dans les 2 embouts de pompe et les tire-laits. 3. Pour un pompage simple, insérez le tuyau de silico- ne sans connecteur dans l‘embout de pompe et le tire-lait. 4. Connectez le tire-lait au câble d'alimentation et branchez la fiche dans la prise. -
Page 43: Utilisation Du Tire-Lait
7.2 Utilisation du tire-lait a) Préparation pour le double pompage : 1. Avant d’utiliser l’appareil, lavez-vous soigneusement les mains et la poitrine. 2. Pour le double pompage, le tire-lait et les 2 biberons doivent être reliés au tuyau en silicone. 3. Asseyez-vous avec le haut du corps légèrement penché vers l’avant. - Page 44 7. Si vous voulez revenir au mode stimulation, appuyez sur le bou- . La stimulation et le compte à rebours de 2 minutes recommencent au début. Le tire-lait dispose d’une « fonction mémoire », ce qui signifie que lorsqu’il s’allume, la dernière puissance de 5.
-
Page 45: Utiliser La Pompe À Main
5. Appuyez sur la touche pour allumer le tire-lait. Maintenez les 1. Activer touches + et - enfoncées pendant 2 secondes jusqu’à ce que l’ap- le mode pareil passe en mode pompage simple « 1 ». Le tire-lait démarre stimula- alors automatiquement en mode stimulation ( ) et un compte tion à... -
Page 46: Conservation Du Lait Maternel
7.5 Conservation du lait maternel Vous pouvez conserver le lait maternel pompé pendant un certain temps au réfrigérateur ou au congé- lateur. • Si vous souhaitez conserver le lait maternel, veillez à ce que le tire-lait et le biberon soient désinfectés avant chaque utilisation. -
Page 47: Que Faire En Cas De Problèmes
4. Stérilisez les biberons et les embouts de pompe (avec membrane et soupape en silicone) pendant cinq minutes dans de l’eau bouillante ou à l’aide d’un stérilisateur à vapeur. Ne réutilisez le tire-lait que lorsque tous les composants sont entièrement secs. N’utilisez aucun produit nettoyant antibactérien, car il pour- rait endommager le plastique du tire-lait. -
Page 48: Pièces De Rechange Et Consommables
– WEEE (Waste Electrical and Electronic Equipment) relative aux appareils électriques et électroniques usagés. Pour toute question, adressez-vous aux collectivités locales respon- sables de l’élimination et du recyclage de ces produits. 11. Caractéristiques techniques Modèle BY 70 Type BY 40 Alimentation électrique 4 piles AA de 1,5 V (piles alcalines) Tension (entrée) -
Page 49: Adaptateur Secteur
AC/DC. 12. Garantie/Maintenance La société Beurer GmbH, sise Söflinger Straße 218, 89077 Ulm, Allemagne, (ci-après désignée « Beurer ») propose une garantie pour ce produit dans les conditions suivantes et dans la mesure prévue ci-après. - Page 50 Le droit allemand s’applique. Si, au cours de la période de garantie, ce produit s’avère incomplet ou défectueux conformément aux dispositions suivantes, Beurer s’engage à proposer gratuitement un remplacement ou une réparation conformément aux présentes Conditions de garantie. Si l’acheteur souhaite faire valoir la garantie, il doit d’abord s’adresser au revendeur local : cf. liste «...
-
Page 51: Información General
Información general Con el set del extractor de leche BY 70 de Beurer, las mujeres en periodo de lactancia pueden extraer su leche materna fácil y cómodamente en casa. Si el pecho de la mujer lactante no se vacía lo suficiente, puede provocar una congestión del pecho dolorosa, la cual puede derivar, en el peor de los casos, en... -
Page 52: Artículos Suministrados
1. Artículos suministrados • Extractor de leche eléctrico doble (unidad del motor) • Tubos flexibles de silicona con pieza de empalme para extracción doble • Tubo flexible de silicona para extracción simple • 2 cabezales de extracción con membrana de silicona y válvula de silicona •... -
Page 53: Uso Correcto
Número de catálogo del fabricante El aparato tiene una protección de aislamiento doble y cumple con los requisitos de la clase de protección 2. Elimine el embalaje respetando el medio ambiente Símbolo de certificación para aquellos productos que se exportan a la Federación Rusa y a los países de la CEI 3. - Page 54 • En caso de que se produzca un fallo o avería de funcionamiento, no abra ni agite el extractor de leche bajo ninguna circunstancia. Lea el capítulo "Solución de problemas". Si su problema no aparece ahí descrito, póngase en contacto con su distribuidor o con el servicio de atención al cliente. •...
- Page 55 • Limpie el aparato antes de cada uso. • Asegúrese de que la temperatura del líquido del biberón no sea superior a 50°C. ADVERTENCIA Indicaciones para la manipulación de pilas • En caso de que el líquido de una pila entre en contacto con la piel o los ojos, lave la zona afectada con agua y busque asistencia médica.
-
Page 56: Descripción Del Aparato
5. Descripción del aparato 1. Extractor de leche con pantalla 10. Tetina 2. Soporte del biberón 11. Tapa del biberón 3. Biberón (180 ml) 12. Adaptador para biberón NUK (si se desea, el extractor de leche puede utilizarse también con este biberón) 4. -
Page 57: Puesta En Funcionamiento
Descripción de la pantalla y los botones 10 11 1. Estado de la batería (en caso de funcionamien- 7. Botón de encendido y apagado to sin conector de red) 2. Modo de extracción (extrae la leche materna) 8. Botón - (reducción del nivel de estimulación o extracción) 3. -
Page 58: Aplicación
2. Introduzca los tubos flexibles de silicona para extracción doble en los 2 cabezales de extracción y los extractores de leche 3. Para la extracción simple, introduzca el tubo flexible de silicona sin pieza de empalme en el cabezal de extracción y en el extractor de leche. -
Page 59: Manejo Del Extractor De Leche
• Si sus pechos están hinchados o irritados, coloque un paño caliente sobre ellos durante unos minutos. Esto favorece el flujo de leche. • Si no sale leche de los pechos de inmediato, intente relajarse y vuelva a probar unos minutos más tarde. •... - Page 60 3. Comenzar el modo extracción 6. Una vez transcurridos los 2 minutos comienza a parpadear en la pantalla. Para a continuación comenzar con la ex- tracción de la leche materna, pulse el botón . Ajuste la 4. Intensidad intensidad de succión que le resulte agradable con los boto- .
-
Page 61: Utilizar El Extractor Manual
4. Coloque el embudo con almohadilla de silicona sobre el pecho con cuidado. Asegúrese de que el pezón quede totalmente cubierto y de que no haya burbujas de aire. Para garantizar un funcionamiento correcto, el embudo debe quedar bien sujeto contra el pecho. -
Page 62: Conservación De La Leche Materna
2. Coloque el embudo con almohadilla de silicona sobre el pecho con cuidado. Asegúrese de que el pezón quede totalmente cubierto y de que no haya burbujas de aire. Para garantizar un funciona- miento correcto, el embudo debe quedar bien sujeto contra el pe- cho. -
Page 63: Limpieza Y Cuidado
• En caso de que el olor de la leche materna resulte desagradable, deséchela de inmediato. • No caliente nunca la leche materna en el microondas, ya que podría calentarse de forma irregular y el niño podría sufrir quemaduras al beber. •... -
Page 64: Piezas De Repuesto Y De Desgaste
Problema Posible solución • Retire la almohadilla de silicona y vuelva a colo- carla. Asegúrese de que la almohadilla de silicona La leche materna se derrama por debajo de la almo- esté en la posición correcta y de que el cabezal hadilla de silicona. -
Page 65: Datos Técnicos
11. Datos técnicos Modelo BY 70 Type BY 40 Alimentación 4 pilas de 1,5 V AA (pilas alcalinas) Tensión (entrada) 100-240 V (CA~) 50/60 Hz Tensión (salida) 6 V (DC ) 1,0 A Dimensiones 168 x 100 x 53 mm... -
Page 66: Garantía/Asistencia
CA/CC. 12. Garantía/Asistencia Beurer GmbH, Söflinger Straße 218, D-89077 Ulm (en lo sucesivo, «Beurer») concede una garantía para este producto. La garantía está sujeta a las siguientes condiciones y el alcance de la misma se describe a continuación. - Page 67 Beurer; - daños que se hayan producido durante el transporte entre las instalaciones del fabricante y las del cliente o bien entre el centro de servicio técnico y el cliente;...
- Page 68 Il team Beurer Introduzione Grazie al set tiralatte BY 70 di Beurer le donne che allattano al seno possono tirare il loro latte in modo semplice e pratico, direttamente a casa. Se il seno non viene sufficientemente svuotato, può verificar- si un doloroso ingorgo mammario, che nel peggiore dei casi può...
-
Page 69: Fornitura
1. Fornitura • Tiralatte elettrico doppio (unità motore) • Tubi in silicone con raccordo per estrazione doppia • Tubo in silicone per estrazione singola • 2 accessori per l’estrazione inclusa membrana in silicone e valvola in silicone • 2 coppe in silicone (dimensione normale) •... -
Page 70: Uso Conforme
Numero di catalogo del produttore L’apparecchio è dotato di doppio isolamento di protezione e corrisponde alla classe di protezione 2. Smaltire la confezione nel rispetto dell‘ambiente Marchio di certificazione per i prodotti esportati nella Federazione Russa e nei paesi CSI 3. - Page 71 • In caso di malfunzionamento o di guasto, non aprire o scuotere il tiralatte in nessuna circostanza. Leggere il capitolo "Che cosa fare in caso di problemi"; nel caso il problema non sia descritto in questo capitolo, rivolgersi al Servizio clienti o al proprio rivenditore. •...
- Page 72 AVVERTENZA Avvertenze sull’uso delle batterie • Se il liquido della batteria viene a contatto con la pelle e con gli occhi, sciacquare le parti interessate con acqua e consultare il medico. • Pericolo d’ingestione! I bambini possono ingerire le batterie e soffocare. Tenere quindi le batterie lon- tano dalla portata dei bambini! •...
-
Page 73: Descrizione Dell'apparecchio
5. Descrizione dell’apparecchio 1. Tiralatte con display 10. Tettarella 2. Supporto per biberon 11. Tappo per biberon 3. Biberon (180 ml) 12. Adattatore per NUK (il tiralatte può essere utilizzato anche con questo biberon) 4. Valvola in silicone 13. Adattatore per AVENT (il tiralatte può essere uti- lizzato anche con questo biberon) 5. -
Page 74: Messa In Funzione
Descrizione del display e dei pulsanti 10 11 1. Stato batteria (per utilizzo senza alimentatore) 7. Pulsante ON/OFF 2. Modalità di estrazione (il latte materno viene 8. Pulsante - tirato) (riduzione del livello di stimolazione o estrazione) 3. Indicazione del tempo (countdown stimolazio- 9. -
Page 75: Utilizzo
2. Inserire i tubi in silicone per l’estrazione doppia nei due accessori per l’estrazione e nel tiralatte. 3. Per l‘estrazione singola, inserire il tubo in silicone nell‘accessorio per l‘estrazione e nel tiralatte senza raccordo. 4. Collegare il tiralatte con il cavo di alimentazione e inserire la spina nella presa. -
Page 76: Utilizzo Del Tiralatte
7.2 Utilizzo del tiralatte a) Preparazione dell’estrazione doppia: 1. Prima di iniziare, lavarsi accuratamente le mani e i seni. 2. Il tiralatte e i 2 biberon devono essere collegati con il tubo in silicone per estrazione doppia. 3. Sedersi con il busto leggermente piegato in avanti. Per un mi- gliore sostegno della schiena, è... - Page 77 7. Per passare di nuovo alla modalità di stimolazione, premere il pulsante . La stimolazione e il countdown di 2 minuti ri- cominciano da capo. Il tiralatte è dotato di una "funzione Memory", vale a di- re, che quando si accende l’apparecchio, viene attivato 5.
-
Page 78: Utilizzo Del Tiralatte Manuale
1. Attivazione 5. Per accendere il tiralatte, premere il pulsante . Tenere premuti della modalità per 2 secondi i pulsanti + e -, finché non viene attivata la moda- di stimolazi- lità di estrazione singola “1”. Il tiralatte si avvia automaticamente in modalità... -
Page 79: Conservazione Del Latte Materno
3. È possibile scegliere l’intensità dell’estrazione con gli indicatori visibili MIN/MAX. 7.5 Conservazione del latte materno Il latte materno estratto può essere conservato per un determinato periodo di tempo in frigorifero o in freezer. • Se si desidera conservare il latte materno, prima dell’utilizzo disinfettare il tiralatte e il biberon. Conservare il latte materno esclusivamente in contenitori disinfettati. -
Page 80: Pulizia E Cura
8. Pulizia e cura AVVERTENZA Sterilizzare e pulire i singoli componenti del tiralatte (ad eccezione dell’unità motore e del tubo in silicone) che entrano a diretto contatto con il latte materno prima del primo e di ogni successivo utilizzo! Non sterilizzare l’unità motore. Per sterilizzare correttamente il tiralatte, procedere come descritto di seguito: 1. -
Page 81: Pezzi Di Ricambio E Parti Soggette A Usura
(RAEE). Per eventuali chiarimenti, rivolgersi alle autorità comunali competenti per lo smaltimento. 11. Dati tecnici Modello BY 70 Type BY 40 Alimentazione 4 batterie AA da 1,5 V (batterie alcaline) - Page 82 Potenza di aspirazione massima 0,32 bar Condizioni operative ammesse Da +5 °C a +40 °C, dal 30 all’ 85% di umidità relativa (senza condensa), 700–1060 hPa di pressione ambiente Condizioni di stoccaggio ammesse Da -20°C a +60°C, dal 10 al 95% di umidità relativa (senza condensa), 700–1060 hPa di pressione ambiente Durata prevista 500 ore...
-
Page 83: Garanzia/Assistenza
Nel caso in cui il prodotto, durante il periodo di garanzia, si dimostrasse incompleto o presentasse difetti di funzionamento in linea con le seguenti disposizioni, Beurer provvederà a sostituire o riparare gratuita- mente il prodotto in base alle presenti condizioni di garanzia. -
Page 84: Ürün Özellikleri
Beurer Ekibiniz Ürün özellikleri Emziren kadınlar, Beurer BY 70 süt pompası setiyle anne sütünü evde kolayca ve rahatlıkla sağabilirler. Emziren kadının göğsü yeterince boşaltılmazsa, bu durum ağrılı bir süt birikmesine yol açabilir, bu da en kötü durumda göğüs ucu iltihabına (mastit) dönüşebilir. Süt pompası ile anne sütünün kontrollü olarak pompalanması... -
Page 85: Teslimat Kapsamı
1. Teslimat kapsamı • Elektrikli çift süt pompası (motor ünitesi) • Çift taraflı sağma için bağlantı parçalı silikon hortumlar • Tek taraflı sağma için silikon hortum • 2x silikon diyafram ve silikon valfli pompa başlığı • 2x silikon yastık (standart boyut) •... -
Page 86: Amacına Uygun Kullanım
Üreticinin katalog numarası Cihaz çift koruyucu izolasyonludur ve bu nedenle Koruma Sınıfı 2’ye uygundur. Ambalajı çevreye saygılı şekilde bertaraf edin Rusya ve Bağımsız Devletler Topluluğu ülkelerine ihraç edilecek ürünler için sertifika işareti 3. Amacına uygun kullanım Süt pompasını yalnızca emziren kadınların göğsünden anne sütü sağmak için kullanın. Süt pompasını hayvanlar üzerinde kullanmayın! Süt pompası... - Page 87 • Hatalı çalışması veya bir çalışma arızası olması durumunda süt pompasını hiçbir surette açmayın veya sallamayın. “Sorunların giderilmesi” bölümünü okuyun, eğer sorununuz orada tarif edilmemişse müşteri hizmetlerine veya satıcınıza başvurun. • Tamir işlemleri yalnızca müşteri hizmetleri veya yetkili satıcılar tarafından yapılabilir. Süt pompasını hiçbir surette kendiniz açmayın veya tamir etmeyin, aksi halde kusursuz çalışması...
- Page 88 UYARI Pillerin kullanımıyla ilgili bilgiler • Pilden sızan sıvı cilt veya gözlerle temas ettiğinde, ilgili yeri suyla yıkayın ve bir doktora başvurun. • Yutma tehlikesi! Küçük çocuklar pilleri yutabilir ve bunun sonucunda boğulabilir. Bu nedenle pilleri, küçük çocukların erişmeyeceği yerlerde saklayın! •...
-
Page 89: Cihaz Açıklaması
5. Cihaz açıklaması 1. Ekranlı süt pompası 10. Emzik 2. Biberon tutucu 11. Biberon kapağı 3. Biberon (180 ml) 12. NUK için adaptör (süt pompası istendiğinde bu biberonla da kullanılabilir) 4. Silikon valf 13. AVENT için adaptör (süt pompası istendiğinde bu biberonla da kullanılabilir) 5. -
Page 90: Çalıştırma
Ekran ve düğmelerin açıklamaları 10 11 1. Pil durumu (elektrik adaptörsüz çalıştırıldığında) 7. AÇMA/KAPATMA düğmesi 2. Sağma modu (anne sütünü sağmak için) 8. - düğmesi (stimülasyon veya sağma kademesini azaltmak için) 3. Zaman göstergesi (geri sayım, stimülasyon/ 9. MOD düğmesi (sağma ve stimülasyon modları kullanım süresi, sağma modu) arasında geçiş... -
Page 91: Kullanım
2. Çift taraflı sağma için silikon hortumu, 2 pompa baş- lığına ve süt pompalarına takın 3. Tek taraflı sağma için silikon hortumu bağlantı parçası olmadan pompa başlığına ve süt pompasına takın. 4. Elektrik kablosunu süt pompasına bağlayın ve fişli elektrik adaptörünü prize takın. 5. -
Page 92: Süt Pompasının Kullanımı
7.2 Süt pompasının kullanımı a) Çift taralı sağma hazırlığı: 1. Kullanmaya başlamadan önce ellerinizi ve göğüslerinizi özen- le yıkayın. 2. Süt pompası ve 2 biberon, çift taralı sağma için silikon hortum ile bağlanmalıdır. 3. Gövdenizin üst kısmı hafifçe öne eğilmiş olarak oturun. Sırtınızın daha iyi desteklenmesi için yastık kullanabilirsiniz. -
Page 93: Süt Pompasının Kullanımı
7. Stimülasyon moduna geri dönmek istiyorsanız düğmesine basın. Stimülasyon ve 2 dakikalık geri sayım baştan başlar. Süt pompasının “hafıza özelliği” vardır, yani süt pompa- sını açtığınızda en son ayarlamış olduğunuz stimülasyon ve sağma kademeleri etkin olur. 5. Stimülasyon moduna geri dönüş Dikkat edilmesi gerekenler: “1”... -
Page 94: El Pompasının Kullanılması
5. Süt pompasını açmak için düğmesine basın. Lütfen cihaz “1” kodlu tek taraflı sağma moduna geçinceye kadar + ve - Stimülasyon düğmesine 2 saniye süreyle basın. Süt pompası otomatik ola- modunun açılması rak stimülasyon modunda ( ) çalışmaya başlar ve ekranda 2 dakikalık geri sayım başlar. -
Page 95: Anne Sütünün Saklanması
7.5 Anne sütünün saklanması Sağılan anne sütünü belli bir süre buzdolabında veya derin dondurucu bölmesinde de saklayabilirsiniz. • Anne sütünü saklamak istiyorsanız, kullanmadan önce süt pompasının ve biberonların dezenfekte edilmiş olmasına dikkat edin. Anne sütünü yalnızca dezenfekte edilmiş kaplar içinde saklayın. •... -
Page 96: Sorunların Giderilmesi
ra tekrar kullanın. Antibakteriyel temizlik maddeleri kullanmayın çünkü bunlar süt pompasının plastiğine zarar verebilir. 5. Motor ünitesini dikkatli bir şekilde, sadece hafif nemlendirilmiş bir bezle temizleyin. Temizlik maddeleri veya çözücü maddeler kullanmayın. Motor ünitesini hiçbir şekilde suyun altına tutmayın, aksi takdirde içi- ne su girebilir ve süt pompası... -
Page 97: Bertaraf Etme
Cihazı AB Elektrikli ve Elektronik Ekipman Atık Direktifine (WEEE - Waste Electrical and Electronic Equipment) uygun olarak bertaraf edin. Bertaraf etme ile ilgili sorularınızı, ilgili yerel makamlara iletebilirsiniz. 11. Teknik veriler Model BY 70 Type BY 40 Güç kaynağı 4 x 1,5 V AA pil (alkalin pil) Voltaj (giriş) -
Page 98: Elektrik Adaptörü
12. Garanti / Servis Beurer GmbH, Söflinger Straße 218, D-89077 Ulm (aşağıda „Beurer“ olarak anılacaktır) bu ürün için aşa- ğıdaki koşullar çerçevesinde ve aşağıda açıklanan kapsamda bir garanti sunmaktadır. Aşağıdaki garanti koşulları, satıcının müşteri ile yaptığı satış sözleşmesinden doğan yasal garanti yükümlülüklerini etkilemez. - Page 99 Alman yasaları geçerlidir. Bu ürünün garanti süresi içinde aşağıda belirtilen hükümler uyarınca eksiksiz olmadığı veya çalışma açı- sından kusurlu olduğu saptanırsa, Beurer bu garanti koşulları kapsamında ücretsiz bir ikame ürün teslimatı veya onarım gerçekleştirmekle yükümlüdür. Müşteri bir garanti talebinde bulunmak istediğinde önce yerel satıcıya başvuracaktır: Servis ad- reslerinin olduğu ekteki „Uluslararası...
-
Page 100: Уважаемый Покупатель
компания Beurer Для ознакомления Комплект молокоотсоса BY 70 фирмы Beurer позволяет кормящим женщинам легко и удобно сце- живать грудное молоко в домашних условиях. Если у кормящей женщины в груди остается мо- локо, это может приводить к болезненному застою молока, что в неблагоприятном случае может... -
Page 101: Комплект Поставки
1. Комплект поставки • Электрический двойной молокоотсос (моторный блок) • Силиконовые шланги с соединительным элементом для двустороннего отсасывания • Силиконовый шланг для отсасывания с одной стороны • 2 насадки молокоотсоса с силиконовой мембраной и силиконовым клапаном • 2 силиконовые подушечки (нормальный размер) •... -
Page 102: Использование По Назначению
Номер производителя по каталогу Прибор имеет двойную защитную изоляцию и соответствует классу защиты 2. Утилизировать упаковку в соответствии с предписаниями по охране окружающей среды Сертификационный знак для изделий, экспортируемых в Российскую Федерацию и страны СНГ 3. Использование по назначению Молокоотсос следует использовать исключительно для груди кормящей женщины с целью отсасывания... - Page 103 • В режиме двустороннего отсасывания «2» используйте только соответствующее шланговое сое- динение с соединительным элементом для 2 бутылочек. • Никогда не используйте молокоотсос, принимая ванну или душ. • Ни в коем случае не открывайте и не встряхивайте молокоотсос в случае сбоя или неполадок в работе...
- Page 104 • Не допускайте контакта соски со сладкими веществами, так как они способствуют возникновению кариеса. • Не используйте моющие средства или антибактериальные очистители. • Все детали, которые контактируют с грудным молоком, стерилизуйте в кипящей воде в течение пяти минут. • Перед каждым применением мойте прибор. •...
-
Page 105: Описание Прибора
5. Описание прибора 1. Молокоотсос с дисплеем 10. Соска 2. Держатель для бутылочки 11. Колпачок для бутылочки 3. Бутылочка (180 мл) 12. Адаптер для бутылочек NUK (по желанию молокоотсос можно использовать также с бутылочкой этого производителя) 4. Силиконовый клапан 13. Адаптер для бутылочек AVENT (по желанию молокоотсос... -
Page 106: Подготовка К Работе
Описание дисплея и кнопок 10 11 1. Уровень заряда батареек (при работе без 7. Кнопка ВКЛ./ВЫКЛ. подключения сетевого штекера) 2. Режим отсасывания (отсасывание грудного 8. Кнопка «-» молока) (уменьшение интенсивности стимуляции или отсасывания) 3. Отображение времени (обратный 9. Кнопка MODUS (РЕЖИМ) (выбор между режимом... -
Page 107: Рекомендации Для Улучшения Выделения
2. Вставьте силиконовые шланги для двустороннего отсасывания в 2 насадки и в молокоотсосы 3. Для одностороннего отсасывания вставьте силиконовый шланг без соединительного элемента в насадку для молокоотсоса и в молокоотсос. 4. Подключите к молокоотсосу сетевой кабель и вставьте сетевой штекер в розетку. 5. -
Page 108: Использование Молокоотсоса
• Если груди опухли или воспалены, подержите несколько минут на груди теплое полотенце. Это стимулирует выделение молока. • Если молоко сразу не начинает течь из груди, попробуйте расслабиться и попытайтесь повторить попытку через несколько минут. • Если в течение пяти минут применения молокоотсоса молоко из груди так и не начало течь, пре- кратите... - Page 109 3. Начать отсасывание 6. По истечении 2 минут на дисплее начинает мигать символ . Чтобы начать отсасывание молока, нажмите кнопку . С помощью кнопок отрегулируйте силу всасы- 4. Интенсивность вания таким образом, чтобы Вы не ощущали дискомфорта. Когда в бутылочках наберется 180 мл молока, завершите использование...
-
Page 110: Использование Ручного Насоса
4. Осторожно разместите накладку с силиконовой подушеч- кой на груди. Следите за тем, чтобы сосок был полно- стью охвачен и чтобы не было пузырьков воздуха. Для безупречной работы прибора накладка для груди должна плотно присосаться к груди. 5. Для включения молокоотсоса нажмите кнопку . -
Page 111: Хранение Грудного Молока
2. Осторожно разместите накладку с силиконовой подушечкой на груди. Следите за тем, чтобы сосок был полностью охвачен и чтобы не было пузырьков воздуха. Для безупречной рабо- ты прибора накладка для груди должна плотно присосаться к груди. Приведите в действие ручной насос, как показано на рисунке. -
Page 112: Очистка И Уход
• Никогда не разогревайте грудное молоко в микроволновой печи, так как оно может разогреться неравномерно, в результате чего ребенок может обжечься. • Если Вы разогреваете грудное молоко, проверяйте его температуру, прежде чем давать его ребенку. 8. Очистка и уход ПРЕДОСТЕРЕЖЕНИЕ Перед первым и перед каждым последующим применением очищайте и стерилизуйте детали молокоотсоса... -
Page 113: Запасные Детали И Детали, Подверженные Быстрому Износу
Проблема Возможные решения • Снимите силиконовую подушечку и наденьте ее еще раз. Следите за тем, чтобы силиконо- Грудное молоко вытекает из-под силиконовой по- вая подушечка была расположена правильно душечки. и чтобы насадка для отсоса молока прилега- ла плотно. • Слегка наклоните верхнюю часть тела вперед. •... -
Page 114: Технические Данные
11. Технические данные Модель BY 70 Type BY 40 Электропитание 4 алкалиновые батарейки АА 1,5 В Напряжение (входное) 100–240 В (переменного тока~), 50/60 Гц Напряжение (выходное) 6 В (пост. тока ) 1,0 A Размеры 168 x 100 x 53 мм Вес 310 г (без батареек) Максимальная мощность всасывания... -
Page 115: Гарантия/Сервисное Обслуживание
• Применение сторонних принадлежностей, отличающихся от прилагаемого к данному прибору, может привести к росту электромагнитных помех или ослаблению помехоустойчивости прибора и тем самым вызвать ошибки в работе. • Несоблюдение данного указания может отрицательно сказаться на характеристиках мощности прибора. Блок питания №... -
Page 116: Informacje Ogólne
Beurer Informacje ogólne Zestaw laktacyjny BY 70 firmy Beurer umożliwia karmiącym kobietom łatwe i wygodne odciąganie swojego po- karmu w warunkach domowych. Jeśli kobieca pierś nie zostanie w wystarczającym stopniu opróżniona, może to doprowadzić do bolesnego zastoju pokarmu, który z kolei w najgorszym razie może przekształcić się w zapalenie gruczołu sutkowego (mastitis). -
Page 117: Zawartość Opakowania
1. Zawartość opakowania • Podwójny laktator elektryczny (silniczek) • Wężyki silikonowe ze złączką do odciągania dwustronnego • Wężyk silikonowy do odciągania jednostronnego • 2 wkłady laktatora z membraną silikonową i zaworem silikonowym • 2 poduszki silikonowe (zwykła wielkość) • 2x Buteleczka •... -
Page 118: Użytkowanie Zgodne Z Przeznaczeniem
Numer katalogowy producenta Urządzenie posiada podwójną izolację ochronną i jest zgodne z klasą ochronności II. Opakowanie zutylizować w sposób przyjazny dla środowiska Oznakowanie certyfikacyjne dla produktów eksportowanych do Federacji Rosyjskiej oraz państw WNP 3. Użytkowanie zgodne z przeznaczeniem Proszę używać laktatora wyłącznie w celu odciągania pokarmu matek karmiących. Laktatora nie należy stosować... - Page 119 • Nigdy nie stosuj laktatora w łazience ani pod prysznicem. • W przypadku wadliwego funkcjonowania lub zakłócenia pracy w żadnym wypadku nie wolno otwierać laktatora ani potrząsać nim. Proszę przeczytać rozdział „Postępowanie w przypadku problemów”, a gdyby Wasz problem nie był tam opisany, proszę się zwrócić do działu obsługi klienta lub swojego dystrybutora. •...
- Page 120 • Niewolno używać środków szorujących lub antybakteryjnych. • Należy sterylizować wszystkie części mające kontakt z pokarmem przez pięć minut we wrzącej wodzie. • Urządzenie należy myć przed każdym użyciem. • Proszę zwracać uwagę na to, aby temperatura płynu w butelce nigdy nie przekraczała 50°C. OSTRZEŻENIE Wskazówki dotyczące postępowania z bateriami •...
-
Page 121: Opis Urządzenia
5. Opis urządzenia 1. Laktator z wyświetlaczem 10. Smoczek butelki 2. Uchwyt buteleczki 11. Nasadka buteleczki 3. Buteleczka (180 ml) 12. Adapter do buteleczek NUK (w razie potrze- by laktator może być stosowany także z tą buteleczką) 4. Zawór silikonowy 13. -
Page 122: Uruchomienie
Opis wyświetlacza i przycisków 10 11 1. Status baterii (w przypadku użytkowania bez 7. Przycisk WŁ./WYŁ. zasilacza) 2. Tryb odciągania (pokarm jest odciągany) 8. Przycisk – (zmniejszanie stymulacji lub stopnia odciągania) 3. Wyświetlacz czasu (odliczanie stymulacji/cza- 9. Przycisk TRYB (zmiana między trybem su trwania trybu odciągania) odciągania i stymulacji) 4. -
Page 123: Zastosowanie
2. Włożyć wężyki silikonowe do obustronnego odsysania do 2 wkładów laktatora i laktatorów 3. W celu odciągania jednostronnego włożyć silikonowy wężyk bez złączki do wkładu laktatora i samego lak- tatora. 4. Połączyć laktator z kablem sieciowym i włożyć wtyczkę do gniazdka sieciowego. 5. -
Page 124: Obsługa Laktatora
• W przypadku, gdyby przy użyciu laktatora po pięciu minutach nadal nie popłynęło mleko z piersi, należy przerwać proces i spróbować później. • W razie pojawiania się silnego bólu przy stosowaniu laktatora proszę się skonsultować z lekarzem. 7.2 Obsługa laktatora a) Przygotowanie dwustronnego odciągania: 1. -
Page 125: Obsługa Laktatora
7. Aby przełączyć się z powrotem na tryb stymulacji, należy na- cisnąć przycisk . Stymulacja i odliczanie dwóch minut rozpoczynają się od nowa. Laktator posiada funkcję pamięci, co oznacza, że kiedy włącza się laktator, aktywny jest ostatnio ustawiony sto- 5. Z powrotem do trybu stymulacji pień... -
Page 126: Obsługa Ręcznego Laktatora
5. W celu włączenia laktatora proszę nacisnąć przycisk . Przy- 1. Włączanie trzymać wciśnięte przyciski + i – przez 2 sekundy, aby przełą- trybu sty- czyć urządzenie na tryb jednostronnego odciągania „1”. Lak- mulacji tator rozpoczyna teraz odliczanie automatyczne w trybie sty- mulacji ( ), a na wyświetlaczu pojawia się... -
Page 127: Przechowywanie Pokarmu
7.5 Przechowywanie pokarmu Odciągnięty pokarm można przez pewien czas przechowywać także w lodówce lub zamrażarce. • Chcąc przechowywać pokarm, proszę zwrócić uwagę na to, aby laktator i buteleczka zostały zdezyn- fekowane przed użyciem. Pokarm należy przechowywać wyłącznie w zdezynfekowanych pojemnikach. •... -
Page 128: Co Należy Zrobić W Przypadku Problemów
4. Sterylizować buteleczki i nakładki laktatora (z membraną silikonową i zaworem silikonowym) przez pięć minut we wrzącej wodzie lub w sterylizatorze parowym. Laktator może być używany ponownie po cał- kowitym wyschnięciu wszystkich poszczególnych części. Nie wolno używać antybakteryjnych środków czyszczących, gdyż mogłyby uszkodzić plastikowe elementy laktatora. 5. -
Page 129: Części Zamienne I Części Ulegające Zużyciu
Urządzenie należy zutylizować zgodnie z dyrektywą o zużytym sprzęcie elektrycznym i elektronicznym. W razie pytań należy zwrócić się do odpowiedniej in- stytucji odpowiedzialnej za utylizację. 11. Dane techniczne Model BY 70 Type BY 40 Źródło zasilania 4 baterie AA 1,5 V (baterie alkaliczne) Napięcie (wejście) - Page 130 Wymogi bezpieczeństwa według EN 60601-1 Artykuły dla niemowląt i dzieci - Sprzęt do picia według EN 14350 Urządzenie do odciągania pokarmu Urządzenie z próżnią niską i małą płynnością Część aplikacyjna typu BF Urządzenia nie wolno użytkować w obecności wybuchowych lub trujących mieszanek gazowych ani tlenków azotu (gaz rozweselający) Producent zastrzega sobie prawo do zmiany danych technicznych z powodu aktualizacji bez koniecz- ności powiadamiania...
-
Page 131: Gwarancja/Serwis
12. Gwarancja/serwis Firma Beurer GmbH, Söflinger Straße 218, D-89077 Ulm (zwana dalej „Beurer”) udziela gwarancji na ten produkt na następujących warunkach i w poniżej opisanym zakresie. Poniższe warunki gwarancji nie naruszają ustawowych zobowiązań gwarancyjnych sprzedającego wynikających z umowy kupna zawartej z kupującym. - Page 132 Beurer GmbH • Söflinger Straße 218 • 89077 Ulm, Germany • www.beurer.com www.beurer-gesundheitsratgeber.com • www.beurer-healthguide.com...