Table des Matières
Publicité
Les langues disponibles
Les langues disponibles
Liens rapides
Publicité
Table des Matières

Manuels Connexes pour BH FITNESS Pegasus


Sommaire des Matières pour BH FITNESS Pegasus
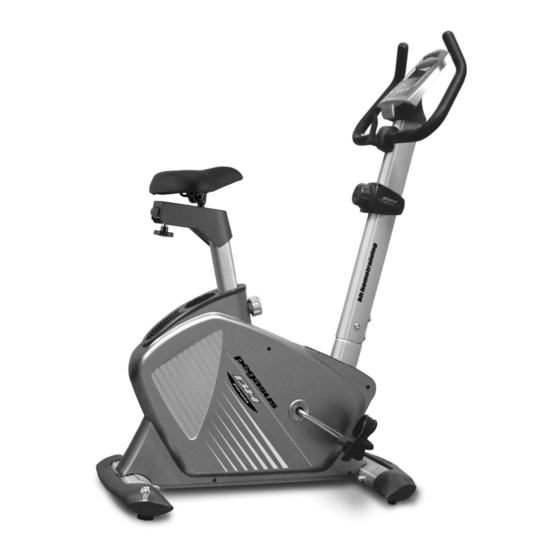
- Page 1 H105 / H106 Instrucciones de montaje y utilización Instructions for assembly and use Instructions de montage et utilisation Montage- und Gebrauchsanleitung Instruções de montagem e utilização Istruzioni di montaggio e uso Montage-en gebruiksinstrukties...
-
Page 5: Indicaciones Generales
Español AVISO IMPORTANTE DE asistencia de una persona cualificada o un médico. SEGURIDAD 10 Antes de utilizar este aparato, realice PRECAUCIONES un calentamiento con ejercicios de Esta bicicleta ha sido diseñada y estiramiento. construida de modo que proporcione la 11 No utilice la bicicleta si no funciona máxima seguridad. - Page 6 6 Utilice prendas de vestir y calzado del todo, meta la arandela (20) y la adecuado. Átese cordones palanca apriete manillar (19), correctamente. posicione manillar apriete suavemente, coloque la tapa protección INSTRUCCIONES DE MONTAJE de brida (18). Saque la unidad de la caja y compruebe COLOCACION DEL MONITOR que tiene todas las piezas Fig.1.
-
Page 7: Montaje De Los Pedales
Introduzca el tubo manillar (8) en en los agujeros de la tija. Apriete dirección a la flecha por el tubo saliente fuertemente el pomo (21) en el sentido cuerpo principal (1), teniendo de las agujas del reloj. cuidado pillar cables, compruebe si el mando de tensión (100) MONTAJE DE LOS PEDALES funciona... -
Page 8: Conexión A La Red
NIVELACIÓN CONEXIÓN A LA RED Una vez colocada la unidad en su Transformador: lugar definitivo, para la realización del 12V -1000 mAmp. ejercicio, compruebe Introduzca la clavija de enganche (g) asentamiento suelo del transformador (c) en el punto de nivelación sean correctos. Esto se conexión (h), del cuerpo central (A), conseguirá... -
Page 9: Important Safety Advice
English IMPORTANT SAFETY ADVICE 11 Do not use the bicycle if it is not working correctly. PRECAUTIONS This bicycle has been designed and Caution: Consult your doctor before constructed to provide maximum safety. beginning to use the bicycle. This advice Nevertheless, certain precautions... -
Page 10: Fitting The Handlebar
ASSEMBLY INSTRUCTIONS FITTING THE MONITOR Take the unit out of its box and make Mod H-105.- Take the monitor (24) and sure that all of the pieces are there remove the four screws (25) from the Fig.1. base of the monitor, Fig.4A, connect the 1.(1) Main body;... - Page 11 Insert the handlebar stem (8) onto the Tighten the knob (21) securely by boss on the main body (1) in the turning it clockwise. direction of the arrow, making sure not to catch any of the cables, and check FITTING THE PEDALS that the tension control (100) works The assembly instructions for the pedals correctly.
-
Page 12: Mains Connection
LEVELLING. MAINS CONNECTION Once the unit has been placed into its Transformer: final position, make sure that it sits flat 12 V- 1000 mAmp. on the floor and that it is level. This can Insert the jack (g) on the transformer (c) be achieved by screwing the adjustable into the connection hole (h) on the main feet (7) up or down, as shown in Fig.8. -
Page 13: Importantes Consignes De Sécurité
Français 8 Ne pas poser d’objets coupants aux IMPORTANTES CONSIGNES abords de la machine. DE SÉCURITÉ personnes handicapées PRÉCAUTIONS pourront utiliser la machine que si elles Cette bicyclette a été conçue et sont accompagnées par une personne fabriquée de façon à ce qu’elle puisse qualifiée pour ce faire ou par un médecin. -
Page 14: Montage
5 Cette machine ne peut être utilisée sortir par la partie supérieure du guidon. que par une personne à la fois. Placez la bride de fixation du guidon 6 L’utilisateur de la machine doit porter (16), la vis (17) sans la visser à fond, des vêtements et des chaussures mettre la rondelle (20) et le levier de appropriés. -
Page 15: Montage De La Selle
Prendre le câble de tension (11) du tube RÉGLAGE DE LA HAUTEUR guidon (8) et le connecter au support de DE LA SELLE tension inférieur (12) comme indiqué sur Desserrez légèrement le pommeau de la Fig.5A. serrage (21) de la tige dans le sens Introduire le tube guidon (8) en suivant contraire à... -
Page 16: Déplacement & Rangement
Pour augmenter résistance Fig.9. La machine doit être gardée dans pédalage, il suffit de tourner le bouton de un endroit sec, sans changements tension (100) dans le sens des aiguilles importants de température. d’une montre (+), jusqu’à obtention de l’effort souhaité pour cet exercice. Pour BRANCHEMENT AU RÉSEAU réduire la résistance du pédalage, Transformateur:... -
Page 17: Wichtiger Sicherheitshinweis
Deutsch 9 Behinderte Personen dürfen das WICHTIGER Gerät nur mit Unterstützung durch SICHERHEITSHINWEIS qualifiziertes oder medizinisches VORSICHTSMASSNAHMEN Personal benutzen. Dieses Fahrrad wurde so entwickelt und 10 Bevor Sie das Gerät benutzen, konstruiert, dass es maximale Sicherheit führen Aufwärmen bietet. Trotzdem müssen bestimmte Streckübungen durch. - Page 18 5 Ihr Gerät darf nur von jeweils einer Kabel des Hand-Grip (26) durch die Nut Person benutzt werden. Fig.2A und 2B) und ziehen Sie es am 6 Tragen Sie bitte geeignete Kleidung oberen Teil der Lenkstange wieder und Schuhe. Achten Sie darauf, dass heraus.
-
Page 19: Montage Des Sattels
MONTAGE DER LENKSTANGE befestigen Sie die Sattelstange mit Hilfe dieses Knaufs (21) auf einer bequemen Mod. H-105.- Halten Sie die Lenkstange Position und stellen Sie ihn durch (8) und verbinden Sie die Klemmen der Drehen im Uhrzeigersinn fest. Feedback-Kabel (9) und (10) sowie die Klemmen (33) (34),... -
Page 20: Transport Und Lagerung
REGULIEREN DES der Vorderseite des Geräts. Durch leichtes Anheben und Schieben an der WIDERSTANDS Vorderseite können Sie Ihr Gerät so Mod. H-105.- Für die Steuerung eines problemlos an den gewünschten Ort gleichmäßigen Widerstands während transportieren Fig.9. Bewahren Sie das Ihres Trainings verfügt dieses Gerät Gerät an einem trockenen Ort mit über einen Spannungsregler (100), der möglichst... -
Page 21: Indicações Gerais
Português AVISO IMPORTANTE DE assistência de uma pessoa qualificado ou de um médico. SEGURANÇA 10 Antes de utilizar este aparelho, PRECAUÇÕES realize um aquecimento com exercícios Esta bicicleta desenhada de estiramento. construída de modo a proporcionar a 11 Não utilize a bicicleta se esta não máxima segurança. -
Page 22: Instruções De Montagem
6 Utilize peças de roupa e calçado totalmente. Introduza o anel (20) e a adequado. atacadores alavanca para apertar guiador (19), correctamente. coloque o guiador e aperte suavemente. Coloque a tampa protecção do grampo INSTRUÇÕES DE MONTAGEM (18). Retire a unidade da caixa e comprove COLOCAÇÃO DO MONITOR que estão todas as peças Fig.1. - Page 23 Introduza o tubo guiador (8) na direcção mola e este introduzir-se-á nos buracos da seta pelo tubo saliente do corpo tige. Depois deverá apertar principal (1), tendo cuidado para não fortemente o botão mola (21) no sentido enganchar os cabos; comprove se o dos ponteiros do relógio.
-
Page 24: Ligação À Rede
NIVELAMENTO. LIGAÇÃO À REDE Depois de ter colocado a unidade no Transformador: seu lugar definitivo, para a realização do 12V-1000 mAmp. exercício, comprove se a sua colocação Introduza a cavilha de engate (g) do no chão e o seu nivelamento são os transformador (c) no ponto de conexão correctos. -
Page 25: Indicazioni Generali
Italiano AVVERTIMENTO assistenza di una persona qualificata o un medico. IMPORTANTE DI SICUREZZA 10 Prima di usare questo apparecchio, PRECAUZIONI realizzi un riscaldamento con esercizi di Questa bicicletta è stata disegnata e stiramento. costruita in modo che garantisca la 11 Non usi la bicicletta se non funziona massima sicurezza. -
Page 26: Istruzioni Di Montaggio
6 Usi capi d’ abbigliamento e scarpe Collochi il pezzo di fissaggio del adatti. Si allacci le scarpe correttamente. manubrio (16), collochi la vite (17) senza stringere completamente, metta ISTRUZIONI DI MONTAGGIO rondella (20) e la leva per stringere il manubrio (19), collochi il manubrio e Estragga l’... -
Page 27: Montaggio Del Sellino
MONTAGGIO DEL TUBO DEL REGOLAZIONE DELL’ MANUBRIO ALTEZZA DEL SELLINO Mod. H-105.- Prenda il tubo del Allentando un poco la maniglia di manubrio (8) e colleghi dei cavi di rinvio regolazione (21) dell’ albero in senso (9) e (10) e i terminali (33) e (34) Fig.5. antiorario tirando indietro... -
Page 28: Collegamento Alla Rete Elettrica
Per aumentare la resistenza della luogo secco che subisca le minori pedalata lei giri il comando di tensione variazioni di temperatura possibili. (100), in senso orario (+), fino ad ottenere sforzo COLLEGAMENTO ALLA RETE allenamento sia quello ideale per lei. Per ELETTRICA diminuire la resistenza della pedalata, Trasformatore:... -
Page 29: Algemene Aanwijzingen
Nederlands BELANGRIJKE Gebruik GEEN accessoires die niet worden aanbevolen door de fabrikant. VEILIGHEIDSVOORSCHRIFTEN 8 Plaats geen scherpe voorwerpen in de VOORZORGSMAATREGELEN buurt van het apparaat. Deze hometrainer dusdanig Invaliden dienen apparaat ontworpen en geconstrueerd om een uitsluitend te gebruiken onder leiding maximale veiligheid te waarborgen. -
Page 30: Montage-Instructies
5 Dit apparaat kan slechts door één plaats de schroef (17) zonder deze persoon tegelijk gebruikt worden. geheel vast te draaien, plaats de ring Gebruik adequate kleding (20) en de aandrukhendel van het stuur schoeisel. Strik uw veters goed. (19), zet het stuur goed en druk voorzichtig aan, plaats... - Page 31 Neem de spanningskabel (11) van de REGELING HOOGTE ZADEL framebuis (8) en bevestig deze aan de Draai instelknop (21) van de zadelpen onderste spanningshouder (12), zoals een beetje los door deze tegen de wordt getoond in Fig.5A. wijzers van de klok in te draaien en trekt Plaats de framebuis (8) in de richting deze uit Fig.6 en wanneer het zadel zich van de pijl op de buis die uit het centrale...
- Page 32 Om de weerstand op de pedalen te een droge plaats op, waar zo min vergroten draait mogelijk temperatuursschommelingen weerstandsregelaar (100) met de wijzers plaats vinden van de klok mee (+), tot u de ideale krachtsinspanning voor uw oefening AANSLUITING heeft gevonden. Om de weerstand op ELEKTICITEITSNET de pedalen te verminderen, draai u de Transformator:...
- Page 33 H-105...
- Page 34 Para pedido de repuesto: Indicar el modelo de la máquina Nº correspondiente a la pieza Cantidad To order replacement parts: State the machine model Corresponding parts nº Quantity Pour toute commande pièces détachées Indiquer le modèle de la machine Numéro de la pièce Quantité...
- Page 35 H-106...
- Page 36 Para pedido de repuesto: Indicar el modelo de la máquina Nº correspondiente a la pieza Cantidad To order replacement parts: State the machine model Corresponding parts nº Quantity Pour toute commande pièces détachées Indiquer le modèle de la machine Numéro de la pièce Quantité...
- Page 37 Por medio de la presente Exercycle S.L. declara que este producto Español cumple con los requisitos esenciales y cualesquiera otras disposiciones aplicables o exigibles de las Directivas 2004/108/CE y 2006/95/CE. English Hereby, Exercycle S.L, declares that this product is in compliance with the essential requirements and other relevant provisions of Directives 2004/108/EC and 2006/95/EC.
- Page 38 Fax: +33 0810 00 290 Fax: +34 945 56 05 27 e-mail: info@bhfitness.pt e-mail: e-mail: sat@bhfitness.es savfrance@bhfitness.com BH FITNESS NORTH AMERICA BH FITNESS MEXICO BH FITNESS UK 20155 Ellipse BH Exercycle de México S.A. de Halliards, Terrington Drive Foothill Ranch...