Publicité

Les langues disponibles

Les langues disponibles

Liens rapides

CU2000 / CU3000
ISTRUZIONI
IT
INSTRUCTIONS
UK
MODE D'EMPLOI
FR
GEBRAUCHSANWEISUNG
D E

Publicité

Table des Matières
loading

Sommaire des Matières pour CAN CU2000

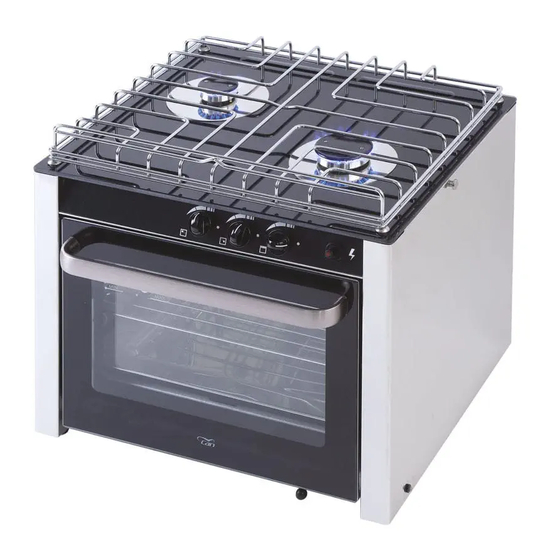
  • Page 1 CU2000 / CU3000 ISTRUZIONI INSTRUCTIONS MODE D’EMPLOI GEBRAUCHSANWEISUNG...
  • Page 2 TILTING OVEN CUISINIÈRE BASCULANTE KIPPBARER HERD CU3000 CUCINA BASCULANTE TILTING OVEN CUISINIÈRE BASCULANTE KIPPBARER HERD CAN S.r.l. Via Nazionale, 65 – 25080 Puegnago del Garda (Brescia) ITALY T. +39 0365 555909 – F. +39 0365 651822 – info@cansrl.com – www.cansrl.com...
  • Page 3 DIMENSIONI - SIZES - DIMENSIONS - MASSNAHMEN RICAMBI - SPARE PARTS - PIÈCES DE RECHANGE - ERSATZTEILE 3000033 Griglia top Top grid 3000033 Grille plan de caisson 3000044 Oberer Rost Portina complete Complete door 3000041 Porte complete 3000043 Tür, komplett Leccarda Dripping pan 3000043...
  • Page 4 RICAMBI IMPIANTO GAS CU2000 CU2000 GAS PLANT SPARE PARTS-ERSATZTEILIE GASANLAGE CU2000 PIEC ES DE RECHANGE ISTALLATION GAS CU2000 4000000 Rubinetto forno Oven gas valve Robinet four Backofenhahn Bruciatore SR Bruleur SR Brenner SR 4000003 SR burner full completo complete komplett...
  • Page 5: Piec Es De Rechange Istallation Gas Cu3000

    RICAMBI IMPIANTO GAS CU3000 CU3000 GAS PLANT SPARE PARTS-ERSATZTEILIE GASANLAGE CU3000 PIEC ES DE RECHANGE ISTALLATION GAS CU3000 4000000 Rubinetto forno Oven gas valve Robinet four Backofenhahn 4000003 Bruciatore SR Bruleur SR Brenner SR SR burner full completo complete komplett 4000010 Manopola Knob Bouton...
  • Page 6 CAN S.r.l. décline toute responsabilité pour les dommages dus à une CAN SRL declina ogni responsabilità per tutti i danni dovuti ad una errata mau-vaise/incorrecte installation ou à une mauvaise utilisation de e/o cattiva installazione o causati da uno scorretto utilizzo dell’apparecchio.
  • Page 7 INSTALLAZIONE BOMBOLA DEL GAS (GPL) Si consiglia l’utilizzo di una bombola nuova parchè venga installata da un tecnico competente, il quale provvederà ad installare secondo le normative correnti vigenti. IMPERATIVO non ostruire le aperture di ventilazione del vano bombola. TUBO FLESSIBILE DI ALLACCIAMENTO La connessione di questo apparecchio può...
  • Page 8 dell’apparecchio in particolar modo dove avviene la fuoriuscita dei fumi del forno(parte poste- riore piano sopra), la porta frontale del forno e il vetro portina. Si raccomanda di non toccare queste parti a mani nude ma bensì con degli appositi guanti da forno. Questo apparecchio deve essere tenuto distante da materiali infiammabili e da fonti di qualsiasi tipo di calore.
  • Page 9 Fig. 2 Fig. 3 Inserire la cucina nelle staffe di aggancio, come indicato nella Fig. 2. Ricavare un foro ø6 nel mobile per l’alloggiamento del catenacciolo atto a bloccare la cucina, come indicato, Fig. 3. Fig. 4 Dimensioni minime consigliate per il mobile che sovrasta la cucina, vedi Fig. 4...
  • Page 10: Indicazioni Generali

    INDICAZIONI GENERALI Non fare funzionare l’apparecchio senza costante sorveglianza. Verificare che tutte le manopole dell’apparecchio siano in posizione di chiuso (spento) prima di aprire la valvola della bombola del gas. Le manopole si trovano in posizione di spento quando la tacca di riferimento impressa sulla manopola coincide con il cerchio impresso sull’apparecchio in prossimità...
  • Page 11 PROCEDURA DI ACCENSIONE DEL BRUCIATORE DEL FORNO E RELATIVA REGOLAZIONE Attenzione: Accendere il bruciatore del forno con accensione piezo SOLO dopo aver preventiva- mente aperto la porta del forno stesso. Aprite la porta del forno completamente Aprite la valvola della bombola del gas Premere il pulsante in plastica dell’accensione identificato da una scintilla impressa sull’apparec- chio e simultaneamente premere e ruotare la manopola in senso antiorario fino alla posizione di massima.
  • Page 12: Pulizia E Manutenzione Dell'apparecchio

    Iniettore – Injector G30 28…..30 mbar Marking By-pass G30 28…..30 mbar Marking 0,36 CONSUMO GAS CU2000 Potenza totale – Nominal rate 4,65 Potenza calorifico max – Gross calorific value G30 MJ/Kg 49,47 Potenza calorifico max – Gross calorific value G30 MJ/Kg...
  • Page 13 CONNECTION HOSE The connection of this product can be carried out through the use of a rubber hose that must meet the current compliance Standards in force in the Country of destination of the product (the fitting for the connection of this hose is located in the rear of the product).
  • Page 14 The appliance, but above all, the rear parts must never be in contact with wood, plastic and inflammable objects or surfaces. It is strictly forbidden to use the appliance as a heat source (heater). Adequate ventilation must be planned as this appliance is not connected to a smoke collec- tion system produced by gas combustion in the burners towards the outside of the premises.
  • Page 15 Fig. 2 Fig. 3 Insert the oven in the hooking brackets, as indicated in Fig. 2; Make a 6 ø hole in the cabinet for housing the clasp adopted to block the oven, as indicated, see Fig. 3. Fig. 4 Minimum advised dimensions for the cabinet overlaying the oven, see Fig.
  • Page 16: General Indications

    For every burner, the maximum and minimum off position are indicated by means of symbols imprinted on the appliance. Any desired power between maximum and minimum can be obtained by turning the knob so that the mark is between the two respective symbols imprinted on the appliance.
  • Page 17 Place the foodstuff only on the grid/upper pan 2) Oven door The oven door can be in 3 different positions: 1) DOOR PARTIALLY OPEN 2) DOOR FULLY OPEN (in this position during turning on of the oven burner, or when foodstuff must be inserted or accessories removed from the turned on oven.
  • Page 18: Technical Characteristics

    Iniettore – Injector G30 28…..30 mbar Marking By-pass G30 28…..30 mbar Marking 0,36 GAS CONSUMPTION CU2000 Potenza totale – Nominal rate 4,65 Potenza calorifico max – Gross calorific value G30 MJ/Kg 49,47 Potenza calorifico max – Gross calorific value G30 MJ/Kg...
  • Page 19: Tuyau Flexible De Raccordement

    INSTALLATION BOUTEILLE DE GAZ (GPL) Il est conseillé d‘utiliser une bouteille neuve, installée par un technicien compétent, qui procèdera à l‘installation conformément aux normes courantes en vigueur. IMPÉRATIF : ne pas obstruer les ouvertures d‘aération du local de la bouteille. TUYAU FLEXIBLE DE RACCORDEMENT Le raccordement de cet appareil peut être effectué...
  • Page 20: Montage Des Cuisinières Sur Meuble

    et de sources de tout type de chaleur. L‘appareil, notamment les parties arrière, ne doivent jamais être en contact avec du bois, du plastique et des objets ou surfaces inflammables. Il est strictement interdit d‘utiliser l‘appareil en tant qu‘appareil de chauffage (poêle). Une ventilation correcte doit être prévue car cet appareil n‘est pas raccordé...
  • Page 21 Fig. 2 Fig. 3 Fixer la cuisinière aux étriers de fixation, comme indiqué en Fig. 2 Pratiquer un perçage ø6 dans le meuble pour loger la chaîne de blocage de la cuisinière, comme indiqué, voir Fig. 3 Fig. 4 Dimensions minimales conseillées pour le meuble au-dessus de la cuisinière, voir Fig. 4...
  • Page 22: Indications Generales

    INDICATIONS GENERALES Ne pas faire fonctionner l‘appareil sans une surveillance constante. Vérifier que tous les boutons de l‘appareil sont en position « fermé » (éteint) avant d‘ouvrir le robinet de la bouteille de gaz. Les boutons sont en position « éteint » quand le repère gravé sur le bouton coïncide avec le cercle imprimé...
  • Page 23: Procédure D'allumage Des Brûleurs Du Four Et Réglage

    PROCÉDURE D’ALLUMAGE DES BRÛLEURS DU FOUR ET RÉGLAGE Attention : Allumer le brûleur du four avec un allume-gaz piézo-électrique UNIQUEMENT après avoir ouvert la porte du four. Ouvrir la porte du four complètement Ouvrir le robinet de la bouteille de gaz Appuyer sur le bouton en plastique d‘allumage identifié...
  • Page 24: Nettoyage Et Entretien De L'appareil

    Injecteur – Injector G30 28…..30 mbar Marquage By-pass G30 28…..30 mbar Marquage 0,36 CONSOMMATION GAZ CU2000 Puissance totale – Nominal rate 4,65 Puissance calorifique max – Gross calorific value G30 MJ/Kg 49,47 Puissance calorifique max – Gross calorific value G30 MJ/Kg...
  • Page 25 INSTALLATION GASFLASCHE (LGP) Wir empfehlen die Verwendung einer neuen Gasflasche, vorausgesetzt, sie wird von einem kompetenten Techniker installiert, der eine Installation nach den geltenden Normen vornehmen wird. Die Lüftungsöffnungen des Raumes der Gasflaschen dürfen AUF KEINEN FALL verstellt werden. FLEXIBLER VERBINDUNGSSCHLAUCH Der Anschluss dieses Geräts muss unter Verwendung eines flexiblen Gummischlauchs erfol- gen, der in Übereinstimmung mit den im Bestimmungsland des Produkts gültigen Konformitäts- normen stehen muss.
  • Page 26 TEMPERATUREN UND LUFTZUFUHR HINWEIS: Manche Teile des Geräts werden während des Betriebs sehr heiß (zum Beispiel der Rost der Kochplatte, die Brenner, sowohl die Front- als auch die Rückenteile des Geräts, insbeson- dere wo der Austritt der Abgase des Backofens erfolgt (Rückenteil Platte oben), die Fronttür des Backofens und die Glasplatte der Tür.
  • Page 27 Abb. 2 Abb. 3 Den Herd in die Haltebügel setzen, wie in Abb. 2 angegeben Ein Loch in das Möbel für die Aufnahme des Riegels zur Feststellung des Herdes wie in Abb. 3 angegeben bohren Abb. 4 Empfohlene Mindestmaße für das Möbel oberhalb des Herdes, siehe Abb. 4...
  • Page 28: Allgemeine Angaben

    ALLGEMEINE ANGABEN Das Geräten nie ohne beständige Aufsicht betreiben. Überprüfen, dass alle Drehknöpfe des Geräts vor dem Öffnen des Ventils der Gasflasche ge- schlossen (ausgeschaltet) sind. Die Drehknöpfe befinden sich in geschlossener Position, wenn die auf dem Drehknopf befind- liche Markierung mit dem auf dem Gerät befindlichen Kreis in der Nähe des Drehknopfes selbst übereinstimmt.
  • Page 29 VORGANG DER ENTZÜNDUNG DES BRENNERS DES BACKOFENS UND ENTSPRECHENDE REGULIEUNG Hinweis: Den Brenner des Backofens durch Piezo-Zündung ERST nach einem vorherigen Öff- nen der Backofentür entzünden. Die Tür des Backofens vollständig öffnen Das Ventil der Gasflasche öffnen Die mit einem Funken gekennzeichnete Kunststofftaste auf dem Gerät drücken und gleichzeitig den Drehknopf im Gegenuhrzeigersinn bis zu Position Maximum drehen.
  • Page 30: Reinigung Und Wartung Des Geräts

    0,55 Injektor – Injector G30 28…..30 mbar Markierung Bypass G30 28…..30 mbar Markierung 0,36 GASVERBRAUCH CU2000 Gesamtleistung – Nominal rate 4,65 Maximale Wärmeleistung – Gross calorific value G30 MJ/Kg 49,47 Maximale Wärmeleistung – Gross calorific value G30 MJ/Kg 50,37 Gesamtgasverbrauch - Total gas consumption...
  • Page 31 NOTE...

Ce manuel est également adapté pour:

Cu3000

Table des Matières