Yamaha A-S2000 Mode D'emploi
Table des Matières
Les langues disponibles
Les langues disponibles
Liens rapides
Chapitres
Table des Matières
Dépannage

Manuels Connexes pour Yamaha A-S2000


Sommaire des Matières pour Yamaha A-S2000
- Page 1 UCAB Stereo Amplifier Amplificateur Stéréo OWNER’S MANUAL MODE D’EMPLOI...
- Page 26 La Hi-Fi doit ses débuts à Yamaha La passion de Yamaha pour la musique remonte à plus d’un siècle, plus exactement à 1887, l’année où nous avons conçu notre première orgue à anche. Actuellement, nous sommes le principal producteur de pianos et d’instruments de musique au monde, et nous sommes impliqués de...
-
Page 27: L'excellence Dans L'accomplissement Audio
Devenue une des enceintes de studio les plus populaires au monde. Amplificateur intégré A-1 Tourne-disque PX-2 Le premier tourne-disque à bras droit de Yamaha. Amplificateur de puissance B-6 Amplificateur de puissance pyramidal. Tourne-disque GT-2000/L Premier lecteur de CD (CD-1) commercialisé en1983... -
Page 28: Transmission Du Signal Symétrique À Tous Les Étages
La conception des circuits entièrement à symétrie flottante permet d’atteindre pour la première fois tout le potentiel de l’amplification analogique Un tout nouvel amplificateur de puissance à symétrie flottante qui atteint une parfaite symétrie et permet une transmission totalement symétrique (amplification) depuis la prise d’entrée jusque devant la prise d’enceinte Transmission du signal symétrique à... -
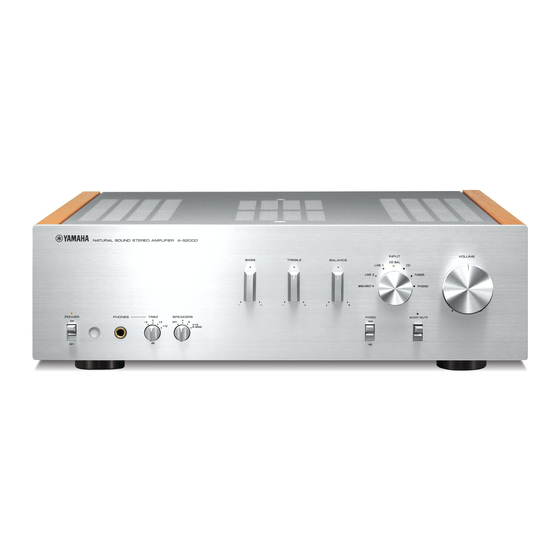
Page 29: Commandes Et Fonctions
Commandes et fonctions Ce chapitre décrit les commandes et fonctions du A-S2000. -
Page 30: Face Avant (Côté Gauche)
• Si le témoin POWER clignote lorsque vous mettez cet appareil sous tension, débranchez le câble d’alimentation secteur et contactez le revendeur ou service après-vente agréé Yamaha le plus proche (voir page 24). • Lorsque vous mettez l’appareil sous tension, il faut attendre quelques secondes pour que l’appareil puisse reproduire le son. -
Page 31: Prise Phones
INPUT VOLUME TREBLE BALANCE CD BAL LINE 1 LINE 2 TUNER MAIN DIRECT PHONO PHONO AUDIO MUTE 3 Prise PHONES 5 SPEAKERS Fournit les signaux audio destinés à l’écoute au casque. Met en et hors service la paire d’enceintes raccordées aux bornes SPEAKERS L/R CH A et/ou B situées sur le panneau arrière. -
Page 32: Face Avant (Côté Droit)
Commandes et fonctions Face avant (côté droit) BASS POWER PHONES TRIM SPEAKERS BI-WIRING 6 BASS 8 BALANCE Augmente ou diminue la réponse dans les basses Équilibre le son fourni par les enceintes gauche et droite fréquences. La position 0 correspond à une réponse plate. pour compenser le déséquilibre dû... -
Page 33: Sélecteur Input
INPUT VOLUME TREBLE BALANCE CD BAL LINE 1 LINE 2 TUNER MAIN DIRECT PHONO PHONO AUDIO MUTE 0 Sélecteur INPUT A AUDIO MUTE Sélectionne la source d’entrée qui doit être écoutée. Appuyez vers le bas pour réduire le niveau sonore Les signaux audio de la source d’entrée sélectionnée sont d’environ 20 dB. -
Page 34: Panneau Arrière
Commandes et fonctions Panneau arrière SPEAKERS R CH INPUT LINE2 TUNER LINE 1 PHONO 5 Prises PRE OUT Voir page 14 pour ce qui concerne les raccordements. Remarques 1 Prises SPEAKERS L/R CH • Lorsque vous raccordez des fiches cinch audio aux prises 2 Prises INPUT PRE OUT pour que les enceintes soient entraînées par un amplificateur externe, vous n’avez pas besoin d’utiliser les... -
Page 35: Voltage Selector
SPEAKERS L CH VOLTAGE SELECTOR MAIN IN PRE OUT 230- 240V AC IN 6 AC IN 8 Pied Utilisez cette prise pour brancher le câble d’alimentation Les pieds de cet appareil sont pourvus de crampons. secteur fourni. Utilisez ces crampons pour réduire l’effet des vibrations sur l’appareil. - Page 36 Introduisez 2 piles fournies (AA, R6, UM-3) en 3 Touches de commande d’un lecteur de CD respectant les polarités (+ et –) indiquées Yamaha Commandent les fonctions d’un lecteur de CD Yamaha. dans le logement. Reportez-vous au mode d’emploi du lecteur de CD pour le détail.
-
Page 37: Raccordements
Raccordements Dans cette section, vous allez raccorder le A-S2000, les enceintes et les appareils source. - Page 38 Raccordements Enceintes A (voie D) Lecteur de CD avec Lecteur de CD avec prises RCA prises XLR Syntoniseur SPEAKERS R CH INPUT LINE2 TUNER LINE 1 MAIN IN PRE OUT PHONO Masse Enceintes B (voie D) Tourne-disque Lecteur de DVD, etc.
- Page 39 Enceintes B (voie G) Lecteur de CD, platine à cassette, etc. Avertissement • L’amplificateur de puissance du A-S2000 étant à symétrie flottante, il n’est pas possible d’effectuer les types de Fig. 1 Fig. 2 raccordements suivants. – Raccordement à la borne “–” de la voie gauche et à la borne “–”...
- Page 40 Raccordements Raccordements des enceintes Connexion d’une fiche banane (Sauf modèle pour l’Europe) Enlevez environ 10 mm de la gaine isolante à l’extrémité de chaque câble d’enceinte et Serrez d’abord le bouton et insérez la fiche torsadez les fils exposés du câble pour éviter banane dans la prise correspondante.
-
Page 41: Connexion Bifilaire
Connexion bifilaire Raccordement aux prises CD BAL Raccordez votre lecteur de CD aux prises de sortie La connexion bifilaire a pour effet de séparer le grave du symétriques XLR. Les broches se répartissent de la façon médium et de l’aigu. Une enceinte compatible avec ce suivante pour ces prises. -
Page 42: Raccordement Du Câble D'alimentation Secteur
Raccordements VOLTAGE SELECTOR (Modèle pour l’Asie et modèle Standard seulement) Avertissement Le sélecteur VOLTAGE SELECTOR placé sur le panneau arrière de cet appareil doit être convenablement positionné AVANT de brancher la fiche du câble d’alimentation secteur. Un mauvais réglage du sélecteur VOLTAGE SELECTOR peut endommager l’appareil et créer un risque d’incendie. -
Page 43: Caractéristiques Techniques
Caractéristiques techniques Dans cette section vous trouverez les caractéristiques techniques du A-S2000. -
Page 44: Section Alimentation
Caractéristiques techniques SECTION ALIMENTATION SECTION DE COMMANDE • Puissance de sortie minimum efficace • Sensibilité et impédance d’entrée (8 Ω , 20 Hz à 20 kHz, DHT 0,02%) ....... 90 W + 90 W CD, etc..............150 mV/47 kΩ (4 Ω... -
Page 45: Schéma Fonctionnel
Schéma fonctionnel for µ COM for MC AMP for EQ AMP for LINE AMP1 for LINE AMP2 for VOLUME1 for VOLUME2 TONE CONTROL/FLAT MAIN DIRECT SPEAKER DRIVER SPEAKER DRIVER COLD (NEGATIVE PHASE) SIDE HOT (POSITIVE PHASE) SIDE... -
Page 46: Caractéristiques Du Contrôle Du Son
Caractéristiques techniques Caractéristiques du contrôle du son +12.5 +7.5 +2.5 –2.5 –5 –7.5 –10 –12.5 –15 100k Frequency (Hz) Distorsion harmonique totale 0.05 0.02 20kHz 0.01 20Hz 0.005 1kHz 0.002 0.001 Output (W) -
Page 47: Distorsion Harmonique Totale (Phono)
Distorsion harmonique totale (PHONO) 0.05 20Hz 1kHz 20kHz 0.02 0.01 0.005 0.002 0.001 0.0005 0.0002 0.0001 100µ 200µ 500µ 100m 200m 500m Input (Vrms) -
Page 48: Guide De Dépannage
Reportez-vous au tableau suivant si l’appareil ne fonctionne pas comme il devrait. Si l’anomalie constatée n’est pas mentionnée, ou encore si les actions correctives suggérées sont sans effet, mettez l’appareil hors service, débranchez la fiche du câble d’alimentation secteur et prenez contact avec le revendeur ou le service après-vente agréé Yamaha le plus proche. Voir la... -
Page 49: Entretien De Cet Appareil
Voir la Anomalies Causes possibles Actions correctives page Mauvais réglage du commutateur Mettez le commutateur PHONO en position MM ou Le niveau sonore est PHONO sur la face avant. MC selon le type de cartouche magnétique du tourne- trop faible pendant —... - Page 50 © 2007 Yamaha Corporation All rights reserved. Printed in Malaysia WM15590-1...
-
Page 51: Stereo Amplifier Amplificateur Stéréo
UCAB Stereo amplifier Amplificateur Stéréo SAFETY BROCHURE BROCHURE SUR LA SECURITE... -
Page 52: Important Safety Instructions
We Want You Listening For A Lifetime Yamaha and the Electronic Industries Association’s Consumer Electronics Group want you to get the most out of your equipment by playing it at a safe level. One that lets the sound come through loud and clear without annoying blaring or distortion –... - Page 53 Modifications not expressly approved by following measures: Yamaha may void your authority, granted by the FCC, to use the product. Relocate either this product or the device that is being 2 IMPORTANT: When connecting this product to affected by the interference.
- Page 54 12 Only voltage specified on this unit must be used. Using this unit with a higher voltage than specified is dangerous and may cause fire, damage to this unit, and/or personal injury. Yamaha will not be held responsible for any damage resulting from use of this unit with a voltage other than specified.
-
Page 55: Handling The Remote Control
(http://www.yamaha-hifi.com/ or http://www.yamaha-uk.com/ for U.K. resident). The product is guaranteed to be free from defects in workmanship or materials for a period of two years from the date of the original purchase. Yamaha undertakes, subject to the conditions listed below, to have the faulty product or any part(s) repaired, or replaced at Yamaha’s discretion, without any charge for parts or labour. -
Page 56: Précautions Concernant La Sécurité
Comme les sons trop forts causent des lésions auditives qui ne peuvent être détectées qu’à long terme, lorsqu’il est trop tard, Yamaha et le Groupe des Entreprises Électroniques... -
Page 57: Informations De La Fcc (Pour Les Clients Résidents Aux États-Unis)
FCC. Ces normes sont destinées à assurer une protection commercialiser ce type de produit. Si ce n’est pas possible, suffisante contre les interférences nuisibles avec d’autres prière de contacter Yamaha Electronics Corp., États-Unis, appareils électroniques dans une installation résidentielle. 6660 Orangethorpe Ave., Buena Park, CA 90620. - Page 58 Alimenter l’appareil sous une tension plus élevée est dangereux et peut être responsable d’incendie, de dommage à l’appareil ou de blessure corporelle. Yamaha ne saurait être tenue responsable des dommages résultant de l’alimentation de l’appareil sous une tension autre que celle prescrite.
-
Page 59: Remarques Concernant Les Piles
Web (http://www.yamaha-hifi.com/ ou http://www.yamaha-uk.com/ pour les résidents au Royaume-Uni). Ce produit est garanti contre les vices de fabrication et de matériaux pour une période de deux ans à compter de la date d’achat originale. Yamaha réparera, ou remplacera à...