Table des Matières

Publicité

Les langues disponibles

Les langues disponibles

Liens rapides

STD150.qxd
12/05/04
13:59
Page 1
D150
Manuel d'utilisation
User guide
Manual del usuario

Publicité

Table des Matières
loading

Sommaire des Matières pour THOMSON Speedtouch D150

  • Page 1 STD150.qxd 12/05/04 13:59 Page 1 D150 Manuel d’utilisation User guide Manual del usuario...
  • Page 2 STD150.qxd 12/05/04 13:59 Page 2 Français L’emballage contient les éléments suivants : - une base, - deux cordons de ligne, - deux combinés, - deux chargeurs, - deux blocs d’alimentation électrique pour les chargeurs, - un bloc d’alimentation électrique pour la base, - six batteries, - le guide d’utilisation et un guide rapide.
  • Page 3: Table Des Matières

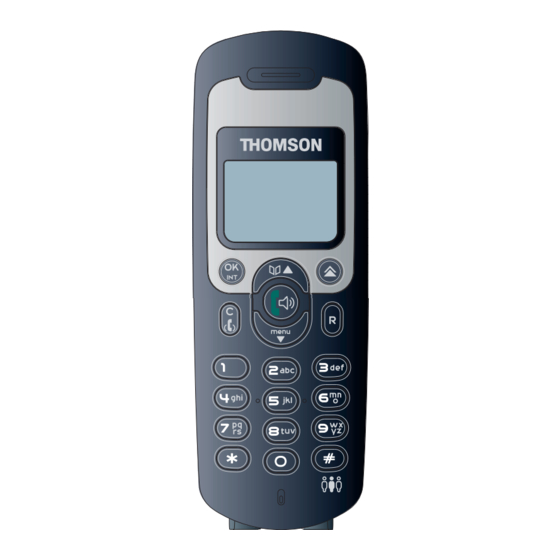
    STD150.qxd 12/05/04 13:59 Page 3 INSTALLATION ..........Précautions d'emploi .
  • Page 4 STD150.qxd 12/05/04 13:59 Page 4 Les touches du combiné Accès au répertoire Augmentation du volume sonore dans l’écouteur du combiné et du mains-libres Accès au menu Diminution du volume sonore dans l’écouteur du combiné et du mains- libres Touche d’annulation/retour Fonction Secret Touche de prise de ligne et de raccrochage Appui long : activation/désactivation mains-libres...
  • Page 5: Installation

    STD150.qxd 12/05/04 13:59 Page 5 1. INSTALLATION PRECAUTIONS D'EMPLOI La qualité de vos communications dépend de la position de la base et de son environnement. Les terminaux du D150 doivent être placés à l'écart de toute zone de chaleur excessive (radiateur, soleil…) et protégés des vibrations et de la poussière.
  • Page 6: Installer La Base

    STD150.qxd 12/05/04 13:59 Page 6 Mise en place des batteries et première charge Insérer les batteries dans la trappe du combiné. Avant la première utilisation, il est conseillé de laisser le combiné en charge sur le chargeur pendant 24 heures, afin d’optimiser les performances et la durée de vie des batteries.
  • Page 7: Prise En Main Du Telephone

    STD150.qxd 12/05/04 13:59 Page 7 Connecter les cordons téléphoniques à la base (ligne 1 et ligne 2) et aux prises téléphoniques correspondantes. Vous pouvez également brancher un fax ou un répondeur sur "Aux. 1". Cordon secteur Connexion à un fax, un répondeur Cordon téléphonique Ligne 1...
  • Page 8: Configuration Des Lignes De La Base

    STD150.qxd 12/05/04 14:00 Page 8 L’afficheur est éteint. Vous ne pouvez pas appeler. Le combiné ne sonnera pas si vous recevez des appels. Pour réactiver le combiné, appuyer sur la touche (appui long). 2. CONFIGURATION DES LIGNES DE LA BASE Vous pouvez configurer les lignes de la base selon vos besoins.
  • Page 9: Choix Du Groupe De Sonnerie

    STD150.qxd 12/05/04 14:00 Page 9 CHOIX DU GROUPE DE SONNERIE Chaque combiné peut recevoir un appel sur la ligne 1 et/ou ligne 2. Par exemple, vous pouvez décider que les combinés 1, 3 et 5 soient associés à la ligne 1 et sonnent sur la ligne 1 et que les combinés 2 et 4 soient asso- ciés à...
  • Page 10: Telephoner

    STD150.qxd 12/05/04 14:00 Page 10 3. TELEPHONER APPELER Avant de passer un appel, vous pouvez voir sur l'écran si les lignes 1 et 2 sont occupées. Numérotation directe Appuyer sur la touche Composer le numéro à appeler. Pour raccrocher en fin de communication, appuyer sur Pré-numérotation Avec la pré-numérotation, vous pouvez entrer et modifier un numéro avant de lancer l'appel.
  • Page 11: Transférer Un Appel

    STD150.qxd 12/05/04 14:00 Page 11 TRANSFERER UN APPEL Pendant un appel, pour le transférer à un autre combiné : Appuyer sur et composer le numéro du poste destinataire. Lorsque le correspondant interne décroche, appuyer sur pour transfé- rer l’appel. Si le correspondant interne ne décroche pas, faire un appui sur RAPPELER L’UN DES DERNIERS NUMEROS COMPOSES (BIS) Les 3 derniers numéros composés sur votre téléphone sans fil DECT sont mémorisés dans la liste des rappels.
  • Page 12: Va-Et-Vient Entre Un Appel Interne Et Un Appel Externe

    STD150.qxd 12/05/04 14:00 Page 12 Les 10 derniers appels entrants ne figurent dans le journal des appels que si les appels ont été reçus via le réseau analogique et à condition que vous soyez abonné au service "Affichage du numéro". Effacer la liste des appels du journal Entrer dans le menu en appuyant sur la touche Sélectionner "Config.
  • Page 13: Gestion De 2 Appels Externes Simultanés Sur Un Même Combiné

    STD150.qxd 12/05/04 14:00 Page 13 3.10 GESTION DE 2 APPELS EXTERNES SIMULTANES SUR UN MEME COMBINE Vous pouvez gérer 2 appels externes simultanément à partir d'un même com- biné. Vous êtes en conversation avec un correspondant externe ; vous recevez un appel externe (vous entendez un bip dans l'écouteur).
  • Page 14: Verrouillage Du Clavier

    STD150.qxd 12/05/04 14:00 Page 14 3.12 VERROUILLAGE DU CLAVIER Vous pouvez verrouiller le clavier de votre combiné. Entrer dans le menu en appuyant sur Sélectionner “Verrou. cla" et valider avec la touche L’écran affiche "Verrouillé". " Pour déverrouiller, appuyer sur L’écran affiche "Déverrou.?".
  • Page 15: Appeler À Partir Du Repertoire

    STD150.qxd 12/05/04 14:00 Page 15 Pour passer en mode majuscules/minuscules, appuyer sur Pour entrer un espace : . Pour corriger : Valider avec la touche Numéro : Entrer le numéro et valider avec la touche APPELER A PARTIR DU REPERTOIRE Entrer dans le répertoire en appuyant sur la touche Rechercher dans la liste des noms grâce aux touches Pour sortir du menu, appuyer sur...
  • Page 16: Personnaliser Votre Combine

    STD150.qxd 12/05/04 14:00 Page 16 5. PERSONNALISER VOTRE COMBINE REGLER LES BIPS DE TOUCHE Un signal sonore est émis à chaque appui sur une touche du combiné de votre téléphone sans fil DECT : il peut être activé ou désactivé. Entrer dans le menu en appuyant sur la touche Sélectionner "Config.
  • Page 17: Nommer Un Combiné

    STD150.qxd 12/05/04 14:01 Page 17 NOMMER UN COMBINE Vous pouvez changer le nom de votre combiné. Entrer dans le menu en appuyant sur la touche Sélectionner "Config. Comb" et valider avec la touche Sélectionner "Utilisateur" et valider avec la touche Entrer le nom (maximum 8 caractères) et valider avec la touche CHOISIR LA LANGUE DE L’AFFICHEUR Votre téléphone sans fil DECT dispose d’un menu en 3 langues.
  • Page 18: Régler La Prise De Ligne Automatique

    STD150.qxd 12/05/04 14:01 Page 18 Entrer le nouveau code PIN et valider avec la touche Confirmer le nouveau code PIN et valider avec la touche REGLER LA PRISE DE LIGNE AUTOMATIQUE La fonction de prise de ligne automatique permet de décrocher, lors d'un appel entrant, en appuyant sur n'importe quelle touche du téléphone.
  • Page 19: Désassocier Un Combiné

    STD150.qxd 12/05/04 14:01 Page 19 Sélectionner la base à laquelle le combiné doit être enregistré et valider avec la touche Un message apparaît sur l’écran dans les 15 secondes et valider avec " Entrer le code PIN : 1590 (par défaut) et valider avec la touche Le numéro du combiné...
  • Page 20: Régler Le Temps De Flashing

    STD150.qxd 12/05/04 14:01 Page 20 Entrer le "Base PIN:" 1590 (par défaut) et valider avec la touche Sélectionner "Interdire" et valider avec la touche Par exemple, pour interdire l’accès à l’international : No. 1 : 00 Entrer 00 et valider avec la touche Puis choisir le ou les combinés qui doivent porter la restriction d’appel et valider avec La restriction d’appel est activée sur les combinés 1,...
  • Page 21: Caracteristiques Techniques

    STD150.qxd 12/05/04 14:01 Page 21 8. CARACTERISTIQUES TECHNIQUES Norme DECT Fréquence radio De 1880 MHz à 1900 MHz Canaux Largeur de bande 1,728 MHz Modulation GFSK Portée en champ libre 300 m* Portée en intérieur 50 m* Adaptateur secteur de la base Entrée : AC 230 V / 50 Hz / 59 mA Sortie : DC 9 V / 600 mA Adaptateur secteur du chargeur...
  • Page 22: En Cas De Probleme

    STD150.qxd 12/05/04 14:01 Page 22 9. EN CAS DE PROBLEME ... D'une manière générale, en cas de problème, retirer les batteries de tous les combinés de votre installation pendant environ 1 minute, débrancher puis rebran- cher l'alimentation électrique de la base et insérer à nouveau les batteries. Problèmes Causes Solutions...
  • Page 23: Garantie

    STD150.qxd 12/05/04 14:01 Page 23 10. GARANTIE Nous vous rappelons que le téléphone est un équipement D150 agréé conformément à la réglementation européenne, attesté par le marquage CE. Vous bénéficiez d’une garantie légale sur ce produit et pour toute information relative à...
  • Page 24: Environnement

    Ne pas utiliser votre poste téléphonique pour signaler une fuite de gaz à proximité de cette fuite. En cas d’orage, il est préconisé de ne pas utiliser cet appareil. Par la présente Thomson Telecom déclare que l’appareil D150 est conforme aux exigences essentielles et aux autres dispositions pertinen-...
  • Page 25 STD150.qxd 12/05/04 14:01 Page 25...
  • Page 26 STD150.qxd 12/05/04 14:01 Page 26 English The package contains the following items: - a base, - two line cables, - two handsets, - two chargers, - two electric power supply units for the chargers, - one electric power supply unit for the base, - six batteries, - the user guide and a quick guide.
  • Page 27 STD150.qxd 12/05/04 14:01 Page 27 INSTALLATION ..........Precautions .
  • Page 28 STD150.qxd 12/05/04 14:01 Page 28 Handset keys Access the address book Increase the sound volume of the handset's earpiece and the hands- free speaker Access the menu Decrease the sound volume of the handset's earpiece and the hands- free speaker Cancel/return key Mute function Line seizure and hang up key...
  • Page 29: Installation

    STD150.qxd 12/05/04 14:01 Page 29 1. INSTALLATION PRECAUTIONS The quality of communication depends on the location and environment of the base. Your handsets must be kept away from sources of excessi- D150 ve heat (radiators, direct sunlight, etc.) and protected against vibrations and dust.
  • Page 30: Installing The Base

    STD150.qxd 12/05/04 14:01 Page 30 Fitting the batteries and charging up for the first time Insert the batteries in the handset's compartment. Before using for the first time, we recommend that you leave the handset to charge up on the charger for 24 hours in order to optimise battery performan- ce and longevity.
  • Page 31: Getting To Grips With Your Telephone

    STD150.qxd 12/05/04 14:01 Page 31 You can also connect a fax or answering machine to "Aux. 1". Mains cable Connection to a fax, an answering machine Telephone cable Line 1 Telephone cable Line 2 GETTING TO GRIPS WITH YOUR TELEPHONE 1.5.1 Navigating through the menus It's easy to adjust and customise your DECT cordless telephone using the scrolling menu.
  • Page 32: Configuring The Base's Lines

    STD150.qxd 12/05/04 14:01 Page 32 2. CONFIGURING THE BASE'S LINES You can configure the base's lines according to your requirements. LINE PRIORITY You have the following options for managing the outgoing calls for each hand- set: - Alternative (Line 1 or Line 2): default setting - Line 1 First: line 1 takes priority and if this line is busy, line 2 will be used - Line 2 First: line 2 takes priority and if this line is busy, line 1 will be used - Line 1 Only (line 1): line 1 authorized and no access to line 2...
  • Page 33: Ringing Priority

    STD150.qxd 12/05/04 14:01 Page 33 Select "Ring Group" and press to confirm. Use the keys to choose one of the lines and press confirm. Choose the handsets you want using the keyboard and press confirm. The handsets which are not available for this line will be indicated by an "X". RINGING PRIORITY You can choose the handset that will ring first when an incoming call is recei- ved.
  • Page 34: Using The Telephone

    STD150.qxd 12/05/04 14:01 Page 34 3. USING THE TELEPHONE MAKING A CALL Before you make a call, you can see on the screen if lines 1 and 2 are busy. Direct dialling Press Dial the number to be called. To hang up after finishing a call, press Pre-dialling With the pre-dialling feature you can enter and modify a number before making the call.
  • Page 35: Transferring A Call

    STD150.qxd 12/05/04 14:02 Page 35 TRANSFERRING A CALL During a call, you can transfer it to another handset: Press and dial the number of the handset to which you want to trans- fer the call. When your internal correspondent picks up the phone, press to trans- fer the call.
  • Page 36: Shuttling Between An External And Internal Call

    STD150.qxd 12/05/04 14:02 Page 36 The last 10 incoming calls only appear in the log of calls if they were received via the analogue network and on condition that you have subscribed to the "Calling line identification presentation" service. Deleting the list of calls from the log Press to enter the menu.
  • Page 37: Managing 2 Simultaneous External Calls On The Same Handset

    STD150.qxd 12/05/04 14:02 Page 37 3.10 MANAGING 2 SIMULTANEOUS EXTERNAL CALLS ON THE SAME HANDSET You can manage 2 external calls simultaneously on the same handset. You are on-line with an external correspondent and you receive a second external call (you hear a beep in the earpiece). To take the second call: Put the first call on hold by pressing Press Press...
  • Page 38: Locking The Keyboard

    STD150.qxd 12/05/04 14:02 Page 38 3.12 LOCKING THE KEYBOARD You can lock your handset's keyboard. Press to enter the menu. Select "Key Lock" and press to confirm. The screen displays "Locked". " To unlock, press The screen displays "Unlock ?". "...
  • Page 39: Using The Phone Book To Make A Call

    STD150.qxd 12/05/04 14:02 Page 39 Confirm by pressing the key. Enter the number and press to confirm. Number: USING THE PHONE BOOK TO MAKE A CALL Enter the phone book by pressing Use the keys to scroll through the list of names. To quit the menu, press Press to make the call.
  • Page 40: Customising Your Handset

    STD150.qxd 12/05/04 14:02 Page 40 5. CUSTOMISING YOUR HANDSET ADJUSTING THE KEYTONES A sound is emitted every time you press a key on your DECT cordless tele- phone handset: it can be activated or deactivated. Press to enter the menu. Select "HS Setting"...
  • Page 41: Naming A Handset

    STD150.qxd 12/05/04 14:02 Page 41 NAMING A HANDSET You can change the name of your handset. Press to enter the menu. Select "HS Setting" and press to confirm. Select "User Name" and press to confirm. Enter the name (max. 8 characters) and press to confirm.
  • Page 42: Changing The Handset's Pin Number

    STD150.qxd 12/05/04 14:02 Page 42 CHANGING THE HANDSET'S PIN NUMBER Press to enter the menu. Select "HS Setting" and press to confirm. Select "Set PIN:" and press to confirm. Enter the PIN code: 1590 (by default) and press to confirm. Enter the new PIN code and press to confirm.
  • Page 43: Removing (Disassociating) A Handset

    STD150.qxd 12/05/04 14:02 Page 43 Then, on the handset which has not yet been registered: you have about 2 minutes to register the handset. Press to enter the menu. Select "HS register" and press to confirm. Select the base with which the handset is to be associated and press to confirm.
  • Page 44: Call Barring

    STD150.qxd 12/05/04 14:03 Page 44 CALL BARRING You can program up to 5 call barrings. These call barrings may cover all the terminals or just some of them. It is possible to bar the first 5 digits. Press to enter the menu. Select "BS Setting"...
  • Page 45: Technical Specifications

    STD150.qxd 12/05/04 14:03 Page 45 8. TECHNICAL SPECIFICATIONS Standard DECT Radio frequency From 1880 MHz to 1900 MHz Channels Bandwidth 1.728 MHz Modulation GFSK Range in open air 300 m* Range inside 50 m* Base mains adapter Input AC 230 V / 50 Hz / 59 mA Output DC 9 V / 600 mA Charger mains adapter Input AC 230 V / 50 Hz / 59 mA...
  • Page 46: Troubleshooting

    STD150.qxd 12/05/04 14:03 Page 46 9. TROUBLESHOOTING ... Generally speaking, if you have a problem, take the batteries out of all the handsets in your installation, disconnect the base's electricity power supply. Wait for 1 minute, reconnect the base and re-insert the batteries. Problems Causes Remedies...
  • Page 47: Warranty

    STD150.qxd 12/05/04 14:03 Page 47 10. WARRANTY complies with the obligations resulting from the EU D150 Directive, as certified by the CE marking. You are covered by a legal warranty for this product and for all information concerning this warranty, please contact your reseller. Notwithstanding other applicable statutory warranties, the reseller warrants that the product complies with the applicable technical specifications and is free from any defect in workmanship and materials for a period of twelve (12) months from...
  • Page 48: Environment

    Do not use your telephone to notify a gas leak when you are in the vicinity of the leak. We recommend that you avoid using this device during electrical storms. Thomson Telecom hereby declares that the D150 conforms to the essential requirements and other applicable provisions of European directive 1999/5/CE.
  • Page 49 STD150.qxd 12/05/04 14:03 Page 49...
  • Page 50 STD150.qxd 12/05/04 14:03 Page 50 Español El embalaje contiene los elementos siguientes: - la base, - dos cables de línea, - dos portátiles, - dos cargadores, - dos bloques de alimentación eléctrica para los cargadores, - un bloque de alimentación eléctrica para la base, - seis baterías, - el manual del usuario y una guía rápida.
  • Page 51 STD150.qxd 12/05/04 14:03 Page 51 INSTALACIÓN ..........Precauciones de uso .
  • Page 52 STD150.qxd 12/05/04 14:03 Page 52 Teclas del portátil Acceso a la agenda Aumento del volumen sonoro en el auricular del portátil y en el altavoz de manos libres Acceso al menú Disminución del volumen sonoro en el auricular del portátil y en el altavoz de manos libres Tecla de anulación/retorno Función Secreto...
  • Page 53: Instalación

    STD150.qxd 12/05/04 14:03 Page 53 1. INSTALACIÓN PRECAUCIONES DE USO La calidad de sus comunicaciones depende de la posición de la base y de su entorno. Los portátiles del D150 deben mantenerse alejados de fuentes de calor excesivo (radiador, luz solar, etc.) y protegerse contra vibraciones y polvo.
  • Page 54: Instalar La Base

    STD150.qxd 12/05/04 14:03 Page 54 Colocación de las baterías y primera carga Insertar las baterías en el alojamiento para baterías del portátil. Antes de la primera utilización de su aparato, le aconsejamos dejar el portátil cargándose sobre el cargador durante 24 horas, para optimizar las cualidades técnicas y la duración de vida de las baterías.
  • Page 55: Uso Del Teléfono

    STD150.qxd 12/05/04 14:03 Page 55 Asimismo, usted puede conectar un fax o un contestador en "Aux 1". Cable de red eléctrica Conexión a un fax, un contestador Cable telefónico Línea 1 Cable telefónico Línea 2 USO DEL TELÉFONO 1.5.1 Navegar en los menús Usted puede con facilidad ajustar y personalizar su teléfono inalámbrico DECT™...
  • Page 56: Configuración De Las Líneas De La Base

    STD150.qxd 12/05/04 14:03 Page 56 2. CONFIGURACIÓN DE LAS LÍNEAS DE LA BASE Usted puede configurar las líneas de la base según sus necesidades. PRIORIDAD DE LÍNEA La gestión de las llamadas salientes para cada portátil se puede efectuar según las siguientes posibilidades: - Opciones (Línea 1 o Línea 2) ajuste por defecto - Prim.
  • Page 57: Asociar Los Portátiles A Una De Las Dos Líneas Posibles

    STD150.qxd 12/05/04 14:03 Page 57 ASOCIAR LOS PORTÁTILES A UNA DE LAS DOS LÍNEAS POSIBLES Cada portátil puede recibir una llamada en la línea 1 y/o línea 2. Por ejemplo, tiene la posibilidad de decidir que los portátiles 1, 3 y 5 estén asociados a la línea 1 y suenen en la línea 1 y que los portátiles 2 y 4 estén asociados a la línea 2 y suenen en la línea 2.
  • Page 58: Efectuar Una Llamada

    STD150.qxd 12/05/04 14:03 Page 58 3. EFECTUAR UNA LLAMADA LLAMAR A UN INTERLOCUTOR EXTERNO Antes de efectuar una llamada, puede ver en la pantalla si están ocupadas las líneas 1 y 2. Marcación directa Pulsar la tecla Marcar el número deseado. Para colgar al final de la comunicación, pulsar Premarcación Con la premarcación, usted puede introducir y modificar un número antes de...
  • Page 59: Transferir Una Llamada

    STD150.qxd 12/05/04 14:03 Page 59 TRANSFERIR UNA LLAMADA Durante una llamada, para transferirla a otro portátil: Pulsar y marcar el número del teléfono destinatario. Cuando el interlocutor interno descuelga, pulsar para transferir la lla- mada. Si el interlocutor interno no descuelga, pulsar RELLAMAR A UNO DE LOS ÚLTIMOS NÚMEROS MARCADOS (REPETICIÓN) En la lista de rellamadas, se memorizan los 3 últimos números marcados en...
  • Page 60: Realizar Una Llamada Interna Estando En Comunicación Externa

    STD150.qxd 12/05/04 14:03 Page 60 Las 10 últimas llamadas entrantes sólo figuran en el diario de las llamadas si las llamadas han sido recibidas a través de la red analógica y está abonado al servicio "Identificación de llamada entrante". Borrar la lista de las llamadas del diario Entrar en el menú...
  • Page 61: Gestión De 2 Llamadas Externas Simultáneas En Un Mismo Portátil

    STD150.qxd 12/05/04 14:03 Page 61 3.10 GESTIÓN DE 2 LLAMADAS EXTERNAS SIMULTÁNEAS EN UN MISMO PORTÁTIL Usted puede administrar 2 llamadas externas simultáneamente a partir de un mismo portátil. Se encuentra en conversación con un interlocutor externo y recibe una 2ª lla- mada externa.
  • Page 62: Bloqueo Del Teclado

    STD150.qxd 12/05/04 14:03 Page 62 3.12 BLOQUEO DEL TECLADO Usted puede bloquear el teclado de su portátil. Entrar en el menú pulsando Seleccionar "Bloquear" y validar con la tecla La pantalla visualiza "Bloqueado". " Para desbloquear, pulsar La pantalla visualiza "Desbloq.?". "...
  • Page 63: Llamar A Partir De La Agenda

    STD150.qxd 12/05/04 14:04 Page 63 Para pasar a modo mayúsculas/minúsculas, pulsar Para introducir un espacio: . Para rectificar: Validar con la tecla Número: Introducir el número y validar con la tecla LLAMAR A PARTIR DE LA AGENDA Entrar en la agenda pulsando la tecla Buscar en la lista los nombres mediante las teclas Para salir del menú, pulsar Pulsar la tecla...
  • Page 64: Personalizar Su Portátil

    STD150.qxd 12/05/04 14:04 Page 64 5. PERSONALIZAR SU PORTÁTIL ACTIVAR LOS BIPS DE TECLA Se emite una señal sonora en cada pulsación sobre una tecla del teléfono inalámbrico DECT: se puede activar o desactivar. Entrar en el menú pulsando la tecla Seleccionar "Configurar"...
  • Page 65: Dar Un Nombre A Un Portátil

    STD150.qxd 12/05/04 14:04 Page 65 DAR UN NOMBRE A UN PORTÁTIL Usted puede cambiar el nombre de su portátil. Entrar en el menú pulsando la tecla Seleccionar "Configurar" y validar con la tecla Seleccionar "Usuario" y validar con la tecla Teclear el nombre (máximo 8 caracteres) y validar con la tecla ELEGIR EL IDIOMA DE LA PANTALLA El teléfono inalámbrico DECT consta de un menú...
  • Page 66: Cambiar El Código Pin Del Portátil

    STD150.qxd 12/05/04 14:04 Page 66 CAMBIAR EL CÓDIGO PIN DEL PORTÁTIL Entrar en el menú pulsando la tecla Seleccionar "Configurar" y validar con la tecla Seleccionar "Config. PIN" y validar con la tecla Introducir el código PIN: 1590 (por defecto) y validar con la tecla Introducir el nuevo código PIN y validar con la tecla Confirmar el nuevo código PIN y validar con la tecla AJUSTAR LA TOMA DE LÍNEA AUTOMÁTICA...
  • Page 67: Disociar Un Portátil

    STD150.qxd 12/05/04 14:04 Page 67 A partir del portátil aún no asociado: tiene aproximadamente 2 minutos para asociar el portátil. El idioma por defecto es el inglés; para cambiarlo, en primer lugar ¡ tiene que asociar el teléfono. Entrar en el menú pulsando la tecla Seleccionar "HS register"...
  • Page 68: Restricción De Llamada

    STD150.qxd 12/05/04 14:04 Page 68 RESTRICCIÓN DE LLAMADA Usted puede programar hasta 5 restricciones de llamada. Estas restricciones de llamadas pueden afectar a todos los portátiles o solamente a algunos de ellos. Existe la posibilidad de prohibir las 5 primeras cifras. Entrar en el menú...
  • Page 69: Características Técnicas

    STD150.qxd 12/05/04 14:04 Page 69 8. CARACTERÍSTICAS TÉCNICAS Norma DECT Frecuencia radio De 1880 MHz a 1900 MHz Canales Anchura de banda 1,728 MHz Modulación GFSK Alcance en campo libre 300 m* Alcance en interior 50 m* Adaptador de red eléctrica de la Entrada ca 230 V / 50 Hz / 59 mA base Salida cc 9 V / 600 mA...
  • Page 70: En Caso De Incidentes

    STD150.qxd 12/05/04 14:04 Page 70 9. EN CASO DE INCIDENTES ... Generalmente, si se presenta un problema, retirar las baterías de todos los teléfonos de la instalación, durante aproximadamente 1 minuto, desconectar y volver a conectar la alimentación eléctrica de la base e insertar nuevamen- te las baterías.
  • Page 71: Garantía

    La pieza o producto no conforme se reparará o cambiará por una pieza o pro- ducto equivalente sin coste alguno para el cliente; Thomson Telecom garanti- za los equipos reparados por un período de doce meses a partir de la fecha de reparación.
  • Page 72: Seguridad

    En caso de tormenta, le recomendamos que no utilice este aparato y que des- conecte el cable de línea y la alimentación eléctrica. Thomson Telecom declara que el teléfono D150 cumple con los requisitos esenciales y otras disposiciones aplicables de la directiva 1999/5/CE.
  • Page 73 STD150.qxd 12/05/04 14:04 Page 73...
  • Page 74 STD150.qxd 12/05/04 14:04 Page 74 Thomson Telecom Services commerciaux et marketing / Sales and Marketing Departments: 41, boulevard de la République - Bâtiment B6 78400 Chatou - France Servicios comerciales y de marketing en España: c/Ramírez de Prado n° 5 - 28045 Madrid - Tel: 91 330 4000 Siège social / Head office:...

Table des Matières