Publicité

Les langues disponibles
  • FR

Les langues disponibles

Liens rapides

N4
QUICKSTART GUIDE
ENGLISH ( 3 – 8 )
GUÍA DE INICIO RÁPIDO
ESPAÑOL ( 9 - 14 )
GUIDE D'UTILISATION RAPIDE
FRANÇAIS ( 15 – 20 )
GUIDA RAPIDA
ITALIANO ( 21 – 26 )
KURZANLEITUNG
DEUTSCH ( 27 – 32 )

Publicité

Table des Matières
loading

Sommaire des Matières pour Numark N4

  • Page 1 QUICKSTART GUIDE ENGLISH ( 3 – 8 ) GUÍA DE INICIO RÁPIDO ESPAÑOL ( 9 - 14 ) GUIDE D'UTILISATION RAPIDE FRANÇAIS ( 15 – 20 ) GUIDA RAPIDA ITALIANO ( 21 – 26 ) KURZANLEITUNG DEUTSCH ( 27 – 32 )
  • Page 3: System Requirements

    Safety & Warranty Information Booklet REGISTRATION Please go to http://www.numark.com to register your N4. Registering your product ensures that we can keep you up-to-date with any new product developments and provide you with world-class technical support, should you run into any problems.
  • Page 4: Virtualdj Le Setup

    To start using N4: Use the included power adapter to connect the N4 to a power outlet.. Connect N4 to an available USB port on your computer. (If possible, use a USB port on the rear panel of your computer.)
  • Page 5: Front Panel

    To start using N4: Use the included power adapter to connect the N4 to a power outlet.. Connect N4 to an available USB port on your computer. (If possible, use a USB port on the rear panel of your computer.)
  • Page 6: Rear Panel

    REAR PANEL POWER SWITCH – Turns the unit’s power on/off. POWER INPUT – Connect the included power cable here to power the unit. USB – This USB connection sends and receives control information to/from a connected computer. USB IN REC/TIMECODE – Selects whether you are using the USB connection to input audio to the computer or send a timecode signal through to control the software (unsupported in VirtualDJ LE).
  • Page 7 VIDEO TRANSITION – When the Shift button is pressed along with this the video VIDEO TRANSITION MIX-CUE-VOLUME transition type in the software will be adjusted. BOOTH – Adjusts the level of the signal going to the Booth output. MASTER - Adjusts the level of the signal going to the Master output.
  • Page 8 FX 3 FX AUTO/ TAP RELO OP RELO OP Refer to this control map to see what software features can be controlled by N4. For more information see the manual for Serato DJ Intro. FX 1 PARAM FX 2 PARAM...
  • Page 9: Contenido De La Caja

    Folleto de información sobre la seguridad y la garantía REGISTRO Visite http://www.numark.com para registrar su N4. El registro de su producto asegura que podamos mantenerle actualizado con los nuevos desarrollos de productos y brindarle apoyo técnico de categoría mundial en caso de que tenga algún problema.
  • Page 10 Para comenzar a usar N4: Utilice el adaptador de corriente incluido para conectar la N4 a una toma de corriente. Conecte el N4 a un puerto USB disponible de la computadora. (Si es posible, use un puerto USB del panel trasero de la computadora.) Abra VirtualDJ LE haciendo doble clic en el icono del escritorio de la computadora (si creó...
  • Page 11: Panel Frontal

    Para comenzar a usar N4: Utilice el adaptador de corriente incluido para conectar la N4 a una toma de corriente. Conecte el N4 a un puerto USB disponible de la computadora. (Si es posible, use un puerto USB del panel trasero de la computadora.) Abra Serato DJ Intro haciendo doble clic en el icono del escritorio de la computadora (si creó...
  • Page 12: Panel Trasero

    PANEL TRASERO INTERRUPTOR DE ENCENDIDO – Permite encender y apagar la unidad. ENTRADA DE ALIMENTACIÓN – Conecte aquí el cable de alimentación incluido para alimentar la unidad. USB – Esta conexión USB envía y recibe audio e información de control desde una computadora conectada. GRABACIÓN/CÓDIGO DE TIEMPO POR LA ENTRADA USB –...
  • Page 13 REPETICIÓN DE LOOP/ IZQUIERDA – Pulse este botón para saltar al comienzo del loop y activarlo. Si la bandeja ya está VIDEO TRANSITION MIX-CUE-VOLUME en loop cuando lo pulsa, el puntero de audio salta al comienzo del loop y continúa. ningún loop establecido, no sucede nada.)
  • Page 14 FX AUTO/ TAP RELO OP RELO OP Consulte este mapa de control para ver qué características de software pueden controlarse con N4. Para más información, consulte el manual de Serato DJ Intro. PARÁMETRO DE FX 1 PARÁMETRO DE FX 2 PARÁMETRO DE FX 3...
  • Page 15: Contenu De La Boîte

    Livret des consignes de sécurité et des informations concernant la garantie ENREGISTREMENT DU PRODUIT Veuillez visiter le site internet http://www.numark.com pour enregistrer votre nouvelle console N4. L'enregistrement des produits vous permet d'être informé sur les toutes dernières nouveautés concernant les produits et de vous offrir un soutien technique de qualité, si vous en aviez besoin.
  • Page 16: Configuration De L'encodage Temporel

    Pour commencer à utiliser le N4 : Utilisez le adapteur d'alimentation inclus pour brancher la N4 dans une prise d'alimentation murale. Branchez le N4 au port USB de votre ordinateur. (Si cela est possible, utilisez un port USB sur le panneau arrière de l’ordinateur.) Ouvrez le logiciel VirtualDJ LE en double-cliquant l'icône sur le bureau de votre ordinateur (si vous avez créé...
  • Page 17: N4 Et Serato Dj Intro

    Pour commencer à utiliser le N4 : Utilisez le adapteur d'alimentation inclus pour brancher la N4 dans une prise d'alimentation murale. Branchez le N4 au port USB de votre ordinateur. (Si cela est possible, utilisez un port USB sur le panneau arrière de l’ordinateur.) Ouvrez le logiciel Serato DJ Intro en double-cliquant l'icône sur le bureau de votre ordinateur (si vous avez créé...
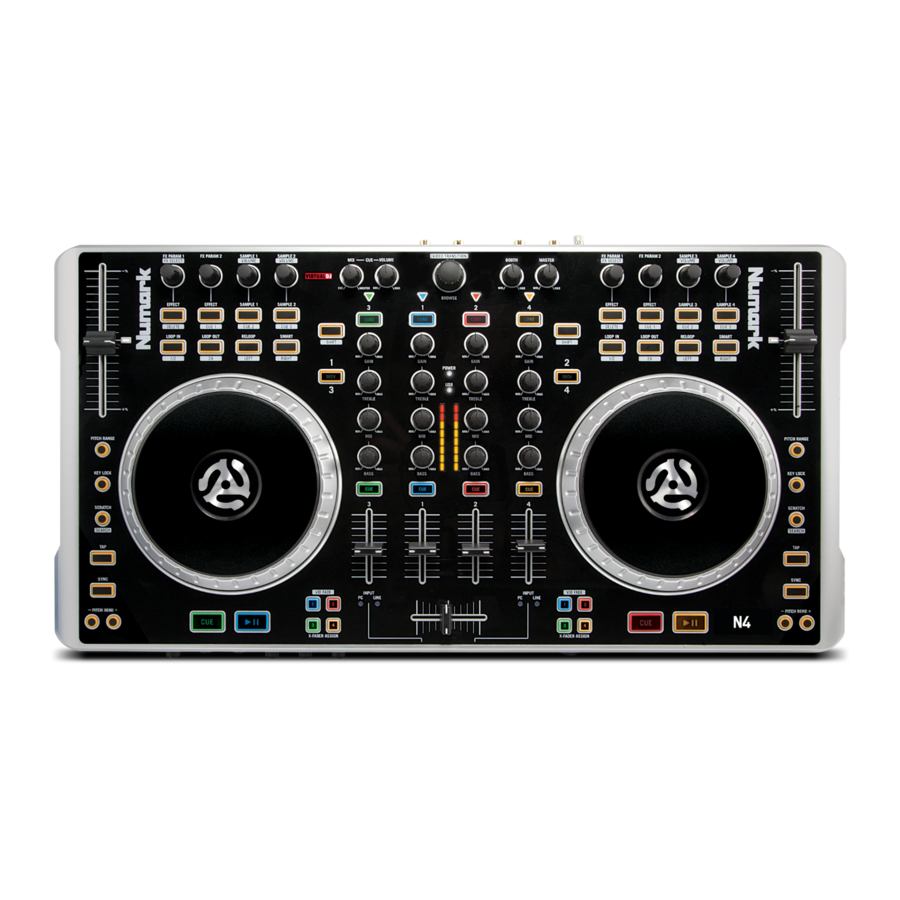
  • Page 18: Panneau Arrière

    PANNEAU ARRIÈRE INTERRUPTEUR D'ALIMENTATION – Cette touche permet de mettre l’appareil sous et hors tension. ENTRÉE D’ALIMENTATION – Cette entrée permet de brancher le câble d’alimentation inclus. USB – Cette connexion permet d’envoyer et de recevoir des données de commande depuis et vers un ordinateur branché.
  • Page 19 LOOP OUT/2X – Cette touche permet de programmer un point de sortie de VIDEO TRANSITION MIX-CUE-VOLUME boucle. Maintenez touche Shift enfoncée afin de doubler la durée de la boucle sélectionnée. RELOOP/LEFT – Cette touche permet de sauter directement au point d’entrée de boucle et de l'activer.
  • Page 20 RELO OP Veuillez vous référer à cette carte des commandes pour voir quelles fonctionnalités du logiciel peuvent être commandées par le N4. Pour de plus amples informations, veuillez consulter le guide d’utilisation du Serato DJ Intro sur le CD. FX 1 PARAM...
  • Page 21: Requisiti Di Sistema

    Libretto di istruzioni di sicurezza e garanzia REGISTRAZIONE Recarsi alla pagina http://www.numark.com per registrare l'N4. La registrazione del prodotto ci consente di tenervi aggiornati con tutti gli ultimissimi sviluppi del prodotto e di offrirvi assistenza tecnica di livello mondiale, in caso di eventuali problemi.
  • Page 22 Per iniziare a utilizzare l'N4: Servirsi dell'adattatore di alimentazione in dotazione per collegare il N4 ad una cavo di alimentazione. Collegare l'N4 ad una porta USB disponibile sul computer. (Se possibile, servirsi di una porta USB sul pannello posteriore del computer.) Aprire il VirtualDJ LE facendo doppio clic sull’icona presente sul Desktop del computer (se è...
  • Page 23: Pannello Anteriore

    Per iniziare a utilizzare l'N4: Servirsi dell'adattatore di alimentazione in dotazione per collegare il N4 ad una cavo di alimentazione. Collegare l'N4 ad una porta USB disponibile sul computer. (Se possibile, servirsi di una porta USB sul pannello posteriore del computer.) Aprire il Serato DJ Intro facendo doppio clic sull'icona presente sul desktop del computer (se è...
  • Page 24: Pannello Posteriore

    PANNELLO POSTERIORE INTERRUTTORE DI ALIMENTAZIONE (POWER) – Accende e spegne l'alimentazione dell'apparecchio (on/off). INGRESSO DI ALIMENTAZIONE – Collegare il cavo di alimentazione in dotazione a questo livello per alimentare l'apparecchio. USB – Questo collegamento USB invia e riceve informazioni di controllo da/a un computer collegato. USB IN REC/TIMECODE –...
  • Page 25 CUE-MIX-VOLUME – Regola il livello dell’audio del canale Cue. Girare il comando per mixare tra MIX-CUE-VOLUME VIDEO TRANSITION Cue e Program nel canale cuffie. Quando impostato all’estrema sinistra, udranno unicamente i canali convogliati a CUE. Quando impostato all’estrema destra, si udrà solo il mix programma.
  • Page 26 RELO OP RELO OP Fare riferimento a questa mappa dei comandi per vedere quali funzioni del software possono essere controllate dall'N4. Per maggiori informazioni, si veda il manuale del Serato DJ Intro. FX 1 PARAM FX 2 PARAM FX 3 PARAM...
  • Page 27: Lieferumfang

    Sicherheitshinweise und Garantieinformationen REGISTRIERUNG Bitte besuchen Sie http://www.numark.com, um Ihr N4 zu registrieren. Wenn Sie Ihr Produkt registrieren, sorgen wir dafür, dass Sie immer am neuesten Stand aller Produktentwicklungen sind. Außerdem bieten wir Ihnen erstklassige technische Unterstützung an, sollten Sie auf Probleme stoßen.
  • Page 28 Hinweis: Video-Mapping im Vollbildmodus wird von VirtualDJ LE nicht unterstützt. TIMECODE-SETUP So konfigurieren Sie Deck 1 des N4 für die Verwendung mit Timecodes (nur in VirtualDJ Pro): Stellen Sie den Schalter USB IN REC/TIMECODE an der Rückseite des N4 auf "TIMECODE".
  • Page 29 Zur Verwendung des N4: Verwenden Sie das beiliegende netzkabel, um den N4 mit einer Steckdose zu verbinden. Schließen Sie das N4 an einen freien USB-Anschluss Ihres Computers an. (Wenn möglich, verwenden Sie einen USB-Anschluss an der Rückseite Ihres Computers.) Öffnen Sie Serato DJ Intro, indem Sie auf das entsprechende Symbol auf Ihrem Desktop doppelklicken (falls Sie eine Desktop-Verknüpfung erstellt haben) oder indem Sie folgenden Pfad wählen:...
  • Page 30 RÜCKSEITE NETZSCHALTER – Schaltet das Gerät ein/aus. NETZEINGANG - Schließen Sie das mitgelieferte Netzkabel hier an, um das Gerät mit Strom zu versorgen. USB - Diese USB-Verbindung sendet und empfängt Steuerinformationen an - oder von - einem angeschlossenen Computer. USB IN REC/TIMECODE - Wählt aus, ob Sie die USB-Verbindung verwenden, um Audio an den Computer zu senden oder ob Sie ein Timecode-Signal durch die Software senden (wird in VirtualDJ LE nicht unterstützt).
  • Page 31 SAMPLE 1/ CUE 2– Drücken Sie diese Taste, um das Sample zu aktivieren oder zu deaktivieren, das in der Software angezeigt wird. Halten Sie zusätzlich die Umschalttaste gedrückt, um einen Cue-Punkt zuzuweisen oder den Track zu diesem Cue-Punkt zurückzusetzen. SAMPLE 2/ CUE 3 – Drücken Sie diese Taste, um das Sample zu aktivieren oder zu deaktivieren, das in der Software angezeigt wird.
  • Page 32 FX 2 FX 3 RELO OP RELO OP Sehen Sie in dieser Übersicht nach, um zu erfahren, welche Software-Features über das N4 gesteuert werden können. Weitere Informationen finden Sie im Serato DJ Intro Handbuch. FX 1 PARAM FX 2 PARAM...
  • Page 33: Technical Specifications

    TECHNICAL SPECIFICATIONS ANALOG: SNR (Full Signal Path): • BALANCED OUTPUTS (XLR): > 89 dB (A-weighted) • UNBALANCED OUTPUTS (Line, RCA): > 89 dB (A-weighted) • UNBALANCED OUTPUTS (Booth, RCA): > 89 dB (A-weighted) • HEADPHONE OUTPUTS (1/8", 1/4"): > 99 dB (A-weighted) THD+N: •...
  • Page 36 MANUAL VERSION 1.3...

Table des Matières