Publicité

Les langues disponibles
  • FR

Les langues disponibles

  • FRANÇAIS, page 36

Liens rapides

USB 3.0 USB-C/TB3,
3x 4K Docking Station
+ VESA + Power Delivery 70W
User guide • Gebrauchsanweisung • Mode d'emploi
Manual de instrucciones • Manuale • Uživatelská příručka
Instrukcje obsługi • Užívateľská príručka • Vartotojo vadovas
Handleiding
P/N: CATRIPLEDOCKPDPRO

Publicité

Table des Matières
loading

Sommaire des Matières pour i-tec CATRIPLEDOCKPDPRO

  • Page 1 USB 3.0 USB-C/TB3, 3x 4K Docking Station + VESA + Power Delivery 70W User guide • Gebrauchsanweisung • Mode d’emploi Manual de instrucciones • Manuale • Uživatelská příručka Instrukcje obsługi • Užívateľská príručka • Vartotojo vadovas Handleiding P/N: CATRIPLEDOCKPDPRO...
  • Page 2 Please read the entire instruction manual carefully. Detailed manual is available on our website www.i-tec.pro in the tab „Manuals, drivers“. In case of any issues, please contact our technical support at: support@itecproduct.com Bitte lesen Sie das gesamte Handbuch sorgfältig durch. Die ausführliche Gebrauchsanweisung ist auch auf unserer Webseite www.i-tec.pro unter...
  • Page 3 Prosíme o pečlivé přečtení celého manuálu. Podrobný manuál je k dis - pozici na našem webu www.i-tec.pro v záložce „Manuály, ovladače“ u tohoto produktu. V pří padě problémů se můžete obrátit na naši technickou podporu: support@itecproduct.com Upewnij się, że uważnie przeczytałeś instrukcji obsługi. Szczegółowy podręcznik jest dostępny na naszej stronie internetowej www.i-tec.pro w zakładce...
  • Page 4 USB 3.0 USB-C/TB3, 3x 4K Docking Station + VESA + Power Delivery 70W ENGLISH........... 05–19 DEUTSCH..........20–35 FRANÇAIS..........36–51 ESPAÑOL........... 52–67 ITALIANO........... 68–83 ČESKY............84–98 POLSKI............99–113 SLOVENSKY..........114–128 LIETUVOS..........129–143 NEDERLANDS........... 144–159 WEEE............160–161 Declaration of Conformity......162–163 FCC..............164...
  • Page 5 GLOSSARY Interface / port / connector / input / slot – a place where two devices • physically interconnect. Controller – a semi-conductor component (so-called chipset) in a laptop, • tablet, PC etc. ensuring the operation of a port. USB-C / USB-type C – It enables faster charging, power supply, dual-role (not •...
  • Page 6 Product Dimensions: 191 x 85 x 31 mm • Product weight: 341 g * 5K resolution only supports Windows External power supply exclusively for use with CATRIPLEDOCKPDPRO. DESCRIPTION Front panel: USB 3.1 port gen. 2 to connect your existing USB 3.1/3.0/2.0 devices and transfer data (10 Gbps), support USB Hot Swapping and BC 1.2 fast charging...
  • Page 7: System Requirements

    USB 3.0 USB-C/TB3, 3x 4K Docking Station+ VESA+PD 70W Back panel: Power input - external power adapter (output: DC 24V/4A) Ethernet GLAN RJ-45 port for high-speed network and internet access via Gigabit Ethernet, supports 10/100/1000 Mbps speeds USB-C 3.0 port for connecting your USB-C devices, it is for data transfer only (5 Gbps) 10.
  • Page 8 Before installation, make sure that your system has installed the latest drivers for your device and updated BIOS. For Windows 7 / 8 / 8.1, download the drivers from our website www.i-tec.pro on the “Download” tab of this product. Run the installation from the downloaded file, select the installation language, and follow the instructions on the screen.
  • Page 9 USB 3.0 USB-C/TB3, 3x 4K Docking Station+ VESA+PD 70W the existing drivers (see chapter “Uninstalling Drivers”), and reinstall the latest drivers available on our website www.i-tec.pro on the “Download” tab of this product. Then reconnect the docking station to the laptop / tablet. In case of problems, please contact our technical support: support@itecproduct.com.
  • Page 10 USB 3.0 USB-C/TB3, 3x 4K Docking Station+ VESA+PD 70W a) Connecting up to three 4K monitors simultaneously (1x HDMI 4K 3840x2160@30Hz and 2x Display Port/HDMI monitor 4K 4096x2160@60Hz) b) Connect one 5K and one 4K monitor simultaneously (1x HDMI 4K 3840x2160@30Hz and 1x Display Port 5K 5120x2880@60Hz monitor).
  • Page 11 USB 3.0 USB-C/TB3, 3x 4K Docking Station+ VESA+PD 70W Options for controlling the monitor with attached docking station Ad a) DisplayLink Manager – the software version is displayed after selecting. Installed software version Ad b) Audio settings – this will allow audio settings (settings similar to Control Panels →...
  • Page 12 USB 3.0 USB-C/TB3, 3x 4K Docking Station+ VESA+PD 70W This can be used to set up Skype, for example. Audio settings for Skype Ad c) Advanced configuration – clicks to display the Windows Display Resolution settings. Display Resolution in Windows 10 Now you can set Extend and Mirror mode: Extend mode: on the monitor select the 2 Monitor, select Several monitors...
  • Page 13 USB 3.0 USB-C/TB3, 3x 4K Docking Station+ VESA+PD 70W Placing one additional monitor to the original laptop / tablet monitor The Standby / Hibernate mode and the Video port – after the activation of the laptop / tablet from the Standby / Hibernate mode the primary (original) monitor is displayed, for this reason we recommend using the monitor that is integrated with the laptop / tablet as the primary monitor, so that you can log on to the system again.
  • Page 14: Uninstalling Drivers

    USB 3.0 USB-C/TB3, 3x 4K Docking Station+ VESA+PD 70W Control the monitor in Windows 7 Control the monitor in Windows 8 / 8.1 and Windows 10 UNINSTALLING DRIVERS Go to Control Panel → All Control Panel Items → Programs and Features → Remove: DisplayLink Core Software for Video drivers.
  • Page 15 USB 3.0 USB-C/TB3, 3x 4K Docking Station+ VESA+PD 70W Uninstalling drivers USING IN MACOS After connecting the monitor, the screen on your Mac will glimmer, which is a standard condition, after stabilization it is possible to perform standard setting of the monitor here: System Preferences-Displays:...
  • Page 16 USB 3.0 USB-C/TB3, 3x 4K Docking Station+ VESA+PD 70W Click on Arrangement and in the default mode (Extended desktop) click on the new monitor and drag it as necessary vis-à-vis the Mac monitor. If you select Mirror displays the mode will change to Mirror (the resolution of the monitors will be automatically adjusted according to their parameters and the highest possible resolution will be set on both monitors).
  • Page 17 USB 3.0 USB-C/TB3, 3x 4K Docking Station+ VESA+PD 70W Mirror mode: This mode can only be used if supported by the Mac. Click on Gather Windows: using this option you can choose the settings of the corresponding monitor – Scaled (offers available resolutions), Rotation (Standard, 90°, 180°...
  • Page 18: Other Functions

    USB 3.0 USB-C/TB3, 3x 4K Docking Station+ VESA+PD 70W Display option 2 In Scaled mode click on the required icon, the resolution is displayed below (which looks like this, 3008x1692 = 4K@30Hz) Closed-display mode – It is possible to work on the connected monitor when the Mac monitor is closed, but you will require power supply and mouse and keyboard connection.
  • Page 19: Safety Instructions

    Check functionality after falling to water or to the ground. • Check functionality when the cover is broken. • Send the device back if it does not work in accordance with the user manual. FREQUENTLY ASKED QUESTIONS Available on our website www.i-tec.pro on the “FAQ” tab of this product.
  • Page 20 USB 3.0 USB-C/TB3, 3x 4K Docking Station+ VESA+PD 70W BEGRIFFSWÖRTERBUCH Schnittstelle / Port / Anschluss / Eingang / Steckplatz – Stelle, an der zwei • Geräte physisch verbunden werden. Kontroller – Halbleiterbestandteil (s.g. Chipsatz) in Notebook, Tablet-PC, der • die Arbeit eines der Ports sichert. USB-C / USB Type-C –...
  • Page 21: Beschreibung

    • Gewicht des Produkts: 341 g 5K-Auflösung unterstützt nur Windows Die Außenstromversorgungsquelle ist ausschließlich zur Verwendung für CATRIPLEDOCKPDPRO bestimmt. BESCHREIBUNG Frontseite: USB 3.1-Port Gen. 2 zum Anschluss Ihrer vorhandenen USB 3.1/3.0/2.0-Geräte und zur Datenübertragung (10 Gbit/s), unterstützt USB Hot Swapping und BC 1.2-Schnellladung...
  • Page 22: Systemanforderungen

    USB 3.0 USB-C/TB3, 3x 4K Docking Station+ VESA+PD 70W 3.5-mm-Audio-Kombianschluss Ein/Aus-Schalter zum Ein- und Ausschalten des Docks USB-C-Anschluss zum Anschluss des Docks an einen Laptop mit USB-C oder USB-A-Schnittstelle (USB-C/F-auf-USB-A/M-Adapter für den Anschluss an den USB-A-Anschluss im Lieferumfang enthalten). Wenn das Dock mit dem USB-C- oder Thunderbolt 3-Anschluss Ihres Laptops verbunden ist, unterstützt es auch Power Delivery zum Laden Ihres Laptops - 70 W.
  • Page 23 Benutzung zu installieren. Vergewissern Sie sich vor der Installation, dass Sie im System die neuesten Treiber für Ihr Gerät installiert haben und BIOS aktualisiert ist. Für Windows 7/8/8.1 sind die Treiber unter unserer Internetseite www.i-tec.pro unter „Download“ bei diesem Produkt herunterzuladen. Starten Sie die Installation von heruntergeladener Datei, wählen Sie die Installationssprache aus und gehen...
  • Page 24 HINWEIS! Schließen Sie die Docking Station an Ihren Mac nicht an, bis die betreffenden Treiber nicht installiert sind. Die Treiber sind nur vor erster Verwendung zu installieren. Wir empfehlen das neueste Betriebssystem macOS zu installieren. Die Treiber sind unter unserer Internetseite www.i-tec.pro unter „Download“ bei diesem Produkt herunterzuladen.
  • Page 25 “About this Mac” → “System Profiler” → “Hardware” → “USB” angezeigt. TREIBERINSTALLATION UNTER WEITEREN BETRIEBSSYSTEMEN Für Android, Chrome OS und Ubuntu benutzen Sie die Treiber vom Hersteller des DisplayLink Chipsatzes. Sie sind unter unserer Internetseite www.i-tec.cz/setup unter „Download“ bei diesem Produkt oder hier zu finden: http://www.displaylink.com/downloads.
  • Page 26 USB 3.0 USB-C/TB3, 3x 4K Docking Station+ VESA+PD 70W a) Anschluss von bis zu drei 4K-Monitoren gleichzeitig (1x HDMI 4K 3840x2160@30Hz und 2x Display Port/HDMI Monitor 4K 4096x2160@60Hz) b) Schließen Sie gleichzeitig einen 5K- und einen 4K-Monitor an (1x HDMI 4K 3840x2160@30Hz und 1x Display Port 5K 5120x2880@60Hz Monitor).
  • Page 27 USB 3.0 USB-C/TB3, 3x 4K Docking Station+ VESA+PD 70W Hier können Sie dann wählen: a) DisplayLink Manager b) Toneinstellungen c) Fortgeschrittene Konfiguration Wahlen zur Bildschirmbedienung mit angeschlossener Docking Station Ad a) DisplayLink Manager – nach der Wahl wird die installierte Softwareversion angezeigt.
  • Page 28 USB 3.0 USB-C/TB3, 3x 4K Docking Station+ VESA+PD 70W Es kann dann für die Einstellung von z. B. Skype ausgenutzt werden. Toneinstellung für Skype Ad c) Fortgeschrittene Konfiguration – nach dem Klicken wird die Einstellung für Anzeigeauflösung unter Windows System angezeigt. Anzeigeauflösung unter Windows 10 Es ist möglich Erweitern (Extend) und Spiegeln / Duplizieren (Mirror) einzustellen):...
  • Page 29 USB 3.0 USB-C/TB3, 3x 4K Docking Station+ VESA+PD 70W Durch die Wahl des Feldes „Diesen Bildschirm zum Primärbildschirm einstellen“ wird der zusätzliche Bildschirm zum Hauptbildschirm eingestellt. Nach dem Klick auf den zweiten Bildschirm und nach seinem Verschieben können Sie ihn nach Bedarf gegenüber dem primären Bildschirm von Ihrem Notebook / Tablet-PC platzieren.
  • Page 30 USB 3.0 USB-C/TB3, 3x 4K Docking Station+ VESA+PD 70W Mit Hilfe der Tastenkombination „Windows“ + P ist es auch möglich, beide Displays einfach zu bedienen (diese Tastaturabkürzung funktioniert erst ab Windows 7 und höher). Zur Bildschirmbenutzung unter Windows 7 dienen folgende Vorwahlen: Nur Computer, Duplizieren, Erweitern und Nur Projektor.
  • Page 31 USB 3.0 USB-C/TB3, 3x 4K Docking Station+ VESA+PD 70W Treiberdeinstallation VERWENDUNG UNTER MACOS Nach dem Anschluss von Bildschirm wird das Display auf Ihrem Mac blinken, was ein Standardzustand ist, und nach der Stabilisierung kann die Standardeinstellung hier vorgenommen werden: Systemeinstellungen-Bildschirme.
  • Page 32 USB 3.0 USB-C/TB3, 3x 4K Docking Station+ VESA+PD 70W Klicken Sie auf Anordnen und im erweiterten Modus klicken Sie auf den neuen Bildschirm und ziehen ihn nach Bedarf hin zum Mac Bildschirm. Durch die Wahl „Bildschirme spiegeln“ wird der Modus auf „Spiegeln“ (die Auflösung der Bildschirme wird automatisch nach ihren Parametern geändert und auf die möglichst höchste Auflösung auf beiden Bildschirmen eingestellt) eingestellt.
  • Page 33 USB 3.0 USB-C/TB3, 3x 4K Docking Station+ VESA+PD 70W Modus „Spiegeln“: Kann verwendet werden, wenn er von Mac angeboten wird. Klicken Sie auf „Fenster sammeln“: durch diese Wahl können Sie die Einstellung des entsprechenden Bildschirms wählen – Auflösung (zeigt verwendbare Auflösungen an), Drehung (Standard, 90°, 180°...
  • Page 34: Andere Funktionen

    USB 3.0 USB-C/TB3, 3x 4K Docking Station+ VESA+PD 70W Abbildung 2 Im angepassten Modus klicken Sie auf die von Ihnen gewählte Schaltfläche, unter dem Bildschirm erscheint die Auflösung (hier zum Beispiel 3008x1692 = 4K@30Hz) Modus des zugeklappten Bildschirms – Die Arbeit auf angeschlossenem Bildschirm, wenn der Mac Bildschirm zugeklappt ist, ist nur bei Netzversorgung und angeschlossener Maus und Tastatur möglich.
  • Page 35: Sicherheitshinweise

    Boden. • Überprüfen Sie die Funktionsfähigkeit bei Bruch des Deckels. • Reklamieren Sie das Gerät, wenn es nicht so funktioniert, wie im Benutzerhandbuch beschrieben. HÄUFIG GESTELLTE FRAGEN Verfügbar auf unserer Webseite www.i-tec.pro auf der Registerkarte „FAQ“ dieses Produkts.
  • Page 36: Glossaire Des Termes Techniques

    USB 3.0 USB-C/TB3, 3x 4K Docking Station+ VESA+PD 70W GLOSSAIRE DES TERMES TECHNIQUES Interface / port / connecteur / entrée / emplacement - endroit où deux • périphériques sont physiquement connectés. Contrôleur - composant semi-conducteur (chipset) se trouvant dans un •...
  • Page 37 Dimensions du produit : 198 x 85 x 31 mm • Poids du produit : 341 g La résolution 5K ne supporte que Windows Source d’alimentation extérieure prévue exclusivement pour être utilisée avec CATRIPLEDOCKPDPRO. SPÉCIFICATIONS ET DESCRIPTION Panneau avant: port USB 3.1 gen. 2 pour connecter périphériques 3.1/3.0/2.0...
  • Page 38: Exigences Système

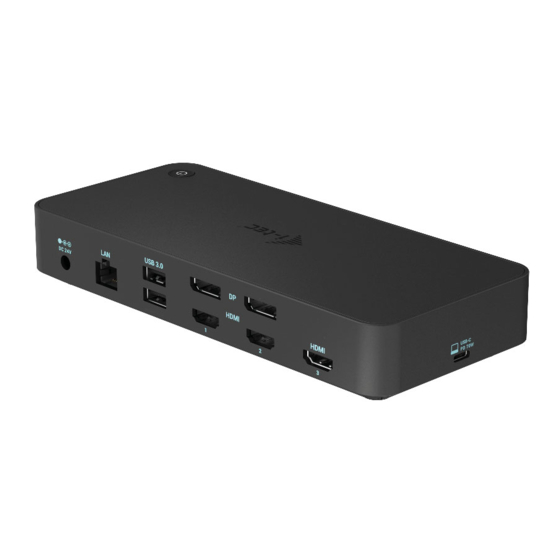
    USB 3.0 USB-C/TB3, 3x 4K Docking Station+ VESA+PD 70W Panneau arrière: Entrée d’alimentation - adaptateur électrique externe (sortie : DC 24V/4A) port Ethernet GLAN RJ-45 pour un réseau à haut débit et un accès à Internet via Gigabit Ethernet, prend en charge les vitesses de 10/100/1000 Mbps Port USB-C 3.0 pour la connexion de vos périphériques USB-C, il sert uniquement au transfert de données (5 Gbps).
  • Page 39: Installation Materielle (Connexion De La Station D'acceuila L'ordinateur Portable / Tablette)

    BIOS mis à jour installé sur votre système. Pour Windows 7/8 / 8.1, téléchargez les pilotes sur notre site web www.i-tec.pro dans l'onglet "Download" du produit. Exécutez l'installation à partir du fichier téléchargé, sélectionnez la langue d'installation et suivez les instructions à...
  • Page 40: Installation De Pilotes Dans Macos

    Nous vous recommandons d'avoir installé le dernier système d'exploitation macOS. Téléchargez les pilotes de notre site Web www.i-tec.pro sous l'onglet "Download" de ce produit. Décompressez le fichier sur le bureau de votre MacBook en tant que disque virtuel, sélectionnez «Pilotes»...
  • Page 41: Installation Des Contrôleurs Dans D'autres Systèmes D'exploitation

    Pour Android, Chrome OS et Ubuntu, utilisez les pilotes du fabricant de composants DisplayLink. Vous pouvez les télécharger sur notre site Web à l’adresse www.i-tec.pro sous l’onglet «Download» pour ce produit ou ici: http://www.displaylink.com/downloads. CONNEXION HDMI / MONITEUR DISPLAY PORT Utilisez le câble HDMI / DP pour connecter le moniteur à...
  • Page 42: Utilisation De La Station D'accueil Sous Systeme D'exploitation Windows

    USB 3.0 USB-C/TB3, 3x 4K Docking Station+ VESA+PD 70W b) Connectez un moniteur 5K et un moniteur 4K simultanément (1x HDMI 4K 3840x2160@30Hz et 1x moniteur Display Port 5K 5120x2880@60Hz). Pour obtenir une résolution de 5K, vous devez connecter un moniteur DP avec deux câbles DP, la carte graphique de votre ordinateur peut ne pas prendre en charge la résolution 5K).
  • Page 43 USB 3.0 USB-C/TB3, 3x 4K Docking Station+ VESA+PD 70W Ad a) DisplayLink Manager - la version du logiciel est affichée après la sélection Version du logiciel installée Ad b) Paramètres audio - Permet de régler le son (les paramètres sont similaires à...
  • Page 44 USB 3.0 USB-C/TB3, 3x 4K Docking Station+ VESA+PD 70W Cela peut être utilisé pour configurer Skype, par exemple. Paramètres audio pour Skype Ad c) Configuration avancée – après avoir cliqué s’affiche les paramètres de résolution d’affichage Windows. Résolution d’affichage dans Windows 10 Vous pouvez maintenant exécuter les paramètres Etendre (Extend) et Miroir (Mirror): •...
  • Page 45 USB 3.0 USB-C/TB3, 3x 4K Docking Station+ VESA+PD 70W Placez un moniteur supplémentaire sur le moniteur d’ordinateur portable / tablette d’origine Mode veille / Mise en veille prolongée et port vidéo - après avoir activé l’ordinateur portable / tablette et être sorti du mode veille / Mise en veille prolongée celui-ci affiche le moniteur primaire (original), il est recommandé...
  • Page 46: Pilotes De Désinstallation

    USB 3.0 USB-C/TB3, 3x 4K Docking Station+ VESA+PD 70W Contrôle du moniteur sous Windows 7 Contrôle du moniteur sous Windows 8 / 8.1 et Windows 10 PILOTES DE DÉSINSTALLATION Par défaut, allez dans Panneau de configuration → Tous les éléments du panneau de configuration →...
  • Page 47: Utilisation De La Station D'accueil Avec Macos

    USB 3.0 USB-C/TB3, 3x 4K Docking Station+ VESA+PD 70W Désinstallation des pilotes UTILISATION DE LA STATION D’ACCUEIL AVEC MACOS Une fois le moniteur connecté, l’écran de votre Mac clignote, ce qui correspond à un état normal. Après la configuration, vous pouvez définir les paramètres ici: Préférences Système-Moniteurs:...
  • Page 48 USB 3.0 USB-C/TB3, 3x 4K Docking Station+ VESA+PD 70W Sous l’onglet Disposition et en mode par défaut (Étendre), cliquez sur le nouveau moniteur et faites-le glisser sur le moniteur Mac si nécessaire. Lorsque Moniteurs miroirs est sélectionné, le mode passe à Miroir (la résolution du moniteur est réglée automatiquement en fonction des paramètres réglés et la résolution la plus élevée possible sur les deux moniteurs est définie).
  • Page 49 USB 3.0 USB-C/TB3, 3x 4K Docking Station+ VESA+PD 70W Mode miroir: Peut être utilisé uniquement avec Mac En sélectionnant Rassembler les fenêtres, vous pouvez choisir les paramètres du moniteur approprié - Résolution personnalisée (offre les résolutions utilisables), Rotation (Standard, 90 °, 180 ° et 270 °) et Taux de rafraîchissement (si disponible). Selon le moniteur utilisé, les paramètres sont les suivants: Option d’affichage 1...
  • Page 50: Autres Fonctions

    USB 3.0 USB-C/TB3, 3x 4K Docking Station+ VESA+PD 70W Option d’affichage 2 En mode personnalisé, cliquez sur l’icône choisie sous l’écran s’affiche la résolution (ici, visuellement 3008x1692 = 4K@30Hz) Mode d’affichage fermé - Le travail sur le moniteur externe connecté lorsque le moniteur Mac est en position capot fermé, n’est possible que lorsque le Mac est sous tension et que la souris et le clavier sont connectés.
  • Page 51: Instructions De Securite Pour L'utilisation De La Station De Reservation

    Vérifier la fonctionnalité lorsque le couvercle est cassé. • L’équipement ne fonctionne pas conformément au manuel. RÉPONSES AUX QUESTIONS FRÉQUEMMENT POSÉES À votre disposition sur notre page web www.i-tec.pro, où se trouvent sous l’onglet de « FAQ » qui correspondent au respectif produit.
  • Page 52: Glosario De Términos

    USB 3.0 USB-C/TB3, 3x 4K Docking Station+ VESA+PD 70W GLOSARIO DE TÉRMINOS Interfaz / puerto / conector / entrada / ranura – Un lugar donde dos • dispositivos están físicamente interconectados. Unidad de control (UC) – Un componente semiconductor (llamado chipset) •...
  • Page 53 • Peso del producto: 341 g La resolución 5K sólo es compatible con Windows Fuente de alimentación externa, exclusivamente para el uso en CATRIPLEDOCKPDPRO. DESCRIPCIÓN Panel frontal: Puerto USB 3.1 gen. 2 para conectar tus dispositivos USB 3.1/3.0/2.0 ex- istentes y transferir datos (10 Gbps), soporta USB Hot Swapping y carga rápida BC 1.2...
  • Page 54: Requisitos Del Sistema

    USB 3.0 USB-C/TB3, 3x 4K Docking Station+ VESA+PD 70W Panel trasero: Entrada de alimentación: adaptador de corriente externo (salida: DC 24V/4A) Puerto Ethernet GLAN RJ-45 para una red de alta velocidad y acceso a Internet a través de Gigabit Ethernet, compatible con velocidades de 10/100/1000 Mbps Puerto USB-C 3.0 para conectar tus dispositivos USB-C, es solo para transferencia de datos (5 Gbps)
  • Page 55 Para Windows 7 / 8 / 8.1, descargue los controladores de nuestro sitio web www.i-tec.pro en la pestaña "Download" de este producto. Ejecute la instalación desde el archivo descargado, seleccione el idioma de instalación y siga las instrucciones de la pantalla.
  • Page 56 (consulte el capítulo “Desinstalación de los controladores”) y vuelva a instalar los controladores más recientes disponibles en nuestro sitio web en www.i-tec.pro bajo la pestaña “Download” de este producto. A continuación, vuelva a conectar la estación de acoplamiento a la computadora, portátil / tableta.
  • Page 57: Instalación Del Hardware

    “About this Mac” → “System Profiler” → “Hardware” → “USB”. INSTALACIÓN DE CONTROLADORES EN OTROS SISTEMAS OPERATIVOS Para Android, Chrome OS y Ubuntu, utilice el controlador de chipset DisplayLink. Estos están disponibles para descargar en nuestro sitio web www.i-tec.cz/setup bajo la pestaña “Download” para este producto o aquí: http://www.displaylink.com/downloads.
  • Page 58 USB 3.0 USB-C/TB3, 3x 4K Docking Station+ VESA+PD 70W b) Conecta un monitor 5K y uno 4K simultáneamente (1x HDMI 4K 3840x2160@30Hz y 1x monitor Display Port 5K 5120x2880@60Hz). Para conseguir una resolución 5K, necesitas conectar un monitor DP con dos cables DP, la tarjeta gráfica de tu ordenador puede no soportar la resolución 5K).
  • Page 59 USB 3.0 USB-C/TB3, 3x 4K Docking Station+ VESA+PD 70W Ad a) Administrador de DisplayLink: la versión del software se muestra después de seleccionar. Versión de software instalada Ad b) Ajustes de sonido: le permite ajustar el sonido (el ajuste es similar al Panel de control →...
  • Page 60 USB 3.0 USB-C/TB3, 3x 4K Docking Station+ VESA+PD 70W Ad c) Configuración avanzada: tras el clic apare la configuración para la Resolución de la visualización del sistema Windows. Resolución de la pantalla en Windows 10 Ahora puede realizar los ajustes Extender y Espejo: Modo Extender: En la pantalla, seleccione varias pantallas →...
  • Page 61 USB 3.0 USB-C/TB3, 3x 4K Docking Station+ VESA+PD 70W Coloque un monitor adicional en el monitor portátil / tableta original Modo de suspensión / Hibernación y puerto de vídeo - Cuando se enciende el ordenador portátil / tableta desde el modo de espera / hibernación, se muestra la pantalla principal (original), por lo que recomendamos utilizar el principal integrado con el portátil o tableta para poder volver a entrar en el sistema.
  • Page 62 USB 3.0 USB-C/TB3, 3x 4K Docking Station+ VESA+PD 70W Control de pantalla en Windows 7 Control de pantalla en Windows 8/8.1 y Windows 10 DESINSTALACIÓN DE LOS CONTROLADORES Normalmente vaya a Panel de Control → Programas → Programas y características →...
  • Page 63 USB 3.0 USB-C/TB3, 3x 4K Docking Station+ VESA+PD 70W Desinstalar controladores USO DEL REPLICADOR DE PUERTOS EN MACOS Una vez que la pantalla está conectada, la pantalla de su Mac parpadeará, que es el estado estándar. Una vez configurado, puede realizar la configuración aquí: Preferencias del Sistema-Pantallas:...
  • Page 64 USB 3.0 USB-C/TB3, 3x 4K Docking Station+ VESA+PD 70W En la pestaña Alineación y en Modo predeterminado (Extender), haga clic en el nuevo monitor y arrástrelo según sea necesario desde la pantalla Mac. Cuando se selecciona Pantallas duplicadas, el modo se cambia a Espejo (la resolución de la pantalla se ajusta automáticamente según sus parámetros y se establece la resolución más alta posible en ambas pantallas).
  • Page 65 USB 3.0 USB-C/TB3, 3x 4K Docking Station+ VESA+PD 70W Modo Pantallas Duplicadas: Sólo se puede utilizar cuando se ofrece con MacBook. Seleccionando Reunir Ventanas, puede elegir la configuración de la pantalla - Resolución personalizada (ofrece resoluciones utilizables), Rotar (Estándar, 90 °, 180 °...
  • Page 66: Otras Funciones

    USB 3.0 USB-C/TB3, 3x 4K Docking Station+ VESA+PD 70W Opción de visualización 2 En el modo Personalizado, haga clic en el icono elegido debajo de la pantalla para describir la resolución (Aquí 3008x1692 = 4K@30Hz) Modo de visualización cerrado - El trabajo en el monitor externo conectado cuando el monitor Mac está...
  • Page 67: Preguntas Frecuentes

    Verificar la funcionalidad después de caer en el agua o en el suelo. • Verificar la funcionalidad cuando la cubierta está rota. • Reivindique que el equipo no funcione de acuerdo con el manual. PREGUNTAS FRECUENTES Disponible en nuestra página web www.i-tec.pro, en la pestaña “FAQ” de este producto.
  • Page 68: Specificazioni Tecniche

    USB 3.0 USB-C/TB3, 3x 4K Docking Station+ VESA+PD 70W TERMINI TECNICI Interfaccia / porta / connettore / ingresso / slot – punto di collegamento • materiale di due dispositivi. Unità di controllo – componente semiconduttore di notebook/tablet (cd. • chipset) che provvede al funzionamento di porte. USB-C / USB Type-C –...
  • Page 69 USB 3.0 USB-C/TB3, 3x 4K Docking Station+ VESA+PD 70W 3 schermi: 1x Porta Display/HDMI 1/2+ 1x Porta Display/HDMI 1/2+ 1x HDMI 3 → fino a 2x 4K/60Hz + 4K/30Hz • 1x porta USB-C gen. 1 (solo dati) • 1x porta USB-C gen. 2 (solo dati) con supporto Fast Charge (BC 1.2) •...
  • Page 70: Requisiti Di Sistema

    USB 3.0 USB-C/TB3, 3x 4K Docking Station+ VESA+PD 70W Pannello posteriore: Ingresso alimentazione - adattatore esterno (uscita: DC 24V/4A) Porta Ethernet GLAN RJ-45 per la rete ad alta velocità e l’accesso a Internet tramite Gigabit Ethernet, supporta velocità di 10/100/1000 Mbps Porta USB-C 3.0 per collegare i tuoi dispositivi USB-C, è...
  • Page 71 BIOS è aggiornato. Scaricare gli strumenti per il sistema operativo Windows dalla scheda “Download” del nostro sito web: www.i-tec.pro Avviare l’installazione dal file scaricato, selezionare la lingua dell’installazione e seguire le istruzioni visualizzate sullo schermo.
  • Page 72 (si veda il capitolo “Disinstallare gli strumenti”) e installare di nuovo gli strumenti più recenti che possono essere scaricati dalla scheda “Download” sul nostro sito web: www.i-tec.pro Dopodiché ricollegare la Stazione dock al notebook/tablet. In caso di problemi persistenti non esitare a contattare il nostro centro di assistenza tecnica: support@itecproduct.com.
  • Page 73 Per i sistemi operativi Android, Chrome OS o Ubuntu usare gli strumenti del rispettivo produttore del chipset DisplayLink. Essi possono essere scaricati dalla scheda “Download” sul nostro sito web www.i-tec.pro o dalle seguenti pagine web: http://www.displaylink.com/downloads. COLLEGAMENTO DEL MONITOR TRAMITE LA PORTA HDMI / DISPLAY PORT Per collegare il monitor alla Stazione dock usare il cavo HDMI / DP.
  • Page 74 USB 3.0 USB-C/TB3, 3x 4K Docking Station+ VESA+PD 70W b) Collegare un monitor 5K e uno 4K simultaneamente (1x HDMI 4K 3840x2160@30Hz e 1x monitor Display Port 5K 5120x2880@60Hz). Per ottenere la risoluzione 5K, è necessario collegare un monitor DP con due cavi DP, la scheda grafica del computer potrebbe non supportare la risoluzione 5K).
  • Page 75 USB 3.0 USB-C/TB3, 3x 4K Docking Station+ VESA+PD 70W a) DisplayLink Manager – scelta questa funzione, viene visualizzata la versione del software. Versione software installata b) Impostazione audio – permette di impostare l’audio (l’impostazione è simile all’impostazione dell’audio tramite il Pannello di controllo → Audio). Scegliere la cuffia a 2 canali e il microfono con il connettore jack di 3.5 mm.
  • Page 76 USB 3.0 USB-C/TB3, 3x 4K Docking Station+ VESA+PD 70W c) Configurazione avanzata – cliccando su questa funzione optional, viene visualizzata l’impostazioni della Risoluzione dell’immagine nel sistema Windows. Risoluzione dell’immagine nel SO Windows 10 A questo punto si può procedere all’impostazione della modalità: Immagine estesa / Immagine speculare / Immagine duplicata: •...
  • Page 77 USB 3.0 USB-C/TB3, 3x 4K Docking Station+ VESA+PD 70W Posizionamento del monitor secondario rispetto al monitor primario del notebook/tablet Modalità Standby / Hibernate e Video port – dopo l’attivazione del notebook/ tablet nella modalità Standby/Hibernate viene visualizzato il monitor primario (originario) perciò...
  • Page 78 USB 3.0 USB-C/TB3, 3x 4K Docking Station+ VESA+PD 70W Impostazione del monitor nel sistema Windows 7 Impostazione del monitor nei SO Windows 8/8.1 e Windows 10 DISINSTALLAZIONE DEGLI STRUMENTI Procedere in modo standard tramite il Pannello di controllo → Mostra tutto →...
  • Page 79 USB 3.0 USB-C/TB3, 3x 4K Docking Station+ VESA+PD 70W Disinstallazione degli strumenti USO DELLA STAZIONE DOCK NEL SISTEMA OPERATIVO MACOS Collegato il monitor, lo schermo lampeggia ma è un fenomeno normale. Quando il lampeggio finisce, l’impostazione può essere effettuata qui: Preferenze di sistema Monitor:...
  • Page 80 USB 3.0 USB-C/TB3, 3x 4K Docking Station+ VESA+PD 70W Aprendo la scheda Disposizione nella modalità default (Estendere), cliccare sul nuovo monitor e trascinarlo rispetto al monitor Mac a seconda del bisogno. Se viene scelta la modalità Immagine speculare, la modalità cambia a quella Speculare e la risoluzione dei monitor si adegua automaticamente secondo i loro parametri impostando la risoluzione più...
  • Page 81 USB 3.0 USB-C/TB3, 3x 4K Docking Station+ VESA+PD 70W Modalità Immagine speculare: Può essere usata solo se è a disposizione nel sistema Mac. Per impostare il rispettivo monitor scegliere la modalità Raggruppa le finestre – Risoluzione (visualizza le risoluzioni disponibili), Rotazione (Standard, 90°, 180°...
  • Page 82: Altre Funzioni

    USB 3.0 USB-C/TB3, 3x 4K Docking Station+ VESA+PD 70W Variante della visualizzazione n. 2 Cliccare sull’icona della Modalità selezionata. In basso appare la rispettiva risoluzione (in questo caso 3.008 x 1.692 = 4K, 30 Hz) Modalità display chiuso – questa funzione permette di usare il monitor esterno connesso quando lo scherma Mac è...
  • Page 83: Domande Frequenti

    • verificare il funzionamento del dispositivo in caso di rottura dell’involucro • sporgere il reclamo se il dispositivo non funziona secondo il Libretto d’uso. DOMANDE FREQUENTI Si veda la scheda “FAQ” di questo prodotto sulle nostre pagine web www.i-tec.pro.
  • Page 84 1 Gbit/s – označení GLAN / RJ-45. Audio – označení pro zvukové vstupní (mikrofon) nebo výstupní zařízení (sluchátka/reproduktory). Vnější napájecí zdroj výlučně pro použití pro CATRIPLEDOCKPDPRO. SPECIFIKACE • 1x USB-C port pro připojení k zařízení s USB-C nebo USB-A rozhraním (propojovací...
  • Page 85 USB 3.0 USB-C/TB3, 3x 4K Docking Station+ VESA+PD 70W 3 monitory – 1x Display Port/HDMI 1/2+ 1x Display Port/HDMI 1/2+ 1x HDMI 3 → až 2x 4K/60Hz + 4K/30Hz • 1x USB-C port gen. 1 (pouze pro data) • 1x USB-C port gen. 2 (pouze pro data) with Fast Charge support (BC 1.2) •...
  • Page 86: Systémové Požadavky

    USB 3.0 USB-C/TB3, 3x 4K Docking Station+ VESA+PD 70W Zadní panel: Vstup pro napájení – externí napájecí adaptér (výstup: DC 24V/4A) Ethernet GLAN RJ-45 port pro vysokorychlostní přístup k síti a internetu přes Gigabit Ethernet, podporuje rychlosti 10 / 100 / 1000 Mbps USB-C 3.0 port pro připojení...
  • Page 87 Před samotnou instalací se ujistěte, že máte v systému nainstalovány nejnovější ovladače pro vaše zařízení a aktualizovaný BIOS. Pro Windows 7 / 8 / 8.1 si ovladače stáhněte z našeho webu www.i-tec.pro v záložce „Download“ u tohoto produktu. Spusťte instalaci ze staženého souboru, zvolte jazyk instalace a postupujte dle pokynů...
  • Page 88 Ovladače je třeba nainstalovat pouze před prvním použitím. Doporučujeme mít nainstalován nejnovější operační systém macOS. Ovladače si stáhněte z našeho webu www.i-tec.pro v záložce „Download“ u tohoto produktu a spusťte instalaci: Soubor rozbalte na plochu vašeho MacBooku jako virtuální disk, zvolte “Drivers“...
  • Page 89 INSTALACE OVLADAČŮ V DALŠÍCH OPERAČNÍCH SYSTÉMECH Pro Android, Chrome OS a Ubuntu použijte ovladače od výrobce chipsetu DisplayLink. Ty jsou ke stažení na našem webu www.i-tec.pro v záložce „Download“ u tohoto produktu nebo zde: http://www.displaylink.com/downloads. PŘIPOJENÍ HDMI / DISPLAY PORT MONITORU Pro připojení...
  • Page 90 USB 3.0 USB-C/TB3, 3x 4K Docking Station+ VESA+PD 70W POUŽITÍ DOKOVACÍ STANICE V OS WINDOWS Ve skrytých ikonách na liště Start klikněte na ikonku síťového připojení-DisplayLink: Zde pak můžete zvolit: a) DisplayLink Manager b) Nastavení zvuku c) Pokročilá konfigurace Volby pro ovládání monitoru s připojenou dokovací stanici Ad a) DisplayLink Manager –...
  • Page 91 USB 3.0 USB-C/TB3, 3x 4K Docking Station+ VESA+PD 70W Nastavení zvuku To je pak možno využít pro nastavení např. Skype. Nastavení zvuku pro Skype Ad c) Pokročilá konfigurace – po kliknutí se zobrazí nastavení pro Rozlišení zobrazení ze systému Windows. Rozlišení...
  • Page 92 USB 3.0 USB-C/TB3, 3x 4K Docking Station+ VESA+PD 70W Nyní lze provádět nastavení Rozšířit (Extend) a Zrcadlit / Duplikovat (Mirror): • Režim Rozšířit (Extend): na obrazovce zvolte u Více monitorů → Rozšířit toto zobrazení → OK. • Režim Zrcadlit / Duplikovat (Mirror): na obrazovce zvolte u Více monitorů →...
  • Page 93 USB 3.0 USB-C/TB3, 3x 4K Docking Station+ VESA+PD 70W 1280x1024, pak se obrazovka přenáší na přídavný monitor v rozlišení maximálně 1280x1024, i když jej nastavíte na vyšší rozlišení. Pomocí volby na klávesnici „Windows“ + P lze také jednoduše monitory ovládat (tato klávesová...
  • Page 94 USB 3.0 USB-C/TB3, 3x 4K Docking Station+ VESA+PD 70W ODINSTALOVÁNÍ OVLADAČŮ Standardně postupujte přes Ovládací panely → Všechny položky Ovládacích panelů → Programy a funkce → Odebrat: DisplayLink Core Software pro Video ovladače. V průběhu odinstalování potvrďte nabízené volby. Odinstalování ovladačů POUŽITÍ...
  • Page 95 USB 3.0 USB-C/TB3, 3x 4K Docking Station+ VESA+PD 70W V záložce Uspořádání a v defaultním režimu (Rozšířit), klikněte na nový monitor a přetáhněte jej dle potřeby vzhledem k monitoru Macu. Při volbě Zrcadlit monitory se změní režim na Zrcadlit (rozlišení monitorů se automaticky upraví podle jejich parametrů...
  • Page 96 USB 3.0 USB-C/TB3, 3x 4K Docking Station+ VESA+PD 70W Režim zrcadlit: Lze použít jen v případě, že je nabízen Macem. Volbou Shromáždit okna si můžete zvolit nastavení odpovídajícího monitoru – Přizpůsobené rozlišení (nabízí využitelná rozlišení), Otočení (Standardní, 90°, 180° a 270°) a Obnovovací frekvence (jestli je nabízena). Podle používaného monitoru jsou tyto možnosti nastavení: Varianta zobrazení...
  • Page 97 USB 3.0 USB-C/TB3, 3x 4K Docking Station+ VESA+PD 70W Varianta zobrazení 2 V Přizpůsobeném režimu klikněte na Vámi vybranou ikonku, pod obrazovkou se popíše dané rozlišení (zde vzhledově 3008x1692 = 4K@30Hz) Režim zavřeného displeje – práce na připojeném externím monitoru, když je monitor Macu sklopený, je možná...
  • Page 98: Ostatní Funkce

    V součinnosti se servisním oddělením: • Ověřte funkčnost po pádu do vody nebo na zem. • Ověřte funkčnost při prasknutí krytu. • Reklamujte zařízení nefungující dle manuálu. ČASTO KLADENÉ OTÁZKY K dispozici na našem webu www.i-tec.pro v záložce „FAQ“ u tohoto produktu.
  • Page 99 1 Gbit/s - oznaczenie GLAN / RJ-45. • Audio - oznaczenie wejścia audio (mikrofon) lub urządzenia wyjściowego (słuchawki/głośniki). Zewnętrzny zasilacz przeznaczony wyłącznie do użytku z CATRIPLEDOCKPDPRO. SPECYFIKACJA • 1x port USB-C do podłączenia urządzeń USB-C lub USB-A (kabel USB-C i przejściówka z USB-C na USB 3.0 w zestawie)
  • Page 100 USB 3.0 USB-C/TB3, 3x 4K Docking Station+ VESA+PD 70W 3 monitory - 1x Display Port/HDMI 1/2+ 1x Display Port/HDMI 1/2 + 1x HDMI 3 → do 2x 4K/60Hz + 4K/30Hz • 1x port USB-C gen. 1 (tylko dane) • 1x port USB-C gen. 2 (tylko dane) z obsługą szybkiego ładowania (BC 1.2) •...
  • Page 101: Wymagania Systemowe

    USB 3.0 USB-C/TB3, 3x 4K Docking Station+ VESA+PD 70W Panel tylny: Wejście zasilania - zewnętrzny zasilacz (wyjście: DC 24V/4A) port Ethernet GLAN RJ-45 dla szybkiej sieci i dostępu do Internetu przez Gigabit Ethernet, obsługuje prędkości 10/100/1000 Mbps Port USB-C 3.0 do podłączenia urządzeń USB-C, służy tylko do transferu danych (5 Gbps) 10.
  • Page 102 BIOS. Dla Windows 7 / 8 / 8.1, pobierz sterowniki z naszej strony internetowej www.i-tec.pro w zakładce „Download” dla tego produktu. Rozpocznij instalację z pobranego pliku, wybierz język instalacji i postępuj zgodnie z instrukcjami wyświetlanymi na ekranie.
  • Page 103 „Odinstalowywanie sterowników”) i zainstaluj ponownie najnowsze sterowniki, które są dostępne do pobrania na naszej stronie internetowej www.i-tec.pro w zakładce „Download” dla tego produktu. Następnie ponownie podłącz stację dokującą do laptopa/tabletu. W razie problemów możesz skontaktować się z naszą pomocą techniczną: support@itecproduct.com INSTALACJA STEROWNIKÓW NA MACOS X...
  • Page 104 INSTALOWANIE STEROWNIKÓW W INNYCH SYSTEMACH OPERACYJNYCH W przypadku systemów Android, Chrome OS i Ubuntu należy użyć sterowników producenta chipsetu DisplayLink. Można je pobrać z naszej strony internetowej www.i-tec.pro w zakładce „Download” dla tego produktu lub tutaj: http://www.displaylink.com/downloads. PODŁĄCZENIE MONITORA HDMI / DISPLAY PORT Użyj kabla HDMI / DP, aby podłączyć...
  • Page 105 USB 3.0 USB-C/TB3, 3x 4K Docking Station+ VESA+PD 70W KORZYSTANIE ZE STACJI DOKUJĄCEJ W SYSTEMIE WINDOWS W ukrytych ikonach na pasku Start kliknij ikonę Network Connection-DisplayLink: W tym miejscu można wybrać: a) Menedżer DisplayLink b) Ustawienia audio. c) Konfiguracja zaawansowana Opcje sterowania monitorem z podłączoną...
  • Page 106 USB 3.0 USB-C/TB3, 3x 4K Docking Station+ VESA+PD 70W Ustawienia audio Można go następnie wykorzystać do skonfigurowania np. programu Skype. Ustawienia dźwięku dla Skype Ad c) Konfiguracja zaawansowana - po kliknięciu wyświetlą się ustawienia rozdzielczości wyświetlania z systemu Windows. Rozdzielczość wyświetlacza w systemie Windows 10...
  • Page 107 USB 3.0 USB-C/TB3, 3x 4K Docking Station+ VESA+PD 70W Ustawienia Extend (rozszerzenie) i Mirror/Duplicate (lustro) mogą być teraz dokonane: • Tryb rozszerzenia: na ekranie wybierz Wiele monitorów → Rozszerz ten widok → OK. • Tryb lustrzany: na ekranie wybierz Multi Monitor → Duplikuj ten widok na 2 i 3 →...
  • Page 108 USB 3.0 USB-C/TB3, 3x 4K Docking Station+ VESA+PD 70W Możesz również łatwo kontrolować monitory za pomocą opcji klawiatury „Windows” + P (ten skrót klawiaturowy działa tylko w systemie Windows 7 i wyżej). Aby korzystać z monitora w systemie Windows 7, dostępne są opcje Tylko komputer, Powielanie, Rozszerzanie i Tylko projektor.
  • Page 109 USB 3.0 USB-C/TB3, 3x 4K Docking Station+ VESA+PD 70W Odinstalowanie sterowników UŻYWANIE DOCKA W SYSTEMIE MACOS Po podłączeniu monitora ekran komputera Mac będzie migotał, co jest standardowym zjawiskiem. Kiedy już się ustabilizuje, możesz dokonać ustawień tutaj: Preferencje systemowe-Monitory:...
  • Page 110 USB 3.0 USB-C/TB3, 3x 4K Docking Station+ VESA+PD 70W Na karcie Rozmieszczenie, w trybie domyślnym (Rozwiń), kliknij nowy monitor i przeciągnij go w razie potrzeby względem monitora Mac. Po wybraniu opcji Mirror Monitors, tryb zmienia się na Mirror (rozdzielczość monitorów jest automatycznie dostosowywana do ich parametrów, ustawiając najwyższą...
  • Page 111 USB 3.0 USB-C/TB3, 3x 4K Docking Station+ VESA+PD 70W Mirror Mode: Może być używany tylko wtedy, gdy jest oferowany przez Mac. Możesz wybrać ustawienia dla odpowiedniego monitora - Customized Resolution (oferuje użyteczne rozdzielczości), Rotation (Standard, 90°, 180° i 270°) oraz Refresh Rate (częstotliwość odświeżania) (jeśli jest oferowana) wybierając Gather Windows.
  • Page 112 USB 3.0 USB-C/TB3, 3x 4K Docking Station+ VESA+PD 70W Wariant wyświetlacza 2 W trybie niestandardowym, kliknij na wybraną ikonę, rozdzielczość będzie opisana poniżej ekranu (tutaj wizualnie 3008x1692 = 4K@30Hz) Tryb zamkniętego ekranu - praca na podłączonym monitorze zewnętrznym, gdy monitor komputera Mac jest odchylony, jest możliwa tylko wtedy, gdy komputer Mac jest zasilany oraz gdy podłączone są...
  • Page 113: Instrukcje Bezpieczeństwa

    Zachowaj instrukcję obsługi w celu późniejszego wykorzystania. We współpracy z działem serwisowym: • Sprawdź, czy urządzenie nie jest uszkodzone. • Reklamuj / zgłoś nieprawidłowości gdy urządzenie nie działa zgodnie z instrukcją obsługi. CZĘSTO ZADAWANE PYTANIA Dostępne na naszych stronach www.i-tec.pro w zakładce „FAQ“ przy niniejszym produkcie.
  • Page 114 USB 3.0 USB-C/TB3, 3x 4K Docking Station+ VESA+PD 70W SLOVNÍK POJMOV Rozhranie / port / konektor / vstup / slot - miesto, kde sú fyzicky prepojené dve zariadenia. Radič - polovodičová súčiastka (nazývaná čipová súprava) v prenosnom počítači/tablete, ktorá zabezpečuje fungovanie portu. USB-C / USB Type-C - je nový...
  • Page 115 USB 3.0 USB-C/TB3, 3x 4K Docking Station+ VESA+PD 70W • 1x port USB-C gen. 1 (len pre dáta) • 1x port USB-C gen. 2 (len pre dáta) s podporou rýchleho nabíjania (BC 1.2) • 1x port USB 3.1 gen. 2 s podporou rýchleho nabíjania (BC 1.2) •...
  • Page 116: Systémové Požiadavky

    USB 3.0 USB-C/TB3, 3x 4K Docking Station+ VESA+PD 70W Zadný panel: Napájací vstup - externý napájací adaptér (výstup: DC 24V/4A) Ethernetový port GLAN RJ-45 pre vysokorýchlostnú sieť a prístup na internet cez gigabitový Ethernet, podporuje rýchlosti 10/100/1000 Mb/s Port USB-C 3.0 na pripojenie zariadení USB-C, slúži len na prenos dát (5 Gb/s) 10.
  • Page 117 BIOS. Pre Windows 7 / 8 / 8.1 si stiahnite ovládače z našej webovej stránky www.i-tec.pro v záložke „Na stiahnutie“ pre tento produkt. Spustite inštaláciu zo stiahnutého súboru, vyberte jazyk inštalácie a postupujte podľa pokynov na obrazovke.
  • Page 118 (pozri kapitolu „Odinštalovanie ovládačov“) a znovu nainštalujte najnovšie ovládače, ktoré sú k dispozícii na stiahnutie na našej webovej stránke www.i-tec.pro v záložke „Na stiahnutie“ pre tento produkt. Potom znovu pripojte dokovaciu stanicu k prenosnému počítaču/tabletu. V prípade problémov môžete kontaktovať našu technickú podporu: support@itecproduct.com.
  • Page 119 Pre systémy Android, Chrome OS a Ubuntu použite ovládače od výrobcu čipovej sady DisplayLink. Sú k dispozícii na stiahnutie na našej webovej stránke www.i-tec.pro v záložke „Na stiahnutie“ pre tento produkt alebo tu: http://www.displaylink.com/downloads. PRIPOJENIE MONITORA HDMI / DISPLAY PORT Na pripojenie monitora k dokovacej stanici použite kábel HDMI/DP.
  • Page 120 USB 3.0 USB-C/TB3, 3x 4K Docking Station+ VESA+PD 70W POUŽÍVANIE DOKOVACEJ STANICE V SYSTÉME WINDOWS V skrytých ikonách na paneli Štart kliknite na ikonu Sieťové pripojenie - DisplayLink: Tu potom môžete vybrať: a) DisplayLink Manager b) Nastavenia zvuku. c) Rozšírená konfigurácia Možnosti ovládania monitora s pripojeným dokom Ad a) DisplayLink Manager - po výbere sa zobrazí...
  • Page 121 USB 3.0 USB-C/TB3, 3x 4K Docking Station+ VESA+PD 70W Nastavenia zvuku To sa potom môže použiť na nastavenie napr. služby Skype. Nastavenia zvuku pre Skype Ad c) Rozšírená konfigurácia - po kliknutí sa zobrazia nastavenia pre Rozlíšenie displeja zo systému Windows. Rozlíšenie displeja v systéme Windows 10...
  • Page 122 USB 3.0 USB-C/TB3, 3x 4K Docking Station+ VESA+PD 70W Teraz je možné vykonať nastavenia Extend (Rozšíriť) a Mirror/Duplicate (Zrkadliť): • Režim rozšírenia: na obrazovke vyberte Viac monitorov → Rozšíriť toto zobrazenie → OK. • Režim zrkadlenia: na obrazovke vyberte Multi Monitor → Duplikovať tento pohľad na 2 a 3 →...
  • Page 123 USB 3.0 USB-C/TB3, 3x 4K Docking Station+ VESA+PD 70W Režim zrkadlenia - prídavný monitor sa riadi parametrami pôvodného monitora v systéme, t. j. ak nastavíte režim zrkadlenia a pôvodný monitor má rozlíšenie 1280x1024, potom sa obrazovka prenesie na prídavný monitor s maximálnym rozlíšením 1280x1024, aj keď...
  • Page 124 USB 3.0 USB-C/TB3, 3x 4K Docking Station+ VESA+PD 70W ODINŠTALOVANIE OVLÁDAČOV Predvolene postupujte podľa Ovládací panel → Všetky položky Ovládacieho panela → Programy a funkcie → Odinštalovať: DisplayLink Core Software pre ovládače videa. Potvrďte možnosti ponúkané počas procesu odinštalovania. Odinštalovanie ovládačov POUŽÍVANIE DOKU V SYSTÉME MACOS Keď...
  • Page 125 USB 3.0 USB-C/TB3, 3x 4K Docking Station+ VESA+PD 70W Na karte Usporiadanie a v predvolenom režime (Rozbaliť) kliknite na nový monitor a podľa potreby ho potiahnite vzhľadom na monitor Mac. Keď vyberiete možnosť Zrkadliť monitory, režim sa zmení na Zrkadlenie (rozlíšenie monitorov sa automaticky prispôsobí...
  • Page 126 USB 3.0 USB-C/TB3, 3x 4K Docking Station+ VESA+PD 70W Režim zrkadlenia: Možno ho použiť len vtedy, ak ho ponúka počítač Mac. Výberom položky Gather Windows môžete vybrať nastavenia pre príslušný monitor - Customized Resolution (ponúka použiteľné rozlíšenia), Rotation (Standard, 90°, 180° a 270°) a Refresh Rate (ak je k dispozícii). V závislosti od používaného monitora sú...
  • Page 127 USB 3.0 USB-C/TB3, 3x 4K Docking Station+ VESA+PD 70W Možnosť zobrazenia 2 V prispôsobenom režime kliknite na vybranú ikonu, rozlíšenie bude popísané pod obrazovkou. (tu 3008x1692 = 4K@30Hz) Režim zatvoreného displeja - práca na pripojenom externom monitore pri naklonenom monitore Macu je možná len vtedy, keď je Mac napájaný a je pripojená...
  • Page 128: Bezpečnostné Pokyny

    V súčinnosti so servisným oddelením: • Overte funkčnosť po páde do vody alebo na zem. • Overte funkčnosť pri prasknutí krytu. • Reklamujte zariadenie nefungujúce podľa manuálu. ČASTO KLADENÉ OTÁZKY K dispozícii na našom webe www.i-tec.pro v záložke „FAQ“ pri tomto produkte.
  • Page 129: Terminų Žodynėlis

    USB 3.0 USB-C/TB3, 3x 4K Docking Station+ VESA+PD 70W TERMINŲ ŽODYNĖLIS Sąsaja / prievadas / jungtis / įvestis / lizdas - vieta, kurioje fiziškai sujungiami du įrenginiai. Valdiklis - puslaidininkinis komponentas (vadinamas mikroschemų rinkiniu) nešiojamajame kompiuteryje ir (arba) planšetiniame kompiuteryje, kuris užtikrina prievado veikimą.
  • Page 130 Gaminio matmenys: 191 x 85 x 31 mm • Produkto svoris: 341 g 5K raiška palaiko tik „Windows Išorinis energijos šaltinis, skirtas naudoti tik CATRIPLEDOCKPDPRO. APRAŠYMAS Priekinis skydelis: 2 kartos USB 3.1 prievadas, prie kurio galima prijungti turimus USB 3.1/3.0/2.0 įrenginius ir perduoti duomenis (10 Gb/s), palaikyti „USB Hot Swapping“...
  • Page 131: Sistemos Reikalavimai

    USB 3.0 USB-C/TB3, 3x 4K Docking Station+ VESA+PD 70W Galinis skydelis: Maitinimo įvestis - išorinis maitinimo adapteris (išvestis: DC 24V/4A) Ethernet GLAN RJ-45 prievadas, skirtas didelės spartos tinklui ir interneto prieigai per Gigabit Ethernet, palaiko 10/100/1000 Mbps greitį USB-C 3.0 prievadas USB-C įrenginiams prijungti, jis skirtas tik duomenų perdavimui (5 Gb/s) 10.
  • Page 132 įdiegti tik prieš naudojant pirmą kartą. Prieš diegdami įsitikinkite, kad sistemoje įdiegtos naujausios įrenginio tvarkyklės ir atnaujinta BIOS. „Windows 7 / 8 / 8.1“ tvarkykles parsisiųskite iš mūsų svetainės www.i-tec.pro šio gaminio skirtuke „Atsisiųsti“. Pradėkite diegimą iš atsisiųsto failo, pasirinkite diegimo kalbą...
  • Page 133 Tokiu atveju atjunkite prijungimo stotelę, pašalinkite esamas tvarkykles (žr. skyrių „Vairuotojų pašalinimas“) ir iš naujo įdiekite naujausias tvarkykles, kurias galite atsisiųsti mūsų svetainėje www.i-tec.pro, šio gaminio skirtuke „Atsisiuntimas“. Tada vėl prijunkite doko stotį prie nešiojamojo kompiuterio / planšetinio kompiuterio. Iškilus problemoms, galite susisiekti su mūsų...
  • Page 134 USB 3.0 USB-C/TB3, 3x 4K Docking Station+ VESA+PD 70W Kitą galą įkiškite į laisvą „MacBook“ USB 3.0 / USB-C prievadą. Tada prasidės automatinis prievadų diegimas. Baigę diegimą, iš naujo paleiskite „MacBook“. Įdiegti prievadai rodomi „macOS X“ sistemoje kaip „USB-C Triple-4K Dock“ skyrelyje „About this Mac“...
  • Page 135 USB 3.0 USB-C/TB3, 3x 4K Docking Station+ VESA+PD 70W b) Vienu metu prijunkite vieną 5K ir vieną 4K monitorių (1x HDMI 4K 3840x2160@30Hz ir 1x „Display Port“ 5K monitorių 5120x2880@60Hz). Norėdami pasiekti 5K raišką, turite prijungti DP monitorių dviem DP kabeliais, nes kompiuterio vaizdo plokštė...
  • Page 136 USB 3.0 USB-C/TB3, 3x 4K Docking Station+ VESA+PD 70W Ad a) „DisplayLink Manager“ - pasirinkus, bus rodoma įdiegta programinės Įdiegtos programinės įrangos versija Ad b) Garso nustatymai - leidžia nustatyti garsą (nustatymai panašūs į Valdymo skydas → Garsas). Naudojimui pasirinkite 2 kanalų ausines ir mikrofoną su 3,5 mm lizdu.
  • Page 137 USB 3.0 USB-C/TB3, 3x 4K Docking Station+ VESA+PD 70W Ad c) Išplėstinė konfigūracija - spustelėkite , kad būtų rodomi „Windows“ ekrano skiriamosios gebos nustatymai. Ekrano skiriamoji geba sistemoje „Windows 10 Dabar galima atlikti nustatymus Extend (Išplėsti) ir Mirror/Duplicate (Veidrodis): • Išplėtimo režimas: ekrane pasirinkite Keli monitoriai →...
  • Page 138 USB 3.0 USB-C/TB3, 3x 4K Docking Station+ VESA+PD 70W Budėjimo / užmigdymo režimas ir vaizdo prievadas - įjungus nešiojamąjį kompiuterį / planšetinį kompiuterį iš budėjimo / užmigdymo režimo, rodomas pagrindinis (originalus) monitorius, todėl rekomenduojame naudoti su nešiojamuoju kompiuteriu / planšetiniu kompiuteriu integruotą monitorių kaip pagrindinį...
  • Page 139 USB 3.0 USB-C/TB3, 3x 4K Docking Station+ VESA+PD 70W VALDIKLIŲ IŠINSTALIAVIMAS Standartiškai eikite per Valdymo paneliai → Visos eilutės Valdymo paneliai → Programos ir funkcijos → Pašalinti: DisplayLink Core Software programinė įranga vaizdo įrašų valdikliams. Išinstaliavimo metu patvirtinkite siūlomas parinktis. Valdiklių...
  • Page 140 USB 3.0 USB-C/TB3, 3x 4K Docking Station+ VESA+PD 70W Kortelėje „Išdėstymas“, pasirinkę numatytąjį režimą („Išskleisti“), spustelėkite naująjį monitorių ir vilkite jį, kaip reikia, „Mac“ monitoriaus atžvilgiu. Pasirinkus Mirror Monitors (veidrodiniai monitoriai), režimas pasikeičia į Mirror (veidrodinis) (monitorių skiriamoji geba automatiškai pritaikoma pagal jų parametrus, nustatant didžiausią...
  • Page 141 USB 3.0 USB-C/TB3, 3x 4K Docking Station+ VESA+PD 70W Veidrodinis režimas: gali būti naudojamas tik tada, kai jį siūlo „Mac“. Paspauskite ties Surinkti langus: su šia komanda galite pasirinkti atitinkamo monitoriaus nustatymą – Pritaikyta raiška (siūlo naudotinas raiškas), Pasukimas (Standartinis, 90°, 180° ir 270°) ir Atnaujinimo dažnis (jeigu yra siūloma). Pagal naudojamą...
  • Page 142: Kitos Funkcijos

    USB 3.0 USB-C/TB3, 3x 4K Docking Station+ VESA+PD 70W Vaizdo variantas 2 Pritaikytame režime paspauskite ties pasirinkta piktograma, po ekranu bus nurodoma raiška (čia 3008x1692 = 4K@30Hz) Uždaras ekrano režimas - dirbti prijungtame išoriniame monitoriuje, kai „Mac“ monitorius pakreiptas, galima tik tada, kai „Mac“ įjungtas, o pelė ir klaviatūra prijungtos.
  • Page 143 Bendradarbiaudami su servisu: • Patikrinkite veikimą po įkritimo į vandenį arba nukritimo ant žemės. • Įskilus dangčiui patikrinkite veikimą. • Jeigu įrenginys neveikia pateikite pretenzijas vadovaudamiesi įrenginio vadovu. DAŽNAI UŽDUODAMI KLAUSIMAI Rasite mūsų svetainėje: www.i-tec.pro skiltyje „FAQ“ prie šio produkto.
  • Page 144: Specificaties

    Audio – aanduiding voor geluidsapparatuur, zowel ingang (microfoon) als • uitgang (koptelefoon / luidsprekers). De externe voedingsbron uitsluitend voor het gebruik ten behoeve van CATRIPLEDOCKPDPRO. SPECIFICATIES • 1x USB-C-poort voor aansluiting op USB-C- of USB-A-apparaten (USB-C- kabel en USB-C-naar-USB 3.0-adapter meegeleverd) •...
  • Page 145 USB 3.0 USB-C/TB3, 3x 4K Docking Station+ VESA+PD 70W 3 monitoren - 1x Weergavepoort/HDMI 1/2+ 1x Weergavepoort/ HDMI 1/2+ 1x HDMI 3 → tot 2x 4K/60Hz + 4K/30Hz • 1x USB-C poort gen. 1 (alleen gegevens) • 1x USB-C poort gen. 2 (alleen gegevens) met ondersteuning voor snel opladen (BC 1.2) •...
  • Page 146 USB 3.0 USB-C/TB3, 3x 4K Docking Station+ VESA+PD 70W Achterpaneel: Stroomvoorziening - externe stroomadapter (uitgang: DC 24V/4A) Ethernet GLAN RJ-45-poort voor hogesnelheidsnetwerk en internettoegang via Gigabit Ethernet, ondersteunt 10/100/1000 Mbps-snelheden USB-C 3.0-poort voor het aansluiten van uw USB-C-apparaten, deze is alleen voor gegevensoverdracht (5 Gbps) 10.
  • Page 147 BIOS op uw systeem hebt geïnstalleerd voordat u met de installatie begint. Voor Windows 7 / 8 / 8.1, download de drivers van onze website www.i-tec.cz onder het tabblad “Download” voor dit product. Start de installatie vanuit het gedownloade bestand, selecteer de installatietaal en volg de instructies op het scherm.
  • Page 148 (zie de sectie “Drivers verwijderen”) en installeert u de nieuwste drivers opnieuw, die u kunt downloaden op onze website www.i-tec.pro onder het tabblad “Download” voor dit product. Sluit vervolgens het docking station weer aan op de laptop/tablet. In geval van problemen kunt u contact opnemen met onze technische ondersteuning: support@itecproduct.com.
  • Page 149 Voor Android, Chrome OS en Ubuntu gebruikt u de stuurprogramma’s van de fabrikant van de DisplayLink-chipset. Deze kunnen worden gedownload op onze website www.i-tec.cz onder het tabblad “Download” voor dit product of hier: http://www.displaylink.com/downloads. HDMI / DISPLAY PORT MONITOR AANSLUITING Gebruik een HDMI / DP kabel om de monitor aan te sluiten op het docking station.
  • Page 150 USB 3.0 USB-C/TB3, 3x 4K Docking Station+ VESA+PD 70W GEBRUIK VAN HET DOCKING STATION IN WINDOWS Klik in de verborgen pictogrammen op de startbalk op het pictogram Netwerkverbinding-DisplayLink: Hier kunt u dan kiezen: a) DisplayLink-manager b) Audio-instellingen. c) Geavanceerde configuratie Opties voor het bedienen van de monitor terwijl het dock is aangesloten Ad a) DisplayLink Manager - als u deze optie selecteert, wordt de geïnstalleerde versie van de software weergegeven.
  • Page 151: Audio-Instellingen

    USB 3.0 USB-C/TB3, 3x 4K Docking Station+ VESA+PD 70W Ad b) Geluidsinstellingen - hiermee kunt u de geluidsinstellingen aanpassen (instellingen zijn vergelijkbaar met Configuratiescherm → Geluid). Voor gebruik, kies een 2-kanaals hoofdtelefoon en een microfoon met een 3,5 mm aansluiting. In audio-apparaten, stel “USB Audio”...
  • Page 152 USB 3.0 USB-C/TB3, 3x 4K Docking Station+ VESA+PD 70W Ad c) Geavanceerde Configuratie - indien aangeklikt, worden de instellingen voor Beeldschermresolutie van Windows weergegeven. Beeldschermresolutie in Windows 10 U kunt nu de instellingen voor Uitbreiden en Spiegelen/Dupliceren maken: • Modus uitbreiden: op het scherm, selecteer Meerdere monitors → Deze weergave uitbreiden →...
  • Page 153 USB 3.0 USB-C/TB3, 3x 4K Docking Station+ VESA+PD 70W Vink het vakje “Deze monitor als hoofdmonitor instellen” aan om de extra monitor als hoofdmonitor te selecteren. Klik en versleep de tweede monitor om deze naar wens te positioneren ten opzichte van de oorspronkelijke monitor van uw laptop/tablet. Plaatsing van een extra monitor ten opzichte van de oorspronkelijke laptop/tablet-monitor Stand-by / slaapstand en videopoort - wanneer u uw laptop/tablet vanuit stand-by /...
  • Page 154 USB 3.0 USB-C/TB3, 3x 4K Docking Station+ VESA+PD 70W U kunt de monitoren ook gemakkelijk bedienen met de toetsenbordoptie “Windows” + P (deze sneltoets werkt alleen vanaf Windows 7). Om de monitor in Windows 7 te gebruiken, zijn er opties voor Alleen computer, Dupliceren, Verlengen en Alleen projector.
  • Page 155 USB 3.0 USB-C/TB3, 3x 4K Docking Station+ VESA+PD 70W Stuurprogramma’s verwijderen GEBRUIK VAN HET DOCKING STATION IN MACOS Wanneer u uw monitor aansluit, zal het scherm van uw Mac flikkeren, wat een standaardconditie is. Als het eenmaal gestabiliseerd is, kunt u hier instellingen maken: Systeem Voorkeuren-Monitors:...
  • Page 156 USB 3.0 USB-C/TB3, 3x 4K Docking Station+ VESA+PD 70W Klik onder het tabblad Opstelling en in de standaardmodus (Uitvouwen) op de nieuwe monitor en versleep deze naar wens ten opzichte van de Mac-monitor. Wanneer u Mirror Monitors selecteert, verandert de modus in Mirror (de resolutie van de monitoren wordt automatisch aangepast aan hun parameters, waarbij op beide monitoren de hoogst mogelijke resolutie wordt ingesteld).
  • Page 157 USB 3.0 USB-C/TB3, 3x 4K Docking Station+ VESA+PD 70W Spiegelmodus: kan alleen worden gebruikt als deze door een Mac wordt aangeboden. U kunt de instellingen voor de betreffende monitor kiezen - Aangepaste resolutie (biedt bruikbare resoluties), Rotatie (Standaard, 90°, 180° en 270°), en Vernieuwingsfrequentie (indien aangeboden) door Windows Gather te selecteren.
  • Page 158 USB 3.0 USB-C/TB3, 3x 4K Docking Station+ VESA+PD 70W Weergave Optie 2 In Aangepaste modus, klik op het icoon van uw keuze, de resolutie zal onder het scherm beschreven worden (hier 3008x1692 = 4K@30Hz) Gesloten beeldschermmodus - werken op een aangesloten extern beeldscherm wanneer het beeldscherm van de Mac is gekanteld, is alleen mogelijk als de Mac is ingeschakeld en de muis en het toetsenbord zijn aangesloten.
  • Page 159: Andere Functies

    Controleer de functionaliteit nadat de apparatuur in het water of op de grond is gevallen. • Controleer de functionaliteit als de behuizing beschadigd werd. • Reclameer apparatuur die niet volgens de handleiding werkt. VEELGESTELDE VRAGEN Beschikbaar op onze website www.i-tec.pro op het tabblad “FAQ” bij dit product.
  • Page 160 EUROPEAN UNION ONLY NOTE: MARKING IS IN COMPLIANCE WITH EU WEEE DIRECTIVE ENGLISH This equipment is marked with the above recycling symbol. It means that at the end of the life of the equipment you must dispose of it separately at an appropriate collection point and not place it in the normal domestic unsorted waste stream.
  • Page 161 ČEŠTINA Toto zařízení je označeno výše uvedeným recyklačním symbolem. To znamená, že na konci doby života zařízení musíte zajistit, aby bylo uloženo odděleně na sběrném místě, zřízeném pro tento účel a ne na místech určených pro ukládání běžného netříděného komunálního odpadu. Přispěje to ke zlepšení stavu životního prostředí...
  • Page 162 šiuo pareiškia, kad gaminys / verklaart hierbij dat het product Product, Bezeichnung, Le prénom, Producto, Prodotto, Název, Názov, Nazwa, Gaminys, Naam: i-tec USB 3.0 USB-C/TB3, 3x 4K Docking Station+ VESA+Power Delivery 70W Model, Modell, Modèle, Modelo, Modello, Model, Model, Model, Modelis, Model CATRIPLEDOCKPDPRO Determination, Bestimmung, La détermination, Determinación, Determinazione,...
  • Page 163 EC Directive 2014/30/EU, 2014/35/EU, 2011/65/EU and 2009/125/ES EMS (For EMC, Für EMC, Pour la CEM, Para EMC, Per la compatibilità elettromagnetica, Pro EMC, Pre EMC, Dla Kompatybilności elektromagnetycznej, Skirtas EMC, Voor EMC): EN 55032:2015+A11:2020, EN 55035:2017 For Electrical Safety, Für die elektrische Sicherheit, Pour la sécurité électrique, Para la se- guridad eléctrica, Per la sicurezza elettrica, Pro Elektrickou bezpečnost, pre Elektrickú...
  • Page 164: Fcc Compliance Statement

    This equipment has been tested and found to comply within the limits of a Class B digital device pursuant to Part 15 of the FCC Rules. These limits are designed to provide reasonable protection against harmful interference in a residential installation. www.i-tec.pro/en...

Table des Matières