
Manuels Connexes pour Handicare SIMPLICITY Série


Sommaire des Matières pour Handicare SIMPLICITY Série
- Page 1 USER MANUAL, HANDBUCH, GUIDE DE L UTILISATEUR MANUAL DEL USUARIO, MANUALE UTENTE SIMPLICITY SERIES MINIVATOR 1000 MINIVATOR 2000 MANUUML...
-
Page 2: Table Des Matières
Folding your stairlift ......Please contact your Handicare dealer or our Slide Track Customer Service Department in the United . -
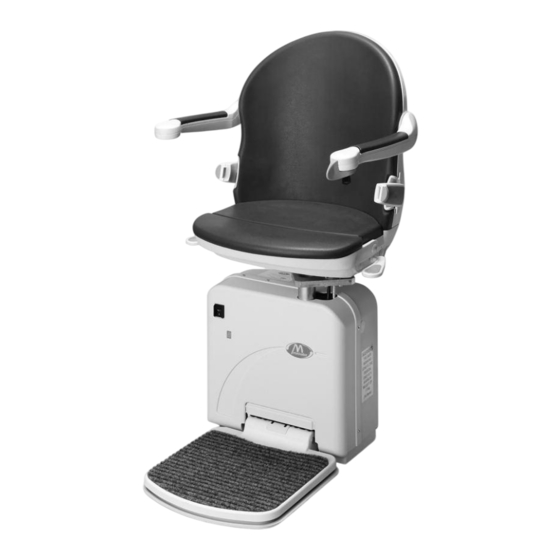
Page 3: Features Of Your Minivator Stairlift
Features of your Minivator stairlift Folding seat base Simple to operate key switch control Swivel seat Folding armrests Infrared remote control Diagnostic display Folding footrest with safety edges USER MANUAL 3... -
Page 4: Operating Your Minivator Stairlift
Operating your Minivator stairlift Figure 1 Figure 2 Before use On/off switch Before using your stairlift, MOST IMPORTANTLY As well as a key switch your stairlift is fitted with please ensure the stairs are clear of other people, an on/off switch Figure 2). This switch is either pets or any objects which may obstruct your located on the lower front panel of the lift or on stairlift. -
Page 5: Key Switch
Operating your Minivator stairlift Figure 3 Figure 4 Key switch Operating toggle Your Minivator stairlift is fitted with a key switch Your Minivator stairlift is operated by simply Figure 3). The stairlift cannot be operated pressing and holding the operating toggle in unless the key is inserted and turned to the the direction you wish to travel Figure 4). -
Page 6: Remote Control
Operating your Minivator stairlift Figure 5 Figure 6 Remote control Diagnostic display The remote control Figure 5) is used to call The stairlift is fitted with a diagnostic display the lift to either the top/bottom of the stairs or Figure 6) that displays a code to help diagnose to operate a powered folding hinge where fitted. -
Page 7: Operating The Swivel
Operating your Minivator stairlift Operating the swivel A swivel seat is provided to enable you to mount/dismount the seat more easily at the top of the stairs by swivelling you on to the landing. To operate the seat swivel, wait until the stairlift has stopped. -
Page 8: Folding Your Stairlift
Operating your Minivator stairlift Figure 8 Figure 9 Folding your stairlift Your Minivator stairlift seat, armrests and footrest Power footplate – can be folded to allow easier passage up and arm switch operated optional) down stairs when it is not in use Figure 8). If your stairlift is fitted with a power footplate operated from the arm it will have an additional SAFETY PRECAUTION... -
Page 9: Slide Track
Operating your Minivator stairlift Minivator Slide Track or Hinged track In some installations a hinged track or Minivator Slide Track may be necessary, usually to move the track out of the way of the doorway at the foot of the stairs. The Minivator powered hinged track and Slide Track are fully automatic in operation and will function as follows:... -
Page 10: Hinged Track (Powered)
Operating your Minivator stairlift Locking bolt Figure 11 Figure 12 Minivator Slide Track Hinged track optional) – ontinued powered optional) Emergency Manual Override Going up the stairs Your Slide Track is fitted with a manual override Mount the stairlift as previously directed and that allows the track to be moved in case of an push the operating toggle in the up direction. -
Page 11: Hinged Track (Manual)
Operating your Minivator stairlift Figure 13 Figure 14 At this time the seat will beep three times Hinged track whilst the hinge track automatically folds open manual optional) Figure 13). When the hinge is fully open the stairlift will continue to the bottom of the stairs. Before raising the manual hinged track park the Parking the Stairlift stairlift on the charge points, above the hinge,... -
Page 12: Emergency Hand Winding Instructions
4 When the desired position is reached remove the hand winder and switch the lift on. If in any doubt contact your local Handicare approved dealer or ring Handicare direct on +44 0) 8700 118282. 12 USER MANUAL... -
Page 13: Safety And Servicing
This work must be carried out by a competent person, i.e. a Handicare approved dealer. If in doubt, please contact the Handicare Service Department on +44 (0) 8700 118282. If you own your stairlift and no longer require it your dealer or Handicare may be interested in purchasing it. Warnings and precautions... -
Page 14: Routine Care And Maintenance
If it is switched on and the beeping continues engineers. please contact your dealer or the Handicare Service Department on +44 (0) 8700 118282. Disposal WARNING... -
Page 16: Appendix 1
– if the ‘Okay code does dealer or Handicare. not show or the lift is already on the charge contacts check the power supply is on. Failing this contact your dealer or Handicare. Code: Meaning: Code: Meaning: Ends limit activated. - Page 17 Code: Meaning: Code: Meaning: Ends limit activated. Safety edge (up/down direction) Self help action: activated – footplate. Contact your dealer or Handicare. Self help action: Contact your dealer or Handicare. Code: Meaning: Code: Meaning: Batteries approaching Shows when toggle critical level.
- Page 18 Meaning: The main power relay The main power relay is welded closed. did not close. Self help action: Self help action: Contact your dealer or Handicare. Contact your dealer or Handicare. Code: Meaning: Code: Meaning: Brake semi-conductor Brake not connected.
- Page 19 Meaning: The main control board Powered swivel has a memory problem. did not respond. Self help action: Self help action: Contact your dealer or Handicare. Contact your dealer or Handicare. Code: Meaning: Code: Meaning: No charge current. Faulty power supply.
-
Page 20: Appendix 2
Appendix 2 – Wiring diagrams 20 USER MANUAL 20 USER MANUAL... - Page 21 Appendix 2 – Wiring diagrams USER MANUAL 21...
-
Page 22: Appendix 3
Electro Magnetic Compatibility Directive 2004/108/EC Low Voltage Directive – 2006/95/EC Machinery Directive – 2006/42/EC Signed: Name: G.M.Welch Date: Position: New Product Development Manager Technical documentation is available on request from Handicare at the address above. 22 USER MANUAL 22 USER MANUAL... -
Page 23: Installation Information
Installation information Important information about your stairlift which should be completed by the installation engineer. Installed by: (Company Name) Serial No: Date of installation: First service due: Dealer Stamp: USER MANUAL 23... - Page 24 Reinigung selber durchfuhren. Bedienung des Drehsitzes ....Bitte wenden Sie sich an Ihren Handicare- Zusammenklappen Ihres Treppenlifts ..Händler oder unsere Kundendienstabteilung im Vereinigten Königreich unter +44 (0) 8700...
-
Page 25: Merkmale Ihres Minivator-Treppenlifts
Merkmale Ihres Minivator-Treppenlifts Zusammenklappbare Sitzbasis Einfach zu bedienende Drehsitz Schlusselschalter-Steuerung Infrarot-Fernbedienung Zusammenklappbare Armlehne Zusammenklappbare Fußauflage Diagnoseanzeige mit Sicherheitskanten HANDBUCH 25... -
Page 26: Bedienung Ihres Minivator-Treppenlifts
Bedienung Ihres Minivator-Treppenlifts Abb. 1 Abb. 2 Vor Nutzung Ein/Aus-Schalter Vor Nutzung Ihres Treppenlifts ist am wichtigsten, Neben dem Schlusselschalter hat Ihr Treppenlift dass Sie sicherstellen, dass sich keine anderen auch einen Ein/Aus-Schalter Abb. 2). In Personen, Haustiere oder sonstigen Gegenstände Abhängigkeit von Ihrem Modell befindet sich auf der Treppe befinden, die den Treppenlift dieser Schalter entweder auf der unteren... -
Page 27: Schlusselschalter
Bedienung Ihres Minivator-Treppenlifts Abb. 3 Abb. 4 Schlusselschalter Bedienhebel Ihr Minivator-Treppenlift hat einen Schlusselschalter Ihr Minivator-Treppenlift wird einfach durch Abb. 3). Der Treppenlift kann nur betrieben Drucken und Halten des Bedienhebels in die werden, wenn sich der Schlusselschalter in der gewunschte Fahrtrichtung betrieben Abb. -
Page 28: Fernbedienung
Bedienung Ihres Minivator-Treppenlifts Abb. 5 Abb. 6 Fernbedienung Diagnoseanzeige Die Fernbedienung Abb. 5) wird zum Rufen des Der Treppenlift hat eine Diagnoseanzeige Lifts zum oberen/unteren Treppenende oder zum Abb. 6), die einen Fehlercode zur Hilfe bei der Betrieb eines angetriebenen Scharniers, sofern Fehlerdiagnose anzeigt. -
Page 29: Bedienung Des Drehsitzes
Bedienung Ihres Minivator-Treppenlifts Bedienung des Drehsitzes Der Drehsitz wird geboten, um Ihnen das Besteigen/Absteigen vom Sitz oben an der Treppen durch Drehen des Sitzes in den Flur zu erleichtern. Warten Sie vor Betrieb des Drehsitzes bis der Treppenlift zum Stillstand gekommen ist. Zum Drehen des Sitzes einen der Drehhebel (es befindet sich jeweils einer auf beiden Seiten des Sitzes) herunter drucken oder nach oben ziehen... -
Page 30: Zusammenklappen Ihres Treppenlifts
Bedienung Ihres Minivator-Treppenlifts Abb. 8 Abb. 9 Zusammenklappen Ihres Treppenlifts Sitz, Armlehnen und Fußauflage Ihres Minivator- Angetriebene Fußauflagen- Treppenlifts können zusammengeklappt werden, Verbindung – betrieben von Anlehne um einfachen Durchgang die Treppe herauf und optional) hinunter zu ermöglichen, wenn der Lift nicht Wenn Ihr Treppenlift mit einer angetriebenen, benutzt wird Abb. -
Page 31: Slide Track
Bedienung Ihres Minivator-Treppenlifts Minivator Slide Track oder Schiene mit Scharnier In einigen Fällen kann die Installation einer Schiene mit Scharnier oder des Minivator-Slide Tracks erforderlich sein. Dies geschieht gewöhnlich, um die Schiene unten an der Treppe aus dem Bereich einer Turöffnung zu entfernen. Die Schiene mit Scharnier oder der Slide Track von Minivator sind vollautomatisch und funktionieren wie folgt:... -
Page 32: Schiene Mit Scharnier Angetrieben)
Bedienung Ihres Minivator-Treppenlifts Klemmbolzen Abb. 11 Abb. 12 Minivator Slide Track Schiene mit Scharnier optional) – fortg s tzt angetrieben optional) Um fortzufahren den Knopf AUF wieder drucken Die Treppe hinauffahren und halten. Nach kurzer Verzögerung beginnen Besteigen Sie den Treppenlift wie zuvor die Bewegungen wieder. -
Page 33: Schiene Mit Scharnier Manuell)
Bedienung Ihres Minivator-Treppenlifts Abb. 13 Abb. 14 Der Sitz piept nun drei Mal während der WARNUNG klappbare Bereich sich automatisch ausklappt BITTE ENTFERNEN SIE ALLE HINDERNISSE, Abb. 13). Nachdem der klappbare Bereich DIE DIE BEWEGUNG DER SCHIENE vollständig verfahren wurde, fährt der Lift bis zum BEHINDERN KÖNNTEN, BEVOR SIE DEN unteren Treppenende weiter. -
Page 34: Anleitung Notfall-Handbetrieb
Bewegung angezeigte Richtung. 4 Nachdem die gewunschte Position erreicht wurde, den Drehknopf herausziehen und den Treppenlift wieder einschalten. Wenden Sie sich im Zweifelsfalle an Ihren örtlichen zugelassenen Händler oder direkt an Handicare unter +44 0) 8700 118282. 34 HANDBUCH... -
Page 35: Sicherheit Und Wartung
Diese Arbeiten mussen von einem Fachmann, d.h. von einem von Handicare zugelassenen Händler, ausgefuhrt werden. Im Zweifelsfalle wenden Sie sich bitte an die Kundendienstabteilung von Handicare unter +44 (0) 8700 118282. Wenn der Treppenlift Ihr Eigentum ist und Sie ihn nicht mehr benötigen, können Ihr Händler oder Handicare daran interessiert sein, ihn Ihnen abzukaufen. -
Page 36: Routinemäßige Pflege Und Wartung
Geräusche macht oder sich abnorm verhält. Materialien entsprechend gehandhabt werden. Wir empfehlen, dass Ihr Treppenlift nach den Bitte wenden Sie sich an Handicare unter +44 0) ersten 12 Monaten und danach MINDESTENS 8700 118282, Ihren Händler oder Ihre Gemeinde ALLE 12 MONATE gewartet wird. -
Page 38: Anhang 1
Ihrem Händler oder Handicare Kontakt aufnehmen. Code: Bedeutung: Code: Bedeutung: Endanschlag aktiviert. Sicherheitskante (Richtung hoch/runter) aktiviert – Selbsthilfemaßnahmen: Fußauflage. Mit Ihrem Händler oder Handicare Kontakt aufnehmen. Selbsthilfemaßnahmen: Mit Ihrem Händler oder Handicare Kontakt aufnehmen. 38 HANDBUCH... - Page 39 Anhang 1 Code: Bedeutung: Code: Bedeutung: Endanschlag aktiviert. Sicherheitskante (Richtung hoch/runter) aktiviert – Selbsthilfemaßnahmen: Fußauflage. Mit Ihrem Händler oder Handicare Kontakt aufnehmen. Selbsthilfemaßnahmen: Mit Ihrem Händler oder Handicare Kontakt aufnehmen. Code: Bedeutung: Code: Bedeutung: Batterien haben kritisches Wird angezeigt, wenn Niveau erreicht.
- Page 40 Anhang 1 Code: Bedeutung: Code: Bedeutung: Das Hauptspannungsrelais Das Hauptspannungsrelais ist verschweißt. hat nicht geschlossen. Selbsthilfemaßnahmen: Selbsthilfemaßnahmen: Mit Ihrem Händler oder Handicare Kontakt Mit Ihrem Händler oder Handicare Kontakt aufnehmen. aufnehmen. Code: Bedeutung: Code: Bedeutung: Bremsen-Halbleiter ausgefallen. Bremse nicht angeschlossen. Selbsthilfemaßnahmen: Selbsthilfemaßnahmen:...
- Page 41 Anhang 1 Code: Bedeutung: Code: Bedeutung: Speicherproblem auf der Angetriebener Drehstuhl Hauptsteuerplatine. spricht nicht an. Selbsthilfemaßnahmen: Selbsthilfemaßnahmen: Mit Ihrem Händler oder Handicare Kontakt Mit Ihrem Händler oder Handicare Kontakt aufnehmen. aufnehmen. Code: Bedeutung: Code: Bedeutung: Kein Ladestrom. Fehlerhafte Spannungsversorgung. Selbsthilfemaßnahmen: Stellen Sie sicher, dass die Selbsthilfemaßnahmen:...
-
Page 42: Anhang 2
Anhang 2 – Schaltpläne 42 HANDBUCH... - Page 43 Anhang 2 – Schaltpläne HANDBUCH 43...
-
Page 44: Anhang 3
Produkte, auf die sich diese Erklärung bezieht, mit den folgenden EG-Richtlinien ubereinstimmen: Richtlinie 2004/108/EG uber elektromagnetische Verträglichkeit Niederspannungsrichtlinie – 2006/95/EG Maschinenrichtlinie – 2006/42/EG Unterschrieben: Name: G.M.Welch Datum: Position: Manager Neuproduktentwicklung Technische Dokumentationen sind auf Anfrage bei Handicare unter der oben aufgefuhrten Adresse erhältlich. 44 HANDBUCH... -
Page 45: Installationsinformationen
Installationsinformationen Wichtige Informationen uber Ihren Treppenlift, die vom Installationstechniker ausgefullt werden mussen. Installiert durch: Unternehmensname) Seriennummer: Installationsdatum: Fälligkeitsdatum des ersten Service: Händlerstempel: HANDBUCH 45... - Page 46 Télécommande relatifs aux soins et à la maintenance. Handicare ......
-
Page 47: Caractéristiques De Votre Monte-Escalier Minivator
Caractéristiques de votre monte-escalier Minivator Siège escamotable Interrupteur à clé convivial Siège pivotant Accoudoirs pliants Télécommande à infrarouge Écran de dépannage Repose-pieds escamotable avec rives de sécurité GUIDE DE L UTILISATEUR 47... -
Page 48: Commande De Votre Monte-Escalier Minivator
Commande de votre monte-escalier Minivator Figure 1 Figure 2 Préparatifs avant Bouton Marche/Arrêt l emploi En sus d un interrupteur à clé, votre monte- escalier est également doté d un bouton Avant d utiliser votre monte-escalier, VEUILLEZ Marche/Arrêt (Figure 2). Selon votre modèle OBLIGATOIREMENT vous assurer que les particulier, ce bouton est situé... -
Page 49: Interrupteur À Clé
Commande de votre monte-escalier Minivator Figure 3 Figure 4 Interrupteur à clé Manette de commande Votre monte-escalier Minivator est muni d un interrupteur à clé Figure 3). Il ne peut Pour piloter votre monte-escalier Minivator, il fonctionner que si la clé est introduite et vous suffit d appuyer et de maintenir appuyée tournée à... -
Page 50: Télécommande
Commande de votre monte-escalier Minivator Figure 5 Figure 6 Télécommande Écran de diagnostic La télécommande (Figure 5) sert à appeler Votre monte-escalier est muni d un écran de l appareil en haut ou en bas de l escalier, ou à diagnostic (Figure 6) qui affiche un code pour commander un rail articulé... -
Page 51: Commande Du Siège Pivotant
Commande de votre monte-escalier Minivator Commande du siège pivotant Un siège pivotant est prévu pour vous aider à monter/descendre plus facilement sur le palier en haut de l escalier. Avant d actionner le pivot du siège, attendez l arrêt du monte-escalier. Pour pivoter le siège, il vous suffit d appuyer ou de lever (uniquement lever sur le modèle 950 Simplicity) l une ou l autre poignée (il y en a une de chaque côté... -
Page 52: Pliage De Votre Monte-Escalier
Commande de votre monte-escalier Minivator Figure 8 Figure 9 Pliage de votre monte-escalier Au repos, le siège de votre monte-escalier Liaison motorisée entre le repose- Minivator et le repose-pieds sont escamotables, pieds et l accoudoir (en option). ce qui facilite le passage dans l escalier Si votre monte-escalier est muni d une liaison (Figure 8). -
Page 53: Rail À Glissière Ou Rail Articulé Minivator
Commande de votre monte-escalier Minivator Rail à glissière ou Rail articulé Minivator Certaines situations peuvent nécessiter un rail articulé ou un rail à glissière Minivator, notamment pour tenir le rail à l écart d une porte située en bas de l escalier. Le rail articulé... -
Page 54: Rail Articulé (Électrique)
Commande de votre monte-escalier Minivator Locking bolt Figure 11 Figure 12 Rail à glissière Rail articulé Minivator électrique (en option) (en option) – suite Pour monter Asseyez-vous dans le monte-escalier comme à glissière s arrêteront dès que vous lâcherez le indiqué... -
Page 55: Rail Articulé (Manuel)
Commande de votre monte-escalier Minivator Figure 13 Figure 14 il s arrête – CONTINUEZ D AGIR SUR LA AVERTISSEMENT MANETTE DE COMMANDE DANS LE SENS AVANT DE PILOTER LE RAIL ARTICULÉ, DE LA DESCENTE. VEILLEZ À ENLEVER TOUT OBSTACLE Le siège émet alors 3 bips sonores tandis ÉVENTUELLEMENT PRÉSENT SUR LE que le rail articulé... -
Page 56: Soins Et Maintenance Périodiques
4 Une fois la position désirée obtenue, enlevez la poignée, et allumez le monte-escalier. En cas de doute quelconque, contactez votre revendeur Handicare agréé, ou appelez directement Handicare au +44 (0) 8700 118282. 56 GUIDE DE L UTILISATEUR... -
Page 57: Sécurité Et Révision
La révision sera obligatoirement réalisée par une personne compétente, par ex. un revendeur Handicare agréé. En cas de doute, merci de contacter le service Handicare au +44 (0) 8700 118282. Vous êtes propriétaire d un monte-escalier et souhaitez vous en séparer ? Contactez votre revendeur ou la société... -
Page 58: Soins Et Maintenance Périodiques
S il est allumé et que le monte-escalier continue d émettre des bips sonores, veuillez contacter votre Enlèvement de votre revendeur ou le service Handicare au +44 (0) 8700 118282. monte-escalier AVERTISSEMENT Votre monte-escalier est fabriqué... -
Page 60: Appendice 1
OK ne s affiche pas ou si le monte-escalier est société Handicare. déjà sur un plot de recharge, vérifiez que le courant secteur est bien allumé. Dans le cas contraire, contactez votre revendeur ou la société Handicare. Code: Description: Code: Description: Déclenchement d un... - Page 61 Les batteries de votre monte-escalier ont besoin Mesure autocorrectrice: d être rechargées. Déplacez le monte-escalier s.o. jusqu aux plots de recharge – si le code OK ne s affiche pas, contactez votre revendeur ou la société Handicare Code: Description: Code: Description: Indique le déclenchement Le rail articulé...
- Page 62 Code: Description: Code: Description: Limite de courant Mi-vitesse. dépassée. Mesure autocorrectrice: Mesure autocorrectrice: S il s agit d un contact continu, contactez votre Contactez votre revendeur ou la société revendeur ou la société Handicare. Handicare. 62 GUIDE DE L UTILISATEUR...
- Page 63 Mesure autocorrectrice: Assurez-vous que le courant secteur est bien Mesure autocorrectrice: allumé. S il est allumé, contactez votre Contactez votre revendeur ou la société revendeur ou la société Handicare. Handicare. Code: Description: Code: Description: Défaut logiciel sur la carte s.o.
-
Page 64: Appendice 2
Appendice 2 – Schémas de câblage 64 GUIDE DE L UTILISATEUR... - Page 65 Appendice 2 – Schémas de câblage GUIDE DE L UTILISATEUR 65...
-
Page 66: Appendice 3
Appendice 3 – Certificat de conformité Nous Handicare 82 First Avenue, Pensnett Estate, Kingswinford West Midlands DY6 7FJ, Angleterre. Déclarons sous notre seule responsabilité que les produits Monte-escaliers de la gamme Minivator Simplicity 950 Minivator 1000 et Minivator 2000 ont été fabriqués conformément aux normes et spécifications ci-après:... -
Page 67: Informations Relatives À L Installation
Informations relatives à l installation Informations importantes sur votre monte-escalier, à remplir par l installateur. Installé par: (Nom de la société) No de série: Date d installation: Date de la première révision: Timbre du revendeur: GUIDE DE L UTILISATEUR 67... - Page 68 Plegar su silla elevadora ....de Handicare o nuestro Departamento de Riel de deslizamiento .....
-
Page 69: Características De Su Silla Elevadora Minivator
Características de su silla elevadora Minivator Plegado de la base de su asiento Control de llave de contacto fácil de operar Giro del asiento Apoyabrazos plegables Control a distancia infrarrojo Visualización de diagnóstico Plegado del reposapiés con bordes de seguridad MANUAL DEL USUARIO 69... -
Page 70: Operación De Su Silla Elevadora Minivator
Operación de su silla elevadora Minivator Figura 1 Figura 2 Antes de usar Interruptor on/off Antes de usar su silla elevadoras, LO MÁS Además de una llave de contacto, su silla IMPORTANTE, es asegurarse de que las elevadora dispone de un interruptor on/off escaleras están despejadas de gente, animales Figura 2) . -
Page 71: Llave De Contacto
Operación de su silla elevadora Minivator Figura 3 Figura 4 Llave de contacto Palanca de operación Su silla elevadora Minivator viene con una llave de contacto instalada Figura 3). La silla elevadora Su silla elevadora Minivator funciona con sólo no funcionará a menos que se meta la llave y se apretar y mantener apretada la palanca de ponga en la posición de encendida on). -
Page 72: Control A Distancia
Operación de su silla elevadora Minivator Figura 5 Figura 6 Control a distancia Visualización de diagnóstico El mando de control a distancia Figura 5) se utiliza para llamar a la silla elevadora bien hacia La silla elevadora ha sido instalada con una arriba o hacia abajo de las escaleras o para visualización de diagnóstico Figura 6) que operar una bisagra de plegamiento automática... -
Page 73: Operar El Giro
Operación de su silla elevadora Minivator Operar el giro Se proporciona un asiento de giro para que pueda subirse y bajarse del asiento con más facilidad, arriba de las escaleras, girándolo hacia el rellano. Para operar el giro del asiento, espere hasta que la silla elevadora se haya parado. -
Page 74: Plegar Su Silla Elevadora
Operación de su silla elevadora Minivator Figura 8 Figura 9 Plegar su silla elevadora El reposapiés, el apoyabrazos y el asiento de su Enlace del reposapiés automático – silla elevadora Minivator se pueden plegar para operado por el brazo opcional) hacer más fácil el pasaje hacia arriba y hacia Si su silla elevadora tiene instalado un enlace abajo de las escaleras cuando no esté... -
Page 75: Riel De Deslizamiento
Operación de su silla elevadora Minivator Riel de bisagra o riel de deslizamiento Minivator En ciertas instalaciones puede que sea necesario un Riel de bisagra o un riel de deslizamiento Minivator, normalmente para despejar el riel de la puerta al pie de las escaleras. El riel de deslizamiento y el riel de bisagra automática de Minivator tienen una operación totalmente automatizada y funcionan de la... -
Page 76: Riel De Bisagra Automático)
Operación de su silla elevadora Minivator pernos de fijación Figura 11 Figura 12 Riel de deslizamiento Riel de bisagra Minivator automático opcional) opcional) – continu ción Desplazarse hacia arriba de las escaleras Monte la silla elevadora como se ha indicado moverse. -
Page 77: Riel De Bisagra Manual)
Operación de su silla elevadora Minivator Figura 13 Figura 14 En este punto el asiento emitirá un pitido tres AVISO veces mientras el riel de bisagra se despliega ANTES DE OPERAR EL RIEL DE BISAGRA automáticamente por si solo Figura 13). Cuando QUITE CUALQUIER OBSTÁCULO QUE la bisagra esté... -
Page 78: Instrucciones Para El Rebobinado Manual De Emergencia
4 Cuando haya alcanzado la posición deseada quite el rebobinador de mano y encienda la silla elevadora. Si tiene alguna duda póngase en contacto con su distribuidor autorizado local de Handicare o llama directamente a Handicare al +44 0) 8700 118282. 78 MANUAL DEL USUARIO... -
Page 79: Seguridad Y Mantenimiento
Si tiene alguna duda, póngase en contacto con el Departamento de Servicio de Handicare en el +44 (0) 8700 118282. Si usted posee su propia silla elevadora y ya no la necesita más su distribuidor de Handicare podría estar interesado en comprarla. -
Page 80: Mantenimiento Y Cuidado Rutinarios
Si se ha encendido y el pitido continúa, póngase en contacto con su distribuidor o con el Departamento silla elevadora de Servicio de Handicare en el +44 (0) 8700 118282. AVISO Su silla elevadora ha sido fabricada utilizando componentes y materiales de alta calidad, que Si va a dejar la silla desatendida durante se pueden reciclar y volver a usar. -
Page 82: Apéndice 1
Código: Significa: Código: Significa: Limites finales activados. Borde de seguridad (dirección arriba/abajo) Acción de auto ayuda: activado; reposapiés. Contacte con su distribuidor o con Handicare. Acción de auto ayuda: Contacte con su distribuidor o con Handicare. 82 MANUAL DEL USUARIO... - Page 83 Código: Significa: Limites finales activados. Borde de seguridad (dirección arriba/abajo) Acción de auto ayuda: activado; reposapiés. Contacte con su distribuidor o con Handicare. Acción de auto ayuda: Contacte con su distribuidor o con Handicare. Código: Significa: Código: Significa: El nivel de la batería se Muestra cuando el aproxima a nivel crítico.
- Page 84 Significa: Código: Significa: El relé principal está cerrado. El relé principal no se ha cerrado. Acción de auto ayuda: Contacte con su distribuidor o con Handicare. Acción de auto ayuda: Contacte con su distribuidor o Handicare. Código: Significa: Código: Significa: Semi-conductor de freno Freno no conectado.
- Page 85 Acción de auto ayuda: Asegúrese de que el suministro de potencia Acción de auto ayuda: está encendido en el suministro principal. Si Contacte con su distribuidor o Handicare. está, contacte con su distribuidor o Handicare. Código: Significa: Código: Significa: El panel principal de control Sobrecorriente.
-
Page 86: Apéndice 2
Apéndice 2 – Diagramas de cableado 86 MANUAL DEL USUARIO... - Page 87 Apéndice 2 – Diagramas de cableado MANUAL DEL USUARIO 87...
-
Page 88: Apéndice 3
Low Voltage Directive – 2006/95/EC directiva sobre voltaje reducido) Machinery Directive – 2006/42/EC directivas sobre maquinaria) Firmado: Nombre: G.M.Welch Fecha: Posición: Jefe de Desarrollo de Nuevos Productos Documentación técnica está a su disposición. Pidélo a Handicare en la dirección arriba indicada. 88 MANUAL DEL USUARIO... -
Page 89: Información De Instalación
Información de instalación Información importante sobre su silla elevadora que deberá ser completada por el técnico de instalación. Instalado por: Nombre de la compañía) Núm. de serie: Fecha de instalación: Primera revisión esperada: Sello del distribuidor: MANUAL DEL USUARIO 89... - Page 90 Operare il perno ......Handicare o il nostro dipartimento di assistenza Ripiegare il vostro montascale clienti nel Regno Unito al numero +44 (0) 8700 .
-
Page 91: Caratteristiche Del Vostro Montascale Minivator
Caratteristiche del vostro montascale Minivator Sedile pieghevole Interrutore chiave di controllo facile da operare Sedile girevole Braccioli pieghevoli Controllo a distanza infrarosso Display diagnostico Poggiapiedi pieghevole con bordi di sicurezza MANUALE UTENTE 91... -
Page 92: Operare Il Vostro Montascale
Operare il vostro montascale Minivator Figura 1 Figura 2 Prima dell uso Interruttore on/off Prima di usare il vostro montascale, LA COSA Oltre all interruttore a chiave il vostro montascale PIU IMPORTANTE é che vi assicuriate che é dotato di un interruttore on/off (Figura 2) . le scale sono libere da altre persone, animali Questo interruttore é... -
Page 93: Interruttore Chiave
Operare il vostro montascale Minivator Figura 3 Figura 4 Interruttore chiave Leva operativa Il vostro montascale Minivator é dotato di una Il vostro montascale Minivator si opera chiave Figura 3). Il montascale non puó essere semplicemente pressando e tenendo premuto operato a meno che la chiave sia inserita e messa la leva operativa nella direzione che desiderate in posizione on. -
Page 94: Controllo A Distanza
Operare il vostro montascale Minivator Figura 5 Figura 6 Controllo a distanza Display diagnostico Il controllo a distanza (Figura 5) é usato per Il montascale é provvisto di un display diagnostico chiamare l ascensore sia dall cima che dal fondo (Figura 6) che mostra un codice per aiutare a delle scale o per operare una cerniera pieghevole diagnosticare guasti. -
Page 95: Operare Il Perno
Operare il vostro montascale Minivator Operare il perno Un sedile a perno é fornito per permettrvi di salire/scendere dal sedile piú facilmente in cima alle scale girandovi sul pianerottolo. Per operare il perno del sedile, aspettate che il montascale si sia fermato. Per girare il sedile tenete qualsiasi(ce ne una in ogni lato del sedile) leva del perno verso il basso o l alto (verso l alto solo per il modello Semplicity 950). -
Page 96: Ripiegare Il Vostro Montascale
Operare il vostro montascale Minivator Figura 8 Figura 9 Ripiegare il vostro montascale Il sedile, braccioli e poggiapiedi del vostro Piattaforma di collegamento montascale Minivator possono essere ripiegati potenziata – operata a braccio per permettere di andare su e giú per le scale piú (opzionale) facilmente quando non in uso (Figura 8) . -
Page 97: Slide Track
Operare il vostro montascale Minivator Minivator Slide Track o traccia a cerniera In alcune installazioni una traccia a cerniera o Minivator Slide Track puó essere necessario, in genere spostando la traccia dall entrata ai piedi della scala. La traccia a ceniera potenziata Minivator e Slide Track sono completamente automatiche in operazione e funzioneranno nel modo seguente: Minivator Slide Track... -
Page 98: Traccia A Cerniera (Potenziata)
Operare il vostro montascale Minivator Bullone di chiusura Figura 11 Figura 12 Minivator Slide Track Traccia a cerniera (opzionale) – continu potenziata (opzionale) Andando su per le scale Controllo Manuale d emergenza Montate il montascale come diretto in precedenza La vostra Slide Track é dotata di un controllo e spingete la leva operatrice nella direzione verso manuale che permette alla traccia di essere l alto. -
Page 99: Traccia A Cerniera (Manuale)
Operare il vostro montascale Minivator Figura 13 Figura 14 In quel moment il sedile bipperá tre volte mentre ATTENZIONE la traccia a cerniera si aprirá da sola (Figura 13) . PRIMA CHE OPERIATE LA TRACCIA Quando la cerniera é aperta completamente il A CERNIERA RIMUOVETE QUALSIASI montascale continuerá... -
Page 100: Istruzioni D Emergenza Per Avvolgimento A Mano
4 Quando si raggiunge la posizione desiderata rimuovere l avvolgitore a mano e riaccendete l ascensore. Se in dubbio contattate il vostro distributore approvato Handicare o chiamate Handicare direttamente al +44 (0) 8700 118282. 100 MANUALE UTENTE... -
Page 101: Sicurezza E Manutenzione
Questo lavoro deve essere eseguito da una persona competente, per esempio un rivenditore approvato Handicare. Se in dubbio, si prega di contattare il dipartimento di manutenzione Handicare al +44 (0) 8700 118282. Se possedete il vostro montascale e non ne avete piú bisogno il vostro rivenditore Handicare potrebbe essere interessato a comprarlo. -
Page 102: Cura E Manutenzione Di Routine
Se vi sono danni visibili o il vostro montascale si comporta in maniera strana contattate Handicare Si prega di contattare Handicare al +44 (0) o il vostro rivenditore approvato immediatamente. 8700 118282, il vostro rivenditore o il vostro... -
Page 104: Appendice 1
– se il codice ‘Okay non appare Portate l ascensore ai punti di carica – se il contattate il vostro rivenditore o Handicare. codice ‘Okay non appare o l ascensore é giá nei punti di carica contattate che il fornitore di potenza é... - Page 105 Significato: Code: Significato: Nottoli d arresto attivati. Bordo di sicurezza (direzione su/giú) attivato Azione autonoma: – piattaforma. Contattate il vostro rivenditore o Handicare. Azione autonoma: Contattate il vostro rivenditore o Handicare. Codice: Significato: Codice: Significato: Le batterie stanno Appare quando raggiungendo l interruttore a leva é...
- Page 106 Significato: L invertitore principale L invertitore principale di potenza é saldato. di potenza non si chiude Azione autonoma: Azione autonoma: Contattate il vostro rivenditore o Handicare. Contattate il vostro rivenditore o Handicare. Codice: Significato: Codice: Significato: Guasto al freno Freno non connesso.
- Page 107 Significato: Il pannello di controllo Perni Potenziati non principale ha un problema rispondevano. di memoria. Azione autonoma: Azione autonoma: Contattate il vostro rivenditore o Handicare. Contattate il vostro rivenditore o Handicare. Codice: Significato: Codice: Significato: Nessuna carica Guasto al fornitore di corrente.
-
Page 108: Appendice 2
Appendice 2 – Diagramma dei circuiti elettrici 108 MANUALE UTENTE... - Page 109 Appendice 2 – Diagramma dei circuiti elettrici MANUALE UTENTE 109...
-
Page 110: Appendice 3
Direttiva a basso voltaggio – 2006/95/EC Direttiva macchinari – 2006/42/EC Firmato: Nome: G.M.Welch Data: Posizione: nuovo prodotto Dirigente dello sviluppo Nel caso abbiate bisogno di documentazione tecnica Vi preghiamo di inviare la vostra richiesta a Handicare all indirizzo sopra elencato. 110 MANUALE UTENTE... - Page 111 Informazioni di installazione Importanti informazioni circa il vostro montascale che dovrebbero essere completate dal vostro ingegnere installatore. Installato da: (Nome della Ditta) No di serie: Data di installazione: Prima manutenzione dovuta il: Timbro del rivenditore: MANUALE UTENTE 111...
- Page 112 Handicare, 82 First Avenue, Pensnett Estate Kingswinford, West Midlands DY6 7FJ, England Customer Services: +44 (0) 8700 118282 Textphone: (180015) 020 7490 8913 ext 05 Voicephone: (18002) 020 7490 8913 ext 05 Email: sales@handicare.co.uk www.handicare.co.uk Handicare Treppenlifte GmbH, Gesellenweg 7...