
Manuels Connexes pour newmotion Dynamic Power Management Home-Module


Sommaire des Matières pour newmotion Dynamic Power Management Home-Module
- Page 1 INSTALLATIE-INSTRUCTIE - NL | INSTALLATION INSTRUCTION - EN | INSTALLATIONSANLEITUNG - DE | MANUEL D’INSTALLATION - FR Dynamic Power Management Home – Module...
- Page 2 NewMotion Dynamic Power Management Home – Module Inhoudsopgave / Table of content / Inhaltsverzeichnis / Table des matières Installatieinstructie (NL) pagina 03 – 06 Installation instruction (EN) page 07 – 10 Installationsanleitung (DE) Seite 11 – 14 Manuel d’installation (FR) pages 15 –...
- Page 3 Management Home - Module vereist. De module meet de stroomsterkte(s) en vertaalt de waarden naar een bericht. De module kan alleen worden gebruikt in combinatie met een NewMotion Home Advanced-laadpunt. De module verzendt verschillende berichten om het totale stroomverbruik in het huis in realtime aan te geven. Met deze informatie berekent het laadpunt de vrije capaciteit die kan worden gebruikt voor het opladen van een auto.
-
Page 4: Installatie
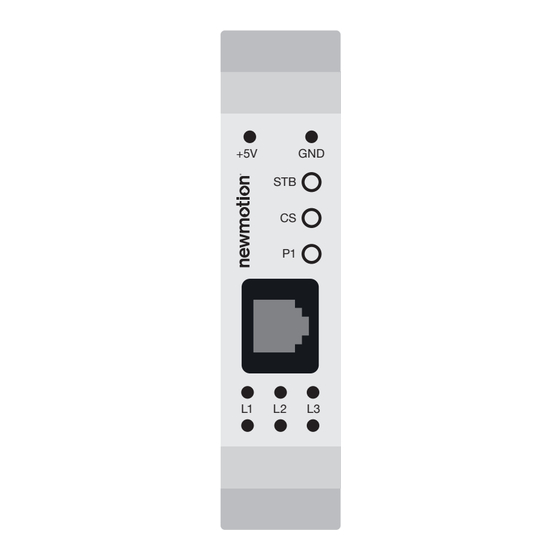
INSTALLATIE De stroomsensormodule moet worden aangesloten zoals is aangegeven op het label op de voorzijde: De externe voedingsadapter is aangesloten op de twee buitenste aansluitingen bovenop de module. Opmerking: Polariteit is belangrijk! 1 van de 2 draden van de voedingsadapter heeft een gebroken witte streep. -
Page 5: Installatieprocedure
Sluit de RJ12 (6P6C)-kabel aan op de module. Als het andere uiteinde van de kabel al is aangesloten op het laadpunt, geeft de P1-LED aan of dit correct is gebeurd. 10. Neem contact op met NewMotion voor activering van DLB-H op afstand: +31 (0)88 010 9500 Opmerking 1: De P1-interface wordt 10 seconden na het opstarten geactiveerd. - Page 6 P1-LED De P1-LED gaat branden zodra de communicatie met een P1-apparaat wordt geactiveerd. Voor een werkende communicatie moet de module via een RJ12-kabel zijn verbonden met een NewMotion Home Advanced-oplaadpunt met een actieve P1-functionaliteit. P-6 | NEDERLANDS | 0243NM11INT02...
- Page 7 INTRODUCTION In order to offer Dynamic Power Management for a home location, the Dynamic Power Management Home - Module is required. The module measures current(s) and translates the values into messages. A series of messages are sent via the module to indicate the real time total power consumption in the house.
- Page 8 INSTALLING The current sensor module must be connected as indicated on the front label: The external power adapter is connected to the two outer terminals on the top of the module. Note: Polarity is important! 1 of the 2 power adapter wires has a broken white stripe. This wire is the power adapter GND and should therefore be connected to the GND pin (right) on the module.
-
Page 9: Installation Procedure
INSTALLING INSTALLATION PROCEDURE Warning: keep module and charge point switched off during installation. To complete an installation, proceed as follows: Don’t plug the power adapter in the power outlet yet. Connect the power adapter to the P1 current sense module. Connect the CT(‘s) to the P1 current sense module. - Page 10 P1 device becomes active. To have an working communication it is needed that the module is connected to a NewMotion Home Advanced charge point with an active P1 functionality, via an RJ12 cable. P-10 | ENGLISH | 0243NM11INT02...
- Page 11 Für dynamischen Lastausgleich an einer Heim-Ladestation ist das Home-Modul erforderlich. Das Modul misst die Spannung(en) und überträgt die Werte in eine Meldung. Das Modul kann nur zusammen mit der Ladestationen des Typs NewMotion Home Advanced benutzt werden. Das Modul übermittelt mittels einer Reihe von Meldungen den gesamten Stromverbrauch der Hausanlage in Echtzeit.
- Page 12 INSTALLATION Das Stromsensor-Modul ist wie auf dem Etikett an der Vorderseite angegeben anzuschließen: Das externe Netzteil wird mit den beiden äußeren Anschlüssen an der Oberseite des Moduls verbunden. Beachten Sie die Polarität! Eines der beiden Netzteilkabel hat eine gestrichelte weiße Linie. Hinweis: Das ist das Massekabel des Netzteils und muss daher mit dem Masse-Stecker (rechts) des Moduls verbunden werden.
- Page 13 INSTALLATION INSTALLATIONSVERFAHREN Warnung: Modul und Ladestation bei der Installation ausschalten. Führen Sie die Installation wie folgt durch: Schließen Sie das Netzteil noch nicht an die Steckdose an. Verbinden Sie das Netzteil mit dem P1-Stromsensor-Modul. Verbinden Sie den/die Stromwandler mit dem P1-Stromsensor-Modul. Installieren Sie das P1-Stromsensor-Modul auf der DIN-Schiene im Sicherungskasten.
- Page 14 P1-LED Die P1-LED leuchtet auf, sobald Kommunikation mit einem P1-Gerät besteht. Voraussetzung für diese Kommunikation ist die Verbindung des Moduls über ein RJ12-Kabel mit einer Ladestation des Typs NewMotion Home Advanced mit aktiver P1-Funktion. P-14 | DEUTSCH | 0243NM11INT02...
- Page 15 Le module mesure le(s) courant(s) et traduit les valeurs dans un message pour le borne de recharge. Le module peut être installé uniquement avec une borne de recharge NewMotion Home Advanced. Le module envoie un signal pour indiquer la consommation totale d’énergie en temps réel d’une installation.
- Page 16 INSTALLATION Le module de mesure de courant doit être alimenté comme indiqué sur l’étiquette frontale : L’adaptateur d’alimentation externe est connecté à deux bornes extérieures sur le haut du module. La polarité est importante ! 1 des 2 fils d’adaptateur d’alimentation a une rayure blanche. Remarque : Le fil rayé...
-
Page 17: Procédure D'installation
Connectez le câble RJ12 (6P6C) au module. Si l’autre côté du câble est déjà connecté à la borne, la LED P1 indiquera si la connexion est correcte ou non. 10. Merci de bien vouloir contacter NewMotion pour l’activation à distance du DPM au numéro +33 9 75 18 03 55 Remarque 1 : L’interface P1 s’allume 10 secondes après la mise sous tension. -
Page 18: Fonctionnalité Des Led
La LED P1 s’allume dès que la communication avec un appareil P1 devient active. Pour obtenir une communication fonctionnelle, le module doit être connecté à la borne de recharge NewMotion Home Advanced avec une fonctionnalité P1 active, via un câble RJ12. P-18 | FRANÇAIS | 0243NM11INT02...