VelLight LEDC25 Mode D'emploi
Table des Matières
Les langues disponibles
Les langues disponibles
Table des Matières

Manuels Connexes pour VelLight LEDC25


Sommaire des Matières pour VelLight LEDC25
-
Page 1: Table Des Matières
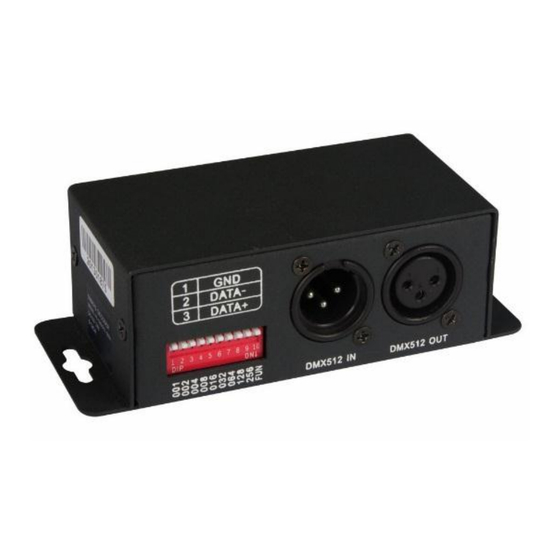
LEDC25 DMX CONTROLLER FOR DIGITAL LED STRIPS DMX-CONTROLLER VOOR DIGITALE LEDSTRIPS CONTRÔLEUR DMX POUR RUBANS LED NUMÉRIQUES CONTROLADOR DMX PARA CINTAS DE LEDS DIGITALES DMX-CONTROLLER FÜR DIGITALE LED-LEISTEN CONTROLADOR DMX PARA FAIXAS LED DIGITAIS USER MANUAL GEBRUIKERSHANDLEIDING MODE D'EMPLOI MANUAL DEL USUARIO... - Page 2 LEDC25 PC converter DMX console DMX input DMX output pc-converter DMX-paneel DMX-ingang DMX-uitgang convertisseur PC console DMX entrée DMX sortie DMX convertidor PC panel DMX entrada DMX salida DMX PC-Konverter DMX-Konsole DMX-Eingang DMX-Ausgang conversor PC consola DMX entrada DMX saída DMX V.
- Page 3 LEDC25 V. 02 – 22/10/2015 ©Velleman nv...
-
Page 14: Mode D'emploi
LEDC25 MODE D'EMPLOI 1. Introduction Aux résidents de l'Union européenne Informations environnementales importantes concernant ce produit Cette icône sur l'appareil ou l'emballage indique que l’élimination d’un appareil en fin de vie peut polluer l'environnement. Ne pas jeter un appareil électrique ou électronique (et des piles éventuelles) parmi les déchets municipaux non sujets au tri... -
Page 15: Directives Générales
LEDC25 Installer l'appareil à une distance minimale de 0.5 m de tout objet ou produit inflammable ou explosif. Respecter une distance minimum de 0.5 m entre la sortie lumière de l’appareil et la surface illuminée. La température ambiante maximale s'élève à 40 °C. Ne pas utiliser l'appareil à... -
Page 16: Mode De Test
Se référer aux illustrations en pages 2 et 3 de ce mode d'emploi. 7. Emploi 7.1 Mode de test Déconnecter chaque raccordement de l'entrée DMX. La LEDC25 est ensuite pivotable par les interrupteurs DIP. Mode statique Le mode statique est pivotable par les interrupteurs DIP 1 à 7; Les interrupteurs DIP 8 et 9 ne sont pas utilisés. -
Page 17: Nettoyage Et Entretien
7.2 Mode DMX Le mode DMX vous permet de contrôler votre bande à LED via une console DMX. Pour ce faire, connecter la console à l'entrée DMX de la LEDC25. Se référer à la page 2 pour voir un exemple d'une connexion. -
Page 18: Spécifications Techniques
LEDC25 9. Spécifications techniques alimentation 5-24 VCC (not incl.) sortie de l'échelle de gris 256 échelles de gris connecteur-DMX-512 connecteur XLR-3 standard IC compatible WS2811(S), WS2812(S), TM1803, TM1804, TM1809, TM1812, UCS1903, UCS1909, UCS1912, UCS2903, UCS2909, UCS2912 modes de vitesse haute vitesse (800 kbps) et basse vitesse... - Page 34 organisaties. Mocht er ondanks deze voorzorgen toch een probleem optreden, dan kunt u steeds een beroep doen op onze waarborg (zie waarborgvoorwaarden). Algemene waarborgvoorwaarden Velleman® Service and Quality Warranty consumentengoederen (voor Europese Unie): Since its foundation in 1972, Velleman® acquired extensive •...
- Page 35 disproportionnés, Velleman® s’autorise à remplacer ledit article par de la compra y entrega, o un artículo de recambio al 50% del precio un article équivalent ou à rembourser la totalité ou une partie du prix de compra o el reembolso del 50% del precio de compra si encuentra d’achat.