Danby Designer DPA100D1MDD Guide D'utilisation Et Soins De Propriètaire
Masquer les pouces
Voir aussi pour DPA100D1MDD:
- Guide d'utilisation et soins de propriètaire (34 pages)
Table des Matières
Publicité
Les langues disponibles
Les langues disponibles
Liens rapides
OWNER'S USE AND CARE GUIDE
GUIDE D'UTILISATION ET SOINS DE PROPRIÈTAIRE
GUÍA DE UTILIZACIÓN Y CUIDADO PARA EL PROPIETARIO
PORTABLE AIR CONDITIONER
CLIMATISEUR PORTATIF
ACONDICIONADOR DE AIRE PORTÁTIL
MODEL • MODÈLE • MODELO
DPA100D1MDD / DPA100D1WDD
DANBY PRODUCTS LIMITED, ONTARIO, CANADA N1H 6Z9
V1.14.11.13
DANBY PRODUCTS INC., FINDLAY, OHIO, USA 45840
Publicité
Table des Matières
Dépannage

Manuels Connexes pour Danby Designer DPA100D1MDD


Sommaire des Matières pour Danby Designer DPA100D1MDD
- Page 1 GUÍA DE UTILIZACIÓN Y CUIDADO PARA EL PROPIETARIO PORTABLE AIR CONDITIONER CLIMATISEUR PORTATIF ACONDICIONADOR DE AIRE PORTÁTIL MODEL • MODÈLE • MODELO DPA100D1MDD / DPA100D1WDD DANBY PRODUCTS LIMITED, ONTARIO, CANADA N1H 6Z9 V1.14.11.13 DANBY PRODUCTS INC., FINDLAY, OHIO, USA 45840...
- Page 2 TO OBTAIN WARRANTY SERVICE YOU MUST PROVIDE A VALID PROOF OF PURCHASE. PLEASE STAPLE YOUR RECEIPT TO THIS PAGE FOR FUTURE REFERENCE. ------------------------------------------------------------------------------------------------------------------- POUR OBTENIR LE SERVICE SUR GARANTIE VOUS DEVEZ FOURNIR UNE PREUVE D’ACHAT VALIDE. VEUILLEZ AGRAFER VOTRE REÇU À CETTE PAGE POUR RÉFÉRENCE FUTURE.
-
Page 3: Table Des Matières
CONTENTS PORTABLE AIR CONDITIONER Owner’s Use and Care Guide ........1-11 • Important Safety Information • Installation Instructions • Features and Components • Operation • Care and Maintenance • Troubleshooting • Warranty CLIMATISEUR PORTATIF Manuel d’utilisation et d’entretien du propriétaire..12-22 •... -
Page 4: Need Help
WELCOME Welcome to the Danby family. We are proud of our quality products, and we believe in dependable service, like you will fi nd in this Owner’s Use and Care Guide, and like you will receive from our friendly customer service department. Best of all, you will experience these values each and every time you use your Danby appliance. -
Page 5: Important Safety Information
IMPORTANT SAFETY INFORMATION READ AND FOLLOW ALL SAFETY INSTRUCTIONS SAFETY PRECAUTIONS ALWAYS DO THIS NEVER DO THIS Your air conditioner should be used in such a way Do not operate your air conditioner in a wet room that it is protected from moisture e.g. condensation, such as a bathroom or laundry room. -
Page 6: Operating Conditions
IMPORTANT SAFETY INFORMATION READ AND FOLLOW ALL SAFETY INSTRUCTIONS OPERATING CONDITIONS The air conditioner must be operated within the temperature ranges indicated below: MODE ROOM TEMPERATURE COOL 17°C (62°F) - 35°C (95°F) 13°C (55°F) - 35°C (95°F) *HEAT (heat pump type) 5°C (41°F) - 30°C (86°F) *HEAT (electrical or heat pump) <30°C (86°F) -
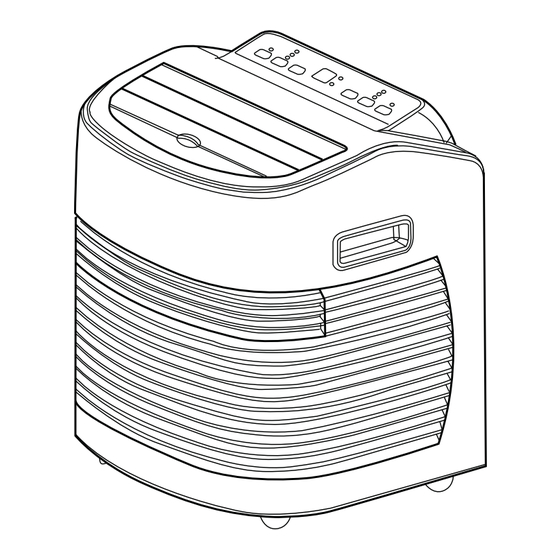
Page 7: Remote Control
FEATURES AND COMPONENTS CONTROL PANEL & REMOTE CONTROL 1. Power button Press the button to turn the unit ON or OFF. 2. Mode button Press the button to cycle between Auto, Cool, Fan, and Dry modes. 3. Down button Press the button in Cool mode to reduce the temperature setting; press it in Timer mode to adjust the ON/OFF time. -
Page 8: Installation Instructions
INSTALLATION INSTRUCTIONS PLACEMENT Place the unit on an even and dry surface and keep it at least 50cm away from any nearby objects. “ (50 cm) INSTALLATION Fasten the exhaust pipe assembly to the air outlet in the back panel (counterclockwise). - Page 9 INSTALLATION INSTRUCTIONS INSTALLATION Insert the air exhaust hose into the window sealing plate. Adjust the opening width of the window to fi t the sealing plate. The length of the sealing plate is adjustable. INCORRECT INSTALLATION It is important to keep the exhaust pipe straight. Incorrect installation will affect the effi ciency of the A/C. Do not bend the exhaust pipe.
- Page 10 OPERATING INSTRUCTIONS Cool mode • When the A/C enters Cool mode automatically, or Cool mode is selected after the unit is turned on, the Cool indicator symbol lights up. • Press the Up or Down buttons to adjust the temperature setting in the range 17°C-30°C (62°F- 86°F). •...
- Page 11 OPERATING INSTRUCTIONS Timer mode • When the unit is plugged in, but the Power button has not been pressed, the unit is in Standby mode. To set an au- tomatic time after which the unit should turn on, press the Timer button while the unit is in Standby mode. While the display is fl...
-
Page 12: Care And Maintenance
CARE AND MAINTENANCE NOTICE In order to avoid electric shock, please turn off the A/C and unplug the plug before maintenance or repair. CLEANING • Unplug before cleaning. • Wipe with soft semi-dry cloth. DO NOT use chemical agents, such as benzene, alcohol, gasoline, etc. Otherwise the surface of the A/C and, potentially, the whole A/C will be damaged. -
Page 13: Troubleshooting
CARE AND MAINTENANCE INTELLIGENT ERROR DETECTION Error-detecting code Cause Error with the coils temperature sensor. Error with the indoor temperature sensor. Frost protection: the temperature of the coil is too low and the A/C shuts down to prevent excess frost build-up. When the temperature increases to 8°C (46.4°F), the protective setting is released and the previous setting is applied. -
Page 14: Terms Of Warranty
LIMITED IN-HOME APPLIANCE WARRANTY LIMITED IN-HOME APPLIANCE WARRANTY This quality product is warranted to be free from manufacturer’s defects in material and workmanship, provided that the unit is used under the normal operating This quality product is warranted to be free from manufacturer’s defects in material and workmanship, provided that the unit is conditions intended by the manufacturer. -
Page 15: Besoin D'assistance
BIENVENUE Bienvenue dans la famille Danby. Nous sommes fi ers de la qualité de nos produits et nous croyons fermement au service par une assistance fi able. Vous découvrirez au travers de ce quide, facile d’utilisation et vous en aurez la confi rmation par notre service d’assistance à... -
Page 16: Consignes De Sécurité Importantes
CONSIGNES DE SÉCURITÉ IMPORTANTES LIRE ET RESPECTER ATTENTIVEMENT TOUTES LES CONSIGNES DE SÉCURITÉ MESURES DE SÉCURITÉ INSTRUCTIONS À RESPECTER À NE PAS FAIRE Utiliser le climatiseur de manière à ce qu'il soit pro- Ne pas utiliser le climatiseur dans un espace humide tel qu'une salle de bain ou une buanderie. -
Page 17: Conditions D'utilisation
CONSIGNES DE SÉCURITÉ IMPORTANTES LIRE ET RESPECTER ATTENTIVEMENT TOUTES LES CONSIGNES DE SÉCURITÉ CONDITIONS D'UTILISATION Le climatiseur doit être utilisé à des températures comprises dans la plage de températures ci-dessous : MODE TEMPÉRATURE AMBIANTE COOL (REFROIDISSEMENT) 17 °C (62 °F) - 35 °C (95 °F) DRY (SEC) 13 °C (55 °F) - 35 °C (95 °F) *HEAT (CHAUFFAGE) -
Page 18: Panneau De Commandes Et Télécommande
CARACTÉRISTIQUES ET COMPOSANTS PANNEAU DE COMMANDES ET TÉLÉCOMMANDE 1. Touche MARCHE/ARRÊT Appuyer sur la touche MARCHE/ARRÊT pour ALLUMER/ÉTEINDRE le climati- seur. 2. Touche MODE Appuyer sur la touche MODE pour naviguer entre les modes AUTO, REFROIDISSEMENT (COOL), VENTILATION (FAN) et DÉSHUMIDIFICATION (DRY). -
Page 19: Emplacement
CONSIGNES D'INSTALLATION EMPLACEMENT Placer le climatiseur sur une surface plane et sèche et à une distance de 50 cm minimum de tout objet. (50 cm) pouces INSTALLATION Fixer le tuyau d'échappement à la sortie d'air située sur le panneau arrière (dans le sens antihoraire). - Page 20 CONSIGNES D'INSTALLATION INSTALLATION Insérer le tuyau d'échappement dans la plaque d'étanchéité de la fenêtre, régler la largeur d'ouverture de la fenêtre pour que celle-ci corresponde à la largeur de la plaque d'étanchéité. La longueur de la plaque d'étanchéité est réglable. INSTALLATION INADÉQUATE •...
-
Page 21: Consignes D'utilisation
CONSIGNES D'UTILISATION Mode REFROIDISSEMENT (COOL) • Lorsque le climatiseur entre en mode REFROIDISSEMENT (COOL) automatiquement ou que le mode REFROIDISS- MENT (COOL) est sélectionné après la mise en marche, le témoin COOL s'allume. • Appuyer sur les touches HAUT/BAS pour régler la température entre 17 °C et 30 °C (62 °F et 86 °F). •... -
Page 22: Méthode De Drainage
CONSIGNES D’UTILISATION REMARQUE : • Pour basculer entre degrés Celsius ou Fahrenheit, appuyer sur les touches Haut et Bas sur le panneau de contrôle simultanément. • La commande « volets oscillants » n’est possible qu’à partir de la télécommande. Mode MINUTERIE (TIMER) •... -
Page 23: Nettoyage
SOINS ET ENTRETIEN NOTE Afi n d’éviter tout choc électrique, éteindre et débrancher le climatiseur avant entretien ou réparation. NETTOYAGE • Débrancher le climatiseur avant le nettoyage. • Nettoyer avec un chiffon doux et humide. Ne pas utiliser de produits chimiques tels que du benzène, de l'alcool, du pétrole, etc. -
Page 24: Dépannage
SOINS ET ENTRETIEN DÉTECTION INTELLIGENTE DES ERREURS Code de détection d'erreur Cause Erreur au niveau du capteur de température des bobines. Erreur au niveau du capteur de température ambiante. Protection contre le gel : la température du serpentin est trop basse et le climati- seur s’arrête pour éviter l’excès de givre. -
Page 25: Appareil Électroménager À Domicile
GARANTIE LIMITÉE SUR LIMITED IN-HOME APPLIANCE WARRANTY APPAREIL ÉLECTROMÉNAGER À DOMICILE This quality product is warranted to be free from manufacturer’s defects in material and workmanship, provided that the unit is used under the normal operating conditions intended by the manufacturer. Cet appareil de qualité... -
Page 26: Necesita Ayuda
BIENVENIDO Bienvenido a la familia Danby. Estamos orgullosos de nuestros productos de alta calidad y creemos en el servicio confi - able. Usted lo podrá apreciar en este manual fácil de usar, y lo escuchará enlas voces amistosas de nuestro departamen- to de servicio al consumidor. -
Page 27: Instrucciones De Seguridad Importantes
INSTRUCCIONES DE SEGURIDAD IMPORTANTES LEA Y SIGA TODAS LAS INSTRUCCIONES DE SEGURIDAD PRECAUCIONES DE SEGURIDAD SIEMPRE HAGA ESTO NUNCA HAGA ESTO La unidad de aire acondicionado debe utilizarse de No haga funcionar el aire acondicionado en un modo tal que esté protegida contra la humedad, p. ej., ambiente húmedo, como un baño o lavadero. -
Page 28: Condiciones De Funcionamiento
INSTRUCCIONES DE SEGURIDAD IMPORTANTES READ AND FOLLOW ALL SAFETY INSTRUCTIONS CONDICIONES DE FUNCIONAMIENTO El aire acondicionado debe funcionar dentro del rango de temperatura indicado a continuación: MODO TEMPERATURA AMBIENTE FRÍO 17 °C (62 °F) - 35 °C (95 °F) SECO 13 °C (55 °F) - 35 °C (95 °F) *CALOR (tipo bomba de calor) 5 °C (41 °F) - 30 °C (86 °F) -
Page 29: Panel De Control Ycontrol Remoto
FUNCIONES Y COMPONENTES PANEL DE CONTROL Y CONTROL REMOTO 1. Botón de encendido Presione el botón para ENCENDIDO/APAGADO del aire acondicionado. 2. Botón de modo Presione el botón para cambiar al modo automático (AUTO), refrigeración (COOL), ventilador (FAN) o deshumidifi cación (DRY). 3. -
Page 30: Instrucciones De Instalación
INSTRUCCIONES DE INSTALACIÓN UBICACIÓN Ubíquelo sobre una superfi cie plana y seca y manténgalo a al menos 50 cm de todos los objetos cercanos. (50 cm) pulgadas INSTALACIÓN Ajuste el montaje del tubo de escape a la salida de aire en el panel trasero (sentido contrario a las manecillas del reloj). - Page 31 INSTRUCCIONES DE INSTALACIÓN INSTALACIÓN Inserte la manguera de salida de aire dentro de la placa de sellado para la ventana y ajuste el ancho de la apertura de la ventana para que encaje en la placa de sellado. La longitud de la placa de sellado es ajustable. INCORRECTO INSTALACIÓN •...
-
Page 32: Operación
OPERACIÓN Modo de refrigeración (COOL) • Cuando el aire acondicionado pasa automáticamente al modo de refrigeración (COOL) o cuando se selecciona el modo de refrigeración después de encenderlo, se enciende la luz indicadora de refrigeración. • Presione el botón Aumentar/Disminuir para confi gurar la temperatura entre 17 °C -30 °C (62 °F- 86 °F). •... - Page 33 OPERACIÓN Modo de temporizador • Cuando la unidad está conectada, pero no se presiona el botón de encendido, la unidad permanece en modo de es- pera. Para confi gurar el tiempo en que la unidad debe encenderse automáticamente, presione el botón temporizador mientras la unidad esté...
-
Page 34: Cuidado Y Mantenimiento
CUIDADO Y MANTENIMIENTO AVISO Para evitar descargas eléctricas, apague el aire acondicionado y desconecte la clavija antes de realizar mantenimiento o reparación. LIMPIEZA • Desconecte antes de limpiar. • Limpie con un paño suave semiseco. No utilice agentes químicos, como benceno, alcohol, gasolina, etc., de lo contrario se dañará... -
Page 35: Diagnósticos De Problemas
CUIDADO Y MANTENIMIENTO DETECCIÓN INTELIGENTE DE ERRORES Código de detección de error Causa Error con el sensor de temperatura de las bobinas. Error con el sensor de temperatura de interior. Protección anticongelante: la temperatura de la bobina es muy baja y el aire acondicionado se desactiva para evitar el congelamiento. - Page 36 GARANTÍA LIMITADA PARA LIMITED IN-HOME APPLIANCE WARRANTY ELECTRODOMÉSTICO This quality product is warranted to be free from manufacturer’s defects in material and workmanship, provided that the unit is used under the normal operating conditions intended by the manufacturer. Este producto de calidad está garantizado contra defectos de fabricación, incluyendo partes y mano de obra, siempre y cuando This warranty is available only to the person to whom the unit was originally sold by Danby Products Limited (Canada) or Danby Products Inc.
-
Page 37: Portable Air Conditioner
PORTABLE AIR CONDITIONER CLIMATISEUR PORTATIF ACONDICIONADOR DE AIRE PORTÁTIL MODEL • MODÈLE • MODELO DPA100D1MDD/ DPA100D1WDD PORTABLE AIR CONDITIONER CLIMATISEUR PORTATIF All repair parts are available for purchase or special Toutes les pièces de rechange ou commandes order when you visit your nearest service depot.To spéciales sont disponibles à...