Publicité

Les langues disponibles

Les langues disponibles

Liens rapides

LEDI
2S
®
vErSIon
ntp
MODE D'EMPLOI - page 3
USER GUIDE - page 15
MDE-LEDI-2S-ntp-1108v1.0

Publicité

Chapitres

Table des Matières
loading

Sommaire des Matières pour Gorgy Timing LEDI 2S NTP

  • Page 1 LEDI ® vErSIon MODE D’EMPLOI - page 3 USER GUIDE - page 15 MDE-LEDI-2S-ntp-1108v1.0...
  • Page 2 (garder quelques centimètres de distance) Gorgy timing décline toute responsabilité en cas d’accidents ou de dommages provoqués par une mauvaise utilisation du produit. Les produits GORGY TIMING sont conformes aux normes : CE, EN 60950, EN 55022, EN 50024. MDE-LEDI-2S-NTP-1108V1.0...
  • Page 3: Caractéristiques Techniques

    ExPLICaTION DES SYMbOLES PRéSENTS SUR LE PRODUIT Danger général – Si les instructions ne sont pas suivies, il y a un risque de dommages aux équipements. Danger électrique – Si les instructions ne sont pas suivies, il y a un risque d’électrocution et de dommages corporels.
  • Page 4: Table Des Matières

    SOMMaIRE DESCRIPTION ......................5 RaCCORDEMENTS ..................... 6 RéGLaGE DE La LUMINOSITE ................... 6 PROGRaMMaTION DE L’HEURE ................6 4.1. Autonome ..........................6 4.2. réceptrice ntp ........................6 CONFIGURaTION VIa L’INTERFaCE WEb ..............7 5.1. pAGE prInCIpALE ......................8 5.2. pArAMÈtrES rÉSEAU ....................8 5.3.
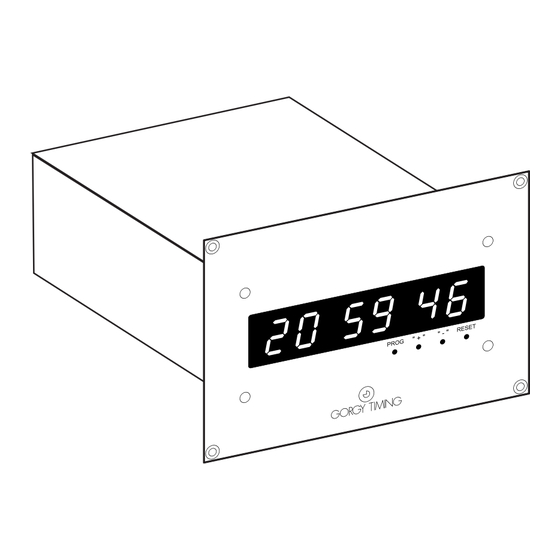
  • Page 5: Description

    1. DESCRIPTION LEDI 2/S ► Affichage numérique 7 segments. LEDI 1/S ► Affichage heures, minutes et secondes. 4xM4 ► Hauteur des chiffres : 20 mm. ► Alimentation 230vAC 50-60Hz ou power over Ethernet (poE). ► réglage de luminosité en face avant. ►...
  • Page 6: Raccordements

    2. RaCCORDEMENTS Toutes les connexions s'effectuent à l'arrière du boîtier. ► Alimentation (ex : 230v 50-60Hz ). ► Entrée de synchronisation ntp. ► ntp - poE 3. RéGLaGE DE La LUMINOSITE Le réglage de luminosité manuellement se fait à l’aide des boutons poussoirs accessibles en face avant à...
  • Page 7: Configuration Via L'interface Web

    5. CONFIGURaTION VIa L’INTERFaCE WEb L’interface Web présente plusieurs pages dédiées à la configuration de l’horloge. Pour accéder à cette interface, il faut ouvrir un navigateur internet puis entrer l’adresse Ip de l’horloge dans la barre d’adresse. ► L’adresse IP de l’horloge est soit attribuée automatiquement, soit définie par l’utilisa- teur.
  • Page 8: Page Principale

    5.1. PaGE PRINCIPaLE La page principale fournit des informations sur l’état de l’horloge. on peut y lire l’heure de l’horloge interne, l’heure sur l’affichage, … ► La navigation dans les différentes pages s’effectue à l’aide du menu se trouvant sur la gauche de l’interface.
  • Page 9: Paramètres Ntp

    5.3. PaRaMÈTRES NTP Cette page permet de configurer le serveur de temps sur lequel l’horloge va se synchro- niser. L’utilisateur peut choisir une détection automatique des serveurs de temps sur son réseau ou spécifier lui-même une liste de serveurs. L’ordre des serveurs définit la priorité d’utilisation de ceux-ci. Par défaut, à chaque synchronisation, le client embarqué...
  • Page 10: Paramètres Des Sorties

    5.4. PaRaMÈTRES DES SORTIES Cette page permet de configurer l’heure affichée sur l’afficheur par rapport à l’heure UTC. La configuration du lien série n’est pas accessible sur la LEDI 2/S NTP. 5.5. PaRaMÈTRE SNMP Cette page permet de renseigner les informations pour la supervision par le protocole SnMp.
  • Page 11: Mise À Jour Du Micrologiciel

    5.6. MISE À JOUR DU MICROLOGICIEL Cette page permet de mettre à jour l’interface web de l’horloge. ► Pour mettre à jour l’interface, il faut sélectionner le fichier «image.bin», fourni par le Service Après-Vente, en cliquant sur «Parcourir …». ► Une fois le fichier «image.bin»...
  • Page 12: Caracteristiques Techniques

    6. CaRaCTERISTIQUES TECHNIQUES aLIMENTaTION : ► 230 volts +/-10% 50/60Hz ou poE, poE + ► Consommation : 2.6vA ► Fusible à l’intérieur, derrière la prise 230v. ENTRéE DE SYNCHRONISaTION : ► Extinction des deux points seconde : 5 secondes sans synchronisation. ►...
  • Page 13 NOTES MDE-LEDI-2S-NTP-1108V1.0...
  • Page 14: Support Technique

    LEDI ®, LEDI CA®, HAnDI ® sont des marques déposées GorGY tIMInG. numéro de déclaration d’activité de prestataire de formation : 82 38 04877 38 GORGY TIMING RC 74 B 38 - Toutes modifications d'ordre technique ou esthétique peuvent être apportées sans préavis. MDE-LEDI-2S-NTP-1108V1.0...
  • Page 15 USER GUIDE LEDI ® VERSION MDE-LEDI-2S-NTP-1108V1.0...
  • Page 16 Generally, the power cable (220v) and transmission cable (of time signal) shall not be very close to each other, so as to avoid interference (keep the distance of a few centimeters). Gorgy timing disclaims all responsibility in case of accident or damage caused by an impro- per use of the product.
  • Page 17 NOTICE OF SaFETY SIGNS ON THE PRODUCT Danger – risk of damage to equipment if the instructions are not followed. Electrical Hazard – Failure to follow the instructions may result in electric shock and injury to persons. the equipment is completed protected through double insulation. Warning Follow the precautions and instructions as indicated below in order to ensure your safety and that of your environment, and to prevent your device from any possible damage.
  • Page 18 CONTENTS DESCRIPTION ......................19 CONNECTIONS ......................20 bRIGHTNESS CONTROL ................... 20 SETTING ........................20 4.1. Autonomous ........................20 4.2. ntp receiver ........................20 CONFIGURaTION VIa WEb INTERFaCE ..............21 5.1. Main page ........................22 5.2. network parameters ......................22 5.3. ntp parameters ......................... 23 5.4.
  • Page 19: Description

    1. DESCRIPTION LEDI 2/S ► 7 segments numerical display. LEDI 1/S ► Display of hours,minutes,seconds. 4xM4 ► Height of figures: 20mm. ► power supply 230 vAC 50-60hz ou power over Ethernet (poE). ► Brightness control on front. ► Consumption 5vA. On the wall ►...
  • Page 20: Connections

    2. CONNECTIONS All necessary connections are made at the back of the case ► Connect the unit to power supply 230vAC 50-60HZ ► ntp synchronisation input ► ntp - poE 3. bRIGHTNESS CONTROL the brightness is adjusted by pressing on the “+” and “-“ button. the button can be reached through the holes in the front of the unit, using a small screwdriver 4.
  • Page 21: Configuration Via Web Interface

    5. CONFIGURaTION VIa WEb INTERFaCE Web Interface includes several pages for configuration of the clock. To access the interface, you shall open internet browser then enter Ip address of the clock in the address bar. ► The clock can be configured to obtain an IP address automatically, or defined by the user.
  • Page 22: Main Page

    5.1. MaIN PaGE the main page contains information on status of the clock. You can view time of internal clock, time of clock display, … ► You can navigate from page to page by using the menu on the left of web page. 5.2.
  • Page 23: Ntp Parameters

    5.3. NTP PaRaMETERS This page allows to configure the Time Server to which the slave clock will be synchronized. the user can choose an automatic detection of time servers present on the network or manually specify a list of servers. The servers order defines their usage priority.
  • Page 24: Output Parameters

    5.4. OUTPUT PaRaMETERS This page allows to configure the time to be displayed as an offset from UTC. The user can also configure serial communication if the option is available. 5.5. SNMP PaRaMETER this page allows to input information for supervision via SnMp protocol. the second part of the page can allow to indicate the addresses alarms shall be sent to.
  • Page 25: Micro Software Upgrade

    5.6. MICRO SOFTWaRE UPGRaDE this page allow to upgrade the web interface of the clock . ► For this, you shall click on “browse…” select “image.bin” file, provided by After Sales Service. ► When «image.bin» selected, click on «Upload» button in order to send the updates. A case will indicate the progress of the file sending.
  • Page 26: Characteristics

    6. CHaRaCTERISTICS POWER SUPPLY ► 230 volts +/-10% 50/60Hz ou poE, poE + ► Maximum consumption 5vA ► Fuse inside, behind the socket 230. (optional 230vAC on cable: fuse on rear panel) SYNCHRONISaTION INPUT ► Seconds colon extinction: 5 seconds without synchronization. ►...
  • Page 27 NOTES MDE-LEDI-2S-NTP-1108V1.0...
  • Page 28: Technical Support

    +33 476 30 48 20 support@gorgy-timing.fr rADIo tIMInG®, LEDI®, LEDICA®, HAnDI® are trademarks by GorGY tIMInG. number of statement for training provider activity : 82 38 04877 38 Gorgy Timing RC74B38 - Any technical, aesthetic, color modifications can be made without notice. MDE-LEDI-2S-NTP-1108V1.0...

Table des Matières