Trotec B 500 Mode D'emploi
Table des Matières
Les langues disponibles
Les langues disponibles
Liens rapides
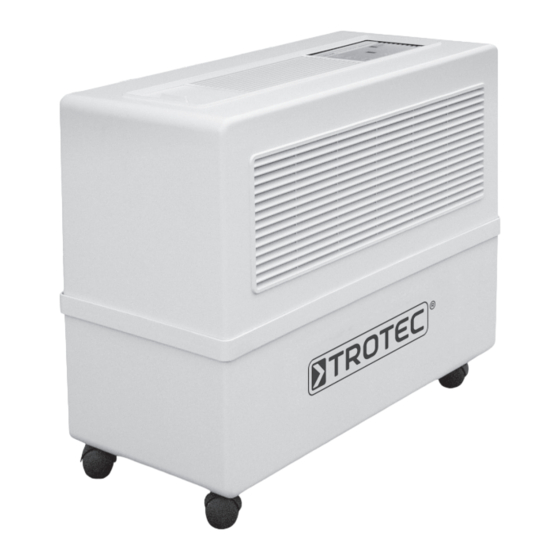
B 500
Bedienungsanleitung – Luftbefeuchter . . . . . . . . . . . . . . . . . . A - 1
DE
Operating Instructions – Electronic Humidifi er . . . . . . . . . . . B - 1
EN
Mode d'emploi – Humidifi cateur d'air . . . . . . . . . . . . . . . . . . . C - 1
FR
TROTEC GmbH & Co . KG
Tel .: +49 2452 962-400
www .trotec .de
•
Grebbener Straße 7
•
•
Fax: +49 2452 962-200
•
E-Mail: info@trotec .de
D-52525 Heinsberg
Chapitres
Table des Matières

Manuels Connexes pour Trotec B 500


Sommaire des Matières pour Trotec B 500
-
Page 40: Mise En Service
. . . . . . . . . . . . . . . . . . C - 06 des illustrations . Le présent document a été rédigé avec tout le soin nécessaire . Nous déclinons toute responsabilité en cas d’erreur ou d’omission . © TROTEC ®... -
Page 41: Emplacement
. La diode luminescente s’allume bri- vèment lorsque l’on appuie sur le bouton noir . Un si- B 500 Professional gnal sonore indique qu’il faut remplacer les piles . En remplaçant les piles, respectez les pôles +/- . -
Page 42: Télécommande
En appuyant sur cette touche, vous ouvrez le mode temps en temps afin d’éviter un affichage erroné ou de programmation du B 500 et pouvez sélectionner un arrêt automatique de l’appareil, provoqué par un les menus principaux (10, 20, 30 – voir description entartrage des électrodes sous tension . -
Page 43: Indicateur De Changement Du Filtre
Baguettes d’électrodes 09. Indicateur de changement du filtre L’humidificateur B 500 dispose d’un indicateur de changement du filtre qui indique la nécessité du changement de filtre en fonction du temps de fonc- tionnement de la pompe, de la dureté de l’eau et du ventilateur . -
Page 44: De Commande
8 . Remettez le tableau de commande en place et fi- xez celui-ci à l’aide de 4 vis . 9 . Remettez maintenant en place la partie supérieure du boîtier sur le B 500 . C - 5 Manuel d’utilisation – Générateur électrique d’air chaud... -
Page 45: Paramètres Du Ventilateur
12. Paramètres du ventilateur 13. Système á capteurs radio-électriques (radiofréquence 435 Mhz) Le régime du ventilateur peut être réglé par la télé- commande à 5 niveaux ( 4 niveaux + fonction auto- Mise en service matique) . Le réglage souhaité peut être effectué avec Retirez la face inférieure du boîtier avec précaution, la touche Ventilateur (voir ci-dessus) sur la télécom- par ex . -
Page 46: Méthode
8 . Soufflez légèrement sur le capteur radioélectrique et contrôlez la fonction du système . 15. Indicatuer de code d’erreur Le B 500 professionnel est équipé d’un système de surveillance indépendant qui vous donne la possibilité de détecter rapidement et de manière sûre les erreurs et de réagir en conséquence . -
Page 47: Programmation De Menu
16. Programmation de menu 5 . Si vous avez sélectionné le sous-menu souhaité, Le B 500 Professional vous offre la possibilité de pro- l’indicateur se met à clignoter au bout de quelques céder à divers réglages suivant vos souhaits et diffé- secon des en affichant une valeur (p . -
Page 48: Menu Principal
cSi plus aucun réglage n’a été effectué dans les 10 secondes, l’indicateur retourne automatique- ment en mode indicateur standard (humidité relative). Le processus de programmation peut néanmoins être interrompu en appuyant sur la touche ON/OFF. Veillez cependant à ce que les modifications effectuées ne soient pas perdues. -
Page 49: Pompe À Eau
Menu Menu Description Réglage Remarque Program- princi- secon- mation de daire l’usine Réglage rinçage Réglage rinçage Cycle 00 = OFF Si rinçage est existant de rinçage en jours (manuel) 01 . . . 07 jours La dureté de l’eau exerce 01 = douce La dureté... -
Page 50: Nettoyage
En outre, la réduction des dépôts cal- 20. Accesoires caires contribue à une longue durée (sur demande contre majoration de prix) de vie du filtre d’évaporation . Alimentation automatique en eau Le raccordement au réseau de conduites d’eau local doit être effectué par un spécialiste, c’est-àdire un in- stallateur agréé... -
Page 51: Dispositif De Rinçage Automatique
Cet accessoire est utilisé spécialement pour les orgues d’église . La hotte est placée ou vissée sur l’expulsion du B 500 . Elle est équipée d’un tuyau d’aération flexible en aluminium (150 mm) qui condu- Un dispositif automatique de rinçage est uniquement it l’air humidifié... -
Page 52: Technique Uv Avec Cartouche De
Technique UV avec cartouche de transformation du calcaire Soulvez précautionneusement par le haut La lampe basse pression au mercure utilisée dans Câble de raccordement l’appareil fonctionne dans le domaine des UV C dont la longueur d’onde élimine la plupart des micro-orga- Tueb en verre nismes . -
Page 53: Nomenclature
Rondelle plate V2 M 5 x 15 1311 Gaine 1568 Rondelle poly M 5 x 15 1312/500 Couverture de gaine 1603 Filtre biologique B 500 1326 Baguette d’électrodes (set = 7) avec tête 1339 Faisceau de câbles 1347 p Platine de base *Equipements spéciaux et accessoires 1348/3 Module de mesure/d’émission dans la... -
Page 54: Construction
22. Construction C - 15 Manuel d’utilisation – Générateur électrique d’air chaud... -
Page 55: Checklists D'entretien
Ces travaux doivent obligatoirement être effectués par des professionnels autorisés! Check-list pour le nettoyage et l’utilisation de l’humidificateur de grands espaces, type B 500 Professionnel Version standard ou avec arrivée automatique d’eau ou stérilisation par UV et cartouche anti-calcaire . - Page 56 Interval- Instructions de nettoyage et d’utilisation les de (Pour effectuer tous les travaux sur l’appareil, retirer la prise du secteur!) temps* Chaque • Sur le type d’appareil avec stérilisation par UV et transformation du calcaire: année • Contrôlez et nettoyez la lampe à UV et la cartouche anti-calcaire (Voir stérilisation aux UV et nettoyage cartouche anti-calcaire) .
-
Page 57: Dépannage
24. Dépannage En cas de dysfonctionnement de votre appareil, veuillez vérifier les éléments suivants: Panne Cause Que faire? Aucune fonction L’appareil n’est pas branché Contrôlez le raccordement au réseau Le symbole réservoir Pas d’eau disponible Faire l’appoint d’eau d’eau est allumé en rouge L’appareil ne démarre L’humidité... -
Page 58: Propositions De Montage
Panne Cause Que faire? L’émetteur radioélectrique Les piles de l’émetteur est vide Remplacez les piles émet un signal sonore Les nouvelles piles ne Les piles ont été placées incorrectement – ils Insérez deux nouvelles piles fonctionnent pas n’ont pas été tenu compte de la polarité 1) Uniquement sur le modèle spécial, technique UV avec cartouche de transformation du calcaire . -
Page 59: Données Techniques
26. Données techniques Raccordement électrique 230 V/50 HZ Puissance absorbée max . 95 VA (sans accessoirs) Ventilation 900 m³/h Capacité d’évaporation 2,6 litres/h à 25°C et 20% hum . rel . Surface du filtre 3,5 m² Poids (vide) 24 kg env . Réserve d’eau 50 litres env . - Page 60 TROTEC GmbH & Co. KG • Grebbener Straße 7 • D-52525 Heinsberg ® Tel.: +49 2452 962 - 400 • Fax: +49 2452 962 - 200 www.trotec.de • E-Mail: info@trotec.de...