Table des Matières
Publicité
Les langues disponibles
Les langues disponibles
Liens rapides
Publicité
Chapitres
Table des Matières

Manuels Connexes pour Adam Equipment GBC Série


Sommaire des Matières pour Adam Equipment GBC Série
- Page 1 Adam Equipment User Manual (EN) GBC/GFC Series (P.N. 3056610587, Revision B4, Apr 2014) Notice Utilisation (FR) Séries GBC/GFC Bedienungsanleitung (DE) GBC / GFC REIHEN Software Rev 2.18 and up © Adam Equipment Company 2014...
- Page 2 Easy Reference: Model name of the indicator/scale: Serial number of the unit: Software revision number (Displayed when power is first turned on): Date of Purchase: Name of the supplier and place: © Adam Equipment Company 2014...
-
Page 3: Table Des Matières
SERVICE PARAMETERS ..............28 12.1 USING “0000” TO ENTER THE CALIBRATION PARAMETER ..28 13.0 REPLACEMENT PARTS AND ACCESSORIES ......30 14.0 SERVICE INFORMATION ..............31 15.0 WARRANTY INFORMATION ............32 P a g e © Adam Equipment Company 2014... - Page 4 P a g e © Adam Equipment Company 2014...
-
Page 5: Introduction
There are 2 types of scales within the GBC/GFC series: GBC/GFC scales are kilogram/gram scales and the GBC/GFC‐a scales are changeable from pounds to kilograms if the user requires it. The scales have the same functions except that GBC/GFC‐a scales have the ability to toggle between the weighing units. All scales are supplied with a RS‐232 bi‐directional interface and real time clock (RTC). The GBC/GFC has a sealed keypad with colour coded membrane switches and there is a large, easy to read liquid crystal type display (LCD). The LCD is supplied with a backlight. The GBC/GFC include automatic zero tracking, audible alarm for pre‐set counts, automatic tare, pre‐set tare, an accumulation facility that allows the count to be stored and recalled as an accumulated total. P a g e © Adam Equipment Company 2014... - Page 6 1g/0.002lb 2g/0.004lb 4g/0.01lb Units of Measure Kilograms and Grams. Pounds for GBC XXa units Stabilization Time 2‐3 Secs Operating Temperature ‐10°C to +40°C / +14°F to +104°F Power Supply 230VAC 50/60Hz. in Europe, Asia and South Africa. 12vDC 800mA UL/CSA adapter for USA Calibration External Calibration Mass User Selectable Display Backlit Green display 25mm with capacity tracker Balance Housing Cast aluminium base, Pantone cool grey painted base, stainless steel grade 304 Top pan, ABS Cool grey indicator housing Pan Size 300mm x 400mm x 50mm / 12” x 15.7” x 2” Overall Dimensions 300mmx 520mm x 660mm / 11.8” x 20.5” x 26” (w x d x h) Net Weight 7.6kg / 16.8 Lb Features Weighing/Counting/Checkweighing with LED lights/Percentage/Hold function/RS232 P a g e © Adam Equipment Company 2014...
- Page 7 20g / 0.04lb 40g / 0.1lb Units of Measure Kilograms and Grams. Pounds for GFC XXa units Stabilization Time 2‐3 Secs Operating Temperature ‐10°C to +40°C / +14°F to +104°F Power Supply 230VAC 50/60Hz. in Europe, Asia and South Africa. 12vDC 800mA UL/CSA adapter for USA Calibration External Calibration Mass User Selectable Display Backlit Green display 25mm with capacity tracker Balance Housing Cast aluminium base, Pantone cool grey painted base, stainless steel grade 304 Top pan, ABS Cool grey indicator housing Pan Size 400mm x 500mm x 65mm/ 15.7” x 19.7” x 2.6” Overall Dimensions 400mmx 620mm x 860mm / 15.7” x 24.4” x 33.9” (w x d x h) Net Weight 12.5kg / 27.6 Lb Features Weighing/Counting/Checkweighing with LED lights/Percentage/Hold function/RS232 P a g e © Adam Equipment Company 2014...
-
Page 8: Installation
Avoid direct contact with water. Do not spray or immerse the scales in water. Avoid air movement such as from fans or opening doors. Do not place near open windows or air‐ conditioning vents. Keep the scales clean. Do not stack material on the scales when they are not in use. © Adam Equipment Company 2011... -
Page 9: Setting Up The Scales
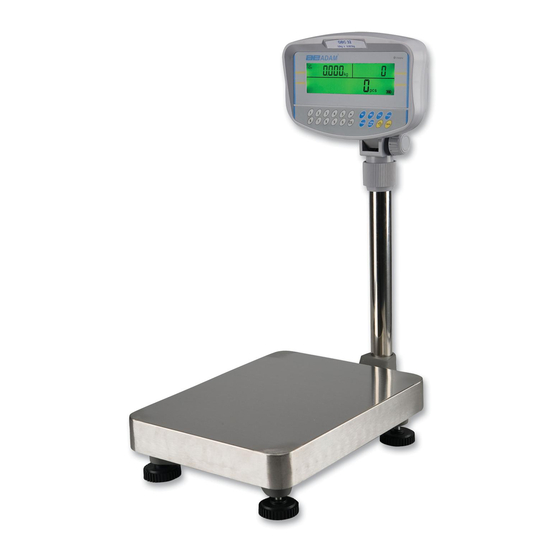
Attach the indicator module to the pillar by sliding it over the bracket with the flanges engaged in the groves on the base. Attach the cable from the base to the connector on the rear of the indicator. Attach the power to the indicator. Press the [On/Off] key which is at the rear of the indicator. The software revision number will be displayed followed by a self‐test showing all digits before the zero is displayed along with the unit of weight that was selected last. © Adam Equipment Company 2011... -
Page 10: Key Descriptions
4.0 KEY DESCRIPTIONS Keys Functions [0‐9, .] Numeric entry keys, used to manually enter a value for tare weights, unit weight, and sample size. [CE] Used to clear the unit weight or an erroneous entry. [M+] Add the current count to the accumulator. Up to 99 values or full capacity of the weight display can be added. Also prints the displayed values when Auto print is switched off. [MR] To recall the accumulated memory. [Pst] To set the upper limit for the number of items counted. When this upper limit is exceeded the scale will sound the beeper. [Print] To print the weight/ unit weight and count to a PC or printer using the RS‐232 interface. Print the totals from memory when [MR] is pressed first. [Smpl] Used to input the number of items in a sample. [U.Wt./Units] Used to enter the weight of a sample manually. Select the weighing unit when the “Unit Weight” display is at zero if enabled. [Tare] Tares the scale. Stores the current weight in memory as a tare value, subtracts the tare value from the weight and shows the results. This is the net weight. Entering a value using the keypad will store that as the tare value. [Zero] Sets the zero point for all subsequent weighing to show zero. © Adam Equipment Company 2011... -
Page 11: Displays
5.0 DISPLAYS The scales have three sections. These are “Weight”, “Unit Weight” and “Count”. The LCD design is: WEIGHT UNIT WEIGHT COUNT 5.1 WEIGHT DISPLAY It has 6‐digit display to indicate the weight on the scale. Net Weight Display, "Net" Stability indicator, symbol Zero indicator, 0 symbol The weighing unit: kg, lb © Adam Equipment Company 2011... -
Page 12: Unit Weight Display
5.4 OTHER SYMBOLS The symbol, when there is insufficient number of samples to accurately determine the count. When the unit weight is not large enough to determine an accurate count, the symbol will be on. In both cases the scale continues to operate and the indications are to alert the user for a potential problem. If a preset count has been stored the symbol will be on. A low battery symbol will turn on if the battery should be recharged. The Lo, OK, Hi symbols will be used when the preset count has been set. The symbol “Mem” will be seen when the internal memory has a record of previous weighings stored in it. © Adam Equipment Company 2011... -
Page 13: Operation
When the container is removed a negative value will be shown. If the scale was tared just before removing the container, this value is the gross weight of the container plus all products those were removed. The indicator “>Z<” will also be ON because the platform is back to the same condition as it was when the [Zero] key was pressed last. 6.2.1 Preset Tare The user can enter a preset tare value if the display is at zero or gross weight. Enter the value for preset tare using the keypad, then press the © Adam Equipment Company 2011... -
Page 14: Parts Counting
The number of units will be displayed on the "Count" display and the computed average weight will be shown on the "Unit Weight" display. As more items are added to the scale, the weight and the quantity will increase. If a quantity which is smaller than the sample is placed on the scale, then the scale will automatically enhance the Unit Weight by re‐calculating it. To lock the Unit Weight and avoid re‐sampling, press [U. Wt./Units]. If the scale is not stable, the calculation will not be completed. If the weight is below zero, the “Count” display will show negative count. © Adam Equipment Company 2011... -
Page 15: Check-Counting
Check‐counting is a procedure to cause an alarm to sound when the number of items counted on the scale meets or exceeds a number stored in the memory by using the [Pst] key. The value to be stored is entered from the keyboard. Enter the numeric value to be stored using the numeric keys. Then press the [Pst] key to store the value. To clear the value from the memory and thereby turn off the check‐ counting feature, enter the value "0" and press [Pst]. During counting if the count is below the setpoint the “Lo” indicator will be on, if it is equal to the set point the “OK” indicator will be on and if it is above the limit the “Hi” indicator will be on. 6.3.4 Manually Accumulated Totals The values (weight and count) shown on the display can be added to the © Adam Equipment Company 2011... - Page 16 “Weight” display is exceeded. When the weight exceeds 6 digits the display will show “diSPEr”. To observe the total stored value, press the [MR] key. The total will be displayed for 2 seconds. To clear the memory‐ first press [MR] to recall the totals from memory and then press the [CE] key to clear all values from the memory. 6.3.6 Automatic Accumulated Totals The scale can be set to automatically accumulate totals when a weight is placed on the scale. This eliminates the need to press the [M+] key to store values into the memory. However the [M+] key is still active and can be pressed to store the values immediately. In this case the values will not be stored when the scale returns to zero. See the Section 9.0 on RS‐232 Interface for details on how to enable Automatic Accumulation. © Adam Equipment Company 2011...
-
Page 17: User Parameters
Press [Tare] once, during the initial counting of the display after the power is turned on. The “Weight” display will show "PIn " requesting for the password number. The default password is "0000" but other numbers can be set using the parameter menus. Press the [0] key four times. Press the [Tare] key. There are 3 functions that can be cycled through using the [U. Wt./Units] key. The Weight window will show the parameter number and the Unit Price window will show the word describing the function. The first parameter is “F1” “CAL”. (See section 8.0 for details) To enter into Calibration function, press the [Tare] key. To exit a parameter, press the [Zero] key. To select the second parameter press the [U. Wt./Units] key. © Adam Equipment Company 2011... -
Page 18: Enable Weighing Units
The display will show "donE" to show the new password has been accepted and will return to the menu. Record the new password in a secured place. To exit a parameter, press the [Zero] key. ENABLE WEIGHING UNITS Display will show “F3” “Unit”. This parameter allows weighing units to be enabled or disabled. If enabled the weighing units will change when the [U.Wt./Unit] key is pressed. See section 6.0. To enter this function press the [Tare] key. The display will show the first weighing unit and if it is currently On or Off. Press the [U.Wt./Unit] key to change the setting and then press the [Tare] key to go to the next weighing unit. The weighing units selected will depend upon the model and the capacity of the scales. See Section 12.2, Service Parameters. Press the [Zero] key to return to the weighing mode. © Adam Equipment Company 2011... -
Page 19: Calibration
00004 KiLoS Place the calibration weight on the platform. If the calibration weight is different from the value shown, Press [CE] to clear the current value then enter the correct value. Press [Tare] to calibrate. When calibration is done the display will show “SPAn” “PASS”. Remove the weight. The scale will return to normal weighing. If an error message “SPAn” “FAIL” is displayed, then repeat the process. After calibration, the scale should be checked whether the calibration is correct. If necessary, repeat calibration. NOTE: GBC/GFC‐a scales will have the lb or kg indicator on, to show the unit of the weight requested. If the scale was in pounds before starting the calibration, the weights requested will be in pound values or if the scale was weighing in kilograms then metric weights will be requested. © Adam Equipment Company 2011... -
Page 20: Rs-232 Interface
9.0 RS‐232 INTERFACE The GBC/GFC Series are supplied with a RS‐232 bi‐directional interface. The scale when connected to a printer or computer through the RS‐232 interface, outputs the weight, unit weight and count. Specifications: RS‐232 output of weighing data ASCII code Adjustable Baud rate, 600, 1200, 2400, 4800, 9600 and 19200 baud 8 data bits No Parity Connector: 9 pin D‐subminiature socket Pin 3 Output Pin 2 Input Pin 5 Signal Ground The scale can be set to print text in English, French, German or Spanish. See the RS‐ 232 parameters section for details. All lines end with line feed <lf>, and carriage return <cr>characters. © Adam Equipment Company 2011... - Page 21 GROSS Wt 1.234 Kg Kg or g for metric weights and lb for pounds. Unit Wt. 123 g 10 pcs Includes 2 line feeds with carriage return <lf><cr> at beginning and end of the form <lf><cr> Data Format‐ Memory Recall Print: <lf><cr> DATE 12/09/2006 TIME 14:56 <lf><cr> ------------------ TOTAL 1.234 Kg 10 pcs <lf><cr> Includes 1 line feed ------------------ <lf><cr> 2 line feeds, carriage return <lf><cr> © Adam Equipment Company 2011...
- Page 22 Weight per unit counted Stck. Piezas Number of items counted Anzhl Num. Number of weighings added to subtotals Total Total Gesamt Total Total weight and count printed Date Date Datum Fecha Print date Time Heure Zeit Hora Print time © Adam Equipment Company 2011...
-
Page 23: Input Commands Format
P<cr><lf> Prints the weight, unit weight and totals same as pressing the [Print] key. R<cr><lf> Recall and Print, Same as if first the [MR] key and then the [Print] key is pressed. Will display the current accumulated memory and print the total results. C<cr><lf> Same as pressing [MR] first and then the [CE] key to erase the current memory. © Adam Equipment Company 2011... -
Page 24: Rs-232 Setup
Select printing options for Print Auto continuous printing, print Print mAn automatically or printing manually. AC Auto Select the operation of AC mAn accumulating AC oFF automatically, manually or turned off. LAnG EnGLiS EnGLiS Select Language for FrEnCH printing. GErMAn SPAniS © Adam Equipment Company 2011... - Page 25 Print mAn [Print] key pressed Print continuously Print continuously and Print continuously , and accumulate accumulate when [M+] is Cont to PC [M+] and [Print] key automatically when pressed, [Print] key no have no function stable , [Print] key no function function © Adam Equipment Company 2011...
-
Page 26: Real Time Clock Setup
Press the [CE] key to change the date and time. The display will show the current time in the format, “H‐m‐S”. “timE” “H-m-S” “142929” or if no time has been set show “000000” Enter the time using the numeric keys using a 24 hour clock format, 3:41PM is “154100”. “timE” “H-m-S” “154100” new time overwrites the old Press the [Tare] key to accept the time. The display will show the current date format. “dAtE” “y-m-d” Press the [U.Wt./Unit] key to change the date format. Available formats are: “Y-m-d” year, month, day “m-d-Y” month, day, year “d-m-Y” day, month, year Press the [Tare] key to accept the chosen format and then enter the date in this format. “dAtE” “m-d-y” “051209” note current date is in current format, will show 000000 if no date has been set. Press the [Tare] key to accept the date. An error code will be shown if the time (Err 1) or the date (Err 2) is not the permissible values. For example, 34th day of a month is an invalid entry. © Adam Equipment Company 2011... -
Page 27: Auto Sleep Function
The battery should be charged as possible. Once the “LO bAT” message is shown the scale will still operate for about 10 minutes after which it will automatically switch off to protect the battery. To charge the battery, simply apply power to the scale. The scale does not need to be turned on. The battery should be charged for at least 12 hours for full capacity. Just above the “Unit Weight” display is an LED to indicate the status of battery charging. When the scale is plugged into the mains power, the internal battery will be charged. If the LED is green the battery is fully charged. If it is red, the battery is nearly discharged and yellow indicates the battery should be charged longer, preferably overnight. If the battery has not been used properly or it is used for a number of years it may eventually fail to hold a full charge. If the battery life becomes unacceptable then contact your supplier. © Adam Equipment Company 2011... -
Page 28: Backlight For Lcd
The backlight of the LCD can be set to be‐ “1”: ON at all the time, “2”: ON only when a weight is placed on the scale or “3”: Turned off. To set the backlight press and hold [Pst] key for 4 seconds. The weight display will show “EL xx” where xx is the current setting for the backlight. Press [U. Wt./Units] to scroll through the options. Sets the backlight to be on at all times. “EL on” Sets the backlight to operate automatically when a weight is placed on the scale or a key is pressed. “EL Au” Sets the backlight to be off. “EL OFF” Press the [Tare] key to store the value or press the [Zero] key to escape from this setting and return to weighing. © Adam Equipment Company 2011... -
Page 29: Error Codes
Damaged load cell. Damaged Electronics. Err 6 A/D count is not correct Platform is not installed. when turning the scale Damaged Load cell. on. Damaged Electronics. diSPEr Shows when a number The accumulated totals for weight or is too large tot fit the count exceed 999999. The data on display RS232 is still shown accurately © Adam Equipment Company 2011... -
Page 30: Service Parameters
To exit a parameter, press the [Zero] key. The Weight window will show the parameter number and the Unit Price and Count windows will show the word describing the function. When a parameter is entered by pressing the [Tare] key, the displays will guide you through the parameter selected and the options available. The parameters available are: “F1” “CAL” To enter the Calibration “F2” “Pin” To set a new Pin number for access “F3” “Unit” Enable Weighing Units © Adam Equipment Company 2011... - Page 31 The display will show “donE” indicating the new password has been accepted and will return to the menu. “F3” “Unit” is shown. Record the new password in a secured place. Press [Zero] to return to weighing. 12.1.3 F3 –Unit To enter this parameter, press the [Tare] key when “F3” “unit” is shown. This parameter allows the user to enable or disable the weighing units available in his scales. To enter this parameter, press the [Tare] key when “F3” “Unit” is shown. The display will show the first available weighing unit and if it is On or Off. Press the [U.Wt./Units] key to change the value. Press [Tare] to accept the displayed setting and go to the next unit. Press the [Zero] key to return to the menus. Press the [Zero] key again to return to normal weighing. © Adam Equipment Company 2011...
-
Page 32: Replacement Parts And Accessories
13.0 REPLACEMENT PARTS ACCESSORIES If you need to order any spare parts and accessories, contact your supplier or Adam Equipment. A partial list of such items is as follows‐ Main Power cord Stainless steel Pan Power supply (GFB/GFC‐a) In use cover Replacement Battery Printer © Adam Equipment Company 2011... -
Page 33: Service Information
‐Contact person’s name: ‐Contact telephone, e‐mail, fax or any other methods: B. Details of the unit purchased (This part of information should always be available for any future correspondence. We suggest you to fill in this form as soon as the unit is received and keep a print‐out in your record for ready reference.) GBC/GFC _____ Model name of the scale: Serial number of the unit: Software revision number (Displayed when power is first turned on): Date of Purchase: Name of the supplier and place: C. Brief description of the problem Include any recent history of the unit. For example: ‐Has it been working since it’s delivered ‐Has it been in contact with water ‐Damaged from a fire ‐Electrical Storms in the area ‐Dropped on the floor, etc. © Adam Equipment Company 2011... -
Page 34: Warranty Information
Repairs carried out under the warranty does not extend the warranty period. Components removed during the warranty repairs become the company property. The statutory right of the purchaser is not affected by this warranty. The terms of this warranty is governed by the UK law. For complete details on Warranty Information, see the terms and conditions of sale available on our web site © Adam Equipment Company 2011... - Page 35 Adam Equipment Séries GBC/GFC P.N. 3056610587, Revision B2, June 2011) Logiciel Rév. 2.18 et au‐delà © Adam Equipment Company 2011...
- Page 36 Référence Rapide: Nom du modèle de la balance / indicateur : Numéro de série de la balance : Numéro de révision du logiciel (S’affiche lors de la mise en marche): Date d’achat: Nom et adresse du fournisseur: © Adam Equipment Company 2011...
- Page 37 EN UTILISANT “0000” POUR ENTRER DANS LE PARAMETRE DE CALIBRAGE ....................30 13.0 REMPLACEMENT DES PIECES ET ACCESSOIRES ....32 14.0 INFORMATION SERVICE ..............33 15.0 INFORMATION SUR LA GARANTIE ..........34 P a g e © Adam Equipment Company 2011...
-
Page 38: Introduction
Les séries GBC/GFC sont des balances compteuses de précision, rapides et polyvalentes. Il y a deux types de modèles dans les séries GBC/GFC: les balances GBC/GFC sont au kilogrammes/grammes et les balances GBC/GFC‐a sont interchangeables des livres en kilogrammes si l’utilisateur le souhaite. Les balances possèdent les mêmes fonctions sauf que les balances GBC/GFC‐a ont la possibilité de changer entre deux unités de pesage. Toutes les balances sont fournies avec une interface bidirectionnelle RS‐232 et une heure en temps réel (RTC). Les balances GBC/GFC possèdent un clavier étanche avec des touches codées en couleur sur une membrane et un grand écran à cristaux liquides de type LCD facile à lire. L’écran LCD est équipé en standard du rétro éclairage. Les GBC/GFC comprennent une recherche automatique du zéro, d’un signal sonore pour les comptages préréglés, une tare automatique, une tare préréglée, une fonction d’accumulation qui permet au comptage d’être enregistré et rappelé comme un total accumulé. P a g e © Adam Equipment Company 2011... -
Page 39: Caracteritiques
2g/0.004lb 4g/0.01lb Unités de Mesure Kilogrammes, Pound, Grammes, et les modèles GBC XXa ont aussi les Pound:Ounces et Ounces Temps de Stabilisation 2‐3 Secondes Température de ‐10°C à +40°C / +14°F à +104°F fonctionnement Alimentation 230VAC 50/60Hz. en Europe, Asie et Afrique du Sud. Adaptateur 12vDC 800mA UL/CSA pour les USA Calibrage Externe Masse calibrage Sélectionnable par l’utilisateur Affichage Ecran rétro éclairé vert de 25mm avec indicateur de capacité Structure de la balance Base en fonte aluminium peinte en couleur gris clair pantone, revêtement du plateau en inox 304, indicateur en plastique ABS gris clair Taille du plateau 300mm x 400mm x 50mm / 12” x 15.5” x 2” Dimensions totales 300mmx 520mm x 680mm / 12” x 20.5” x 26.8” (l x p x h) Poids Net 7.6kg / 16.8 Lb Fonctions Pesage / Comptage / Contrôle de pesée avec voyants LED/Pourcentage / Fonction Hold/RS‐232 P a g e © Adam Equipment Company 2011... - Page 40 Unités de Mesure Kilograms and Grams. Pounds pour les unités GFC XXa Temps de stabilisation 2‐3 Secondes Température de ‐10°C à +40°C / +14°F à +104°F fonctionnement Alimentation 230VAC 50/60Hz. en Europe, Asie et Afrique du Sud. Adaptateur 12vDC 800mA UL/CSA pour les USA Calibrage Externe Masse de calibrage Sélectionnable par l’utilisateur Affichage Ecran rétro éclairé vert de 25mm avec indicateur de capacité Structure de la balance Base en fonte aluminium peinte en couleur gris clair pantone, revêtement du plateau en inox 304, indicateur en plastique ABS gris clair Taille du plateau 400mm x 500mm x 65mm/ 15.75” x 19.5” x 2.6” Dimensions totales 400mmx 620mm x 860mm / 15.75” x 24.4” x 33.8” (l x p x h) Poids Net 12.5kg / 27.5 Lb Fonctions Pesage / Comptage / Contrôle de pesée avec voyants LED/Pourcentage / Fonction Hold/RS‐232 P a g e © Adam Equipment Company 2011...
-
Page 41: Installation
• Évitez les tables inadéquates. La table ou le sol doit être rigide et de ne pas vibrer. • Évitez les sources d'énergie instables. Ne pas utiliser à proximité de gros consommateurs d'électricité tels que les équipements de soudage ou de gros moteurs. • Ne pas placer près de vibration des machines. • Évitez un taux élevé d'humidité qui pourrait provoquer de la condensation. Eviter le contact direct avec de l'eau. Ne pas pulvériser ou plonger la balance dans l'eau. • Évitez les mouvements de l'air, tels que des ventilateurs ou l'ouverture des portes. Ne placez pas près d'ouvertures de fenêtres ou de climatisation d'air. • Gardez les balances propres. Ne pas empiler de documents sur la balance quand elles ne sont pas en usage P a g e © Adam Equipment Company 2011... -
Page 42: Installation Des Balances
Fixez l'indicateur sur la colonne en le faisant glisser sur le support. Attachez le câble de la base sur le connecteur à l’arrière de l’indicateur. Connectez l’indicateur sur le secteur. Appuyez sur [On/Off]. Le numéro de révision de logiciel apparaîtra suivi par un autotest affichant tous les chiffres avant d’indiquer le zéro avec l’unité de poids qui a été sélectionnée. P a g e © Adam Equipment Company 2011... -
Page 43: Descriptions Des Touches
Touches d’entrées numériques, utilisées pour saisir une valeur manuellement, pour un poids de tare, un poids unitaire, et une taille d’échantillon. [CE] Utilisée pour effacer le poids unitaire ou une saisir erronée. [M+] Ajoute le comptage en cours dans la mémoire d’accumulation. Jusqu’à 99 valeurs peuvent ajoutées ou jusqu’ à ce que l’écran du poids atteigne sa pleine capacité. Imprime aussi les valeurs affichées quand l’impression automatique est désactivée. [MR] Rappel la mémoire accumulée. [Pst] Règle la limite supérieure d’un nombre de pièces devant être compté. Quand cette limite est atteinte ou dépassée la balance fera retentir un signal. [Print] Imprime le poids, poids unitaire et le comptage vers un PC ou une imprimante en utilisant l’interface RS‐232. Imprime les totaux de la mémoire quand [MR] est d’abord actionnée. [Smpl] Utilisée pour entrer le nombre de pièces qui compose l’échantillon. [U.Wt./Units] Utilisée pour entrer le poids d’un échantillon manuellement. . Sélectionne l’unité de pesage quand l’écran “Unit Weight” est à zéro si activé. [Tare] Tare la balance. Enregistre le poids actuel dans la mémoire comme valeur de tare, soustrait la valeur de tare du poids et affiche les résultats. C’est le poids net. En entrant une valeur en utilisant le clavier enregistrera la valeur de la tare. [Zero] Règle le poids zéro pour toutes les pesées ultérieures. P a g e © Adam Equipment Company 2011... -
Page 44: Ecrans
5.0 ECRANS Les balances possèdent trois sections. Il s’agit du “Weight” = Poids, “Unit Weight” = Poids unitaire et “Count” = Comptage. Le design du LCD est le suivant: POIDS POIDS UNITAIRE COMPTAGE 5.1 ECRAN POIDS Il possède 6 chiffres qui indiquent le poids sur la balance. Affiche le poids Net, "Net" Indicateur de stabilité, symbole Indicateur du zéro, symbole 0 Unité de pesage: kg, lb P a g e © Adam Equipment Company 2011... -
Page 45: Ecran Du Poids Unitaire
s’affichera. Dans les deux cas la balance continue de fonctionner et les indications sont présentes pour alerter l’utilisateur d’un problème potentiel. Si un comptage préréglé a été enregistré, le symbole s’affichera. Un symbole de batterie faible sera allumé si la batterie a besoin d’être rechargée. Les symboles Lo, OK, Hi seront utilisés lors du comptage préréglé. Le symbole “Mem” sera affiché quand la mémoire interne a enregistré une valeur de pesée précédente. P a g e © Adam Equipment Company 2011... -
Page 46: Fonctionnement
L’indicateur de zéro “>Z<” sera allumé. Placez un container sur le plateau et son poids sera affiché. Appuyez sur [Tare] pour tarer la balance. Le poids qui était affiché est enregistré comme valeur de tare laquelle est soustraite de l’écran, laissant le zéro affiché. Les indications “Net” et “>Z<” seront affichées. Lorsqu’un produit sera ajouté, seulement le poids de cet article sera affiché. La balance pourra être tarée une seconde fois si un autre type de produit était ajouté au premier. De nouveau uniquement le poids qui est ajouté après la tare sera affiché. P a g e © Adam Equipment Company 2011... -
Page 47: Tare Préréglée
Mettre à zéro la balance en appuyant sur [Zero] si nécessaire. Si le container doit être utilisé, placez le sur la balance et tarez le en appuyant sur [Tare] comme décrit précédemment. Placez une quantité connue de pièces sur la balance. Après que l’écran du poids soit stabilisé, entrez la quantité de pièces en utilisant les touches numériques et ensuite appuyez sur [Smpl] . Le nombre de pièces sera affiché dans l’écran "Count" (Comptage) et le poids moyen calculé sera affiché dans l’écran "Unit Weight" (Poids Unitaire). P a g e © Adam Equipment Company 2011... -
Page 48: Comptage De Plus De Pièces
Après que la balance soit tarée les pièces devant être comptées sont ajoutées et l’écran "Count" affichera le nombre de pièces, le tout calculé en utilisant le poids total et le poids unitaire. Il est possible d’augmenter la précision du poids unitaire à tout moment pendant le processus de comptage en entrant le comptage affiché et ensuite en appuyant sur [Smpl]. Vous devez être certain que la quantité affichée corresponde à la quantité sur le plateau avant d’appuyer sur la touche. Le poids unitaire peut être ajusté basé sur une plus grande taille d’échantillon. Ceci apportera une plus grande précision lors du comptage d’échantillon de plus grandes tailles. P a g e © Adam Equipment Company 2011... -
Page 49: Contrôle Du Comptage
“Weight” soit excédée. Quand le poids dépasse 6 chiffres l’écran affichera “diSPEr”. Pour observer la valeur totale enregistrée, appuyez sur [MR]. Le total sera affiché pendant 2 secondes. Pour effacer la mémoire, appuyez d’abord sur [MR] pour rappeler les totaux depuis la mémoire et ensuite appuyez sur [CE] pour effacer toutes les valeurs de la mémoire. P a g e © Adam Equipment Company 2011... -
Page 50: Totaux Accumulés Automatiquement
6.3.6 Totaux accumulés automatiquement La balance peut être réglée pour accumuler automatiquement les totaux quand un poids est mis sur la balance. Cela élimine la nécessité d’appuyer sur [M+] pour enregistrer les valeurs en mémoire. C ependant la touche [M+] est encore active et peut être actionnée pour enregistrer les valeurs immédiatement. Dans ce cas les valeurs ne seront pas garder quand la balance revient à zéro. Voir la section 9.0 à propos de l’interface RS‐232 pour des informations sur comment activer l’Accumulation Automatique. P a g e © Adam Equipment Company 2011... -
Page 51: Parametres Utilisateurs
Appuyez sur [Tare]. Il y a 3 fonctions que vous pouvez faire défiler en appuyant sur [U. Wt./Units]. L’écran du poids affichera le numéro du paramètre et l’écran du poids unitaire affichera l’intitulé de la fonction. Le premier paramètre est “F1” “CAL”. (Voir section 8.0 pour plus de détails) Pour entrer dans la fonction de Calibrage appuyez sur [Tare]. Pour sortir d’un paramètre, appuyez sur [Zero]. Pour sélectionner le second paramètre appuyez sur [U. Wt./Units]. P a g e © Adam Equipment Company 2011... -
Page 52: Reglage Du Code Pin
Pour entrer dans cette fonction appuyez sur [Tare]. L’écran affichera la première unité de pesage et si elle est actuellement sur On ou Off. Appuyez sur [U.Wt./Unit] pour changer le réglage et ensuite appuyez sur [Tare] pour aller vers la prochaine unité de pesage. Les unités de pesage sélectionnées dépendront du modèle et de la capacité des balances. Voir section 12.2, Paramètres de service. Appuyez sur [Zero] pour retourner au mode pesage. P a g e © Adam Equipment Company 2011... -
Page 53: Calibrage
Les écrans afficheront alors le poids de calibrage suggéré, la valeur est affichée dans un nombre entier, il n’est pas possible d’avoir une faction d’un kilogramme ou d’une livre, par exemple: LoAd 00004 KiLoS Placez le poids de calibrage sur le plateau. Si le poids de calibrage est différent de la valeur indiquée, appuyez sur [CE] pour effacer la valeur actuelle et entrer la bonne valeur. Appuyez sur [Tare] pour calibrer. Lorsque le calibrage est accompli l’écran affichera “SPAn” “PASS”. Retirez le poids. La balance retournera au pesage normal. P a g e © Adam Equipment Company 2011... - Page 54 Si un message d’erreur “SPAn” “FAIL” est affiché, alors répéter la procédure. Après le calibrage, la balance devra être vérifiée pour savoir si le calibrage est correct. Si nécessaire, répétez le calibrage. NOTE: Les balances GBC/GFC‐a auront l’indicateur lb ou kg allumé pour montrer l'unité de pesage demandée. Si la balance était en livres avant de commencer le calibrage, le . poids requis sera en livres ou si la balance était en kilogrammes alors les poids métriques seront demandés P a g e © Adam Equipment Company 2011...
- Page 55 Les séries GBC/GFC sont fournies avec une interface bidirectionnelle RS‐232. La balance peut envoyer les données du poids, le poids unitaire et le comptage lorsque celle‐ci est connectée à un ordinateur ou une imprimante via l’interface RS‐232. Caractéristiques: Sortie RS‐232 des données de pesage Code ASCII Taux de Baud réglable, 600, 1200, 2400, 4800, 9600 et 19200 baud 8 bits de données Pas de Parité Connecteur: Prise 9 pin D‐subminiature Pin 3 Sortie Pin 2 Entrée Pin 5 Signal de terre La balance peut être réglée pour imprimer le texte en Anglais, Français, Allemand ou Espagnol. Voir la section des paramètres RS‐232 pour plus de détails. Toutes les lignes se terminent par une ligne d’alimentation <lf>, et d’un chariot de retour <cr> caractères. P a g e © Adam Equipment Company 2011...
-
Page 56: Format De Données- Impression Du Rappel Depuis La Mémoire
Kg ou g pour poids métriques et lb pour les livres. Unit Wt. 123 g 10 pcs Inclus 2 lignes d’alimentation avec chariot de retour <lf><cr> au début et à la fin du format <lf><cr> Format de données‐ Impression du rappel depuis la mémoire: <lf><cr> DATE 12/09/2006 TIME 14:56 <lf><cr> ------------------ TOTAL 1.234 Kg 10 pcs <lf><cr> Inclus 1 ligne d’alimentation ------------------ 2 lignes d’alimentation, chariot de retour <lf><cr> <lf><cr> P a g e © Adam Equipment Company 2011... - Page 57 Nombre de pièces compté Anzhl Num. Nombre de pesées ajoutées aux sous totaux Total Total Gesamt Total Poids total et comptage imprimé Date Date Datum Fecha Imprime la date Time Heure Zeit Hora Imprime l’heure P a g e © Adam Equipment Company 2011...
-
Page 58: Format Des Commandes D'entrees
R<cr><lf> Rappel et imprime, agit comme si [MR] est d’abord actionnée et ensuite [Print]. Ceci affichera la mémoire accumulée en cours et imprimera les résultats finaux. C<cr><lf> Agit comme si [MR] est d’abord actionnée et ensuite [CE] pour effacer la mémoire en cours. P a g e © Adam Equipment Company 2011... -
Page 59: Reglage De La Rs-232
Print mAn impression continue, automatique ou manuelle. AC Auto Sélectionne le AC mAn fonctionnement de AC oFF l’accumulation automatique, manuel ou éteint. LAnG EnGLiS EnGLiS Sélectionne l’impression FrEnCH de la langue. GErMAn SPAniS P a g e © Adam Equipment Company 2011... - Page 60 [M+] continuellement accumule est actionnée, [Print] n’a Cont to PC [M+] et [Print] n’ont automatiquement pas de fonction pas de fonction quand la lecture est stable, [Print] n’a pas de fonction P a g e © Adam Equipment Company 2011...
-
Page 61: Reglage De L'heure En Temps Reel
“timE” “H-m-S” “154100” nouvelle heure Appuyez sur [Tare] pour accepter l’heure. L’écran affichera le format de la date en cours. “dAtE” “y-m-d” Appuyez sur [U.Wt./Unit] pour changer le format de la date. Les formats disponibles sont: “Y-m-d” an, mois, jour “m-d-Y” mois, jour, an “d-m-Y” jour, mois, an Appuyez sur [Tare] pour accepter le format choisi et ensuite entrer la date dans ce format. “dAtE” “m-d-y” “051209” notez que la date en cours est dans le format actuel, l’écran affichera 000000 si aucune date n’a pas été réglée. P a g e © Adam Equipment Company 2011... -
Page 62: Fonction Auto Extinction
10.1 BATTERIE Les balances peuvent fonctionner à partir de la batterie, si nécessaire. La durée de vie de la batterie est d’approximativement de 70 heures. Quand la batterie a besoin d’être rechargée, le symbole de batterie apparaîtra. La batterie devra être chargée dès que possible. Une fois que le message “LO bAT” est affiché la balance fonctionnera encore pendant 10 minutes après qu’elle ne s’éteigne automatiquement pour protéger la batterie. Pour charger la batterie, brancher simplement la balance sur le secteur. La balance n’a pas besoin d’être allumée. La batterie devra être rechargée pendant au moins 12 heures pour une P a g e © Adam Equipment Company 2011... -
Page 63: Retro Eclairage Pour Lcd
L’écran du poids affichera “EL xx” ou xx est le réglage courant pour le rétro éclairage. Appuyez sur [U. Wt./Units] pour faire défiler les options. Règle le rétro éclairage sur ON tout le temps. “EL on” Règle le rétro éclairage pour fonctionner automatiquement quand un poids est mis sur la “EL Au” balance ou qu’une touche est actionnée. Règle le rétro éclairage sur OFF. “EL OFF” Appuyez sur [Tare] pour enregistrer la valeur ou appuyez sur [Zero] pour sortir de ce réglage et retourner au pesage. P a g e © Adam Equipment Company 2011... - Page 64 P a g e © Adam Equipment Company 2011...
-
Page 65: Codes Erreur
Le comptage A/D est Le plateau n’est pas installé. incorrect lors de la mise Capteur endommagé. en marche de la balance. Electronique endommagée. diSPEr Indique quand un Les totaux accumulés pour le poids nombre trop grand pour ou le comptage excèdent 999999. s’afficher sur l’écran Les données sur la RS232 sont encore affichées précisément P a g e © Adam Equipment Company 2011... -
Page 66: Parametres De Service
Quand vous êtes entré dans un paramètre en appuyant sur [Tare], les écrans vous guideront à travers les paramètres sélectionnés et les options disponibles. Les paramètres disponibles sont: “F1” “CAL” Pour entrer dans le calibrage “F2” “Pin” Pour régler un nouveau code Pin “F3” “Unit” Activer les unités de pesage P a g e © Adam Equipment Company 2011... - Page 67 Appuyez sur [Zero] pour retourner au pesage. 12.1.3 F3 –Unité Ce paramètre permet à l’utilisateur d’activer ou de désactiver les unités de pesage dans la balance. Pour entrer dans ce paramètre, appuyez sur [Tare] quand “F3” “unit” est affiché. L’écran affichera la première unité de pesage disponible et si elle est sur ON ou OFF. Appuyez sur [U.Wt./Units] pour changer la valeur. Appuyez sur [Tare] pour accepter le réglage affiché et aller à la prochaine unité. Appuyez sur [Zero] pour retourner au menu. Appuyez sur [Zero] de nouveau pour retourner au pesage. P a g e © Adam Equipment Company 2011...
-
Page 68: Remplacement Des Pieces Et Accessoires
13.0 REMPLACEMENT PIECES ACCESSOIRES Si vous avez besoin de commander des pièces détachées, contactez votre fournisseur ou Adam Equipment. Une liste partielle de ces articles est montrée ci‐dessous.‐ Cordon d’alimentation Plateau inox Bloc alim (GBC/GFC‐a) Coque en plastique Batterie de remplacement Imprimante P a g e © Adam Equipment Company 2011... -
Page 69: Information Service
Comporte tout historique récent concernant l’indicateur. Par exemple: -A-t-il fonctionné depuis sa livraison -A-t-il été en contact avec de l’eau -Endommagé par le feu -Orage dans votre région -Tombé sur le sol, etc . P a g e © Adam Equipment Company 2011... -
Page 70: Information Sur La Garantie
Les réparations menées sous la garantie n’étendent pas la période de la garantie. Les composants enlevés durant les réparations de garantie deviennent la propriété de la compagnie. Le droit statuaire de l’acheteur n’est pas affecté par cette garantie. Les modalités de cette garantie sont gouvernées par la Loi au Royaume‐Uni. Pour de plus amples détails sur les Informations de la Garantie, veuillez vous référez aux conditions de ventes disponibles sur notre site P a g e © Adam Equipment Company 2011... - Page 71 Les produits Adam sont principalement conçus pour les marches du laboratoire, l’enseignement, le médical et l’industrie. La gamme de produits peut se résumer comme ce qui suit : ‐Balances Analytiques et de Précision ‐Balances Compacts et Portables ‐Balances hautes capacités ‐Dessiccateurs ‐Balances mécaniques ‐Balances compteuses ‐Balances digitales de pesée digitales/contrôle de pesée ‐Plate formes hautes performances ‐Crochet peseur ‐Balances médicales ‐Balances poids prix Pour une liste complète de tous les produits Adam visitez notre site internet www.adamequipment.com © Copyright par Adam Equipment Co. Ltd. Tous droits réservés. Aucune ou partie de ce document ne peut être réimprimée ou traduite sous tout forme que ce soit sans permission antérieure d'Adam Equipment. Adam Equipment se réserve le droit de faire des changements technologiques, aux dispositifs, aux caractéristiques et à la conception de l'équipement sans communication préalable. Toutes les informations contenues dans ce document sont rédigées avec le meilleur de nos connaissances, précises et complètes une fois publiée. Cependant, nous ne sommes pas responsables d’erreurs d’interprétations qui peuvent résulter de la lecture de ce document. La dernière version de cette publication est disponible sur notre site Web Visiter notre site Web sur: www.adamequipment.com © Adam Equipment Company 2011...
- Page 72 Adam Equipment GBC / GFC REIHEN P.N. 3056610587, Revision B2, June 2011) Software Rev. 2.18 und höher © Adam Equipment Company 2011...
- Page 73 Übersicht: Modellname des Geräts: Seriennummer des Geräts: Software‐Revisionsnummer (Erscheint beim Einschalten des Geräts): Kaufdatum: Name und Ort des Händlers: © Adam Equipment Company 2011...
- Page 74 SERVICEPARAMETER ..............23 13.1 AUFRUFEN DER PARAMETER FÜR DIE KALIBRIERUNG MIT“0000” ....................23 14.0 ERSATZTEILE UND ZUBEHÖR ............25 15.0 SERVICE-INFORMATIONEN ............26 16.0 WARRANTY INFORMATION ....Error! Bookmark not defined. S e i t e © Adam Equipment Company 2011...
- Page 75 S e i t e © Adam Equipment Company 2011...
-
Page 76: Einleitung
Die GBC/GFC haben versiegelte Tastaturen mit farbkodierten Membranschaltern, sowie eine deutlich lesbare Flüssigkristallanzeige (LCD) mit Hintergrund‐ beleuchtung. Ebenfalls inklusive sind automatische Nullnachführung, akustischer Alarm bei voreingestellten Grenzwerten, automatisches & voreingestelltes Tara, und eine Summierfunktion zum Speichern des Gewichtswertes und späteren Aufrufen als akkumulierter Gesamtwert. S e i t e © Adam Equipment Company 2011... -
Page 77: Technische Daten
2g/0.004lb 4g/0.01lb Wägeeinheiten Kilogramms und Gramm, und bei GBC XXa Modellen auch Pfund Stabilisierungszeit 2‐3 Sek. Betriebstemperatur ‐10°C bis +40°C / +14°F bis +104°F Stromversorgung 230VAC 50/60Hz. in Europe, Asien und Südafrika. 12vDC 800mA UL/CSA Adapter für USA Kalibrierung Extern Kalibriergewicht Wählbar Anzeige Grün hinterleuchtete Anzeige mit 25mm Ziffern und Kapazitätsanzeige Gehäuse Plattform aus Gussaluminium, Farbe Pantone Cool Grey, Wägeplatte aus Edelstahl Grad 304, Anzeigeeinheit aus ABS, Farbe Cool grey Größe Wägeplatte 300mm x 400mm x 50mm / 12” x 15.5” x 2” Gesamtabmessungen 300mmx 520mm x 680mm / 12” x 20.5” x 26.8” B x T x H Nettogewicht 7.6kg / 16.8 Lb Merkmale Wägung / Zählung / Kontrollzählung mit LED‐Leuchten / Prozentwägung / Haltefunktion / RS‐232 S e i t e © Adam Equipment Company 2011... - Page 78 10g / 0.02lb 20g / 0.04lb 40g / 0.1lb Wägeeinheiten Kilogramms und Gramm, und bei GFC XXa Modellen auch Pfund Stabilisierungszeit 2‐3 Sek. Betriebstemperatur ‐10°C bis +40°C / +14°F bis +104°F Stromversorgung 230VAC 50/60Hz. in Europe, Asien und Südafrika. 12vDC 800mA UL/CSA Adapter für USA Kalibrierung Extern Kalibriergewicht Wählbar Anzeige Grün hinterleuchtete Anzeige mit 25mm Ziffern und Kapazitätsanzeige Gehäuse Plattform aus Gussaluminium, Farbe Pantone Cool Grey, Wägeplatte aus Edelstahl Grad 304, Anzeigeeinheit aus ABS, Farbe Cool grey Größe Wägeplatte 400mm x 500mm x 65mm/ 15.75” x 19.5” x 2.6” Gesamtabmessungen 400mmx 620mm x 860mm / 15.75” x 24.4” x 33.8” B x T x H Nettogewicht 12.5kg / 27.5 Lb Merkmale Wägung / Zählung / Kontrollzählung mit LED‐Leuchten / Prozentwägung / Haltefunktion / RS‐232 S e i t e © Adam Equipment Company 2011...
-
Page 79: Installation
INSTALLATION AUFSTELLORT Nicht an Orten aufstellen, die Einfluss auf die Genauigkeit haben könnten. Extreme Temperaturen vermeiden. Nicht in direktem Sonnenlicht oder nahe Klimaanlagen aufstellen. Ungeeignete Tische vermeiden. Der Tisch oder Boden muss fest sein und darf nicht vibrieren. Instabile Energiequellen vermeiden. Nicht neben Maschinen mit großem Elektrizitätsverbrauch ... -
Page 80: Aufstellen Der Waage
AUFSTELLEN WAAGE Das Stativ wird in einer mit 4 Schrauben am Rahmen der Plattform angebrachten Halterung befestigt. Das Stativ wird mit 2 Sätzen Schrauben in der Halterung gesichert. Das Kabel, das von der Plattform zur Anzeige geht, muss durch das Rohr geführt werden, und kommt oben durch die Anzeigenhalterung heraus. Überschüssiges Kabel kann im Rohr verstaut werden. ... -
Page 81: Tastatur
TASTATUR TASTEN FUNKTIONEN [0‐9, .] Numerische Tasten, zur manuellen Eingabe eines Tarawerts, Stückgewichts, und Probengröße. [CE] Zum Löschen des Stückgewichts oder einer fehlerhaften Eingabe. [M+] Fügt das momentane Zählergebnis zum Summenspeicher hinzu. Bis zu 99 Werte, bzw. bis die Anzeigekapazität erreicht ist, können hinzugefügt werden. Druckt bei deaktiviertem Auto Print auch die angezeigten Werte. [MR] Zum Aufrufen des Summenspeichers. [Pst] Zum Einrichten des oberen Grenzwerts für die zu zählenden Stücke. Wird der Wert überschritten, ertönt ein Signalton. [Print] Zum Ausgabe von Gewicht / Einheit und Zählung über Drucker oder PC über die RS‐232 Schnittstelle. Wird zuerst [MR] gedrückt, werden die Summen im Speicher ausgedruckt. [Smpl] Zur Eingabe der Anzahl der Artikel einer Probe. [U.Wt./Units] Zur manuellen Eingabe des Gewichts einer Probe. Wenn aktiviert Wahl der Wägeeinheit, wenn “Stückgewicht” auf Null ist. [Tare] Tariert das Gerät. Speichert den gegenwärtigen Wert als Tarawert. Dieser wird vom tatsächlichen Gewicht auf der Waage abgezogen, und das Ergebnis angezeigt. Das nun angezeigte Gewicht ist das Nettogewicht. Bei Eingabe eines Wertes über die Tastatur wird der Wert als Tarawert gespeichert. [Zero] Stellt den Nullpunkt für alle folgenden Wägungen. Die Anzeige geht auf Null. © Adam Equipment Company 2014 ... -
Page 82: Anzeige
ANZEIGE Die Anzeige hat drei Fenster, “Gewicht”, „Stückgewicht“ und „Stückzahl“. Die LCD‐Anordnung ist: GEWICHT STÜCKGEWICHT STÜCKZAHL FENSTER "GEWICHT" Diese hat ein 6‐stelliges Fenster, welches das Gewicht auf der Waage anzeigt. Bei Anzeige des Nettogewichts steht "Net" Stabilitätsanzeige, Symbol Nullanzeige, 0 Symbol Wägeeinheiten: kg, lb © Adam Equipment Company 2014 ... -
Page 83: Fenster Stückgewicht
FENSTER STÜCKGEWICHT Diese Anzeige zeigt das Stückgewicht einer Probe. Dieser Werte kann vom Anwender eingegeben werden, oder er wird von der Waage berechnet. Die Wägeeinheit ist Gramm, wenn Gramm oder Kilogramm als Wägeeinheit eingestellt ist, und Pfund, wenn Pfund gewählt wurde. FENSTER STÜCKZAHL Dieser Abschnitt zeigt die Anzahl der Artikel auf der Waage, oder den Wert der aufsummierten Zählung. Siehe dazu folgenden Abschnitt zum BETRIEB. ... -
Page 84: Betrieb
BETRIEB ANMERKUNG: nur für GBC/GFC‐a EINSTELLEN DER WÄGEEINHEIT, lb oder kg Das Gerät zeigt beim Anschalten die zuletzt gewählte Wägeeinheit, entweder Kilogramm oder Pfund. Zum Wechseln der Einheit drücken Sie, wenn “Stückgewicht” auf Null ist, auf [U. Wt./Units]. Wenn nötig, kann das Stückgewicht vor dem Wechseln mit [CE] gelöscht werden. ANZEIGE NULL STELLEN Sie können jederzeit mit [Zero] den Nullpunkt setzen, von dem alle folgenden Wägungen und Zählungen gemessen werden. Dies geschieht normalerweise bei leerer Wägeplatte. Wurde der Nullpunkt gefunden, erscheint im “Gewicht”‐ Fenster das Null‐Symbol “>Z<”. Das Gerät hat eine Funktion für automatische Nullnachführung, um geringe Abweichungen oder Ansammlung von Material auf der Wägeplatte auszugleichen. ... -
Page 85: Stückzählung
Voreingestelltes Tara Ist die Anzeige bei leerer Waage auf Null oder Bruttogewicht, kann manuell ein Tarawert eingestellt werden. Geben Sie über die Tastatur einen Tarawert ein. Bestätigen Sie mit [Tare], um den voreingestellten Nullwert zu bestätigen. War die Anzeige auf Null, wird ein negativer Wert angezeigt entsprechend des eingegebenen Tarawerts, und das “Net”‐Symbol erscheint. STÜCKZÄHLUNG Einstellen des Stückgewichts Zur Stückzählung muss das Durchschnittsgewicht der zu zählenden Artikel bestimmt werden. Dazu wird eine bekannte Anzahl des Artikels gewogen, und die Anzeige berechnet daraufhin das durchschnittliche Gewicht. Alternativ kann das Durchschnittsgewicht manuell eingegeben werden, falls es bekannt ist. A. Wägung einer Probe zur Bestimmung des Stückgewichts Um das durchschnittliche Gewicht der zu zählenden Artikel zu bestimmen, müssen Sie eine bekannte Menge des Artikels auf die Waage legen, und diese Anzahl dann über die Tastatur eingeben. Die Waage teilt das Gesamtgewicht durch die Anzahl der Stücke, und zeigt dann das durchschnittliche Stückgewicht an. Mit [CE] können Sie jederzeit das Stückgewicht löschen. Stellen Sie die Waage mit [Zero] auf Null wenn nötig. Soll ein Behälter verwendet werden, stellen Sie ihn auf die Waage, und drücken Sie [Tare], um ... - Page 86 B. Eingabe eines bekannten Gewichts Ist das Stückgewicht bereits bekannt, kann der Wert über die Tastatur eingegeben werden. Geben Sie das Stückgewicht in Gramm mit den numerischen Tasten ein, und bestätigen Sie mit [U. Wt./Units]. Das Fenster "Stückgewicht" zeigt nun den eingegebenen Wert. Nun werden die Artikel auf die Waage aufgelegt. Das Gewicht sowie die Stückzahl werden nun, basierend auf dem Stückgewicht, angezeigt. Zählen größerer Mengen Nachdem das Stückgewicht bestimmt wurde, kann die Waage zur Stückzählung ...
- Page 87 Manuelles Aufsummieren Die angezeigten Werte (Gewicht und Stückzahl) können durch Drücken von [M+] zu den bereits gespeicherten Werten addiert werden. Das Fenster "Gewicht" zeigt das gesamte Gewicht, im Fenster "Stückzahl" wird die aufsummierte Gesamtzahl anzeigt, und im Fenster "Stückgewicht" wird angezeigt, wie oft Werte dem Summenspeicher hinzugefügt wurden. Die Werte ...
-
Page 88: Anwenderparameter
Automatisches Aufsummieren Das Gerät kann so eingestellt werden, dass es automatisch die Werte im Speicher aufsummiert, sobald ein Gewicht auf die Waage gelegt wird. Dadurch muss nicht jedes Mal auf [M+] gedrückt werden, um die Werte abzuspeichern. Die [M+] Taste bleibt weiterhin aktiv, und kann gedrückt werden, um die Werte sofort zu speichern. In diesem Fall werden die Werte ... -
Page 89: Aktivierung Von Wägeeinheiten
Das Fenster “Gewicht” zeigt jetzt "Pin 2 ". Geben Sie die Nummer erneut ein, und bestätigen Sie mit [Tare]. Nun wird "donE" angezeigt, um zu bestätigen, dass die neue PIN‐Nummer angenommen wurde, dann kehrt die Anzeige ins Menü zurück. Bewahren Sie die neue PIN an einem sicheren Ort auf. Mit [Zero] schließen Sie dieses Parametermenü. AKTIVIERUNG WÄGEEINHEITEN “F3” “Unit” wird angezeigt. In diesem Parameter können Wägeeinheiten aktiviert und deaktiviert werden. Sind sie aktiviert, ändert sich die Einheit bei Drücken von [U.Wt./Unit]. Siehe Abschnitt 7.0. Mit [Tare] öffnen Sie den Parameter. ... -
Page 90: Kalibrierung
KALIBRIERUNG GBC/GFC Waagen werden mit metrischen, mit GBC/GFC‐a‐Geräte mit Gewichten in Pfund oder ebenfalls metrischen Gewichten kalibriert, je nachdem, welche Einheit vor der Kalibrierung verwendet wird. Weitere Informationen finden Sie in Abschnitt 13 Service‐Parameter. Die Waage zeigt das Gewicht an, das für die Kalibrierung verwendet werden soll. Dieser Wert ist das zuletzt zur Kalibrierung verwendete Gewicht. Bei Bedarf kann ein neuer Wert eingegeben werden. ... - Page 91 Die GBC/GFC Reihen sind serienmäßig mit einer bidirektionalen RS‐232 Schnittstelle ausgestattet. Das Gerät gibt bei Anschluss an einen Drucker oder Computer das Gewicht, Stückgewicht und Stückzahl an. Technische Daten: RS‐232 Ausgabe der Wägedaten ASCII Code Einstellbare Baudrate, 600, 1200, 2400, 4800, 9600 und 19200 Baud 8 Datenbit Keine Parität Anschluss: 9polige D‐Subminiaturbuchse Pin 3 Ausgang Pin 2 Eingang Pin 5 Betriebserde Das Gerät kann für Ausdruck in Englisch, Deutsch, Französisch oder Spanisch eingestellt werden. Siehe dazu Abschnitt 10.2 zum Einrichten der Schnittstelle. Alle Zeilen enden mit den Zeichen für Zeilenvorschub <lf>, und Wagenrücklauf. © Adam Equipment Company 2014 ...
- Page 92 Datenformat‐Normaler Ausdruck: <lf><cr> <lf><cr> DATE 12/09/2006 TIME 14:56 <lf><cr> Net Wt. wenn das Nettogewicht angezeigt wird GROSS Wt 1.234 Kg Kg oder g bei metrischen Gewichten, lb bei Pfund. Unit Wt. 123 g 10 pcs einschl. 2 Zeilenvorschübe mit Wagenrücklauf <lf><cr> am Anfang oder Ende des Formatausdrucks <lf><cr> Datenformat‐ Ausdruck Speicheraufruf: <lf><cr> DATE 12/09/2006 TIME 14:56 <lf><cr> ------------------ TOTAL 1.234 Kg 10 pcs einschließlich 1 Zeilenvorschub <lf><cr> ------------------ <lf><cr>...
- Page 93 Datenformat‐ Fortlaufender Ausdruck: ST,GS, 0.9080 kg U.W. 0.90798 g/pcs 1000 pcs einschl. 2 Zeilenvorschübe mit Wagenrücklauf <lf><cr> zwischen Datensätzen <lf><cr> Das Format ist in anderen Sprachen das gleiche, aber der Text erscheint in der ausgewählten Sprache. Siehe Abschnitt 10.2 Beschreibung ENGLISCH FRANZÖSISCH DEUTSCH SPANISCH Gross Wt Pds Brut Brut-Gew Pso Brut Ausdruck ...
-
Page 94: Format Der Eingabebefehle
FORMAT EINGABEBEFEHLE Das Anzeigegerät kann mit den folgenden Befehlen gesteuert werden. Die Befehle müssen in Großbuchstaben gesendet werden, z. B. "T" statt "t". Drücken Sie zur Bestätigung nach jeder Eingabe am PC die Eingabetaste [Enter]. T<cr><lf> Tariert das Gerät, damit das Nettogewicht angezeigt wird. Entspricht Drücken von [Tare] am Anzeigegerät. Setzt den Nullpunkt für alle folgenden Wägungen. Das Display zeigt Z<cr><If> Null. Entspricht Drücken von [Zero]. P<cr><lf> Druck Gewicht, Stückgewicht und Gesamtzahl aus. Entspricht Drücken von [Print]. R<cr><lf> Abruf und Ausdruck. Entspricht Drücken von erst der [MR]‐, dann der [Print]‐Taste. Zeigt gegenwärtigen gesammelten Speicher‐ inhalt und druckt die Gesamtergebnisse. C<cr><lf> ... -
Page 95: Einrichten Der Rs-232
EINRICHTEN RS‐232 Die RS‐232‐Schnittstelle verwendet die vom Anwender eingerichteten Parameter für u.a. Sprache, Baudrate und Datumsformat. Drücken und halten Sie die Taste [Print] für 4 Sekunden gedrückt, um die Parameter aufzurufen. Drücken Sie [U. Wt./Units], um durch die Optionen zu blättern, und [Tare], um die Änderungen zu speichern. Fahren Sie mit dem nächsten Parameter fort. Wird ein Parameter mit [Tare] geöffnet, führt die Anzeige durch den gewählten Parameter und die verfügbaren Optionen. Die Parameter und deren Funktionen sind wie folgt: Anzeigefenster ... - Page 96 Das Gerät führt folgende Funktionen entsprechend der Einstellungen für Summenspeicher und Ausdruck aus: SPEICHERFUNKTIONEN DRUCK‐ AC Auto AC mAn AC oFF FUNKTIONEN Automatisches Automatischer Ausdruck; Automatischer Speichern und Ausdruck, [M+] ist Speichern und Ausdruck Drucken ohne Funktion Print Auto bei Drücken von [M+] Automatisches Speichern und Ausdruck Ausdruck bei Drücken Speichern ohne bei Drücken von [M+] von ...
-
Page 97: Einstellen Der Echtzeituhr
EINSTELLEN ECHTZEITUHR Die Echtzeituhr (Real Time Clock RTC) wird nur bei Ausgabe über die RS232 verwendet. Datum und Zeit können nach Bedarf eingestellt werden. Die Uhr läuft auch bei ausgeschaltetem Gerät weiter. Einstellen der Uhr Drücken und halten Sie die [CE]‐Taste ca. 4 Sekunden. Lassen Sie los, sobald Zeit und Datum angezeigt werden. Die Fenster zeigen am Anfang das gegenwärtig eingestellte Datum und Zeit. “ rtC “ “11,14,06” “16,41,35” Zum Ändern von Zeit und Datum drücken Sie [CE]. Das Display zeigt die laufende Zeit im Format “H‐m‐S”. ... -
Page 98: Automatischer Schlafmodus
Werden für Zeit (Err 1) und Datum (Err 2) ungültige Werte eingegeben, werden Fehlermeldungen angezeigt. '34' ist beispielsweise ein ungültiger Wert für Tag. AUTOMATISCHER SCHLAFMODUS Diese Funktion kann vom Anwender de‐ oder aktiviert werden. Ist sie aktiviert, schaltet sich das Gerät nach einer gewissen Zeit der Untätigkeit (wie vom Anwender innerhalb dieser Funktion eingestellt) automatisch ab. Drücken und halten Sie die [Zero]‐Taste ca. 4 Sekunden. Lassen Sie los, sobald “SLEEP nodE” angezeigt wird. Mit [U/Wt/Unit] können Sie durch die Zeitwerte für den automatischen Schlafmodus blättern. ... -
Page 99: Hintergrundbeleuchtung Für Die Lcd
werden muss, am besten über Nacht. Bei fehlerhafter Anwendung oder nach jahrelangem Gebrauch verliert der Akku seine volle Ladekapazität. Zeigt der Akku eine extreme kurze Betriebsdauer, kontaktieren Sie bitte Ihren Händler. HINTERGRUNDBELEUCHTUNG FÜR LCD Die Hintergrundbeleuchtung kann wie folgt eingestellt werden: “1”: ständig AN, “2”: nur AN, wenn Gewicht auf Waage gelegt wird, oder “3”: AUS. Zum Einstellen der Beleuchtung drücken und halten Sie [Pst] für etwa 4 Sekunden. ... -
Page 100: Fehlermeldungen
12.0 FEHLERMELDUNGEN Während des Anfangtestlaufs oder während des Betriebs kann es sein, dass eine Fehlermeldung angezeigt wird. Die Bedeutung der jeweiligen Meldung wird unten beschrieben. Wird eine Fehlermeldung angezeigt, wiederholen Sie den Schritt, der die Meldung verursacht hat, wie Einschalten, Kalibrierung, oder andere Funktionen. Erscheint die Fehlermeldung nach wie vor, wenden Sie sich bitte an Ihren Händler. ... -
Page 101: Serviceparameter
13.0 SERVICEPARAMETER AUFRUFEN PARAMETER FÜR KALIBRIERUNG MIT“0000” Drücken Sie nach dem Einschalten während die Anzeige herunterzählt auf [Tare]. Das Fenster "Gewicht" fragt nach einer PIN “Pin “. Geben Sie dann als PIN 0000 ein, und bestätigen Sie mit [Tare]. Wurde bereits eine andere PIN gespeichert, muss diese eingegeben werden. ... - Page 102 F1 ‐KALIBRIERUNG Drücken Sie zum Öffnen des Parameters auf [Tare] , wenn “F1” “CAL” angezeigt wird. Die Waage sollte mit einem Gewicht kalibriert werden, das in etwa 2/3 der Höchstlast entspricht. Wurde die Waage bereits einmal kalibriert, sind diese Werte bereits gespeichert. Details zur Kalibrierung finden Sie in Abschnitt 9. F2 –PIN Drücken Sie zum Öffnen des Parameters auf [Tare], wenn “F2” “Pin” angezeigt wird. Das Fenster “Gewicht” zeigt “Pin 1” ...
-
Page 103: Ersatzteile Und Zubehör
14.0 ERSATZTEILE ZUBEHÖR Sollten Sie Ersatzteile oder Zubehör benötigen, setzen Sie sich bitte mit Ihrem Lieferanten oder Adam Equipment in Verbindung. Hier einige Ersatzteile als Beispiel: Stromkabel Edelstahlwägeplatte Netzadapter (GC‐a) Arbeitsschutzhaube Ersatzakku Drucker © Adam Equipment Company 2014 ... -
Page 104: Service-Informationen
15.0 SERVICE‐INFORMATIONEN Diese Anleitung beinhaltet detaillierte Einzelheiten zum Bedienen der Waage. Sollten bei Ihrer Waage Probleme auftreten, auf die in dieser Anleitung nicht eingegangen wurde, ziehen Sie bitte Ihren Händler zu Rate. Um Ihnen bei Ihrem Problem zu helfen, benötigt dieser die folgenden Information, die Sie stets bereithalten sollten: A. Angaben zu Ihrem Unternehmen ‐ Name Ihrer Firma: ... -
Page 105: Garantieerklärung
1.0 GARANTIEERKLÄRUNG Adam Equipment bietet eine beschränkte Garantie (Teile und Arbeitskraft) für Komponenten, die auf Grund von Material- oder Bearbeitungsmängeln ausgefallen sind. Die Garantie beginnt am Tag der Lieferung. Sollten während des Garantiezeitraums Reparaturen jeglicher Art von Nöten sein, so muss der Käufer seinen Händler oder Adam Equipment Company davon in Kenntnis setzen. - Page 106 WARNING: This product includes a sealed lead-acid battery which contains chemicals known to the State of California to cause cancer and birth defects or other reproductive harm. Adam Equipment products have been tested with, and are always supplied with mains power adaptors which meet all legal requirements for the intended country or region of operation, including electrical safety, interference and energy efficiency.
- Page 107 © Adam Equipment Company 2014 ...
- Page 108 © Copyright by Adam Equipment Co. All rights reserved. No part of this publication may be reprinted or translated in any form or by any means without the prior permission of Adam Equipment. Adam Equipment reserves the right to make changes to the technology, features, specifications and design of the equipment without notice.