
Manuels Connexes pour Monacor DMR-123LCD


Sommaire des Matières pour Monacor DMR-123LCD
- Page 1 SD-VIDEORECORDER MIT LCD SD VIDEO RECORDER WITH LCD ® DMR-123LCD Best.-Nr. 18.1270 BEDIENUNGSANLEITUNG INSTRUCTION MANUAL MODE D’EMPLOI ISTRUZIONI PER L’USO...
- Page 2 Before you switch on ... Wir wünschen Ihnen viel Spaß mit Ihrem neuen We wish you much pleasure with your new Gerät von MONACOR. Bitte lesen Sie diese MONACOR unit. Please read these operating Bedienungsanleitung vor dem Betrieb gründlich instructions carefully prior to operating the unit.
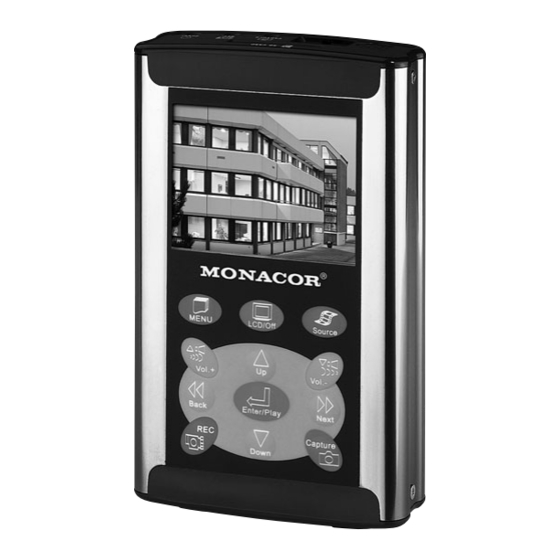
- Page 3 ® Source MENU REC. Capture Back Enter/Play Next Vol.+ Down Vol.- MENU LCD/Off Source Vol.+ Vol.- Back Enter/Play Next Capture Down 9 10 SD CARD Off /On Capture REC. Power Keylock VIDEO 1 VIDEO 2 On/ Off Power...
-
Page 4: Table Des Matières
Bitte klappen Sie die Seite 3 heraus. Sie sehen 1 Übersicht der Bedienelemente und dann immer die beschriebenen Bedienelemente Anschlüsse und Anschlüsse. 1.1 Vorderseite des Recorders (Abb. 1) Inhalt 1 LC-Display 2 Taste Source zum Umschalten der Videoquellen Übersicht der Bedienelemente und und zum Beenden einer Wiedergabe Anschlüsse . -
Page 5: Unterseite Des Recorders
22 Buchse VIDEO 2 zum Anschluss einer Video- und Audioquelle (z. B. Kamera) 3 Verwendungsmöglichkeiten Kontaktbelegung ⇒ Kap. 7 Der DMR-123LCD ist ein Videorecorder, der speziell 23 Infrarotsensor für die Fernbedienung (Abb. 4); die für die mobile Videoüberwachung konzipiert ist. Aus- Fernbedienung hierauf richten gestattet mit einem Farbdisplay und einem Lautspre- 1.4 Infrarot-Fernbedienung (Abb. -
Page 6: Speicherkarte
2) Einen Monitor, der alternativ zum LCD betrieben den Adapter in eine entsprechende Steckdose des werden soll, über den beiliegenden Adapter an die Kfz-Bordnetzes stecken. Buchse V/A OUT (19) anschließen: Für den Betrieb am 230-V-Netz den Kleinspan- nungsstecker des Netzgerätes in die Buchse DC 5 V Kupplung gelb: Videosignal (18) stecken und das Netzgerät in eine Steckdose. -
Page 7: Wiedergabe
Abhängig von den Einstellungen im Bildschirmmenü kann auch mit der Taste zur Übersicht gewech- (⇒ Kap. 5.6.7) wird die Momentaufnahme als Bild-Datei selt werden. (Symboleinblendung ) im JPEG-Format oder als Die Wiedergabe wird als Standard immer am Ende kurze Videosequenz (Symboleinblendung ) mit Ton einer Sequenz angehalten. -
Page 8: Freien Speicher Anzeigen
5.6.3 Datum und Uhrzeit einstellen SYSTEM SETUP CAPACITY TIME SET DELETE 2007/6/5 DATE TIME 08:15:00 BEEP DISPLAY ON Mit den Tasten (6) zwischen den Positionen für Jahr/Monat/Tag und Stunde/Minute/Sekunde FUNCTION SETUP wechseln. Dabei mit den Tasten (8) die MOTION DETECT aktuellen Werte einstellen. -
Page 9: Momentaufnahmemodus
Schalter Keylock (13) in Position „On“ schieben. Im Display wird LOCK eingeblendet und die Änderungen vorbehalten. Diese Bedienungsanleitung ist urheberrechtlich für MONACOR ® INTERNATIONAL GmbH & Co. KG geschützt. Eine Reproduktion für eigene kommerzielle Zwecke – auch auszugsweise – ist untersagt. -
Page 10: Operating Elements And Connections
Please unfold page 3. Thus you will always be able 1 Operating Elements and Connections to see the operating elements and connections described. 1.1 Front side of the recorder (fig. 1) 1 LC display Contents 2 Button Source to switch the video sources and to stop the reproduction Operating Elements and Connections . -
Page 11: Infrared Remote Control
23 Infrared sensor for the remote control (fig. 4); direct 3 Applications the remote control to this sensor The DMR-123LCD is a video recorder which is especial- ly designed for mobile video surveillance. Equipped 1.4 Infrared remote control (fig. 4) -
Page 12: Remote Release
recording time to be expected of the video sequences 5.2 Recording video sequences or the number of the individual pictures (photos) which Note: Prior to the first recording it is recommended to can be memorized with corresponding memory capa- set the date and time correctly so that the recordings city. -
Page 13: Deleting A Recording
it is possible to change to the previous or following DELETE screen page. 4) Start the reproduction of the selected recording with the button . If no reproduction has been started, the recorder switches back to the present Select with the button (6) whether this record- video source after a certain time. -
Page 14: Deleting Recordings
5.6.2 Deleting recordings 5.6.5 Automatic recording in case of movement DELETE MOTION DETECT DELETE ONE DELETE ALL If this function is switched ON, a video sequence of a If DELETE ONE is selected and confirmed with the few seconds is automatically recorded when a move- button , the display changes to the overview of the ment is recognized in the camera picture. -
Page 15: Key Lock
Subject to technical modification. All rights reserved by MONACOR ® INTERNATIONAL GmbH & Co. KG. No part of this instruction manual may be reproduced in any form or by any means for any commercial use. -
Page 16: Eléments Et Branchements
Ouvrez le présent livret page 3 de manière à visua- 1 Eléments et branchements liser les éléments et branchements. 1.1 Face avant de l’enregistreur (schéma 1) Table des matières 1 Ecran LCD 2 Touche Source pour commuter les sources Eléments et branchements ... . . 16 vidéo et arrêter une lecture 1.1 Face avant de l’enregistreur . -
Page 17: Face Inférieure De L'enregistreur
3 Possibilités d’utilisation Les fonctions des touches de la télécommande corres- pondent aux fonctions des touches sur l’enregistreur Le DMR-123LCD est un enregistreur vidéo spéciale- avec le même symbole (voir chapitre 1.1). ment conçu pour la surveillance vidéo mobile. Il est équipé... -
Page 18: Carte Mémoire
Remarque : la tension d’alimentation n’est présente dans une prise correspondante du système électrique qu’au branchement sélectionné comme source du véhicule. [touche de commutation (2)]. Pour un fonctionnement 230 V, reliez la fiche ali- mentation du bloc secteur à la prise DC 5 V (18) et le 2) Reliez un moniteur, devant fonctionner à... -
Page 19: Lecture
le déclencheur à distance. Pendant l’enregistre- 5) Pour interrompre la lecture et revenir à la vue d’en- ment, le symbole est visible, la LED Cap- semble, appuyez sur la touche (2). Si lors de la ture (14) brille et si vous utilisez le déclencheur lecture, la fin d’une séquence vidéo est atteinte, ou (25), un signal retentit si cela a été... -
Page 20: Affichage De La Mémoire Disponible
5.6.3 Réglage de la date et de l’heure SYSTEM SETUP CAPACITY TIME SET DELETE 2007/6/5 DATE TIME 08:15:00 BEEP DISPLAY ON Avec les touches (6), changez entre les posi- FUNCTION SETUP tions pour l’année/le mois/le jour et heure/minute/ MOTION DETECT seconde. -
Page 21: Mode D'enregistrement Momentané
Poids : ....190 g container adapté ou ramenez-les chez votre revendeur. Tout droit de modification réservé. Notice d’utilisation protégée par le copyright de MONACOR ® INTERNATIONAL GmbH & Co. KG. Toute repro- duction même partielle à des fins commerciales est interdite. -
Page 22: Elementi Di Comando E Collegamenti
Vi preghiamo di aprire completamente la pagina 3. 1 Elementi di comando e collegamenti Così vedrete sempre gli elementi di comando e i collegamenti descritti. 1.1 Lato frontale del registratore (fig. 1) 1 Display a cristalli liquidi Indice 2 Tasto Source per cambiare le sorgenti video e per terminare una riproduzione Elementi di comando e collegamenti . -
Page 23: Lato Inferiore Del Registratore
23 Sensore a raggi infrarossi per il telecomando (fig. 4); puntare il collegamento sul sensore 3 Possibilità d’impiego Il DMR-123LCD è in videoregistratore che è stato rea- 1.4 Telecomando a raggi infrarossi (fig. 4) lizzato specialmente per la sorveglianza video mobile. -
Page 24: Scheda Sd
N.B.: La tensione d’alimentazione è presente solo Per il funzionamento con l’alimentazione 230 V, al contatto prescelto come sorgente [tasto di com- inserire lo spinotto per alimentazione DC dell’alimen- mutazione (2)]. tatore nella presa DC 5 V (18) e inserire l’alimentatore in una presa di rete. -
Page 25: Riproduzione
segnale se tale funzione è stata prevista nelle Come standard, la riproduzione si arresta sempre alla impostazioni dell’apparecchio. fine di una sequenza video. Per avere una riprodu- zione continua di tutte le registrazioni, durante la ripro- A seconda delle impostazioni nel menù sullo schermo duzione (oppure con riproduzione interrotta, allora si (⇒... -
Page 26: Indicare La Memoria Libera
Con i tasti (6) passare fra le posizioni per FUNCTION SETUP anno/mese/giorno e ora/minuto/secondo. Impostare MOTION DETECT i valori attuali con i tasti (8). L’opzione DIS- PLAY indica se sul display si deve vedere data ed ora OVERWRITE (ON) o non (OFF). Inoltre, tale impostazione deter- CAPTURE MODE mina se il momento della registrazione viene memoriz- zato come testo nelle immagini singole della funzione... -
Page 27: Modalità Di Registrazione Istantanea
“On”. Sul display si vede LOCK e i tasti del registratore e del telecomando IR sono bloccati per Con riserva di modifiche tecniche. La MONACOR ® INTERNATIONAL GmbH & Co. KG si riserva ogni diritto di elaborazione in qualsiasi forma delle... - Page 28 ® Copyright © by MONACOR INTERNATIONAL GmbH & Co. KG, Bremen, Germany. All rights reserved. A-0749.99.01.06.2007...