Table des Matières
Publicité
Les langues disponibles
Les langues disponibles
Liens rapides
DIGITALER MULTIPLEXREKORDER
DIGITAL MULTIPLEX RECORDER
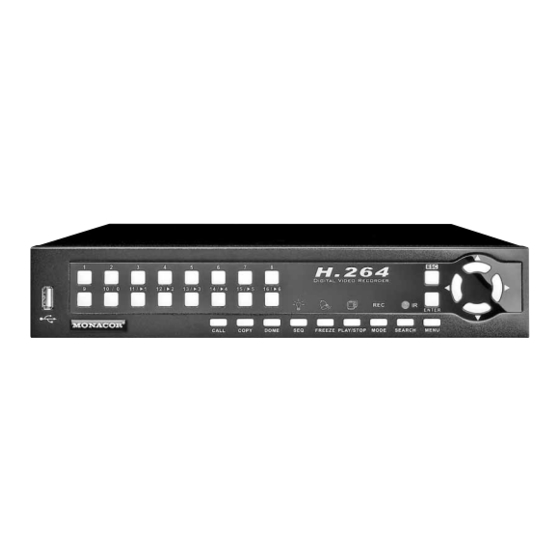
DMR - 604
Best.-Nr. 18.2520
DMR - 608
Best.-Nr. 18.2530
BEDIENUNGSANLEITUNG
INSTRUCTION MANUAL
MODE D'EMPLOI
ISTRUZIONI PER L'USO
VEILIGHEIDSVOORSCHRIFTEN
CONSEJOS DE SEGURIDAD
ŚRODKI BEZPIECZEŃSTWA
SIKKERHEDSOPLYSNINGER
SÄKERHETSFÖRESKRIFTER
TURVALLISUUDESTA
DMR - 616
Best.-Nr. 18.2540
Publicité
Chapitres
Table des Matières

Manuels Connexes pour Monacor Security DMR-604


Sommaire des Matières pour Monacor Security DMR-604
- Page 1 DIGITALER MULTIPLEXREKORDER DIGITAL MULTIPLEX RECORDER DMR - 604 Best.-Nr. 18.2520 DMR - 608 DMR - 616 Best.-Nr. 18.2530 Best.-Nr. 18.2540 BEDIENUNGSANLEITUNG INSTRUCTION MANUAL MODE D’EMPLOI ISTRUZIONI PER L’USO VEILIGHEIDSVOORSCHRIFTEN CONSEJOS DE SEGURIDAD ŚRODKI BEZPIECZEŃSTWA SIKKERHEDSOPLYSNINGER SÄKERHETSFÖRESKRIFTER TURVALLISUUDESTA...
- Page 2 Przed uruchomieniem … Før du tænder … Życzymy zadowolenia z nowego produktu MONACOR. Vi håber, du bliver glad for dit nye MONACOR produkt. Prosimy zapoznać się z informacjami dotyczącymi bez- Læs sikkerhedsanvisningerne nøje før ibrugtagning, for pieczeństwa przed użytkowaniem urządzenia, w ten at beskytte Dem og enheden mod skader, der skyldes sposób zdrowie użytkownika nie będzie zagrożone, a...
- Page 3 Œ DMR-604 Ž DMR-616, DMR-608 ...
-
Page 4: Table Des Matières
Inhalt Auf der ausklappbaren Seite 3 finden Sie alle be - schriebenen Bedienelemente und Anschlüsse. Übersicht der Bedienelemen te und Wiedergabe ......12 Anschlüsse . -
Page 5: Rückseite Des Rekorders
für die Kamerafernsteuerung: 7 Alarmeingang Kanal 2 Hinweise für den sicheren Gebrauch zur Scharfstellung (ferner) 8 Alarmeingang Kanal 3 Die Geräte (Videorekorder und Netzgerät) entspre- 15 Taste PLAY/STOP zum Starten und Beenden 9 Alarmeingang Kanal 4 chen allen erforderlichen Richtlinien der EU und sind der Wiedergabe deshalb mit gekennzeichnet. -
Page 6: Festplatte Einbauen
– 4 (DMR-604), 8 (DMR-608) oder 16 (DMR-616) schließen. Bei den Rekordern DMR-608 und Sensor für Kanal 14 an Kontakt 23 und Masse Alarmeingänge, 1 Alarmausgang DMR-616 kann an die Buchse CALL MONITOR Sensor für Kanal 15 an Kontakt 24 und Masse (31) ein Zusatzmonitor angeschlossen werden, Sensor für Kanal 16 an Kontakt 25 und Masse –... -
Page 7: Inbetriebnahme
Inbetriebnahme Das voreingestellte Passwort für den vorgegebe- geklickt werden. Für die anschließende Eingabe nen Benutzer „admin“ ist „1234“, das für „user“ ist des Passwortes wird bei angeschlossener Maus Mit dem Anlegen der Versorgungsspannung ist der „4321“. zusätzlich eine Ziffernpalette (Abb. 12) einge- Rekorder eingeschaltet. -
Page 8: Grundeinstellungen
Sequence Setup Configuration 4) In der Zeile 1.Audio Output einstellen, ob Einstellungen für die Sequenzfunktion (Kamera- Export oder Import aller Einstellungen des Rekor- immer nur der Live-Ton (Always Live) ausge- reihenfolge und Wechselgeschwindigkeit) auf ders, Rücksetzen der Einstellungen auf die geben werden soll, während der Wiedergabe auf dem Haupt- und Zusatzmonitor Werksvorgaben... -
Page 9: Bildeigenschaften Korrigieren
3) Folgende Bildeigenschaften können korrigiert 6) Entsprechend dem gewählten Format in der Zeile 2.Time die aktuelle Uhrzeit eingeben. werden: 7) In der Zeile 7.Date/Time Order wählen, ob Helligkeit (6.Brightness) das Datum vor der Uhrzeit (Date First) ange- Kontrast (7.Contrast) zeigt werden soll oder die Uhrzeit vor dem Datum Farbsättigung (8.Saturation) (Time First). -
Page 10: Gerätename
Weitere Beispiele für IP-Adressen von NTP-Ser- Ist eine Maus angeschlossen, mit der linken Bei der Bedienung mit einer Maus werden im vern sind: Maustaste auf ein Teilbild klicken, um diesen Kame- unteren Bereich des Fensters Zeichen eingeblen- 129.6.15.28, 129.6.15.29, 132.163.4.101 rakanal als Vollbild zu zeigen. -
Page 11: Aufnahmeeinstellungen
Aufnahmeeinstellungen Die gewünschte Bildauflösung (Bildpunkte hori- Aufnahmezeitplan festgelegt ( Kap. 8.1.3). Ist zontal × vertikal) in der Zeile 1.Record Reso- im Aufnahmezeitplan die Option „Weekend 1) Über das Hauptmenü (Abb. 29) das Untermenü lution einstellen. Schedule“ deaktiviert, kann die Zeile Weekend Record Setup (Abb. -
Page 12: Aufnahmezeitplan Festlegen
Welches Ereignis im Einzelnen zu einer Alarm- der Taste MODE (16) kann zwischen der Voll- aufnahme führt, hängt zusätzlich von den Ein- bilddarstellung der Aufzeichnung eines Kamera- stellungen im Untermenü „Event Setup“ ab kanals und der gleichzeitigen Darstellung mehre- Kap. 10). rer Kanäle auf dem Hauptmonitor umgeschaltet werden. -
Page 13: Export Von Videodateien
Erscheint anstatt des Untermenüs die Mel- Nach erfolgreichem Speichern erscheint die 2) In der Zeile 1.Internal Buzzer wählen, ob dung „No available items!“, sind für die Meldung „Export ok!“. Zum Ausblenden der im Alarmfall ein Signalton zu hören sein soll (ON) gewählten Kamerakanäle keine... -
Page 14: Datenverwaltung
13)In der Zeile 7.Alarm Out wählen, ob eine In der Zeile 3.Avail. Rec Time wird die Alarm auslösung dieses Kanals den Alarmaus- resultierende maximale Aufnahmezeit angezeigt. gang aktivieren soll (ON) oder nicht (OFF). Diese ist auch von den Aufnahmeeinstellungen Kap. 8.1) abhängig. 14)Ist in der Zeile 3.Motion Detect die Bewe- Ist dort im Untermenü... -
Page 15: Einstellungen Für Die Kameras
Weiterhin lässt sich mit den Tasten CALL (10) 13.1 Passwortschutz einrichten und ENTER (6) das Bildschirmmenü der Kamera 1) Das Hauptmenü ( Kap. 6.1, Abb. 14) aufrufen. aufrufen und darin Untermenüs aufrufen sowie 2) Das Untermenü System Setup aufrufen Eingaben bestätigen. Mit der Taste CALL und (Abb.15) den Richtungstasten (8) kann durch... -
Page 16: Tastensperre
beim Aufruf des passwortgeschützten Menüs 14.2 Einstellungen laden (Abb. 8). Auf die gleiche Weise, wie in Kapitel 6.1 Um zuvor gespeicherte Einstellungen zu laden: beschrieben, einen Benutzernamen aus bis zu 14 1) Im Untermenü Configuration über die Zeile Zeichen eingeben. 2.Import Config das entsprechende Unter- 8) In der Spalte PWD des eingegebenen Benutzers menü... -
Page 17: Fernzugriff Über Ein Computernetzwerk
3) In der Zeile 1.Email via SMTP wählen, ob Folgende Informationen werden angezeigt: der E-Mail-Versand durch den Rekorder möglich Model Name interne Modellbezeichnung sein soll ( ) oder nicht ( Video System aktuell mit dem Schalter PAL/ 4) In der Zeile 2.SMTP Server den Mailserver NTSC (25) gewähltes Video- system eingeben, über den die Benachrichtigung gesen-... -
Page 18: Fernbedienung Über Die Programme Windows Internet Explorer Oder Cms
16.2 Fernbedienung über die Programme Ebenso lassen sich auf dem Computer befind- konten ( Kap. 13.1) erforderlich, auch wenn im Windows Internet Explorer liche Aufzeichnungen wiedergeben Rekorder der Passwortschutz deaktiviert ist. oder CMS Dateien, die vom Videorekorder exportiert Auf einen Rekorder können gleichzeitig ein als wurden, auf Echtheit überprüfen. -
Page 19: Kamerafernsteuerung Über Den Ie
16.2.1 Kamerafernsteuerung über den IE System herunterfahren Technische Daten Wurde während der Anzeige der Live-Kamerabilder oder neu starten Videonorm: ... . PAL/ NTSC wählbar eine fernsteuerbare Kamera als Vollbilddarstel- Damit es nicht zu Datenverlusten oder zur Beschä- Videoeingänge lung gewählt, erscheint auf der rechten Seite das digung des Rekorders kommt, vor dem Trennen des... -
Page 20: Aufnahmekapazität
18.1 Aufnahmekapazität Die folgenden Tabellen zeigen die maximale Auf- Die Angaben in den Tabellen basieren auf Tests nahmedauer in Abhängigkeit von dem eingestellten und sind ungefähre Richtwerte. Die tatsächliche Videosystem, der gewählten Bildauflösung, der Aufnahmekapazität kann variieren, da der Kompres- Speicherkapazität der eingebauten Festplatten, der sionsgrad der Daten u. -
Page 21: Videosystem Ntsc
Aufnahmedauer (Tage) bei kontinuierlicher Aufnahme Videosystem PAL, Bildauflösung 352 × 288, keine Audioaufzeichnung Gesamtbildrate gewählte Bildqualität (Speicherbedarf pro Bild) Festplattenkapazität (Bilder/Sekunde) Low (2 KB/ Bild) Fair (3 KB/ Bild) Mid (4 KB/ Bild) High (5 KB/ Bild) Best (6 KB/ Bild) aller Kanäle 17,7 11,8... - Page 22 93,3 47,9 31,9 23,9 19,2 95,7 63,8 47,9 38,3 31,9 1 TB 95,7 76,6 63,8 Diese Bedienungsanleitung ist urheberrechtlich für MONACOR INTERNATIONAL GmbH & Co. KG ® geschützt. Eine Reproduktion für eigene kommerzielle Zwecke – auch auszugsweise – ist untersagt.
-
Page 24: Operating Elements And Connections
Contents 8.1.2 Configuring individual camera channels . 31 All operating elements and connections de - scribed can be found on the fold-out page 3. 8.1.3 Defining the recording schedule ..31 Operating Elements and Connections . . 24 Replay . -
Page 25: Rear Side Of Recorder
for camera remote control: 3 RS485 D+ Safety Notes for focus setting (far) 4 RS485 D- The units (video recorder and power supply unit) 15 Button PLAY/STOP to start and stop the replay 5 not used correspond to all required directives of the EU and are therefore marked with 6 alarm input of channel 1 for camera remote control:... -
Page 26: Installing A Hard Disk
– alarm triggering via motion detection, external 3) To connect a computer monitor with VGA input, Adjust the contact type (NO or NC) separately for alarm signal, video signal loss use the jack VGA (20). The video signal corre- each channel in the OSD menu of the recorder sponds to that at the output for the main monitor chapter 10.1). -
Page 27: Operation
Operation Note: To prevent unauthorized access, it is highly recommended to change the preset passwords When the supply voltage has been applied, the chapter 13). recorder will be switched on. The power indication After the correct combination of user name and (2) will light up. -
Page 28: Basic Settings
Database Setup Basic settings 6.2.3 Monitor settings Indication of information concerning the internal To set the main monitor: hard disks and activation, deactivation and for- 6.2.1 Changing the menu language 1) Via the main menu (fig. 17), activate the submenu matting of the hard disks The preset language for the settings and dialogues Monitor Setup (fig. -
Page 29: Correcting Image Properties
Note: This setting will not affect the display of a cam- change between daylight saving time and stan- era signal on an additional monitor connected to the dard time. With automatic change, an “S” (sum- output CALL MONITOR (31). mer time) for daylight saving time or a “W” (winter time) for standard time will appear in front of the time indication. -
Page 30: Live Surveillance
2) Switch the desired camera channel to the addi- tional monitor with the channel buttons (1) or start the sequence function for the additional monitor with the button SEQ (13) [Configuring the sequence function chapter 7.1]. To stop the sequence, also press the button SEQ. For operation with a mouse, icons will be inserted in the lower part of the window;... -
Page 31: Configuring "Ezrecord
For the presets Best Quality, Standard 4) In the line Event Max PPS, define the maxi- and Extended Record, the resolution will also mum picture rates for the recording mode in case be selectable: of alarm. The actual picture rate for recording a channel will depend on the number of channels 720 ×... -
Page 32: Replay
1) To activate the search function during live sur- return to the search window, press the button Replay veillance or during replay of a recording, press ESC (7). 1) To start the replay of a recording, press the but- the button SEARCH (17). When using a mouse, ton PLAY/ STOP (15). -
Page 33: Exporting From The Event List
medium when exporting data and may be started A free computer program for reproduction directly from it. is available for download on the website www.divx.com. – Depending on the size of the video sequence to Notification by e-mail will require a connection be exported, the storage process may take of the recorder to the Internet and the correct set- 10 minutes to 1 hour. -
Page 34: Camera Remote Control (Dome)
3) Control the camera via the following buttons: Camera Remote Control (DOME) It will be possible to remote-control suitable cameras pan and tilt from the recorder via an RS-485 data bus at the jack MODE (16) open iris IO (26) [ chapter 5.3.3]. -
Page 35: Configuring The Password Protection
required access permission level for each of the var- 7) The user names are listed under Account. To change a user name, click Edit in the column ious functions and menu areas. ID next to the name. The input window Edit To enter the user name and the password when UserName will appear which is similar to the the password protection has been activated see... -
Page 36: Loading Settings
14.2 Loading settings The following information will be indicated: Model Name internal model name To load settings stored previously: Video System video system currently 1) Via the line 2.Import Config in the submenu selected with selector switch Configuration, activate the corresponding PAL / NTSC (25) submenu (fig. -
Page 37: Remote Control Via The Programs Windows Internet Explorer Or Cms
The use of a DDNS server will usually be config- This instruction manual is restricted to operation via It depends on the number of input channels of the ured in the router connecting the recorder to the IE. The operation of the program CMS is similar, but recorder connected if these display arrangements Internet, but will also be possible with the recorder. -
Page 38: Camera Remote Control Via Ie
16.2.1 Camera remote control via IE Shutdown or Restart of the System Specifications If a camera with remote control has been To prevent data loss or damage to the recorder, shut Video standard: ..PAL / NTSC selectable selected as a full-image display while live camera down the system before disconnecting the recorder Video inputs... -
Page 39: Recording Capacity
18.1 Recording capacity The tables below list the maximum recording times The values in the tables are based on tests and depending on the video system selected, the resolu- are guideline values. The actual recording capacity tion selected, the storage capacity of the integrated may vary since the compression rate of the data will hard disks, the picture rate and quality selected. -
Page 40: Video System Ntsc
Recording time (days) for permanent recording Video system PAL, resolution 352 x 288, no audio recording Total picture Image quality selected (storage space required per image) Hard disk capacity rate (PPS) of Low (2 KB/ image) Fair (3 KB/ image) Mid (4 KB/ image) High (5 KB/ image) Best (6 KB/ image) all channels 17.7... - Page 41 63.8 47.9 38.3 31.9 1 TB 95.7 76.6 63.8 All rights reserved by MONACOR ® INTERNATIONAL GmbH & Co. KG. No part of this instruction manual may be reproduced in any form or by any means for any commercial use.
-
Page 42: Eléments Et Branchements
Table des matières Ouvrez le présent livret page 3, dépliable, de manière à visualiser les éléments et branche- Eléments et branchements ... 42 Lecture ......50 ments. -
Page 43: Face Arrière De Lʼenregistreur
15 Touche PLAY/ STOP pour démarrer et arrêter la 8 entrée alarme canal 3 Conseils dʼutilisation et de sécurité lecture 9 entrée alarme canal 4 Les appareils (enregistreur vidéo et bloc secteur) pour une gestion à distance de caméra : 10 entrée alarme canal 5 répondent à... -
Page 44: Mise En Place Du Disque Dur
– signaux de caméra visualisables séparément 2) Reliez lʼentrée vidéo dʼun moniteur à la prise capteur pour canal 14 au contact 23 et masse comme image plein écran ou simultanément sur VIDEO OUTPUT ou MAIN MONITOR (21). Sur capteur pour canal 15 au contact 24 et masse lʼécran divisé... -
Page 45: Fonctionnement
Remarque : Pour éviter tout accès non autorisé, il Fonctionnement est fortement recommandé de modifier les mots de Lʼenregistreur est allumé lorsque la tension dʼali- passe préréglés ( chapitre 13). mentation est appliquée. Le témoin de fonctionne- Une fois la combinaison nom dʼutilisateur et ment (2) brille ;... -
Page 46: Réglages De Base
vements via les images de caméra, signaux aux Réglages de base entrées dʼalarme Database Setup 6.2.1 Modification de la langue du menu affichage des informations à propos des disques Lʼanglais est la langue préréglée pour les réglages durs internes, activation / désactivation et forma- et dialogues dans le menu écran, sur lequel la notice tage des disques durs est fondée. -
Page 47: Correction Des Propriétés De Lʼimage
6.2.6 Visibilité des images de caméra 10)Pour une commutation automatique entre lʼheure dʼété et lʼheure dʼhiver, appelez le sous-menu Si les signaux dʼune caméra doivent être enregistrés correspondant (schéma 23) via la ligne 8.Day- mais ne pas apparaître sur le moniteur en fonction- light Saving Time Setup. -
Page 48: Nom Des Appareils
3.Manually Time Sync, saisissez “Yes”. Installation de la fonction séquence chage Freeze), il faut tout dʼabord quitter ces fonc- Lʼenregistreur essaie immédiatement dʼétablir tions. Avec la fonction séquence, la visualisation change une connexion avec le serveur NTP. Le mes - automatiquement pendant la surveillance Live. -
Page 49: Configuration "Ezrecord
effectivement utilisée, seuls les canaux qui sont 8.1.2 Configuration individuelle de canal de caméra configurés avec des signaux de caméras sont enregistrés. Voir chapitre 8.1.1 pour effectuer ce Si aucun des préréglages pour lʼenregistrement préréglage. nʼest optimal, on peut configurer les canaux pour lʼenregistrement individuellement ;... -
Page 50: Lecture
ture avec la touche ENTER (6). En bas à gauche, Pour lecture dʼenregistrements dʼun X2 Zoom sʼaffiche. Avec les touches de direction moment donné, réglez lʼheure et la date dans la ligne Select puis appelez Begin Playback . (8), on peut déplacer le segment. La lecture en image agrandie peut être gelée via la touche Sʼil nʼy a pas dʼenregistrement pour la période FREEZE puis poursuivie. -
Page 51: Export De Données Vidéo
Motion détection de mouvements concerné doit être affiché en image plein écran Fonctions dʼalarme sur le moniteur principal (Main), supplémentaire Alarm signal à lʼentrée alarme Une alarme peut être déclenchée via le détecteur (Call) ou sur les deux (Both) ou sʼil ne doit pas Loss perte du signal vidéo interne de mouvements, une entrée dʼalarme pour... -
Page 52: Gestion Des Données
11.2 Gestion des disques durs – Dès que la fonction Format est sélectionnée et confirmée avec la touche ENTER (6) [ou clic 1) Via le menu principal (schéma 44) appelez le gauche de la souris], le formatage du disque dur sous-menu Database Setup (schéma 45). -
Page 53: Gérer Une Caméra
12.2 Gérer une caméra dans la colonne Go Preset, réglez lʼoption 6) Pour définir les autorisations utilisateur, quittez le Yes. sous-menu Authority Setup et dans le Pour gérer une caméra pendant la surveillance Live : sous-menu User Management La caméra est orientée selon ces réglages ; la , appelez le 1) Mettez lʼimage de la caméra à... -
Page 54: F 14 Gestion Des Réglages
support de données est correctement relié. Le Gestion des réglages Affichage des informations cas échéant, il faut débrancher puis rebrancher le de lʼenregistreur du système support de données afin quʼil soit reconnu. Dans Tous les réglages système de lʼenregistreur effec- Pour afficher les informations de lʼenregistreur : la colonne Select, réglez Yes pour le support tués par lʼutilisateur peuvent être sauvegardés sur... -
Page 55: Message Par E-Mail
3) Dans la ligne LAN Select, sélectionnez le type 2) Via la ligne 5.SMTP Setup, appelez le sous- 4) Pour établir la connexion avec le serveur DDNS, réglez lʼoption Yes dans la ligne 4.Submit/ de connexion réseau : menu correspondant (schéma 61). Update. -
Page 56: Gestion À Distance De Caméra Via Internet Explorer
4) Dans lʼonglet Sécurité, cliquez sur “Personnaliser 16.2.1 Gestion à distance de caméra dans le champ “Bandwidth”, on peut via Internet Explorer le niveau”. adapter le taux dʼactualisation des images de Si vous sélectionnez une caméra gérable à distance Pour “Contrôles ActiveX et Plugins”, réglez tous caméra à... -
Page 57: Quitter Ou Redémarrer Le Système
Quitter ou redémarrer le système Caractéristiques techniques Pour ne pas perdre de données ou endommager Norme vidéo : ..PAL / NTSC sélection- Entrées alarme lʼenregistreur, il faut quitter le système avant dʼétein- nable DMR-604 : . -
Page 58: Capacité Dʼenregistrement
18.1 Capacité dʼenregistrement Les données mentionnées dans les tableaux sont basées sur des tests et sont des valeurs indicatives Les tableaux suivants présentent la durée maximale approximatives. La capacité effective dʼenregistre- dʼenregistrement selon le système vidéo réglé, la ment peut varier dans la mesure où le degré de com- résolution dʼimage sélectionnée, la capacité... -
Page 59: Système Vidéo Ntsc
Durée dʼenregistrement (jours) en enregistrement continu Système vidéo PAL, résolution dʼimage 352 × 288, pas dʼenregistrement audio Taux d’image global Qualité dʼimage sélectionnée (besoin de mémoire par image) Capacité disque dur (images / seconde) Low (2 ko/ image) Fair (3 ko/ image) Mid (4 ko/ image) High (5 ko/ image) Best (6 ko/ image) - Page 60 46,6 93,3 47,9 31,9 23,9 19,2 95,7 63,8 47,9 38,3 31,9 1 To 95,7 76,6 63,8 Notice dʼutilisation protégée par le copyright de MONACOR INTERNATIONAL GmbH & Co. KG. Toute ® reproduction même partielle à des fins commerciales est interdite.
-
Page 62: Elementi Di Comando E Collegamenti
A pagina 3, se aperta completamente, vedrete Indice sempre gli elementi di comando e i collegamenti Elementi di comando e collegamenti . . . 62 8.1.3 Fissare lʼorario delle registrazioni ..69 descritti. Riproduzione ..... . . 70 1.1 Lato anteriore di registratore . -
Page 63: Lato Posteriore Del Registratore
15 Tasto PLAY/STOP per avviare e terminare una 11 Ingresso dʼallarme canale 6 Avvertenze di sicurezza riproduzione 12 Ingresso dʼallarme canale 7 Gli apparecchi (videoregistratore e alimentatore) per il comando remoto delle telecamere: 13 Ingresso dʼallarme canale 8 sono conformi a tutte le direttive richieste dellʼUE e per chiudere il diaframma pertanto portano la sigla 14 Uscita dʼallarme: Contatto di riposo (NC) -
Page 64: Montaggio Del Disco Rigido
– comando semplice tramite mouse USB CALL MONITOR (31) si può collegare un monitor Il tipo del contatto (NA o NC) deve essere impostato supplementare che offre la possibilità di vedere nel menù sullo schermo del registratore, separata- – 4 (DMR-604), 8 (DMR-608) o 16 ingressi allarme singole telecamere come immagini a schermo mente per ogni canale ( Cap. -
Page 65: Messa In Funzione
Una volta digitata la combinazione corretta fra sinistro del mouse vicino alla tavolozza, si con- Messa in funzione nome utente e password, si apre il menù principale clude la digitazione. Applicando la tensione dʼalimentazione, il registra- (fig. 10), in caso di errore di digitazione, appare il Una volta digitata la combinazione corretta fra tore è... -
Page 66: Impostazioni Base
Database Setup Impostazioni base 6.2.3 Impostazioni del monitor Indicazione dʼinformazioni sui dischi rigidi interni Per impostare il monitor principale: nonché login, logout e formattazione dei dischi 6.2.1 Cambiare la lingua del menù 1) Tramite il menù principale (fig. 17) attivare il sot- rigidi La lingua preimpostata per le impostazioni e per i tomenù... -
Page 67: Correggere Le Caratteristiche Delle Immagini
6.2.6 Visibilità delle immagini Se i segnali di una telecamera devono essere regi- strate senza apparire normalmente sul monitor prin- cipale, il relativo canale può essere messo su “nascosto”. 1) Tramite il menù principale (fig. 19) attivare il sot- tomenù Camera Setup (fig. 20). 2) Nella riga 5.Covert decidere, se lʼimmagine deve essere nascosta (Yes) oppure se deve essere visibile sul monitor in occasione della sor-... -
Page 68: Nomi Degli Apparecchi
Se lʼorologio non mantiene lʼora attuale fino alla Monitor supplementare nuova accensione del registratore, è possibile che la (solo DMR-608 / -616) batteria (bottone nel registratore) è scarica e che Un monitor supplementare collegato allʼuscita CALL deve essere sostituita. MONITOR (31) serve a visualizzare delle immagini dal vivo con schermo intero, mentre il monitor princi- pale visualizza unʼimmagine multipla oppure una 6.2.8... -
Page 69: Configurare "Ezrecord
Le preimpostazioni 512/256/128Kbps DSL 3) Nella riga 6.Data Lifetime determinare il offrono una registrazione continua di tutti i canali numero dei giorni per i quali una registrazione delle telecamere con velocità (frame rate) deve rimanere disponibile per la riproduzione. Se costante e con relativa richiesta di memoria per non è... -
Page 70: Riproduzione
2) Nella riga 1.Day Time Start impostare lʼini- Nella riga superiore impostare lʼanno e il mese. sul simbolo “Playback” per avviare o terminare zio per il periodo di registrazione “giorno”. Durante lʼimpostazione del mese, dai numeri evi- la riproduzione. Con il ruotino del mouse si può denziati nel calendario, si vede già... -
Page 71: Export Dallʼelenco Eventi
Se si vede il messaggio “No exportable movimenti i campi del raster, dove è stato rilevato device detected.Please install the il movimento, devono essere evidenziati (ON) o target device/ media to the DVR.”, no (OFF). significa che non è collegato nessun supporto 12)Nella riga 6.Alarm In decidere se lʼingresso oppure che non è... -
Page 72: Gestione Dei Dati
Gestione dei dati dipende anche dalle impostazioni per la registra- zione ( Cap. 8.1). Se in quelle impostazioni, nel sottomenù 11.1 Cancellare registrazioni “Recording Setup” è stata attivata lʼopzione “Cir- 1) Tramite il menù principale (fig. 29) attivare il sot- cular Recording”... -
Page 73: Memorizzare Le Impostazioni Delle Telecamere
Inoltre, con i tasti CALL (10) e ENTER (6) si può 3) Tramite la riga 5.User Management attivare il volta. Se la seconda digitazione è stata identica, si vede il messaggio “Passwd changing ok”. attivare il menù sullo schermo per la telecamera relativo sottomenù... -
Page 74: Memorizzare Le Impostazioni
“Please specify config name first!” si 14.1 Memorizzare le impostazioni Visualizzare le informazioni segnala che manca ancora il nome per la memoriz- sul sistema Le impostazioni del registratore possono essere zazione (punto 4). memorizzate su un supporto dati esterno collegato Per visualizzare le informazioni sul sistema del regi- Premendo un tasto, il messaggio sparisce. -
Page 75: Accesso Remoto Tramite Una Rete Di Computer
7) Se come connessione di rete è scelto PPPoE, nel 1) Nel sottomenù Network Setup (fig. 58) tra- Accesso remoto tramite una rete di sottomenù LAN Setup appaiono delle righe mite la riga 6.DDNS Setup attivare il relativo computer supplementari. Nelle righe 6.PPPoE Account sottomenù... -
Page 76: Comando Remoto Delle Telecamere Tramite Ie
zione in inglese si trova sul CD insieme al pro- Per ritornare alla rappresentazione multipla, cliccare attuale del programma come “Snapshot-x.jpg” gramma. sul relativo pulsante: con il numero continuo “x”. (2 × 2) Per creare la connessione dal computer al registra- Con il pulsante “Health”... -
Page 77: Dati Tecnici
Arrestare il sistema Dati tecnici Ingressi dʼallarme DMR-604: ... 4, contatto NA/ NC a o riavviarlo Norma video: ... PAL / NTSC a scelta scelta Per escludere perdite di dati o danni al registratore, Ingressi video... -
Page 78: Capacità Di Registrazione
18.1 Capacità di registrazione Le indicazioni delle tabelle sono basate su dei test e hanno valore approssimativo. Lʼeffettiva capa- Le tabelle seguenti indicano la durata massima cità di registrazione può variare, dato che il grado di secondo il sistema video impostato, la risoluzione compressione dei dati dipende anche dai contenuti scelta, la capacità... -
Page 79: Sistema Video Ntsc
Durata di registrazione (giorni) con registrazione continua Sistema video PAL, risoluzione 352 × 288, senza registrazione audio Velocità globale Qualità dellʼimmagine (memoria richiesta per ogni immagine) Capacità del delle immagini disco rigido (imm. / secondo) Low (2 KB/ imm.) Fair (3 KB/ imm.) Mid (4 KB/ imm.) High (5 KB/ imm.) Best (6 KB/ imm.) di tutti i canali 17,7... - Page 80 31,9 1 TB 95,7 76,6 63,8 La MONACOR INTERNATIONAL GmbH & Co. KG si riserva ogni diritto di elaborazione in qualsiasi forma ® delle presenti istruzioni per lʼuso. La riproduzione – anche parziale – per propri scopi commerciali è vietata.
-
Page 82: Veiligheidsvoorschriften
water, uitzonderlijk warme plaatsen en plaatsen Gebruik voor de reiniging uitsluitend een droge, Digitale videorecorder met een hoge vochtigheid (toegestaan omge- zachte doek. Gebruik in geen geval chemicaliën of vingstemperatuurbereik: 0 – 40 °C). water. Lees aandachtig de onderstaande veiligheidsvoor- In geval van ongeoorloofd of verkeerd gebruik, Plaats geen bekers met vloeistof zoals vazen, schriften, alvorens het toestel in gebruik te ne men. - Page 83 Varmen der genereres i optageren cirkuleres gen- Digital harddisk-optager Hvis enheden skal tages ud af drift og bort- nem gennem den indbyggede blæser. Dæk derfor skaffes, skal den altid bringes til en gen- aldrig for hullerne på optageren. brugsstation, for at sikre at den ikke kom- Læs nedenstående sikkerhedsoplys ninger opmærk- mer til at belaste miljøet.
- Page 84 DMR-604 Anschlussmöglichkeiten • Connection possibilities • Possibilités de branchement Possibilità di collegamento...
- Page 85 DMR-616 Anschlussmöglichkeiten • Connection possibilities • Possibilités de branchement Possibilità di collegamento...
- Page 86 ® Copyright by MONACOR INTERNATIONAL GmbH & Co. KG, Bremen, Germany. All rights reserved. A-1075.99.01.06.2010 ©...