Table des Matières
Publicité
Les langues disponibles
Les langues disponibles
Liens rapides
Publicité
Chapitres
Table des Matières

Manuels Connexes pour GardiPool Rectoo


Sommaire des Matières pour GardiPool Rectoo
- Page 1 Montage handleiding Notice de montage Manual RECTOO www.gardipool.com...
- Page 3 ..........390x760 RECTOO 390x920...
-
Page 4: Table Des Matières
Indien u nog problemen zou dikte waarvan min 6 cm boven de 2.4.1 Onderdelen hebben, verwijzen we u graag door naar metalen profielen uw Gardipool verkoper, die u graag met 2.4.2 Monobloc 2) Wapeningsnet 150x150x6x6 geplaatst raad en daad zal bijstaan. 2.4.3 Aansluitingen bovenop en dwars op de horizontale metalen breedteprofielen. - Page 5 RECTOO 390 x 760 BoVEnGRondSE PLAATSInG ondERGRondSE PLAATSInG Beschermend vilt gestabiliseerd zand Steunprofiel Steunprofiel aarde Beton C25/30 Beton C25/30 Wapeningsnet anti bacterie vilt (150x150x6x6) aarde zand drainage ± 20 cm ± 20 cm Plastiekfolie BETonPLATEAu M12 x 40 M12 x 40...
-
Page 6: Algemeen
Montage handleiding - ReCtoo RECTOO 390 x 760 2.3 houten structuur 2.2.1 Algemeen De houten structuur van het zwembad Het is noodzakelijk om de juiste planken bewerkt zodat ze met een andere plank bestaat uit de zwaluwstaartplanken, in de juiste volgorde te gebruiken. -
Page 7: Montage
RECTOO 390 x 760 2.2.2 Montage tip: Na het uitdrogen van het plateau wordt het anti-bacterievilt keurig opengespreid. Vermijd oneffenheden in het vilt. 9 0 ° 9 0° 9 0° 9 0 ° Skimmer : Lengte 3602 mm Terugvoer : Lengte 3187 mm... - Page 8 Montage handleiding - ReCtoo RECTOO 390 x 760 Skimmer 7x110mm Terugvoer tip: De opening van de skimmer wordt het best gericht naar de overheersende windrichting. Hierdoor kunnen losse zwevende deeltjes gemakkelijk afgevoerd worden in de skimmer.
- Page 9 RECTOO 390 x 760 Vooraleer de laatste laag te plaatsen, moet de skimmer tussen de planken geplaatst worden. Deze wordt aan de planken bevestigd met 4 stuks inox vijzen 3,5 x 20 mm in de hoeken van de skimmer (geen gaten voorzien).
- Page 10 Montage handleiding - ReCtoo RECTOO 390 x 760 4x25mm EXO 4x30mm De afdekplanken worden ondersteund door L -hechtingen. Verdeel het aantal L -hechtingen gelijkmatig rondom het zwembad. Schroef op 12 mm van de bovenkant van de eindplank de L -hechting vast (inox vijzen 4x30 mm).
- Page 11 RECTOO 390 x 920 BoVEnGRondSE PLAATSInG ondERGRondSE PLAATSInG Beschermend vilt gestabiliseerd zand Steunprofiel Steunprofiel aarde Beton C25/30 Beton C25/30 Wapeningsnet anti bacterie vilt (150x150x6x6) aarde zand drainage ± 20 cm ± 20 cm Plastiekfolie BETonPLATEAu M12 x 40 M12 x 40...
- Page 12 Ter ondersteuning van deze afdekplank is elkaar. De uiteinden van de planken zijn er rondom de structuur een steunplank voorzien. RECTOO 390 x 920 - H146 EXO TERUGVOER SKIMMER SKIMMER TERUGVOER...
- Page 13 RECTOO 390 x 920 tip: Na het uitdrogen van het plateau wordt het anti-bacterievilt keurig opengespreid. Vermijd oneffenheden in het vilt. 9 0 ° 9 0° 9 0° 9 0 ° Skimmer : Lengte 3602 mm : Lengte 4751 mm...
- Page 14 Montage handleiding - ReCtoo RECTOO 390 x 920 Skimmer 7x110mm Terugvoer tip: De opening van de skimmer wordt het best gericht naar de overheersende windrichting. Hierdoor kunnen losse zwevende deeltjes gemakkelijk afgevoerd worden in de skimmer.
- Page 15 RECTOO 390 x 920 Vooraleer de laatste laag te plaatsen, moet de skimmer tussen de planken geplaatst worden. Deze wordt aan de planken bevestigd met 4 stuks inox vijzen 3,5 x 20 mm in de hoeken van de skimmer (geen gaten voorzien).
- Page 16 Montage handleiding - ReCtoo RECTOO 390 x 920 4x25mm EXO 4x30mm De afdekplanken worden ondersteund door L -hechtingen. Verdeel het aantal L -hechtingen gelijkmatig rondom het zwembad. Schroef op 12 mm van de bovenkant van de eindplank de L -hechting vast (inox vijzen 4x30 mm).
-
Page 17: Binnenafwerking
2.3 Binnenafwerking Om de folie te kunnen aanbrengen, worden Op de blote voeten (Let op voor waterglad- de hung-profielen vastgeschroefd aan de heid !!) en met behulp van een vloertrekker binnenkant van het zwembad om de 20cm kan je nu de plooien van de folie gladstrij- (inox vijzen 4x30 mm). -
Page 18: Technische Installatie
Montage handleiding - ReCtoo 2.4 Technische installatie 2.4.1 Onderdelen De monobloc-filter is het toestel dat Alle filters en pompen moeten voldoen instaat voor de waterbehandeling. Filter, aan de installatienorm NF C15-100 die pomp en zeswegklep zitten verzameld bepaalt dat elk elektrisch apparaat binnen in één apparaat. -
Page 19: Monobloc
2.4.2 Monobloc Controleer of de plastiek bescherming Plaats de installatie op de definitieve (vultrechter) op de filter staat, dit om plaats; houd rekening met de bereikbaar- te voorkomen dat er zand/grind in het heid van de zeswegklep. mondstuk van het spruitstuk komt. _____ _____ De zesweg wisselklep wordt op de filter... -
Page 20: Aansluitingen
Montage handleiding - ReCtoo 2.4.3 Aansluitingen De pomp en filter worden met elkaar verbonden via een halfbuigzame leiding. _____ Draai de verbindingsstukken in de filter en in de pomp. Schuif de fittingen en daarna de inlegstukken over de beide uiteinden van de slang. Breng de inleg- stukken terug in het verbindingsstuk en draai uiteindelijk de fittingen vast. - Page 21 Na het installeren dient de filter manueel Vooraleer u koppeling 1 verbindt, dient gereinigd te worden (REINIGEN) ; hierbij u eerst de PVC elleboog (7) op het wordt het zand in de filter schoonge- terugvoergat te draaien. Doe dit als volgt. maakt, zodat onzuiverheden in het zand Draai de PVC elleboog met wat teflon op niet in het zwembad terecht kunnen...
-
Page 22: Werking
Montage handleiding - ReCtoo 2.4.4 Werking VERANDER DE POSITIE VAN DE ZESWEGWISSELKLEP NOOIT TERWIJL DE MOTOR DRAAIT. VERWIJDER DE PIN UIT DE SELEC- TIEKLEP (zeswegwisselklep) (en niet de bediening) druk ze naar beneden en draai in een andere stand. Laat ze los aan een van de inklemmingen. -
Page 23: Oplossen Van Storingen
2.5 Eindafwerking Functie 5: RECIRCuLATIE Bij de stand recirculatie zonder filteren wordt het water via de skimmer, de pomp en wisselklep terug naar het zwembad teruggevoerd. Kies deze stand als u bijvoorbeeld chloortabletten in de skimmer oplost en niet wilt dat het chloorhoudende water door het filterzand gaat. - Page 24 Montage handleiding - ReCtoo Inox trap De inox ladder wordt gemonteerd volgens de handleiding en wordt op de afdekplank bevestigd. Inox trap niet geschikt samen met zoutelectrolyse! 3) Plaats de twee houders en schroef 5) Plaats de metalen afdekplaten over...
-
Page 25: Zomerzeil
3. Toebehoren 3.3 Technische ruimte 3.4 Waterdichte elektrische koffer 3.1 Zomerzeil Er kan een zomerzeil op het zwembad gelegd worden. Onder invloed van zon- nestralen kan de temperatuur van het water verhoogd worden. Dit zeil wordt gewoon op het water gelegd; bij gebruik van het zwembad wordt het weggeno- men en wordt het zeil omgedraaid en gedroogd. -
Page 26: Halogeen Verlichting
Montage handleiding - ReCtoo 3.5 Halogeen verlichting 3.7 Afstandsbediening voor LED 3.10 Instaptrap Volg de instructies van de bijgeleverde Afstandsbediening + ontvanger voor LED Instaptrap hoekmodel 90° voor types handleiding. verlichting. Volg de instructies van de H133 cm en H 146cm met aangepaste Plaats de onderwaterlamp bij voorkeur bijgeleverde handleiding. -
Page 27: Veiligheidsvoorschriften
4. Veiligheidsvoorschriften 4.1 Algemeen LET OP De afdekplanken zijn niet bedoeld om op te lopen noch om van te duiken. TEChnISChE InSTALLATIE De trappen zijn enkel bedoeld om het Het toestel niet in bedrijf nemen als het bad in- en uit te stappen. Na het gebruik niet op de juiste wijze ontlucht is. -
Page 28: Onderhoud
Montage handleiding - ReCtoo 5. onderhoud 5.3 Technische installatie 5.1 Houten structuur Inspecteer jaarlijks de pomp om een Om het hout een lange levensduur te goede werking te verzekeren. garanderen, kunt u het behandelen met De filterpomp is normaal onderhoudsvrij,... -
Page 29: Garantie
6. Garantie 6.6. Algemeen 6.1. Grenen structuur Garantie van 2 jaar op de pomp bij een Onze garantie beperkt zich tot het • 10 jaar garantie voor aanvallen van normaal gebruik. toesturen ter vervanging van het defecte insecten en verrotting op de klasse IV onderdeel. In géén geval kan een autoclaaf behandelde grenen structuur. -
Page 30: Montage
Nous vous remercions pour l’acquisition nes pour le montage. Le temps estimé d’une piscine Gardipool. Votre piscine à monter une gardipool type RECTOO est fabriquée dans un bois de qualité, à est 2 journées au moins à condition savoir en sapin rouge du Nord, un bois... -
Page 31: Dalle De Beton
RECTOO 390 x 760 PoSITIon hoRS SoL PoSITIon EnTERRé Feutre de protection stabilisé Profilés-supports Profilés-supports terre Béton C25/30 Béton C25/30 Treillage métal feutre anti-bactérie (150x150x6x6) terre sable drainage ± 20 cm ± 20 cm Plastique dALLE dE BéTon M12 x 40 M12 x 40 Béton C25/30... -
Page 32: L'ossage En Bois
- Rectoo RECTOO 390 x 760 2.2 L’ossage en bois 2.2.1 Généralités Les planches en queue-d’aronde, usinées Veillez à utiliser les planches appropriées A chaque extrémité, les planches ont de façon particulière ou non, constituent dans le bon ordre. -
Page 33: Montage
RECTOO 390 x 760 2.2.2 Montage Après que la dalle soit sèche, déployez soigneusement le feutre anti-bactérien. Évitez que le feutre fasse des plis. 9 0 ° 9 0° 9 0° 9 0 ° Skimmer : Longueur 3602 mm Refoulement... - Page 34 - Rectoo RECTOO 390 x 760 Skimmer 7x110mm Refoulement COnsEiL: Installez de préférence le skimmer avec l’ouverture positionnée face aux vents dominants. Les particules en suspension seront alors plus facilement éliminées par le skimmer.
- Page 35 RECTOO 390 x 760 Avant de monter la dernière rangée, insérez le skimmer. Le skimmer se fixe aux quatre coins à l’aide de 4 vis inox 3.5 x 20 mm (pas de trous pré-usinés). Ø10 7x110mm 90° 8x35mm 8x35mm...
- Page 36 - Rectoo RECTOO 390 x 760 4x25mm EXO 4x30mm Les margelles sont soutenues par des équerres. Répartissez les équerres à égale distance sur le pourtour de la piscine. Forez les équerres à 12 mm du bord supérieur de la planche supérieure (vis inox 4x30 mm).
- Page 37 RECTOO 390 x 920 PoSITIon hoRS SoL PoSITIon EnTERRé Feutre de protection stabilisé Profilés-supports Profilés-supports terre Béton C25/30 Béton C25/30 Treillage métal feutre anti-bactérie (150x150x6x6) terre sable drainage ± 20 cm ± 20 cm Plastique dALLE dE BéTon M12 x 40 M12 x 40 Béton C25/30...
- Page 38 Une planche-support est prévue pour permet d’emboîter avec précision toutes languette de la planche) ou d’un marteau les margelles sur tout le pourtour de les rangées les unes dans les autres. caoutchouc. l’ossature. RECTOO 390 x 920 - H146 EXO REFOULEMENT SKIMMER SKIMMER REFOULEMENT...
- Page 39 RECTOO 390 x 920 Après que la dalle soit sèche, déployez soigneusement le feutre anti-bactérien. Évitez que le feutre fasse des plis. 9 0 ° 9 0° 9 0° 9 0 ° Skimmer : Longueur 3602 mm : Longueur 4751 mm...
- Page 40 - Rectoo RECTOO 390 x 920 Skimmer 7x110mm Refoulement COnsEiL: Installez de préférence le skimmer avec l’ouverture positionnée face aux vents dominants. Les particules en suspension seront alors plus facilement éliminées par le skimmer.
- Page 41 RECTOO 390 x 920 Avant de monter la dernière rangée, insérez le skimmer. Le skimmer se fixe aux quatre coins à l’aide de 4 vis inox 3.5 x 20 mm (pas de trous pré-usinés). Ø10 7x110mm 90° 8x35mm 8x35mm...
- Page 42 - Rectoo RECTOO 390 x 920 4x25mm EXO 4x30mm Les margelles sont soutenues par des équerres. Répartissez les équerres à égale distance sur le pourtour de la piscine. Forez les équerres à 12 mm du bord supérieur de la planche supérieure (vis inox 4x30 mm).
-
Page 43: Finition Intérieure
2.3 Finition intérieure Avant d’ancrer le liner, vissez les profilés Après vous être déchaussé, lissez alors d’accrochage sur la paroi intérieure de la le liner et repoussez le vers les angles à piscine, tous les 20 cm (vis inox 4x30 mm). l’aide d’une raclette. -
Page 44: Installation Technique
- Rectoo 2.4 Installation technique 2.4.1 Composants Toutes les filtrations suivent la norme Vérifiez la pompe annuellement afin de d’installation NF C15-100 stipulant que garantir le bon fonctionnement. tout appareil électrique situé à moins de 3 ,50m du bassin et librement Le groupe monobloc-filtre assure le accessible doit être alimenté... -
Page 45: Groupe Monobloc
2.4.2 Groupe monobloc Positionnez l’installation à l’endroit défini- Vérifiez que la protection plastique tif ; prenez en compte l’accessibilité de la (entonnoir) se trouve bien sur le filtre afin vanne à six-voies. d’éviter que du sable/gravier ne rentre _____ dans la bouche du collecteur. _____ Placez la vanne à... -
Page 46: Important
- Rectoo 2.4.3 Raccordements La pompe et le filtre sont raccordés à l’aide d’un tuyau semi-rigide. _____ Vissez les raccords dans le filtre et la pompe. Glissez les manchons, puis les rallonges sur les deux extrémités du flexible. - Page 47 Après avoir terminé l’installation, procé- Avant le raccord 1, vissez d’abord le dez au lavage automatique du filtre, ce coude (7) sur l’orifice du refoulement. qui empêche d’envoyer vers la piscine Procédez de la manière suivante. Vissez les impuretés contenues dans le sable. le coude PVC avec du teflon sur le file- Placez alors la vanne en position de tage sur lequel vous aurez au préalable...
-
Page 48: Fonctionnement
- Rectoo 2.4.4 Fonctionnement NE MODIFIEZ JAMAIS LA POSITION DU CLAPET PENDANT LE FONCTION- NEMENT DU MOTEUR. RETIREZ D’ A BORD LA FICHE. NE DEMONTEZ JAMAIS LE CLAPET PENDANT QUE LE FILTRE SE TROUVE SOUS TENSION La vanne à six-voies assure la commande... -
Page 49: Défaillances
2.5 Finitions dernière phase Fonction 5 : RECIRCuLATIon En position recirculation sans filtration, l’eau est renvoyée vers la piscine, via le skimmer, la pompe et le clapet. Choisis- sez ce mode lorsque vous ajoutez entre autres des tablettes de chlore dans le filtre et que vous ne désirez pas que de l’eau chlorée transite par le sable du filtre. - Page 50 - Rectoo échelle en inox L ’échelle en inox est assemblée con- formément aux instructions et se fixe sur la partie supérieure de la margelle. Pas appropriée dans l’eau sallée ! 3) placez les 2 étuis et vissez les avec 5) placez les supports métalliques...
-
Page 51: Accessoires
3. Accessoires 3.3 Local technique 3.1 Bâche d’été 3.4 Coffret électrique étanche Vous avez la possibilité d’installer une bâche d’été sur votre piscine. Le rayonnement solaire pourra réchauffer la température de l’eau. Posez la bâche tout simplement sur l’eau. Lorsque vous utilisez la piscine, enlevez-la, puis retournez-la pour la faire sécher. -
Page 52: Projecteur Sous-Marin Halogène
- Rectoo 3.5 Projecteur sous-marin halogène 3.7 Commande à distance pour LED 3.10 Escalier intérieur Suivez les instructions du mode d’emploi Commande à distance + récepteur pour Escalier intérieur modèle angle 90° pour qui vous est fourni. -
Page 53: Sécurité
Sécurité 4.1 Généralités ATTENTION Ne courrez pas sur les margelles, ne les utilisez pas pour plonger. InSTALLATIon TEChnIquE Les échelles sont destinées à entrer et L ’appareil ne peut être mis en service à sortir de la piscine. Après utilisation, qu’après avoir été... -
Page 54: Entretien
- Rectoo Entretien 5.3 Installation technique 5.1 L ’ossature en bois Chaque année, vérifiez la pompe afin de L ’ossature en bois de la piscine est main- garantir son bon fonctionnement. tenant montée. La pompe de filtration normalement Afin de prolonger la durée de vie du bois,... -
Page 55: Garantie
6. Garantie 6.3. Filtre / pompe 6.6. Général 6.1. Structure bois Garantie de 2 ans sur l’étanchéité du Notre garantie se limite à la livraison • 10 ans de garantie contre les attaques groupe de filtration. des pièces détachées. Elle n’implique d’insectes et agressions bactériologiques en aucun cas une demande d’indemnité de la structure bois (bois traité... - Page 56 2. Assembly 2.1 Earth works Congratulations on purchasing your The pool should preferably be positioned Gardipool swimming pool. Your pool is in a sunny place, away from any trees manufactured from quality North-Euro- whose leaves could fall into the pool.
- Page 57 RECTOO 390 x 760 ABoVE GRound InGRound Protective felt stabilized sand Metal supports Metal supports ground Concrete C25/30 Concrete C25/30 Metal mesh anti-bacterial felt (150x150x6x6) ground sand drainage ± 20 cm ± 20 cm Plastic foil ConCRETE FLooR M12 x 40...
-
Page 58: Wooden Structure
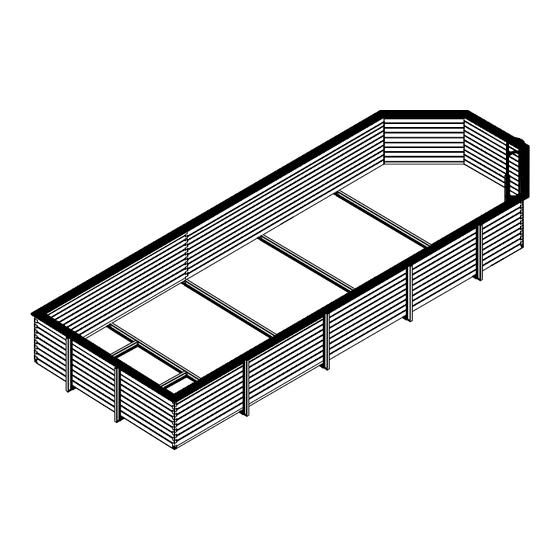
- RECTOO RECTOO 390 x 760 2.2 Wooden structure 2.2.1 General The wooden structure of the pool It is necessary to use the correct planks The ends of the planks are treated in consists of swallow’s tail planks, which in the correct order. -
Page 59: Assembly
RECTOO 390 x 760 2.2.2 Assembly Once the foundation has dried completely, the anti-bacterial felt is carefully spread across the surface. Avoid unevenness in the felt. 9 0 ° 9 0° 9 0° 9 0 ° Skimmer : Length 3602 mm... - Page 60 - RECTOO RECTOO 390 x 760 RECTOO 390 x 760 Skimmer 7x110mm INLET tip: It is advisable to place the opening of the skimmer towards the prevailing wind direction. This way, floating particles on the water will easily be removed by the skimmer.
- Page 61 RECTOO 390 x 760 RECTOO 390 x 760 Before placing the last layer, the skimmer must be fitted between the planks. The skimmer is fixed to the planks in the corners of the skimmer (no pre-made drill holes), with four 3,5 x 20 mm stainless steel screws.
- Page 62 - RECTOO RECTOO 390 x 760 4x25mm EXO 4x30mm The borders are supported by L-brackets. Distribute theses equally around the circumference of the pool. Screw the L -brackets into place 12mm from the top of the wooden structure (stainless steel screws 4x30mm).
- Page 63 RECTOO 390 x 920 ABoVE GRound InGRound Protective felt stabilized sand Metal supports Metal supports ground Concrete C25/30 Concrete C25/30 Metal mesh anti-bacterial felt (150x150x6x6) ground sand drainage ± 20 cm ± 20 cm Plastic foil ConCRETE FLooR M12 x 40...
- Page 64 (to protect the tongue on the plank). A lateral support plank is provided around the wooden structure in order to support these wooden borders. RECTOO 390 x 920 - H146 EXO INLET SKIMMER SKIMMER INLET...
- Page 65 RECTOO 390 x 920 2.2.2 Assembly Once the foundation has dried completely, the anti-bacterial felt is carefully spread across the surface. Avoid unevenness in the felt. 9 0 ° 9 0° 9 0° 9 0 ° Skimmer : Length 3602 mm...
- Page 66 - RECTOO RECTOO 390 x 920 Skimmer 7x110mm INLET tip: It is advisable to place the opening of the skimmer towards the prevailing wind direction. This way, floating particles on the water will easily be removed by the skimmer.
- Page 67 RECTOO 390 x 920 Before placing the last layer, the skimmer must be fitted between the planks. The skimmer is fixed to the planks in the corners of the skimmer (no pre-made drill holes), with four 3,5 x 20 mm stainless steel screws.
- Page 68 - RECTOO RECTOO 390 x 920 4x25mm EXO 4x30mm The borders are supported by L-brackets. Distribute theses equally around the circumference of the pool. Screw the L -brackets into place 12mm from the top of the wooden structure (stainless steel screws 4x30mm).
-
Page 69: Interior Finish
2.3 Interior finish In order to attach the lining, the hung-profile On bare feet and using a plastic squee- is screwed to the inside of the pool at 20cm gee, remove the folds in the liner and intervals. (stainless steel screws 4x30mm) press the liner well into the corners of Ensure walls are dust-free to avoid ir- the pool. -
Page 70: Technical Installation
The pump must be serviced annually to ensure optimal functioning. _____ The pump capacity Type Volume of water Flow rate Ø sandfiltre option elektr. box RECTOO 390x760 / H133 ± 29 m 12 m³/h 0,55 550 mm 34003 code RECTOO 390x920 / H146 ± 39 m 12 m³/h... -
Page 71: Monobloc
2.4.2 Monobloc Place the installation in the final position; Make sure that the plastic protection bear in mind that the 6-way valve must (funnel) is placed on top of the filter to remain accessible. prevent sand/gravel from falling into the _____ mouthpiece of the branch pipe. -
Page 72: Connections
- RECTOO 2.4.3 Connections The pump and filter are interlinked by a semi-flexible tube. _____ Screw the connector pieces into the filter and the pump. Slide the fittings and the inserts over both ends of the hose. Connect the fittings to the connector pieces, and then tighten the fittings. - Page 73 Before you join the connectors, you must After installation, the filter needs to be screw the PVC elbow (7) onto the return backwashed automatically; in this pro- opening. Do this as follows. Screw the cess the filter sand is rinsed to prevent PVC elbow carefully onto the return piece impurities from entering the pool.
-
Page 74: Functioning
- RECTOO 2.4.4 Functioning NEVER ALTER THE POSITION OF THE VALVE WHILE THE MOTOR IS RUNNING FIRST REMOVE THE PLUG NEVER DISMANTLE THE VALVE WHILE THE FILTER IS STILL UNDER PRESSURE. The 6-way valve controls the 6 functions of the filter: backwash, re-circulation, rinse, filtration, waste, closed. -
Page 75: Malfunctions
2.5 Finishing touches Function 5: RECIRCuLATIon With the recirculation position, the water is returned to the pool via the skimmer, pump and valve. Choose this position for instance when you dissolve chlorine tablets in the skimmer and do not want the chlorinated water to circulate through the filter sand. - Page 76 - RECTOO Stainless steel steps The stainless steel interior steps are assembled according to the instructions and are attached on top of the border. not suitable in salted water ! 3) Place the two holders and screw 5) Place the metal covering plates over...
-
Page 77: Accessories
3. Accessories 3.4 Electrical box 3.3 Technical housing 3.1 Summer tarpaulin A summer tarpaulin can be placed across the pool. Sunrays can increase the water temperature. The tarpaulin is simply placed on the water; when using the pool the tarpaulin is removed and turned over to dry. -
Page 78: Underwater Light Halogen
- RECTOO 3.5 Underwater light halogen 3.7 Remote control for LED 3.10 Internal stairs Follow the instructions in the enclosed Remote control + receiver for under- Internal stairs for corner 90° for height manual. water light LED. Follow the instructions 133cm and 146cm with adapted liner. -
Page 79: Safety Instructions
Safety instructions 4.1 General TAKE NOTE The borders are not intended to run on nor to dive from. The steps are only TEChnICAL InSTALLATIon intended for use to step in and out of the Do not activate the appliance if the air pool. -
Page 80: Maintenance
- RECTOO Maintenance 5.3 Technical installation 5.1 Wooden structure Check the pump once a year to ensure In order to guarantee a long lifetime good performance. for your wood, it can be treated with Normally no maintenance is required for a special stain. -
Page 81: Guarantee
6. Guarantee 6.3. Filter / pump 6.6. In general 6.1. Wooden structure Two years’ guarantee on the sealing of Our guarantee is limited to the delivery • Ten years’ guarantee against insect the filtration kit. of the replacement parts for defective infestations and bacterial attacks on the items. - Page 84 Covimex nv - Koolskampstraat 21 - B-8830 Gits T +32 (0)51 21 13 48 - F +32 (0)51 21 07 64 info@gardipool.be - www.gardipool.com...