Masquer les pouces Voir aussi pour AAc5000:

Publicité

Les langues disponibles
  • FR

Les langues disponibles

  • FRANÇAIS, page 15

Liens rapides

AAc5000
handleiding air cooler
Gebrauchsanweisung luftkühler
Mode d'emploi rafraîchisseur d'air
70W, 220-240V ~ 50hz
instruction manual air cooler
istruzioni per l'uso del raffreddatore ad aria
Manual del usuario del refrigerador de aire

Publicité

Table des Matières
loading

Sommaire des Matières pour Bestron AAc5000

  • Page 1 AAc5000 handleiding air cooler instruction manual air cooler Gebrauchsanweisung luftkühler istruzioni per l’uso del raffreddatore ad aria Mode d’emploi rafraîchisseur d’air Manual del usuario del refrigerador de aire 70W, 220-240V ~ 50hz...
  • Page 3 Gebruikershandleiding VeiliGheidsVoorschriften - Algemeen • Lees de gebruiksaanwijzing goed door en bewaar deze zorgvuldig. • G ebruik dit apparaat alleen zoals beschreven in deze gebruiksaan- wijzing. • D it apparaat mag worden gebruikt door kinderen ouder dan 8 jaar en personen met verminderde lichamelijke, zintuiglijke of geestelijke vermogens of gebrek aan ervaring en kennis, maar alleen onder toezicht of als ze instructie hebben gekregen over het veilig gebruik van het apparaat en de mogelijke gevaren ervan begrijpen. • K inderen moeten in de gaten gehouden worden om er zeker van te zijn dat ze niet met het apparaat spelen.
  • Page 4 Gebruikershandleiding VeiliGheidsVoorschriften - tijdens het gebruik • Gebruik het apparaat nooit buitenshuis. • Gebruik het apparaat nooit in vochtige ruimten. • P laats het apparaat op een vlakke ondergrond. • Z org ervoor dat uw handen droog zijn als u het apparaat, het snoer of de stekker aanraakt. • Z org ervoor dat er geen voorwerpen in de ventilatorkolom kunnen komen. • S chakel het apparaat uit en verwijder de stekker uit het stopcontact als u tijdens het gebruik storingen ondervindt, het apparaat gaat reinigen of klaar bent met het gebruik.
  • Page 5 Gebruikershandleiding WerkinG - Algemeen Het apparaat is alleen bedoeld voor huishoudelijke doeleinden, niet voor professioneel gebruik. 1. Behuizing 9. Opbergvak afstandbediening 2. Horizontale lamellen 10. Bedieningspaneel 3. Inlaatfilter en koel/bevochtigingssysteem 11. Knop aan/uit “ ” 4. Waterreservoir 12. IR-ontvanger afstandbediening 5. Vergrendeling waterreservoir 13. Knop koelen/bevochtigen “ ” humidifier 6. Zwenkwielen 14. Knop modus “ ” mode 7. Snoer met stekker 15. Knop zwenken “ ” swing 8. Afstandbediening 16. Knop snelheid “...
  • Page 6 Gebruikershandleiding WerkinG - koelen / Bevochtigen Het apparaat is voorzien van een koel/bevochtigingssysteem waarmee u de uitgeblazen lucht kunt koelen en bevochtigen. Het systeem werkt tevens luchtreinigend. 1. Neem de stekker uit het stopcontact. 2. Ontgrendel het waterreservoir (zie nr. 5 in figuur 1). 3. Trek het waterreservoir uit totdat het stopt. 4. Vul het waterreservoir met min. 1,5 en max. 4,5 liter (ijs)koud water (zie figuur 2). 5. Schuif het waterreservoir terug in het apparaat. 6. Vergrendel het waterreservoir. 7. Steek de stekker in het stopcontact. 8. Schakel het apparaat in zoals beschreven onder ‘WERKING - Ventileren’. 9. Druk op de knop “ ” om het koel/bevochti- humidifier gingssysteem in te schakelen. De uitgeblazen lucht wordt nu gekoeld, bevochtigd en gereinigd. 10. Druk nogmaals op de knop “ ” om het koel/ humidifier bevochtigingssysteem uit te schakelen. • H oe kouder het water waarmee u het reservoir vult is, hoe kouder de uitgeblazen lucht.
  • Page 7: Reiniging En Onderhoud

    Gebruikershandleiding WerkinG - Afstandsbediening Het apparaat kan ook via de bijgeleverde afstandsbediening bediend worden. De afstandsbediening werkt op twee AAA-batterijen (niet inbegrepen). Open het batterijvakje op de onderkant, plaats de batterijen en sluit het deksel. De knoppen op de afstandsbediening werken hetzelfde als de knoppen op het bedieningspaneel, alleen de functie ‘Bevochtigen’ is niet via de afstandsbediening in- of uit te schakelen. Voor een optimale werking: • Zorg dat de afstand tussen de ventilator en de afstandsbediening niet groter is dan 6 meter. • Richt de afstandsbediening op het apparaat en zorg voor een richtingshoek kleiner dan 30 graden. reiniGinG en onderhoud Na verloop van tijd kan er stof blijven zitten in het uitblaasrooster en tussen de vinnen van de ventilator. Ver- wijder met een handveger en/ of stofzuiger het stof. Water vervangen Het water moet elke 3 - 4 dagen worden ververst, zelfs wanneer het apparaat niet wordt gebruikt. 1. Trek de stekker uit het stopcontact. 2. Neem het inlaatfilter van de achterkant van het apparaat (zie figuur 3). 3. Draai de schroef aan de bovenkant van het koel/bevochtigingssysteem los (zie figuur 4). 4. Neem het koel/bevochtigingssysteem uit het apparaat. 5. Verwijder het waterreservoir uit het apparaat. 6. Leeg het waterreservoir, spoel het schoon onder de kraan en droog het vervolgens goed af. 7. P laats achtereenvolgens het waterreservoir, het koel/bevochtigingssysteem en het inlaatfilter terug. 8. Vul het waterreservoir zoals beschreven onder ‘WERKING - Koelen / Bevochtigen’. • R einig het waterreservoir zeer grondig wanneer u het apparaat voor een langere periode niet gebruikt.
  • Page 8: Garantiebepalingen

    9. D e garantie geeft geen enkel recht op vergoeding van eventuele schade, buiten de vervanging respectievelijk reparatie van de defecte onderdelen. De importeur kan nooit aansprakelijk gesteld worden voor eventuele vervolgschade of enigerlei andere consequenties die door of in relatie met de door hem geleverde apparatuur zijn ontstaan. 10. O m aanspraak te maken op garantie kunt u zich wenden tot uw winkelier. Bestron biedt ook de mogelijkheid om het apparaat rechtstreeks ter reparatie aan te bieden aan de Bestron Service Dienst. Stuur echter nooit zomaar iets op. Het pakket kan dan namelijk geweigerd worden en eventuele kosten zijn voor uw rekening. Neem contact op met de Service Dienst en zij zullen u vertellen hoe u het apparaat moet inpakken en verzenden.
  • Page 9 Gebrauchsanweisung sicherheitsBestiMMunGen - Allgemein • L esen Sie die Bedienungsanleitung gut durch und bewahren Sie diese sorgfältig auf. • V erwenden Sie dieses Gerät nur so wie in dieser Bedienungsanleitung beschrieben. • D ieses Gerät kann von Kinder ab 8 Jahren verwendet werden, und Personen mit Behinderungen körperlichen, sensorischen oder geistigen Fähigkeiten oder einem Mangel an Erfahrung und Wissen, es sei denn, sie wurden von einer für ihre Sicherheit verantwortlichen Person im Gebrauch des Gerätes unterrichtet oder bei dessen...
  • Page 10 Gebrauchsanweisung sicherheitsBestiMMunGen - Während der Benutzung • Benutzen Sie das Gerät nie im Freien. • Benutzen Sie das Gerät nie in feuchten Räumen. • Stellen Sie das Gerät auf den Boden, auf einen flachen Untergrund. • S orgen Sie dafür, dass Ihre Hände trocken sind, wenn Sie das Gerät, das Kabel oder den Stecker berühren. • A chten Sie darauf, dass keine Gegenstände zwischen die Ventilatorflügel gelangen. • S chalten Sie das Gerät aus und ziehen Sie den Stecker aus der Steckdose, wenn bei der Benutzung Störungen auftreten, Sie das Gerät reinigen oder es nicht mehr benutzen.
  • Page 11 Gebrauchsanweisung funktion - Allgemein Das Gerät ist nur für den Hausgebrauch vorgesehen und nicht für die professionelle Verwendung. 1. Ventilatorflügel 2. Ventilatorkorb 3. Motorgehäuse 4. Fernbedienung 5. Bedienfeld 6. Ausziehbares Stativ 7. Höhensperre 8. Kabel mit Stecker 1. Gehäuse 9. Staufach der Fernbedienung 2. Horizontalen Lamellen 10. Bedienfeld 3. Lufteinlass-Filter und Kühl/Befeuchtungssytem 11. Taste Ein/Aus “ ” 4. Wassertank 12. IR-Empfänger für Fernbedienung 5. Verriegelung des Wassertanks 13. Taste Kühl/befeuchtung “ ” humidifier 6. Schwenkräder 14. Taste Windwechsel-Funktionen “ ” mode 7. Kabel mit Stecker 15. Taste Oszillation “...
  • Page 12 Gebrauchsanweisung funktion - kühlen / Befeuchten Das Gerät ist mit einem Kühl/Befeuchtungssystem versehen, mit dem Sie die Abluft kühlen und befeuchten können. Das System dient auch zur Luftreinigung. 1. Ziehen Sie den Stecker aus der Steckdose. 2. E ntsperren Sie den Wassertank (siehe Nr. 5, Abb. 1). 3. Z iehen Sie den Wassertank raus, bis er stoppt. 4. F üllen Sie den Wassertank mit mindestens 1,5 und maximal 4,5 Liter (eis)kaltem Wasser (siehe Abb. 2). 5. S chieben Sie den Wassertank zurück in das Gerät. 6. Verriegeln Sie die Verriegelung des Wassertanks. 7. Stecken Sie den Stecker in die Steckdose. 8. S chalten Sie das Gerät ein, wie unter ‘FUNKTION - Lüften’ beschrieben.
  • Page 13: Reinigung Und Wartung

    Gebrauchsanweisung funktion - fernbedienung Das Gerät kann auch über die mitgelieferte Fernbedienung bedient werden. Die Fernbediening braucht zwei AAA Batterien (exklusive). Öffnen Sie das Batteriefach an der Unterseite des Fernbedienungs, legen Sie die Batterien ein und schließen Sie den Deckel. Die Tasten auf der Fernbedienung funktionieren genauso wie die Tasten auf dem Bedienfeld des Geräts, nur die Funktion ‘Befeuchten’ kann nicht über die Fernbedienung ein- oder ausgeschaltet werden. Beachten Sie zur Erreichung einer optimalen Funktion: • Der Abstand zwischen dem Ventilator und der Fernbedienung sollte nicht größer sein als 6 Meter. • Richten Sie die Fernbedienung auf den Ventilator und sorgen Sie für einen Richtungswinkel von weniger als 30 Grad. reiniGunG und WArtunG Nach einiger Zeit kann sich Staub zwischen den Speichen des Ventilatorkorbs und auf den Ventilatorflügeln festsetzen. Versuchen Sie den Staub mit einem Handfeger und/oder einem Staubsauger zu entfernen. ersetzen des Wassers Das Wasser sollte alle 3 - 4 Tage gewechselt werden, auch wenn das Gerät nicht benutzt wird. 1. Ziehen Sie den Stecker aus der Steckdose. 2. Nehmen Sie den Einlassfilter von der Rückseite des Geräts (siehe Abbildung 3). 3. Lösen Sie die Schraube an der Oberseite des Kühl/Befeuchtungssystems (siehe Abbildung 4).
  • Page 14: Kundendienst

    Sie sich zunächst telefonisch, per Fax oder Mail an den Werkskundendienst wenden. Bitte schicken Sie keine Geräte unaufgefordert. Insbesondere dürfen Pakete niemals unfrei eingesendet werden. Sprechen Sie daher zuerst mit uns. Wir sagen Ihnen wie Sie Ihr Gerät an uns einsenden sollen. 11. Das Gerät eignet sich nicht für die professionelle Verwendung. kundendienst Sollte unerwartet eine Störung auftreten dann können Sie sich mit dem BESTRON-Kundendienst in Verbindung setzen: www.bestron.com/service ce-konforMitätserklärunG Dieses Produkt entspricht auf dem Gebiet der Sicherheit den Bestimmungen der folgenden europäischen Richtlinien: • EMC-Richtlinie...
  • Page 15: Consignes De Sécurité - Généralités

    Mode d’emploi consiGnes de sécurité - Généralités • L isez soigneusement le mode d’emploi et conservez-le précieusement. • U tilisez cet appareil uniquement suivant les instructions décrites dans le mode d’emploi. • C et appareil peut être utilisé par les enfants à partir de 8 ans et les personnes ayant réduit les capacités physiques, sensorielles ou mentales ou manque d’expérience et de connaissances si elles ont été aidées ou instruites concernant l’utilisation de l’appareil en toute sécurité et comprennent les risques qu’il peut entraîne. • C et appareil n’est pas un jouet. En présence d’enfants, il est important de s’assurer qu’ils ne jouent pas avec l’appareil. • N ettoyage et entretien ne doivent pas être effectués par les enfants, sauf s’ils sont âgés de plus de 8 ans et supervisés.
  • Page 16: Environnement

    Mode d’emploi consiGnes de sécurité - durant l’utilisation • N’utilisez jamais l’appareil à l’extérieur. • N’utilisez jamais l’appareil dans une pièce humide. • Installez l’appareil par terre, sur une surface plane. • A ssurez-vous que vos mains sont sèches avant de toucher l’appareil, le cordon ou la fiche. • A ssurez-vous que rien ne peut s’introduire dans les pales du ventilateur. • É teignez l’appareil et débranchez la fiche en cas de problème durant l’utilisation, pour le nettoyage, et dès que vous avez fini de l’utiliser. • S i l’appareil est tombé à l’eau, débranchez immédiatement la prise. Cessez d’utiliser l’appareil.
  • Page 17: Fonctionnement - Généralités

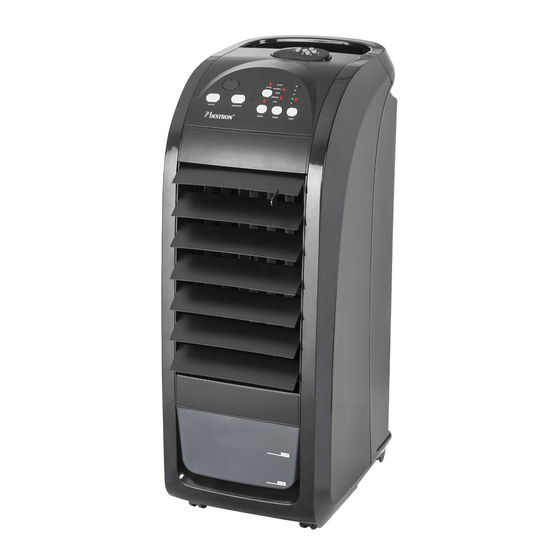
    Mode d’emploi fonctionneMent - Généralités L’appareil est destiné uniquement à l’utilisation domestique, et non à l’usage professionnel. 1. Boîtier 9. Compartiment pour la télécommande 2. Lames horizontales 10. Panneau de contrôle 3. Filtre d’aspiration d’air et système de 11. Bouton marche/arrêt « » refroidissement / humidification 12. Récepteur IR de la télécommande 4. Réservoir d’eau 13. Bouton humidificateur « » humidifier 5. Verrou du réservoir d’eau 14. Bouton mode « » mode 6. Roues pivotantes 15. Bouton oscillation « » swing 7. Cordon et fiche 16. Bouton vitesse «...
  • Page 18: Fonctionnement - Minuterie

    Mode d’emploi fonctionneMent - refroidissement / humidification d’air L’appareil est équipé d’un système de refroidissement / humidification qui permet de refroidir et humidifier l’air évacué. Le système fonctionne également pour le nettoyage de l’air. 1. Débranchez la fiche. 2. Déverrouillez le réservoir d’eau (n° 5 sur la figure 1). 3. Sortir le réservoir d’eau jusqu’à l’arrêt. 4. R emplissez le réservoir d’eau avec au minimum 1,5 et au maximum 4,5 litres d’eau glacée (voir figure 2). 5. Remettre le réservoir d’eau en place dans l’appareil. 6. Bloquer le verrou du réservoir d’eau. 7. Insérez la fiche dans la prise. 8. A llumez l’appareil comme décrit dans ‘FONCTION- NEMENT - Ventiler’. 9. A ppuyez sur le bouton « » pour allumer le humidifier système de refroidissement / humidification. L’air...
  • Page 19: Fonctionnement - Télécommande

    Mode d’emploi fonctionneMent - télécommande L’appareil peut aussi être commandé via la télécommande incluse. La télécommande fonctionne avec deux piles AAA (non incluses). Ouvrez le compartiment des piles en bas de la télécommande, insérez les piles et fermez le couvercle. Les boutons de la télécommande fonctionnent de la même manière que les boutons du panneau de contrôle, seule la fonction « » ne peut pas être activée ou désactivée via la télécommande. humidification Pour un fonctionnement optimal : • La distance entre le ventilateur et la télécommande ne doit pas excéder 6 mètres. • Diriger la télécommande sur le ventilateur, en maintenant un angle de direction inférieur à 30 degrés. nettoyAGe et entretien Après un certain temps, de la poussière peut s’accumuler entre les barreaux de la corbeille du ventilateur, et sur les pales. Utilisez une brosse et/ou un aspirateur à poussière pour enlever la poussière. remplacer l’eau L’eau doit être changée tous les 3 à 4 jours, même si l’appareil n’est pas utilisé. 1. Débranchez la fiche. 2. Enlevez le filtre d’aspiration d’air à l’arrière de l’appareil (voir figure 3). 3. Desserrez la vis située en haut du système de refroidissement / humidification (voir figure 4). 4. Retirez le système de refroidissement / humidification de l’appareil. 5. Retirez le réservoir d’eau de l’appareil. 6. Videz le réservoir d’eau, rincez-le sous le robinet et séchez-le soigneusement. 7. Repositionnez le réservoir d’eau, le système de refroidissement / humidification et le filtre d’entrée. 8. R emplissez le réservoir d’eau comme décrit dans ‘FONCTIONNEMENT - Refroidissement / Humidi- fication d’air’.
  • Page 20: Conditions De Garantie

    10. P our pouvoir faire appel à la garantie, vous pouvez vous adresser à votre revendeur. Bestron offre aussi la possibilité de faire réparer l’appareil directement par le service après-vente de Bestron. Toutefois, n’envoyez jamais rien sans avoir reçu d’instructions au préalable. Le colis pourrait en effet être refusé et les frais éventuels seraient à votre charge. Prenez contact avec le service après-vente qui vous expliquera comment vous devez emballer et expédier l’appareil.
  • Page 21 user’s instructions sAfety instructions - General • P lease read these instructions carefully and retain them for future reference. • Use this appliance solely in accordance with these instructions. • T his appliance can be used by children older than 8 years and persons with reduced physical, sensory or mental capabilities or lack of experience and knowledge, but only if they have been given supervision or instruction concerning use of the appliance in a safe way and understand the hazards involved.
  • Page 22 user’s instructions sAfety instructions - during use • Never use the appliance outdoors. • Never use the appliance in a humid room. • Set the appliance on the floor, on a level surface. • M ake sure that your hands are dry before touching the appliance, power cord or plug. • Make sure that objects cannot contact the fan blades. • S witch off the appliance and remove the plug from the wall socket in the event of a malfunction during use, and before cleaning the appliance or storing it after use.
  • Page 23: Operation - General

    user’s instructions operAtion - General The appliance is intended only for domestic use, not for professional use. 1. Housing 9. Remote control storage compartement 2. Horizontal slats 10. Control panel 3. Intake filter and cooling/humidification system 11. Button “ ” 4. Water tank 12. IR receiver for remote control 5. Water tank lock 13. Button “ ” (cooling/humidification) humidifier 6. Swivel wheels 14. Button “ ” mode 7. Power cord and plug 15. Button “ ”...
  • Page 24 user’s instructions operAtion - cooling / humidifying the air The appliance is equipped with a cooling/humidification system, allowing you to cool and humidify the blown out air. The system also works air-cleaning. 1. Remove the plug from the wall socket. 2. Unlock the water tank (see nr. 5 in figure 1). 3. Pull out the water tank until it stops. 4. F ill the water tank with min. 1.5 and max. 4.5 liters of (ice)cold water (see figure 2). 5. Insert the water tank back into the appliance. 6. Lock the water tank. 7. Connect the plug into a wall socket. 8. T urn on the appliance as described under ‘OPE- RATION - Ventilation’. 9. P ress the “...
  • Page 25: Operation - Remote Control

    user’s instructions operAtion - remote control The appliance can also be controlled using the included remote control. The remote control operates on two AAA batteries (not included). Open the battery compartment on the bottom of the remote, insert the batteries and close the lid. The buttons on the remote control work the same as the buttons on the control panel, apart from the “ ” function which can not be switched on or off via the remote control. humidifying For optimal use: • The distance between the appliance and the remote control should,nt be more than 6 meters. • Point the remote control at the appliance and be sure that the angle is smaller than 30 degrees. cleAninG And MAintenAnce Over the course of time dust can accumulate between the spokes in the fan housing, and on the fan blades. Romove any dust with a brush and/or vacuum cleaner. replacing the water The water should be changed every 3 - 4 days even when the appliance is not being used. 1. Remove the plug from the wall socket. 2. Remove the intake filter from the back of the device (see figure 3). 3. Unscrew the screw at the top of the cooling/humidification system (see figure 4). 4. Remove the cooling/humidifying system from the device. 5. Remove the water tank from the device. 6. Empty the water tank, rinse it under the tap and dry it thoroughly. 7. Insert the water tank, the cooling/humidification system and the intake filter back into the appliance. 8. Fill the water tank as described under ‘OPERATION - Cooling / Humidifying the air’.
  • Page 26: Guarantee Terms

    Losses incurred during transport. b. The removal or changing of the appliance’s serial number. 8. The guarantee does not cover power cords, lamps or glass parts. 9. N o claims can be submitted under this warranty for damage other than the repair or replacement of faulty parts. The importer can never be held responsible for any consequential loss or damage or any other consequences, resulting either directly or indirectly from the appliance supplied by the importer. 10. I n case of claims under guarantee you can contact your dealer where the appliance is purchased. Bestron offers you also the possibility to send the appliance directly to our Service Department. Do not send your appliance without consulting us. The package may be refused and any any costs will be for your account. Please contact the Service Department and they will tell you how to pack and send the appliance. 11. This appliance is not suitable for professional use. serVice If a fault should occur please contact the BESTRON service department: www.bestron.com/service ce declArAtion of conforMity This product conforms to the essential requirements of the following EU safety directives: • EMC Directive...
  • Page 27 istruzioni per l’uso prescriZioni di sicureZZA - Generalità • Leggere con attenzione le istruzioni per l’uso e conservarle con cura. • U tilizzare questo apparecchio esclusivamente come descritto nelle presenti istruzioni. • Q uesto apparecchio può essere utilizzato da bambini di età da 8 anni e di sopra e persone con ridotte capacità fisiche, sensoriali o mentali o mancanza di esperienza e conoscenza se esse sono state date supervisione o istruzioni riguardanti l’uso dell’apparecchio in modo sicuro e capire i rischi coinvolti.
  • Page 28: Norme Di Sicurezza - Durante L'uso

    istruzioni per l’uso norMe di sicureZZA - durante l’uso • Non utilizzare mai l’apparecchio in ambienti esterni. • Non utilizzare l’apparecchio in ambienti umidi. • Collocare il ventilatore sul pavimento, in un luogo dal piano orizzontale. • A ssicurarsi di avere le mani asciutte prima di toccare l’apparecchio, il cavo o la spina. • Evitare che vengano inseriti oggetti tra le pale del ventilatore. • S pegnere l’apparecchio e disinserire la spina dalla presa se durante l’uso si verificano malfunzionamenti e quando si pulisce l’apparecchio o si è terminato di utilizzarlo. • E strarre immediatamente la spina dalla presa qualora l’apparecchio sia caduto in acqua e non utilizzare più l’apparecchio. • N on immergere mai l’apparecchio, il cavo e la presa nell’acqua o in altri liquidi. tutelA dell’AMBiente •...
  • Page 29 istruzioni per l’uso funZionAMento - Avvertenze generali Questo apparecchio è concepito esclusivamente per l’impiego domestico e non per l’uso professionale. 1. Alloggio 9. Telecomando del vano portaoggetti 2. Lamelle orizzontali 10. Pannello di controllo 3. F iltro di ingresso e sistema di raffreddamento / 11. Tasto di accensione / spegnimento “ ” umidificazione 12. Telecomando del ricevitore IR 4. Serbatoio dell’acqua 13. Tasto raffreddamento / umidificazione “ ” humidifier 5. Blocco del serbatoio dell’acqua 14. Tasto di modalità “ ” mode 6. Ruote girevoli 15. Tasto di girare “ ” swing 7. Cavo con spina 16. Tasto di velocità “...
  • Page 30 istruzioni per l’uso funZionAMento - raffreddamento / umidificazione Il dispositivo è dotato di un sistema di raffreddamento / umidificazione che consente di raffreddare e umidificare l’aria di scarico. Il sistema funziona anche con purificazione dell’aria. 1. Rimuovere la spina dalla presa. 2. S bloccare il serbatoio dell’acqua (N. 5 nella figura 1). 3. Estrarre il serbatoio dell’acqua finché non si arresta. 4. R iempire il serbatoio dell’acqua con almeno 1,5 e massimo 4,5 litri (ghiaccio) di acqua fredda (vedere la figura 2).
  • Page 31: Pulizia E Manutenzione

    istruzioni per l’uso funZionAMento - telecomando Il dispositivo può essere utilizzato anche tramite il telecomando in dotazione. Il telecomando funziona con due batterie AAA (non incluse). Aprire il vano batterie sul fondo, inserire le batterie e chiudere il coperchio. I pulsanti sul telecomando funzionano allo stesso modo dei pulsanti sul pannello di controllo, solo la funzione ‘Raffreddamento / Umidificazione’ non può essere attivata o disattivata tramite il telecomando. Per un uso ottimale: • La distanza tra l’apparecchio e il telecomando dovrebbe, nt essere più di 6 metri. • Puntare il telecomando verso l’apparecchio e accertarsi che l’angolo è minore di 30 gradi. puliZiA e MAnutenZione Nel corso del tempo, la polvere può rimanere nella griglia di scarico e tra le alette del ventilatore. Rimuovere la polvere con una spazzola a mano e / o un aspirapolvere. sostituire l’acqua L’acqua dovrebbe essere cambiata ogni 3 - 4 giorni anche quando l’apparecchio non viene utilizzato. 1. Estrarre la spina dalla presa. 2. Prendere il filtro di ingresso dal retro del dispositivo (vedere la figura 3). 3. Allentare la vite nella parte superiore del sistema di raffreddamento / umidificazione (vedere la figura 4). 4. Rimuovere il sistema di raffreddamento / umidificazione dal dispositivo. 5. Rimuovere il serbatoio dell’acqua dal dispositivo. 6. Svuotare il serbatoio dell’acqua, sciacquarlo sotto il rubinetto e asciugarlo accuratamente. 7. Riposizionare il serbatoio dell’acqua, il sistema di raffreddamento / umidificazione e il filtro di ingresso. 8. Riempire il serbatoio dell’acqua come descritto in “Funzionamento - Raffreddamento / Umidificazione”. • P ulire a fondo il serbatoio dell’acqua se non si utilizza l’apparecchio per un lungo periodo di tempo.
  • Page 32: Condizioni Di Garanzia

    7. Le presenti condizioni di garanzia non si applicano inoltre in caso di: a. perdite che si verificano durante il trasporto; b. rimozione o modifica del numero di serie dell’apparecchio. 8. Sono esclusi dalla garanzia i cavi, le spie luminose, le lampade e i componenti in vetro. 9. L a garanzia non riconosce alcun diritto al risarcimento di eventuali danni al di là della mera sostituzione o riparazione delle parti difettose. In nessun caso l’importatore potrà essere ritenuto responsabile per eventuali danni consequenziali o per conseguenze di altro tipo verificatesi a causa delle apparecchiature da questi fornite o a esse correlate. 10. Per reclamare la garanzia, potete rivolgervi al vostro negoziante. Bestron offre anche la possibilità di far riparare l’apparecchio direttamente dal Centro assistenza Bestron. Tuttavia, non spedite mai l’apparecchio senza aver fatto le dovute considerazioni. Il pacco può infatti essere respinto e le eventuali spese sono a vostro carico. Contattate il Centro assistenza e vi diranno come imballare e spedire l’apparecchio. 11. L’apparecchio non è concepito per l’uso professionale. serViZio Qualora dovesse verificarsi un guasto è possibile mettersi in contatto con il servizio clienti BESTRON: www.bestron.com/service dichiArAZione di conforMità ce Questo prodotto soddisfa i requisiti e le seguenti norme europee nel campo della sicurezza: • Direttiva EMC 2014/30/EU • Direttiva sulla bassa tensione...
  • Page 33: Normas De Seguridad - General

    Manual del usuario norMAs de seGuridAd - General • L ea las instrucciones de uso con detenimiento y guárdelas cuidadosamente. • U tilice este aparato únicamente en la forma que se describe en las instrucciones. • E ste aparato puede ser utilizado por niños de 8 años y arriba y personas con reducción capacidades físicas, sensoriales o mentales o falta de experiencia y conocimiento si han tenido supervisión o instrucciones relativas al uso del aparato de forma segura y entender...
  • Page 34 Manual del usuario norMAs de seGuridAd - durante el uso • No use nunca este aparato fuera del hogar. • No utilice el aparato nunca en lugares húmedos. • Coloque el ventilador en el suelo, sobre una superficie plana. • A segúrese de tener las manos secas cuando manipule el aparato, el cable o el enchufe. • A segúrese de que ningún objeto pueda meterse entre las aspas del ventilador. • A pague el aparato y retire el enchufe de la toma de alimentación si se presentan fallos durante el uso, cuando quiera limpiarlo, o después de usarlo. • C uando el aparato haya caído en el agua, retire directamente el enchufe de la toma de pared. No vuelva a utilizar el aparato.
  • Page 35: Funcionamiento General

    Manual del usuario funcionAMiento - General Este aparato está concebido únicamente para uso doméstico, no para uso profesional. 1. Vivienda 9. Compartimento del control remoto 2. Listones horizontales 10. Panel de control 3. F iltro de entrada y sistema de enfriamiento / 11. Botón de encendido / apagado “ ” humidificación 12. Control remoto del receptor IR 4. Depósito de agua 13. Botón de enfriar / humidificar “ ” humidifier 5. Bloquear el depósito de agua 14. Botón de modo “ ” mode 6. Ruedas giratorias 15. Botón de gire “ ” swing 7. Cord con enchufe 16. Botón de velocidad “ ”...
  • Page 36 Manual del usuario funcionAMiento - enfriamiento / humidificación El dispositivo está equipado con un sistema de enfriamiento / humidificación que le permite enfriar y humidificar el aire de salida. El sistema también funciona con purificación de aire. 1. Retire el enchufe del zócalo. 2. D esbloquee el depósito de agua (consulte n.° 5 en la figura 1). 3. Tire del depósito de agua hasta que se detenga. 4. L lene el tanque de agua con al menos 1,5 y un máx. de 4,5 litros (hielo) de agua fría (consulte la figura 2). 5. Vuelva a colocar el depósito de agua en el aparato. 6. Bloquee el tanque de agua.
  • Page 37 Manual del usuario funcionAMiento - Mando a distancia El dispositivo también se puede operar a través del control remoto suministrado. El control remoto funciona con dos pilas AAA (no incluidas). Abra el compartimiento de la batería en la parte inferior, inserte las baterías y cierre la tapa. Los botones del control remoto funcionan igual que los botones en el panel de control, solo la función ‘Humidificación’ no se puede activar o desactivar a través del control remoto. Para un uso óptimo: • La distancia entre el aparato y el mando a distancia que, nt ser más de 6 metros. • Apunte el mando a distancia hacia el aparato y asegúrese de que el ángulo es menor de 30 grados. liMpieZA y MAnteniMiento Con el tiempo, el polvo puede permanecer en la rejilla de descarga y entre las aletas del ventilador. Elimine el polvo con un cepillo de mano y / o una aspiradora. reemplazar agua El agua debe cambiarse cada 3-4 días, incluso cuando el electrodoméstico no se esté utilizando. 1. Saque el enchufe del enchufe. 2. Tome el filtro de entrada de la parte posterior del dispositivo (consulte la figura 3). 3. Afloje el tornillo en la parte superior del sistema de enfriamiento / humidificación (vea la figura 4). 4. Retire el sistema de enfriamiento / humidificación del dispositivo. 5. Retire el tanque de agua del dispositivo. 6. Vacíe el tanque de agua, enjuáguelo debajo del grifo y séquelo bien. 7. Vuelva a colocar el tanque de agua, el sistema de enfriamiento / humidificación y el filtro de entrada. 8. Llene el tanque de agua como se describe en ‘Operación - Refrigeración / humidificación’. • Limpie el tanque de agua a fondo si no usa el aparato por un período de tiempo más largo.
  • Page 38: Disposiciones De Garantía

    9. L a garantía no concede derecho a reclamar indemnización alguna por daños, diferente a la sustitución o reparación, respectivamente, de las partes defectuosas. El importador no podrá ser responsabilizado por daños consecuenciales o por cualquier otra clase de efectos causados por el aparato suministrado por él o que guarden relación con el mismo. 10. Para hacer valer la garantía. Puede acudir a la tienda donde compró el producto. Bestron también ofrece la posibilidad de entregar el aparato directamente al servicio técnico Bestron para su reparación. Pero no podrá enviarlo de cualquier manera. El paquete podría ser rechazado y los costes asociados correrían de su cuenta. Póngase en contacto con el servicio técnico, donde le indicarán cómo debe embalar y enviar el aparato.
  • Page 40 Bestron Customer Service WhatsApp bestron.com/whatsapp...

Table des Matières