Télécharger Imprimer la page

Publicité

Les langues disponibles
  • FR

Les langues disponibles

  • FRANÇAIS, page 41

Liens rapides

AutoCross-Laser 2 XP / AutoCross-Laser 2 XPG
All manuals and user guides at all-guides.com
Laser
635 nm
Laser
510/635 nm
02
DE
10
GB
18
NL
26
DK
34
FR
42
ES
IT
50
58
PL
FI
PT
SE
NO
TR
RU
UA
CZ
EE
LV
S
LT
RO
BG
GR

Publicité

loading

Sommaire des Matières pour LaserLiner AutoCross-Laser 2 XP

  • Page 1 AutoCross-Laser 2 XP / AutoCross-Laser 2 XPG All manuals and user guides at all-guides.com Laser Laser 635 nm 510/635 nm...
  • Page 2 all-gui des.c...
  • Page 3 All manuals and user guides at all-guides.com Lesen Sie vollständig die Bedienungsanleitung und das beiliegende Heft „Garantie- und Zusatzhinweise“. Befolgen Sie die darin ent- haltenen Anweisungen. Diese Unterlage ist aufzubewahren und bei Weitergabe der Lasereinrichtung mitzugeben. Funktion / Verwendung Kreuzlinien- und 5-Punkt-Laser zum vertikalen und horizontalen Ausrichten –...
  • Page 4 AutoCross-Laser 2 XP / AutoCross-Laser 2 XPG All manuals and user guides at all-guides.com Zum Transport immer alle Laser ausschalten und Pendel arretieren, Schiebeschalter auf “OFF” stellen! Besondere Produkteigenschaften Automatische Ausrichtung des Gerätes durch ein magnetisch gedämpftes Pendelsystem. Das Gerät wird in Grundstellung gebracht und richtet sich selbständig aus.
  • Page 5 All manuals and user guides at all-guides.com Anzahl und Anordnung der Laser Kreuzlinien-Laser 5-Punkt-Laser H = horizontale Laser V = vertikale Laser S = Neigungsfunktion 1H 1V 1/4”-Stativgewinde Laseraustrittsfenster (Unterseite) Batteriefach (Unterseite) Handempfängermodus (nur XP) Schiebeschalter a AN LED Handempfängermodus b Neigungsmodus (nur XP) c AUS / Transportsicherung...
  • Page 6 AutoCross-Laser 2 XP / AutoCross-Laser 2 XPG All manuals and user guides at all-guides.com Einlegen der Batterien – Batteriefach (2) öffnen und Batterien gemäß den Installationssymbolen ein- legen. Dabei auf korrekte Polarität achten. + – Horizontal und vertikal Nivellieren Die Transportsicherung lösen, Schiebeschalter (3) auf “ON” stellen. Das Laser- kreuz und die Laserpunkte erscheinen.
  • Page 7 All manuals and user guides at all-guides.com Neigungsmodus Die Transportsicherung nicht lösen, Schiebeschalter (3) auf die mittlere Stellung schieben und die Laser mit der Wahltaste auswählen. Jetzt können schiefe Ebenen bzw. Neigungen angelegt werden. In diesem Modus richten sich die Laserlinien nicht mehr automatisch aus. Dies wird durch ein Blinken der Laserlinien signalisiert.
  • Page 8 all-gui des.c...
  • Page 9 AutoCross-Laser 2 XP / AutoCross-Laser 2 XPG All manuals and user guides at all-guides.com Kalibrierungsüberprüfung vorbereiten: Sie können die Kalibrierung des Laser kontrollieren. Stellen Sie das Gerät in die Mitte zwischen 2 Wänden auf, die mind. 5 m voneinander entfernt sind.
  • Page 10 All manuals and user guides at all-guides.com Überprüfung der vertikalen Linie: Gerät ca. 5 m vor einer Wand aufstellen. An der Wand ein Lot mit einer 2,5 m langen Schnur befestigen, das Lot sollte dabei frei pendeln. Gerät einschalten und den vertikalen Laser auf die Lotschnur richten. Die Genauigkeit liegt inner- halb der Toleranz, wenn die Abweichung zwischen Laserlinie und Lotschnur nicht größer als ±...
  • Page 11 AutoCross-Laser 2 XP / AutoCross-Laser 2 XPG All manuals and user guides at all-guides.com EU-Bestimmungen und Entsorgung Das Gerät erfüllt alle erforderlichen Normen für den freien Warenverkehr innerhalb der EU. Dieses Produkt ist ein Elektrogerät und muss nach der europäischen Richtlinie für Elektro- und Elektronik- Altgeräte getrennt gesammelt und entsorgt werden.
  • Page 12 All manuals and user guides at all-guides.com Read the operating instructions and the enclosed brochure „Guarantee and additional notices“ completely. Follow the instructions they contain. This document must be kept in a safe place and if the laser device is passed on, this document must be passed on with it. Function / Application Cross-line and 5-point laser for vertical and horizontal alignment –...
  • Page 13 AutoCross-Laser 2 XP / AutoCross-Laser 2 XPG All manuals and user guides at all-guides.com When transporting always switch off all lasers, secure the pendulum and set the slide switch to „OFF“! Special product features Automatic alignment of the device with a magnetically dampened pendulum system.
  • Page 14 all-gui des.c...
  • Page 15 All manuals and user guides at all-guides.com Number and direction of the lasers Cross-line laser 5-point laser H = horizontal laser V = vertical laser S = Slopefunction 1H 1V Laser emitting window 1/4“ tripod threads (bottom) Battery compartment (bottom) Hand receiver mode (only XP) Slide switch LED Hand receiver mode...
  • Page 16 AutoCross-Laser 2 XP / AutoCross-Laser 2 XPG All manuals and user guides at all-guides.com Inserting the batteries – Open the battery compartment (2) and insert the batteries in accordance with the installation symbols, ensuring the correct polarity. + – Horizontal and vertical levelling Release the transport restraint, set slide switch (3) to „ON“.
  • Page 17 All manuals and user guides at all-guides.com Slope mode Do not release the transport restraint, set slide switch (3) to the mid-position and select the lasers with the selector switch. Sloping planes and tilts can now be measured. In this mode, the laser lines no longer align automatically. This is signalised by the laser lines flashing.
  • Page 18 AutoCross-Laser 2 XP / AutoCross-Laser 2 XPG All manuals and user guides at all-guides.com Preparing the calibration check: It is possible for you to check the calibration of the laser. To do this, position the device midway between 2 walls, which must be at least 5 metres apart.
  • Page 19 All manuals and user guides at all-guides.com Checking the vertical line: Position the device about 5 m from a wall. Fix a plumb bob with a line of 2.5 m length on the wall, making sure that the bob can swing freely. Switch on the device and align the vertical laser to the plumb line.
  • Page 20 all-gui des.c...
  • Page 21 AutoCross-Laser 2 XP / AutoCross-Laser 2 XPG All manuals and user guides at all-guides.com EU directives and disposal This device complies with all necessary standards for the free movement of goods within the EU. This product is an electric device and must be...
  • Page 22 All manuals and user guides at all-guides.com Lees de bedieningshandleiding en de bijgevoegde brochure ‚Garantie- en aanvullende aanwijzingen‘ volledig door. Volg de daarin beschreven aanwijzingen op. Bewaar deze documentatie en geef ze door als u de laserinrichting doorgeeft. Functie / Toepassing Kruislijn- en 5-puntslaser voor de verticale en horizontale uitlijning –...
  • Page 23 AutoCross-Laser 2 XP / AutoCross-Laser 2 XPG All manuals and user guides at all-guides.com Schakel vóór het transport altijd alle lasers uit, zet de pendel vast en de schuifschakelaar op ‚OFF‘! Speciale functies van het product Automatische uitlijning van het apparaat door middel van een magnetisch gedempt pendelsysteem.
  • Page 24 All manuals and user guides at all-guides.com Aantal en richting van de laser Kruislijnlaser 5-puntslaser H = horizontale laserlijn V = verticale laserlijn S = inclinaties (Slope-Funktion) 1H 1V 1/4”-schroefdraad (onderzijde) Laseruitlaat Batterijvakje (onderzijde) Handontvangermodus (alleen XP) Schuifschakelaar a AAN LED Handontvangermodus b Neigingsmodus (alleen XP)
  • Page 25 AutoCross-Laser 2 XP / AutoCross-Laser 2 XPG All manuals and user guides at all-guides.com Plaatsen van de batterijen – Batterijvak (2) openen en de batterijen volgens de installatiesymbolen inleggen. Let daarbij op de correcte polarisatie. + – Horizontaal en verticaal nivelleren Deactiveer de transportbeveiliging en zet de schuifschakelaar (3) op ‚ON‘.
  • Page 26 all-gui des.c...
  • Page 27 All manuals and user guides at all-guides.com Neigingsmodus Ontgrendel de transportbeveiliging niet, zet de schuifschakelaar (3) in de middelste stand en selecteer de lasers met de keuzetoets. Nu kunnen schuine vlakken en neigingen worden aangelegd. In deze modus worden de laserlijnen niet meer automatisch uitgelijnd. Dit wordt gesignaleerd door de knipperende laserlijnen.
  • Page 28 AutoCross-Laser 2 XP / AutoCross-Laser 2 XPG All manuals and user guides at all-guides.com Kalibratiecontrole voorbereiden: U kunt de kalibratie van de laser controleren. Plaats het toestel in het midden tussen twee muren die minstens 5 meter van elkaar verwijderd zijn. Schakel het apparaat in, desactiveer daarvoor de transportbeveiliging (laserkruis ingeschakeld).
  • Page 29 All manuals and user guides at all-guides.com Controleren van de verticale lijn: Apparaat op ca. 5 meter van de wand opstellen, aan de wand een lood met ongeveer 2,5 meter draad bevestigen, de draad moet vrij kunnen pendelen, apparaat instellen in de verticale positie en wanneer u de draad nadert, mag het verschil niet meer zijn dan ±...
  • Page 30 AutoCross-Laser 2 XP / AutoCross-Laser 2 XPG All manuals and user guides at all-guides.com EU-bepalingen en afvoer Het apparaat voldoet aan alle van toepassing zijnde normen voor het vrije goederenverkeer binnen de EU. Dit product is een elektrisch apparaat en moet volgens...
  • Page 31 All manuals and user guides at all-guides.com Læs betjeningsvejledningen og det vedlagte hæfte „Garantioplysninger og supplerende anvisninger“ grundigt igennem. Følg de heri indeholdte instrukser. Dette dokument skal opbevares og følge med laserenheden, hvis denne overdrages til en ny bruger. Funktion / Anvendelsesformål Krydslinje- og 5-punkt-laser til vertikal og horisontal indjustering –...
  • Page 32 all-gui des.c...
  • Page 33 AutoCross-Laser 2 XP / AutoCross-Laser 2 XPG All manuals and user guides at all-guides.com Til transport skal man altid slukke alle lasere, fastlåse penduler og stille skydekontakter på “OFF”! Særlige produktegenskaber Automatisk indjustering af apparatet via et magnetisk dæmpet pendulsystem. Apparatet nulstilles og indstiller sig automatisk.
  • Page 34 All manuals and user guides at all-guides.com Antal og placering af lasere Krydslinje-laser 5-punkt-laser H = horisontal laserlinje V = vertikal laserlinje S = hældningsfunktion 1H 1V Laserudgangsvindue 1/4” gevindbøsning (underside) Batterirum (underside) Håndmodtagermodus (kun XP) Skydekontakt a TIL LED Håndmodtagermodus b Hældningsfunktion (kun XP) c FRA / Transportsikring...
  • Page 35 AutoCross-Laser 2 XP / AutoCross-Laser 2 XPG All manuals and user guides at all-guides.com Isætning af batterier – Batterihuset (2) åbnes og batterierne sættes i som angivet ved symbolerne. Låget lukkes omhyggeligt. + – Horisontal og vertikal nivellering Man løsner transportsikringen og stiller skydekontakten (3) på “ON”.
  • Page 36 All manuals and user guides at all-guides.com Hældningsfunktion Undgå at løsne transportsikringen, sæt skydekontakten (3) i midterstilling, og vælg laserne med valgknappen. Nu kan der anlægges skæve niveauer eller hældninger. I denne modus indjusterer laserlinjerne sig ikke længere automatisk. Dette indikeres ved, at laserlinjerne blinker. LASER LASER LASER...
  • Page 37 AutoCross-Laser 2 XP / AutoCross-Laser 2 XPG All manuals and user guides at all-guides.com Forberedelse til kontrol af retvisning: Man kan kontrollere kalibreringen af laseren. Opstil apparatet midt mellem 2 vægge, som er mindst 5 m fra hinanden. Slå transport - sikringen fra og tænd for instrumentet (laserkrydset aktiveres).
  • Page 38 all-gui des.c...
  • Page 39 All manuals and user guides at all-guides.com Kontrol af lodret laserlinie: Laseren opstilles ca. 5 m fra en væg. På væggen ophænges et snorelod med 2,5 m snor, således at det hænger frit. Den lodrette laserstråle tændes, laseren sigtes ind, så den lodrette laserstråle flugter med snoren, og det kon- trolleres, at linien ikke afviger mere end ±...
  • Page 40 AutoCross-Laser 2 XP / AutoCross-Laser 2 XPG All manuals and user guides at all-guides.com EU-bestemmelser og bortskaffelse Apparatet opfylder alle påkrævede standarder for fri vareomsætning inden for EU. Dette produkt er et elapparat og skal indsamles og bortskaffes separat i henhold til EF-direktivet for (brugte) elapparater.
  • Page 41 All manuals and user guides at all-guides.com Lisez entièrement le mode d‘emploi et le carnet ci-joint „Remarques supplémentaires et concernant la garantie“ cijointes. Suivez les instructions mentionnées ici. Conservez ces informations et les donner à la personne à laquelle vous remettez le dispositif laser. Fonction / Emploi prévu Laser à...
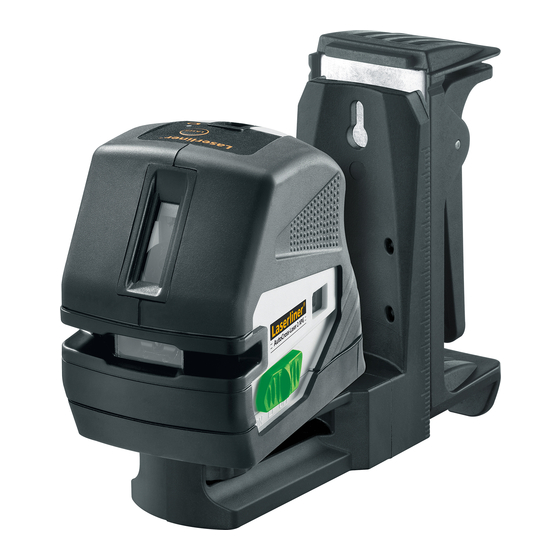
  • Page 42 AutoCross-Laser 2 XP / AutoCross-Laser 2 XPG All manuals and user guides at all-guides.com Pour le transport, éteindre systématiquement tous les lasers, bloquer le balancier, mettre l’interrupteur à coulisse sur « OFF » (ARRÊT) ! Caractéristiques du produit spécial Orientation automatique de l‘instrument par un système pendulaire à...
  • Page 43 All manuals and user guides at all-guides.com Quantité et direction des lasers Laser en croix Laser 5 points H = ligne laser horizontale V = ligne laser verticale S = Inclinaisons 1H 1V Fenêtre de sortie du rayon laser Mode récepteur manuel (seulement XP) Compartiment à...
  • Page 44 all-gui des.c...
  • Page 45 AutoCross-Laser 2 XP / AutoCross-Laser 2 XPG All manuals and user guides at all-guides.com Mise en place des piles – Ouvrir le compartiment à piles (2) et mettre en place les piles conformément aux symboles explicatifs. Veiller à ne pas inverser la polarité.
  • Page 46 All manuals and user guides at all-guides.com Mode d‘inclinaison Ne pas dégager le blocage de transport, positionner l‘interrupteur à coulisse (3) sur la position médiane, puis sélectionner les lasers en appuyant sur la touche de sélection. Il est maintenant possible de poser l‘instrument sur des plans inclinés ou des inclinaisons.
  • Page 47 AutoCross-Laser 2 XP / AutoCross-Laser 2 XPG All manuals and user guides at all-guides.com Préliminaires au contrôle du calibrage: Vous pouvez contrôler le calibrage du laser. Posez l‘appareil au centre entre deux murs écartés l‘un de l‘autre d‘au moins 5 m. Éteindre l’instrument en dégageant le blocage du transport (croix laser allumée).
  • Page 48 All manuals and user guides at all-guides.com Vérification de la ligne verticale : Placez l‘appareil à env. 5 m d‘un mur. Fixez sur le mur un fil d‘aplomb avec une corde de 2,5 m de longueur. Le fil d‘aplomb doit alors pendre librement. Allumez l‘appareil et aligner le laser vertical sur le fil d‘aplomb.
  • Page 49 AutoCross-Laser 2 XP / AutoCross-Laser 2 XPG All manuals and user guides at all-guides.com Réglementation UE et élimination des déchets L‘appareil est conforme à toutes les normes nécessaires pour la libre circulation des marchandises dans l‘Union européenne. Ce produit est un appareil électrique et doit donc faire l‘objet d‘une collecte et d‘une mise au rebut...
  • Page 50 all-gui des.c...
  • Page 51 All manuals and user guides at all-guides.com Lea atentamente las instrucciones de uso y el pliego adjunto „Garantía e información complementaria“. Siga las instrucciones indicadas en ellas. Conserve esta documentación y entréguela con el dispositivo si cambia de manos. Funcionamiento y uso Láser de líneas cruzadas y de 5 puntos para nivelar horizontal y verticalmente.
  • Page 52 AutoCross-Laser 2 XP / AutoCross-Laser 2 XPG All manuals and user guides at all-guides.com Para el transporte, apagar siempre todos los láseres, bloquear el péndulo y cambiar el interruptor deslizante a “OFF”. Características especiales Alineación automática del aparato mediante sistema de péndulo con amortiguación magnética.
  • Page 53 All manuals and user guides at all-guides.com Número y disposición de los láseres Láser de líneas cruzadas Láser de 5 puntos H = línea de láser horizontal V = línea de láser vertical S = función de inclinación 1H 1V Conexión de rosca 1/4”...
  • Page 54 AutoCross-Laser 2 XP / AutoCross-Laser 2 XPG All manuals and user guides at all-guides.com Insertar las pilas – Abra la caja para pilas (2) e insierte las pilas según los símbolos de Instalación. Coloque las pilas en el polo correcto.
  • Page 55 All manuals and user guides at all-guides.com Modo de inclinación No soltar el seguro de transporte, cambiar el interruptor deslizante (3) a la posición central y seleccionar el láser con el botón de selección. Ahora ya se puede crear planos inclinados o pendientes. En este modo ya no se alinean automáticamente las líneas láser.
  • Page 56 all-gui des.c...
  • Page 57 AutoCross-Laser 2 XP / AutoCross-Laser 2 XPG All manuals and user guides at all-guides.com Preparativos para la comprobación de la calibración: Usted mismo puede comprobar la calibración del láser. Coloque el aparato en el medio entre 2 paredes, separadas como mínimo 5 m. Encienda el aparato, suelte para ello el seguro de transporte (cruz de láser activado).
  • Page 58 All manuals and user guides at all-guides.com Control de la línea vertical: Coloque el aparato a unos 5 m de una pared. Fije una plomada con una cuerda de 2,5 m en la pared, la plomada debe poderse mover libremente. Conecte el aparato y oriente el láser vertical según la cuerda de plomada.
  • Page 59 AutoCross-Laser 2 XP / AutoCross-Laser 2 XPG All manuals and user guides at all-guides.com Disposiciones europeas y eliminación El aparato cumple todas las normas requeridas para el libre tráfico de mercancías en la UE. Se trata de un aparato eléctrico, por lo que debe ser recogido y eliminado por separado conforme a la directiva europea relativa a los aparatos eléctricos...
  • Page 60 All manuals and user guides at all-guides.com Leggere completamente le istruzioni per l‘opuscolo allegato „Indicazioni aggiuntive e di garanzia“. Attenersi alle indicazioni ivi riportate. Questo documento deve essere conservato e fornito insieme all‘apparecchio laser in caso questo venga inoltrato a terzi. Funzione / Scopo Laser a linee intersecantisi e laser a 5 punti per il puntamento verticale e orizzontale...
  • Page 61 AutoCross-Laser 2 XP / AutoCross-Laser 2 XPG All manuals and user guides at all-guides.com Per il trasporto spegnere sempre tutti i laser e bloccare il pendolo; portare l‘interruttore a scorrimento in posizione “OFF”! Caratteristiche particolari del prodotto Orientamento automatico dell‘apparecchio con un sistema a pendolo a smorzamento magnetico.
  • Page 62 all-gui des.c...
  • Page 63 All manuals and user guides at all-guides.com Numero e disposizione dei laser Laser a linee intersecantisi Laser a 5 punti H = linea laser orizzontale V = linea laser verticale S = funzione dell‘inclinazione 1H 1V Finestra di uscita laser Filettatura del treppiede 1/4”...
  • Page 64 AutoCross-Laser 2 XP / AutoCross-Laser 2 XPG All manuals and user guides at all-guides.com Inserimento delle batterie – Aprire il coperchio del vano batterie (2) ed introdurre le batterie come indicato dai simboli di installazione, facendo attenzione alla correttezza delle polarità.
  • Page 65 All manuals and user guides at all-guides.com Modalità di inclinazione Non sbloccare la sicura di trasporto, spostare l‘interruttore a scorrimento (3) in posizione intermedia e selezionare i laser con il tasto di selezione. È ora possibile tracciare piani obliqui e inclinazioni. In questa modalità le linee laser non si posizionano più...
  • Page 66 AutoCross-Laser 2 XP / AutoCross-Laser 2 XPG All manuals and user guides at all-guides.com Verifica della calibratura: La calibratura del laser può essere controllata. Collocate lo strumento al centro di due pareti distanti tra loro almeno 5 m e accendetelo. Accendere l‘apparecchio sbloccando la sicura di trasporto (croce di collimazione attiva).
  • Page 67 All manuals and user guides at all-guides.com Verifica della linea verticale: Collocare l‘apparecchio a circa 5 m da una parete. Fissare alla parete un filo a piombo lungo 2,5 m; il piombo deve poter oscillare liberamente. Accendere l‘apparecchio e puntare il laser verticale sul filo a piombo. La precisione rientra nella tolleranza se lo scostamento tra la linea laser ed il filo a piombo non è...
  • Page 68 all-gui des.c...
  • Page 69 AutoCross-Laser 2 XP / AutoCross-Laser 2 XPG All manuals and user guides at all-guides.com Norme UE e smaltimento L‘apparecchio soddisfa tutte le norme necessarie per la libera circolazione di merci all‘interno dell‘UE. Questo prodotto è un apparecchio elettrico e deve pertanto essere raccolto e smaltito separatamente in conformità...
  • Page 70 All manuals and user guides at all-guides.com Przeczytać dokładnie instrukcję obsługi i załączoną broszurę „Informacje gwarancyjne i dodatkowe”. Postępować zgodnie z zawartymi w nich instrukcjami. Niniejszy dokument należy zachować, a w przypadku przekazania urządzenia laserowego załączyć go. Działanie / Zastosowanie Laser z krzyżem nitkowym, 5-punktowy, z możliwością...
  • Page 71 AutoCross-Laser 2 XP / AutoCross-Laser 2 XPG All manuals and user guides at all-guides.com Do transportu należy zawsze wyłączać wszystkie lasery, zaryglować układ wahliwy i ustawić włącznik suwakowy w pozycji „OFF”! Cechy szczególne produktu Automatyczne ustawianie za pomocą magnetycznie tłumionego systemu wahadła. Urządzenie ustawiane jest w pozycji podstawowej, a następnie reguluje się...
  • Page 72 All manuals and user guides at all-guides.com Liczba i rozmieszczenie laserów Laser krzyżowy Laser 5-punktowy H = pozioma linia laserowa V = pionowa linia laserowa S = funkcja nachylenia 1H 1V Gwint statywu 1/4” (od dołu) Okienko wylotu lasera Komora baterii (od dołu) Trybu odbiornika ręcznego (tylko XP) Włącznik suwakowy...
  • Page 73 AutoCross-Laser 2 XP / AutoCross-Laser 2 XPG All manuals and user guides at all-guides.com Wkładanie baterii – Otworzyć komorę baterii (2) i włożyć Baterie zgodnie z symbolami instalacyjnymi. Zwrócić przy tym uwagę na prawidłową biegunowość. + – Niwelowanie poziome i pionowe Zwolnić...
  • Page 74 all-gui des.c...
  • Page 75 All manuals and user guides at all-guides.com Tryb pochylenia Nie zwalniać zabezpieczenia transportowego, włącznik suwakowy (3) przesunąć do położenia środkowego i przyciskiem wyboru wybrać Laser. Można teraz ustawić ukośne płaszczyzny lub nachylenia. W tym trybie linie laserowe nie ustawiają się automatycznie. Jest to sygnalizowane pulsowaniem linii laserowych.
  • Page 76 AutoCross-Laser 2 XP / AutoCross-Laser 2 XPG All manuals and user guides at all-guides.com Kontrola Kalibracji - przygotowanie: Można w każdej chwili sprawdzić kalibrację. Stawiamy niwelator w środku pomiędzy dwiema łatami (ścianami), które są oddalone o co najmniej 5 m.
  • Page 77 All manuals and user guides at all-guides.com Sprawdzanie linii pionowej: Instrument ustawić ok. 5 m od jednej ze ścian. Na ścianie zawiesić pion o długości sznurka 2,5 m. Pion powinien być luźno zawieszony. Włączyć instrument i naprowadzić pionowy laser na sznurek pionu. Instrument spełnia wymagania tolerancji, jeżeli odchylenie linii lasera od sznurka jest mniejsze niż...
  • Page 78 AutoCross-Laser 2 XP / AutoCross-Laser 2 XPG All manuals and user guides at all-guides.com Przepisy UE i usuwanie Przyrząd spełnia wszystkie normy wymagane do wolnego obrotu towarów w UE. Produkt ten jest urządzeniem elektrycznym i zgodnie z europejską dyrektywą dotyczącą...
  • Page 79 All manuals and user guides at all-guides.com...
  • Page 80 all-gui des.c...
  • Page 81 AutoCross-Laser 2 XP / AutoCross-Laser 2 XPG All manuals and user guides at all-guides.com...
  • Page 82 AutoCross-Laser 2 XP / AutoCross-Laser 2 XPG All manuals and user guides at all-guides.com SERVICE Umarex GmbH & Co. KG – Laserliner – Möhnestraße 149, 59755 Arnsberg, Germany Tel.: +49 2932 638-300, Fax: +49 2932 638-333 laserliner@umarex.de Umarex GmbH & Co. KG...

Ce manuel est également adapté pour:

Autocross-laser 2 xpg