Télécharger Imprimer la page

Publicité

Les langues disponibles
  • FR

Les langues disponibles

Liens rapides

All manuals and user guides at all-guides.com
HRA-1750D+BT
Instruction manual
Bedienungsanleitung
Manuel d'instructions
Manuale d'istruzioni
Gebruiksaanwijzing
www.roadstar.com
is a registered Trademark of Roadstar S.A. - Switzerland All rights reserved

Publicité

loading

Sommaire des Matières pour Roadstar HRA-1750D+BT

  • Page 1 All manuals and user guides at all-guides.com HRA-1750D+BT Instruction manual Bedienungsanleitung Manuel d’instructions Manuale d’istruzioni Gebruiksaanwijzing www.roadstar.com is a registered Trademark of Roadstar S.A. - Switzerland All rights reserved...
  • Page 2 Nous espérons que cet appareil vous donnera assemblato sotto lo stretto controllo di qualità entière satisfaction. Avant de vous adonner à ces ROADSTAR. Vi ringraziamo di aver acquistato un activités, veuillez lire attentivement ce manuel nostro prodotto per il vostro piacere d’ascolto.
  • Page 3 All manuals and user guides at all-guides.com • Do not spill water or any liquid on the remote control. HRA-1750D+BT - REMOTE CONTROL • Do not place the remote control on a wet object. • Do not place the remote control under the direct sunlight or near sources of excessive heat.
  • Page 4 All manuals and user guides at all-guides.com English English WARNINGS LOCATION OF CONTROLS 1. Standby Button / Source Knob The exclamation point within the triangle is a warning sign alerting 2. Speakers the user of important instructions accompanying the product. 3.
  • Page 5 All manuals and user guides at all-guides.com English English 15. Mute Button SETTING THE CLOCK 16. Number Button Setting the Clock Manually 17. Open/Close Button 1. In standby mode, long pressing the CLOCK button on the remote control for 2 se- 18.
  • Page 6 All manuals and user guides at all-guides.com English English Mute sound “SCANNING” will be displayed on the LCD. You can mute the sound temporarily. During play, press the MUTE button to mute or IF NO DAB service is available, “NO DAB” will be display. ...
  • Page 7 All manuals and user guides at all-guides.com English English  Station Name: When an RDS station is received, the name of that station will be displayed. Manual Tuning Ensemble Name: This displays the name of the multiplex that contains the station Repeatedly press the TUNING +/- buttons on the unit or ...
  • Page 8 All manuals and user guides at all-guides.com English English To change the FM Reception Mode Press the   button on the remote control to select the Stereo or Mono channel to re- To Search and Play ceive the best FM reception mode. Press and hold the ...
  • Page 9 USB source. The word “USB” will be displayed on the LCD. 3. Select "HRA-1750D+BT" on your device for pairing. For elder devices, you need to 3. The device's stored music will be played automati- input “0000” as pairing password.
  • Page 10 All manuals and user guides at all-guides.com English English yed. 2. Rotate the SOURCE knob on the unit or repeatedly press BLUETOOTH/AUX but- ton on the remote control to select auxiliary equipment source. The word “AUX” will To deactivate sleep timer be displayed on the LCD.
  • Page 11 All manuals and user guides at all-guides.com Deutsch Deutsch HRA-1750D+BT SICHERHEITSHINWEISE Das Ausrufszeichen im Dreieck weist den Benutzer auf wi- chtige Bedienungs- und Wartungsanweisungen (Service) in diesem Handbuch hin, die unbedingt zu befolgen sind. Um die Gefahr elektrischer Schläge auszuschliessen, Ge- häuse auf keinen Fall abnehmen.
  • Page 12 All manuals and user guides at all-guides.com • Setzen Sie die Fernbedienung keinem direkten Sonnenlicht aus und platzieren Sie sie nicht HRA-1750D+BT - FERNBEDIENUNG in der nähe von Quellen übermäßiger Wärme. • Verwenden Sie keine ätzenden Reinigungsmittel (Porzellan-, Edelstahl-, Toiletten oder Ofenreiniger usw.) an der Fernbedienung, da dies zu Schäden führen kann.
  • Page 13 All manuals and user guides at all-guides.com Deutsch Deutsch LAGE DER BEDIENUNGSELEMENTE 22. Zusatz-Bass-Taste 23. Schlummertaste Standby-Taste / Quellenschalter 24. Timer-Taste Lautsprecher 25. Informationstaste / RDS-Information-Taste Linse der LCD-Anzeige 26. Suchlauf vorwärts / Tuning vorwärts-Taste Fernbedienung 27. Stopptaste / SCAN / Pairing gelöscht-Taste Zurück / Suchlauf rückwärts / Voreinstellung abwärts-Taste 28.
  • Page 14 All manuals and user guides at all-guides.com Deutsch Deutsch Hinweis: Drücken Sie die LOUDNESS -Taste, um die Loudness-Funktion aufzurufen. Es wird  Sie können die Uhr nur im Standby-Modus einstellen. “LOUD ON” auf dem LCD-Display angezeigt. Drücken Sie die Taste erneut, um den ...
  • Page 15 All manuals and user guides at all-guides.com Deutsch Deutsch Drücken Sie wiederholt die TUNING +/- -Tasten am Gerät oder die  -Tasten auf  Audio-Bitrate: Das Display zeigt die digitale Audio-Bitrate, die empfangen wird. der Fernbedienung, um die Frequenz  Stereo/Mono: Das Display zeigt an, ob der empfangene Sender in Mono oder zu ändern, bis Sie den gewünschten Sender gefunden haben.
  • Page 16 All manuals and user guides at all-guides.com Deutsch Deutsch  Der erste programmierte Radiosender wird automatisch ausgestrahlt. CD-Fach (mit der bedruckten Seite nach oben). Drücken Sie die  -Taste, um das Disc-Fach zu schließen. Das Gerät liest die Manuell Disc und spielt sie automatisch ab. Hinweis: Im Stoppmodus drücken Sie bitte die -Taste, um mit dem Abspielen der Stellen Sie einen Radiosender ein.
  • Page 17 Massenspeichervorrichtung (einschl. eines USB-Flash-Speichers, eines USB-Flash- Benutzerhandbuch). Players oder Speicherkarten) an das Gerät anschließen, können Sie die auf dem Zum Pairing wählen Sie an Ihrem Gerät "HRA-1750D+BT". Bei älteren Geräten müssen Sie “0000” als Pairing-Passwort eingeben. Gerät gespeicherte Musik über das Gerät genießen.
  • Page 18 All manuals and user guides at all-guides.com Deutsch Deutsch Drücken Sie die  -Taste 2 Sekunden oder länger, um den Bluetooth-Pairing- ANSCHLUSS VON HILFSAUSRÜSTUNG Verlauf zu löschen. Verbinden Sie die AUX-Eingangsanschlussklemmen auf der Rückseite des Ge- räts mit einem Audiokabel mit den AUXAusgangsklemmenanschlüssen an der EINSTELLUNG DES SCHLUMMER-TIMERS Hilfsausrüstung, wie nachfolgend dargestellt.
  • Page 19 All manuals and user guides at all-guides.com Français Français HRA-1750D+BT ATTENTION Le symbole “point d’exclamation” à l’intérieur d’un triangle avertit l’utilisateur que d’importantes instructions d’utilisation et de maintenance sont contenues dans le mode d’emploi. Le symbole “éclair” à l’intérieur d’un triangle sert à avertir l’utilisateur de la présence du courant à...
  • Page 20 All manuals and user guides at all-guides.com Français Français HRA-1750D+BT - TELECOMMANDE Branchements Attention: Effectuez tous les branchements avant de brancher l'appareil dans la prise électrique CA. Branchement de l'antenne DAB/FM Attention: à 1. Branchez l'antenne DAB/FM fournie la prise de l'an- Installation de la pile à...
  • Page 21 
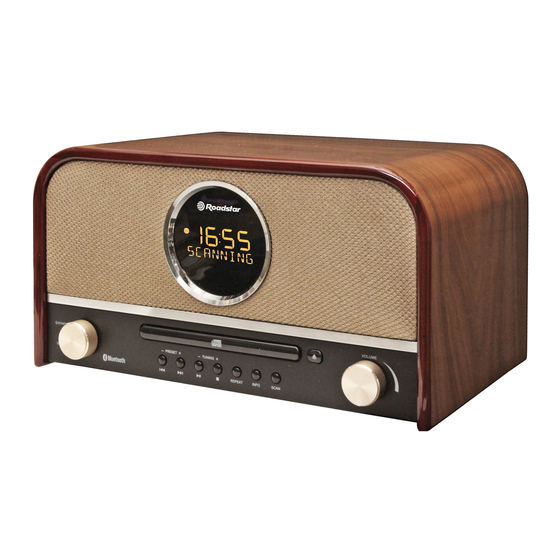
All manuals and user guides at all-guides.com Français Français APERÇU DU PRODUIT Touche de Fonction USB Touche de fonction Bluetooth / Touche de fonction AUX (AUX) 1. Touche Veille (STANDBY) / Molette de Source (SOURCE) 20. Touche Aléatoire (RANDOM) Haut-parleurs 21.
  • Page 22 All manuals and user guides at all-guides.com Français Français 3. Appuyez sur la touche CLOCK , le voyant d'heure clignotera. Contrôle du niveau de son 4. Tournez la molette du - VOLUME + sur l'appareil ou appuyez les touches VOL Cet appareil est muni d'une fonction de niveau de son qui peut automatiquement de la télécommande pour régler l'heure.
  • Page 23 All manuals and user guides at all-guides.com Français Français Appuyez plusieurs fois sur les touches PRESET +/- de l'appareil ou sur les tou- Les multiplex nationaux et locaux existent. Les locaux comportent des stations qui ches PRESET de la télécommande pour attribuer un numéro à cette station radio. sont spécifiques à...
  • Page 24 All manuals and user guides at all-guides.com Français Français té. Sa bande et fréquence sont affichées sur le LCD.  Nom de la Station - Les touches de 0 à 9 de la télécommande peuvent être utilisées pour saisir directe- Lorsqu'une station RDS est reçue, le 'RDS' et le nom de cette station s'afficheront.
  • Page 25 All manuals and user guides at all-guides.com Français Français  Affichage de texte durant la lecture re pour sélectionner: - Pour les CD audio - REP UN : La lecture du titre en cours est répétée. Appuyez plusieurs fois sur la touche INFO pour afficher le numéro du titre en cours - REP ALB : La lecture de tous les titres de l'album est répétée.
  • Page 26 6. Répétez les étapes 4 à 5 pour régler les minutes, et régler le volume. du dispositif). 3. Sélectionnez 'HRA-1750D+BT' sur votre dispositif pour apparier. * Si la source disc/USB est sélectionnée et que l'audio ne puisse pas être entendu,...
  • Page 27 All manuals and user guides at all-guides.com Italiano Italiano HRA-1750D+BT ATTENZIONE Il punto esclamativo all’interno di un triangolo avverte l’utente che il libretto d’istruzioni contiene delle importanti istruzioni per l’uso e la manutenzione. Il simbolo del fulmine all’interno di un triangolo avverte l’utente della presenza di una pericolosa tensione all’interno...
  • Page 28 All manuals and user guides at all-guides.com • Non versare acqua o altri liquidi sul telecomando. HRA-1750D+BT—TELECOMANDO • Non posizionare il telecomando su un oggetto bagnato. • Non posizionare il telecomando sotto la luce solare diretta o vicino a fonti di calore.
  • Page 29 All manuals and user guides at all-guides.com Italiano Italiano ELENCO DEI PULSANTI 19. Tasto funzione Bluetooth / AUX 20. Tasto casuale Pulsante di attesa (STANDBY) Sorgente segnale 21. Tasto Dimmer Altoparlanti 22. Tasto Super Bass Display LCD 23. Tasto Sleep Sensore telecomando 24.
  • Page 30 All manuals and user guides at all-guides.com Italiano Italiano Girare la manopola VOLUME sull'unità o premere i pulsanti VOL +/- sul teleco- mando per impostare i minuti. Preselezione Equalizer Premere il tasto CLOCK, l'orologio inizia a funzionare. È possibile regolare il suono in base al genere della musica di vostro gusto. Nota: Durante la riproduzione, premere ripetutamente il tasto P-EQ del telecomando per ...
  • Page 31 All manuals and user guides at all-guides.com Italiano Italiano Sintonia manuale  Stereo / Mono: Il display mostra se la stazione in fase di ricezione è in mono o Premere a lungo ill tasto   per 2 o più secondi per accedere alla modalità di stereo.
  • Page 32 All manuals and user guides at all-guides.com Italiano Italiano  La prima stazione radio programmata viene trasmessa automaticamente. del disco (con il lato stampato verso l'alto). Premere il pulsante  per chiudere lo sportello del disco, l'unità leggere il disco Manualmente e lo riproduce automaticamente.
  • Page 33 All manuals and user guides at all-guides.com Italiano Italiano il tasto  due volte per cancellare il programma. Per i dispositivi dotati di cavo USB: Riproduzione intro di ogni traccia Inserire una spina del cavo USB (non in dotazione) Premere il tasto INTRO sul telecomando per riprodurre l'inizio di ogni brano conse- alla presa dell'unità.
  • Page 34 All manuals and user guides at all-guides.com Italiano Italiano Premere il pulsante di accoppiamento per 2 o più secondi per disattivare la fun- Collegare i terminali di ingresso AUX sul retro dell'apparecchio ai terminali di zione dal Dispositivo Bluetooth. uscita AUX sul ad altre sorgenti con un cavo audio. Premere il tasto ...
  • Page 35 All manuals and user guides at all-guides.com Nederlands Nederlands HRA-1750D+BT WARNINGS Het uitroepteken in een gelijkzijdige driehoek is bedoeld om de gebruiker erop attent te maken dat de gebruikershandleiding be- langrijke instructies bevat voor het gebruik en het onderhoud. De bliksemschicht in een gelijkzijdige driehoek is bedoeld om de gebruiker te waarschuwen voor de aanwezigheid van gevaarlijke spanning binnen in het apparaat.
  • Page 36 All manuals and user guides at all-guides.com Zorg dat er geen water of andere vloeistof op de afstandsbediening gemorst HRA-1750D+BT - AFSTANDSBEDIENING wordt. Leg de afstandsbediening niet op een natte ondergrond. Leg de afstandsbediening niet in direct zonlicht of vlakbij hittebronnen.
  • Page 37 All manuals and user guides at all-guides.com Nederlands Nederlands PRODUCT OVERZICHT Album omlaag knop (ALB -) Geluid dempen knop (MUTE) Nummers (0-9, 10+) Stand-by knop (STANDBY) Bron knop (SOURCE) Luidsprekers Openen/Sluiten knop LCD display-venster USB functieknop Afstandsbedieningssensor Knop Vorige Knop Terug Zoeken Voorkeuze Omlaag knop (- PRESET) Bluetooth functieknop AUX functieknop (AUX) 20.
  • Page 38 All manuals and user guides at all-guides.com Nederlands Nederlands ECO stand Bij een DAB/RDS station, de INFO knop gedurende 2 of meer seconden ingedrukt houden om CT te kiezen (tijd van de klok). Ais er een correcte CT tijd wardt ontvan- De klok wordt niet weergegeven.
  • Page 39 All manuals and user guides at all-guides.com Nederlands Nederlands Tijdens het afspelen drukt u herhaaldelijk op de P-EQ knap op de afstandsbedie- ning om uw gewenste geluidsmodus in te stellen. Druk de PROG knop op de afstandsbediening om de programmeermodus te activeren.
  • Page 40 All manuals and user guides at all-guides.com Nederlands Nederlands DAB+ informatiescherm • Audio-bitrate kunt de DAB+ service informatie bekijken in volgende modi. Afhankelijk van het DAB+ radio station waar u op afstemt, kunnen sommige informatie modi Het scherm toont de digitale audio-bitrate ontvangen wordt.
  • Page 41 All manuals and user guides at all-guides.com Nederlands Nederlands een van de 0-9 knoppen. RDS (Radio Data System) ontvangst RADIOSLALIONS PROGRAMMEREN Veel FM stations zenden extra gegevens compatible zijn met ROS (Radio Data System). Dit toestel biedt handige functies die deze gegevens gebruiken.
  • Page 42 All manuals and user guides at all-guides.com Nederlands Nederlands het nummer dat moet worden opgeslagen te bevestigen. Druk op de knop om het afspelen van de disk te stoppen. Nummer 8, LCD-scherm "008 p-02".  Overslaan en afspelen Herhaal de stappen 3-4 en sla aile gewenste nummers op. •...
  • Page 43 Het woord "USB" wordt van het apparaat). getoand op het LCD-scherm. De op het apparaat opgeslagen muziek ward! Selecteer “HRA-1750D+BT" op uw apparaat om te koppelen. autama!isch afgespeeld. Voor oudere apparaten dient u "0000" in te voeren ais koppel-wachtwoord. Wanneer u meer dan één map in het USB-flash...
  • Page 44 All manuals and user guides at all-guides.com Nederlands Nederlands uit-stekkers op het externe apparaat met behulp van een audio-kabel zoals hie- Wanneer de slaap-timer aan staat, wordt "zz" weergegeven. ronder wordt aangegeven. Draai de SOURCE knop op het toestel of druk herhaaldelijk op de Slaap timer uitzetten BLUETOOTH/AUX knop op de afstandsbediening...