Télécharger Imprimer la page
DELTA DORE TYXIA 631 Mode D'emploi
Masquer les pouces Voir aussi pour TYXIA 631:

Publicité

Les langues disponibles

Les langues disponibles

Liens rapides

PACK TYXIA 631
Pack pour le pilotage de Brise Soleil
FR
Orientable, store banne, store à lamelles
Pack for control of blackout blind,
EN
awning and indoor venitian blinds
Pakket voor besturing van verstelbare
NL
zonnewering, rolluik met lamellen
Pakiet do zdalnego sterowania
PL
regulowaną żaluzją zewnętrzną,
markizą regulowaną
i markizą z lamelami

Publicité

loading

Sommaire des Matières pour DELTA DORE TYXIA 631

  • Page 1 PACK TYXIA 631 Pack pour le pilotage de Brise Soleil Orientable, store banne, store à lamelles Pack for control of blackout blind, awning and indoor venitian blinds Pakket voor besturing van verstelbare zonnewering, rolluik met lamellen Pakiet do zdalnego sterowania regulowaną...
  • Page 2 Sommaire 1/ Installation de la télécommande ....3 1.1 Fixé au mur ............3 1.2 Posé sur une surface plane ......3 2/ Installation du récepteur.......4 2.1 Instructions de connexion des bornes 1 2 3 4 ........6 2.2 Instructions de connexion des bornes IN1 - COM - IN2 ....7 2.3 Raccordement ..........8 3/ Association radio ..........9 3.1 Association d’un récepteur .....9...
  • Page 3 1/ Installation de la télécommande 1.1 Fixé au mur 1.2 Posé sur une surface plane...
  • Page 4 
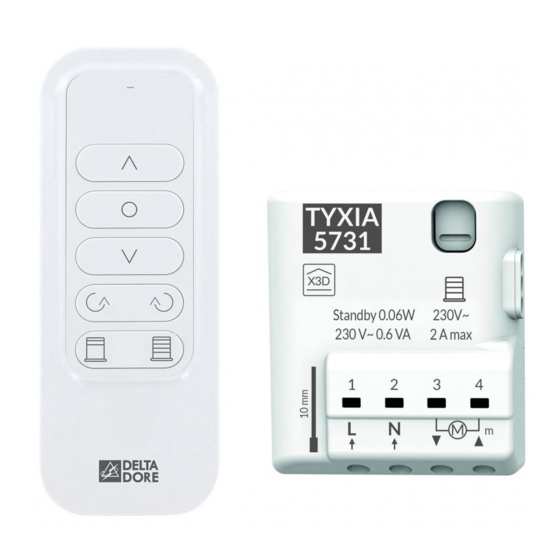
2/ Installation du récepteur Recommandations ATTENTION, les fils de commande ne sont pas  isolés du secteur. Tout matériel raccordé doit être marqué CE et satisfaire aux exigences des appareils  basse tension ainsi qu’aux prescriptions de montage. Possibilité de rallonger jusqu’à 10m les fils de la  commande locale (à séparer du 230V). Les butées haute et basse du volet doivent être réglées avant l’installation du récepteur.  Utilisez un outil isolé électriquement pour réaliser les actions sur la touche de configuration du récepteur. ...
  • Page 5 230V~ Coupez l’alimentation de l’installation. Vous pouvez installer le récepteur pour volet  roulant dans une boîte d’encastrement derrière un interrupteur ou un bouton poussoir de commande ou dans une boîte étanche à l’intérieur du coffre du  volet roulant, à distance de pièces métalliques. IPx4...
  • Page 6 2/ Installation du récepteur 2.1 Instructions de connexion Ø 0,75 - 1,5 mm des bornes 1 2 3 4 Dénudez les fils en respectant la longueur de  dénudage indiquée sur le produit. • • Fils rigides Fils souples Poussez le fil jusqu’au  A l’aide de l’outil fourni ou d’un fond de la borne. tournevis de 2,5 mm, appuyez sur le bouton de la borne puis insérez le fil.
  • Page 7 2.2 Instructions de connexion des bornes IN1 - COM - IN2 230V Utilisez les fils fournis. Poussez le fil jusqu’au  fond de la borne. 0,5 mm KY31A02 Ne pas dénuder les fils lorsqu’ils sont  connectés sur le produit au risque d’endommager le connecteur interne. Préconisations de démontage Tournez en tirant sur le fil.
  • Page 8 2/ Installation du récepteur 2.3 Raccordement - Raccordez les fils de commande du moteur aux  bornes 3 et 4 (le fil de descente du moteur à la  borne 3, le fil de montée à la borne 4). - Raccordez l’interrupteur aux bornes IN1 - COM - IN2. - Raccordez l’alimentation 230V aux bornes 1 et 2. - Rétablissez l’alimentation de l’installation afin de  procéder à l’association. Interrupteur TYXIA maintenu Double bouton poussoir 230 V~ Bouton poussoir 2 3 4...
  • Page 9 3/ Association radio Ce chapitre vous permet d’associer la télécommande à un récepteur pour volet roulant  X3D ou un moteur radio X3D. Vous pouvez associer jusqu’à 16 récepteurs  (ou moteurs). 3.1 Association d’un récepteur 3.1.1 Un seul récepteur est sous tension ❶ Appuyez 3 secondes sur la touche du récepteur jusqu’à ce que son   v oyant clignote, relâchez. >...
  • Page 10 3/ Association radio ❷ Sur la télécommande, appuyez simultanément pendant 3 secondes, jusqu’à  ce que le voyant rouge s’allume. Relâchez. Lorsque le récepteur est détecté, le voyant s’allume vert brièvement. ❸ Après quelques secondes, le volet s’actionne 2 fois pour confirmer l’association. Le voyant du récepteur ne clignote plus. > 3s Sortie automatique du mode association...
  • Page 11 3.1.2 Plusieurs récepteurs (ou moteurs) sont en attente d’association ❶ Sur la télécommande, appuyez simultanément  pendant 3 secondes, jusqu’à ce que  le voyant rouge s’allume. Relâchez. La télécommande recherche les différents récepteurs ou moteurs. Son voyant clignote (flash) rouge, puis brièvement vert dès qu’un nouveau récepteur est détecté. ❷ Dès que le voyant clignote lentement rouge,  appuyez autant de fois que nécessaire sur pour sélectionner le récepteur à associer. ...
  • Page 12 3/ Association radio 3.2 Association de plusieurs récepteurs (ou moteurs) ❶ Mettez les récepteurs en attente d’association. ❷ Sur la télécommande, appuyez simultanément  pendant 3 secondes, jusqu’à ce que  le voyant clignote. Relâchez. La télécommande recherche les différents récepteurs ou moteurs. Son voyant clignote (flash) rouge, puis brièvement vert dès qu’un nouveau récepteur est détecté.
  • Page 13 4/ Configuration du récepteur Configurez le récepteur en fonction du type d’interrupteur raccordé Mode 1 : Interrupteur maintenu Montée / Stop / Descente Mode 2 (par défaut) : Double bouton poussoir Montée / Descente Stop (Montée+descente) Mode 3 : Bouton poussoir Montée / Stop / Descente / Stop...
  • Page 14 4/  Configuration du récepteur Pour modifier la configuration du récepteur ❶ Appuyez 6 secondes sur la touche du récepteur. ❷ Le voyant clignote puis  s’allume fixe, relâchez.  > 6 s Le nombre de flashs du  voyant correspond au TYXIA mode en cours. ❸ Appuyez brièvement sur la touche du récepteur pour sélectionner le mode. Mode 1 Mode 2 Mode 3...
  • Page 15 5/ Apprentissage des temps  de courses du volet Effectuez un cycle complet de butée à butée : ❶ Descendez ou montez complètement le volet jusqu’à la butée.  ❷ Effectuez une manœuvre inverse jusqu’à la  butée opposée. Ne pas interrompre la course du volet. Remarque L’apprentissage des temps de courses du volet,  s’ajuste automatiquement à chaque cycle complet  de butée à butée.
  • Page 16 5/  Apprentissage des temps  de courses du volet 5.1 Réglage manuel des temps de courses du volet L’apprentissage des temps de courses du volet  s’ajuste automatiquement à chaque cycle complet  de butée à butée.  Si le moteur possède  4 fils (Phase/Neutre/Montée/ Descente) ou si la puissance du moteur raccordé est inférieure à 45 W il est nécessaire de réaliser cette  opération manuellement. 5.1.1 Réglage du temps de course du volet - Avant d’effectuer ce réglage, remontez complète- ment le volet avec la commande filaire locale, une  télécommande ou un TYDOM et appuyez sur Stop.
  • Page 17 - Commandez la descente du volet avec la com- mande locale, une télécommande ou TYDOM. - Appuyez sur Stop dès que le volet est fermé. - Le temps de course est enregistré. > 6s TYXIA TYXIA TYXIA > 3s TYXIA...
  • Page 18 6/ Apprentissage du temps  d’inclinaison Ne pas effectuer cette opération, si le TYXIA 5731 pilote un store banne. ❶ Maintenez appuyée la touche du récepteur pendant 9 secondes, le voyant s’éteint, relâchez. Le volet  se positionne à  mi-hauteur TYXIA ❷ Maintenez la touche rotation >9s appuyée (mode pas à ...
  • Page 19 7/ Enregistrer les positions favorites Vous pouvez enregistrer jusqu’à 2 positions  favorites : ❶ ❷ Mettez le volet dans la position souhaitée (Ex : ❸ Appuyez sur  pour régler l’orientation  des lames. ❹ Appuyez simultanément 3 secondes sur  pour enregistrer la position.  Le voyant s’allume rouge, puis vert si le récepteur a bien reçu l’information. Le volet s’actionne brièvement.
  • Page 20 8/ Utilisation • Appuyez sur pour commander le volet roulant. Le voyant s’allume rouge, puis vert si le récepteur a bien reçu l’information. • Appuyez sur  pour régler l’orientation  des lames. • Appuyez sur pour atteindre la position favorite 1 (si elle a été enregistrée). • Appuyez sur pour atteindre la position favorite 2 (si elle a été enregistrée).
  • Page 21 9/ Aide • Le voyant rouge clignote plusieurs fois à chaque appui sur une touche. La pile est usée. Changez la pile. • Effacer une association Enlevez la face avant de la télécommande. Appuyez sur la touche A. Le voyant rouge clignote (flash).
  • Page 22 9/ Aide • Effacer toutes les associations Enlevez la face avant de la télécommande. Appuyez sur la touche A. Le voyant rouge clignote (flash). Appuyez simultanément 3 secondes sur les touches Appuyez sur la touche A pour sortir. • Le récepteur se bloque en arrêt Sur détection de surcharge, le produit se bloque ...
  • Page 23 10/ Caractéristiques techniques Télécommande TYXIA 1705 • Alimentation par pile Lithium 3 V, CR2430 • Isolement classe III • Dispositif télécommande radio X3D : 868,7 à 869,2 MHz • Puissance radio max. < 10 mW, récepteur catégorie 2 • Portée radio de 100 à 300 mètres en champ libre,  variable selon les équipements associés (portée pouvant être altérée en fonction des conditions d’installation et de l’environnement électroma- gnétique) •...
  • Page 24 10/ Caractéristiques techniques Récepteur TYXIA 5731 • Alimentation : 230 V ~ 0,6 VA • 2 sorties contacts alimentés : 2 A • Consommation en veille : 0,06 W • Nombre d’émetteurs associés : 16 maximum • Température de stockage : -10 °C / +70 °C • Température de fonctionnement : -10 °C / +40 °C • IP 40 (en boîte d’encastrement) •...
  • Page 25 Contents 1/ Remote control installation ...... 26 1.1 Mounted on the wall ....... 26 1.2  Placed on a flat surface ......26 2/  Installing the receiver ........27 2.1 Connection instructions for terminals 1 2 3 4......... 29 2.2 Connection instructions for IN1 - COM - IN2 terminals ....30 2.3 Connection ..........
  • Page 26 1/ Remote control installation 1.1 Mounted on the wall 1.2 Placed on a flat surface...
  • Page 27 2/ Installing the receiver Recommendations IMPORTANT: the control wires are not insulated from the mains power supply. All connected equip- ment must be marked CE and meet the require- ments of the low voltage devices as well as assembly  recommendations. Local control wires can be extended up to 10 m (separate from the 230 V). The roller shutter high and low stops must be set ...
  • Page 28 2/  Installing the receiver 230V~ Switch off the installation power supply You can install the receiver for roller shutter in a flush-mounted box behind a switch or control  push-button or in a sealed box inside the roller shutter, a safe distance from metal parts. IPx4...
  • Page 29 2.1 Connection instructions Ø 0,75 - 1,5 mm for terminals 1 2 3 4. Strip the wires while respecting the strip length  specified on the product. • • Solid wires Stranded wires Push the wire fully Using the tool supplied or a  into the terminal. 2.5 mm screwdriver, press the terminal button then insert the wire.
  • Page 30 2/  Installing the receiver 2.2 Connection instructions for IN1 - COM - IN2 terminals 230V - Use the wires supplied. - Push the wire fully into the terminal. 0,5 mm KY31A02 Do not strip the wires when they are connected to the product as you could damage the internal connector.
  • Page 31 2.3 Connection - Connect the motor control wires to terminals 3 and 4 (motor lowering control wire to terminal 3,  raising control wire to terminal 4). - Connect the switch to the IN1 - COM - IN2 terminals. - Connect the 230 V power supply to terminals 1  and 2. - Switch the installation power back on to continue with the association operation. Hold switch TYXIA Double...
  • Page 32 3/ Wireless association This chapter allows you to associate a remote control with an X3D wireless motor or X3D roller shutter receiver. You can associate up to 16 receivers (or motors). 3.1 Associating a receiver or motor 3.1.1 A single receiver is turned on ❶...
  • Page 33 ❷ On the remote control press at the same time and hold for 3 seconds, until the red LED flashes. Release. If a receiver is found, the LED will light up green briefly. ❸ After a few seconds, the shutter will activate twice to confirm the association.  The LED stops flashing. > 3s The association mode is automatically exited.
  • Page 34 3/  Wireless association 3.1.2 Several receivers or motors are in association standby mode ❶ On the remote control press at the same time and hold for 3 seconds, until the red LED flashes. Release. The remote control searches the different receivers or motors. The LED flashes red, then briefly green as soon as a new receiver is found.
  • Page 35 3.2 Associate multiple receivers or motors ❶ Set the receivers to association standby mode. ❷ On the remote control press at the same time and hold for 3 seconds, until the LED flashes. Release. The remote control searches the different receivers or motors.
  • Page 36 4/ Configuring the receiver Configure the receiver according to the type of  switch connected. Mode 1: Hold switch  Raise/Stop/Lower Mode 2 (by default): Raise/Lower double push-button Raise + Lower: Stop Mode 3: Raise/Stop/Lower/Stop push-button...
  • Page 37 To modify the receiver configuration ❶ Press the receiver’s button for 6 seconds. ❷ The LED flashes, then becomes steady, release.  The number of flashes corresponds to the current  mode. ❸ Briefly press the receiver button to select the  mode. Mode 1 Mode 2 Mode 3 TYXIA TYXIA TYXIA ❹ Confirm the selected mode by pressing the  button for 3 seconds until the LED switches off.
  • Page 38 5/ Learning for the shutter travel time Perform a complete cycle from stop to stop: ❶ Lower or raise the roller shutter completely to the stop. ❷ Do the reverse action until the opposite stop is reached. Do not interrupt the roller shutter travel. Note: The learning for the shutter travel time  adjusts itself automatically for each complete cycle ...
  • Page 39 5.1 Manual adjustment for the shutter travel time The learning for the shutter travel time adjusts itself  automatically for each complete cycle from stop to stop. If the motor has 4 wires (Live/Neutral/Raise/Lower) or if the power of the connected motor is less than 45 W, this operation must be done manually. 5.1.1 Adjustment of shutter travel time - Before making this adjustment, fully raise the ...
  • Page 40 5/  Learning for the shutter travel time - Lower the shutter using the local control, a remote  control or TYDOM. - Press Stop once the shutter is down. - Travel time is recorded. > 6s TYXIA TYXIA TYXIA > 3s TYXIA...
  • Page 41 6/ Learning for the tilt time Do not carry out this operation, if the TYXIA 5731 controls an awning. ❶ Hold down the receiver button for 9 seconds,  the LED switches off, then release. The shutter is positioned at the midpoint of its height TYXIA ❷ Press and hold the rotation >9s button (step...
  • Page 42 7/ Save the favourite positions You can save up to 2 favourite positions: ❶ ❷ Set the shutter to the required position (e.g.  ❸ Press  to set the angle of the slats. ❹ Press and hold for 3 seconds to save the position. The red then green LED indicates that the receiver has correctly received the information.
  • Page 43 8/ Use • Press to control the roller shutter. The red then green LED indicates that the receiver has correctly received the information. • Press  to set the angle of the slats. • Press  to go to favourite position 1 (if it has  been saved). • Press  to go to favourite position 2 (if it has  been saved).
  • Page 44 9/ Troubleshooting • The red LED flashes several times every time a button is pressed. The battery is low. Change the battery. • Remove an association - Remove the front face of the remote control. - Press button A. The red LED flashes. - Press as many times as CR 2430...
  • Page 45 • Remove all associations - Remove the front face of the remote control. - Press button A. The red LED flashes. - Press the buttons at the same time and hold for 3 seconds. - Press button A to exit. •...
  • Page 46 10/ Technical characteristics Remote control TYXIA 1705 • Power supplied by 3V lithium battery, CR2430 • Class III insulation • X3D Transmission frequency: 868.7 MHz to 869.2 MHz • Maximum radio power < 10 mW • Receiver category II • Wireless range: 100 to 300 metres outside,  variable depending on the associated equipment  (the range can vary depending on the installation  conditions and the electromagnetic environment) • Mounted on a base • Dimensions: 46 x 121 x 10.7 mm • Degree of protection: IP 40 • Operating temperature: 0 to +55°C • Storage temperature: -10 to +70°C • Installation in an environment with normal pollution levels...
  • Page 47 Receiver TYXIA 5731 • Power supply: 230 V~ 0.6 VA  • 2 Powered contact outputs: 2A • Stand-by consumption: 0.06 W • Number of associated transmitters: 16 maximum • Storage temperature: -10°C/+70°C  • Operating temperature: -10°C/+40°C  • IP 40 (flush mounting box) • Dimensions: 41 x 36 x 14.5 mm • X3D wireless remote control device: 868.7 MHz to 869.2 MHz • Maximum radio power < 10 mW, receiver category II...
  • Page 48 Inhoudsopgave 1/  Installatie van de afstandsbediening ..49 1.1  Wandmontage ........... 49 1.2  Op een vlakke ondergrond ....49 2/  Installatie van ontvanger ......50 2.1  Instructies voor aansluiting  van de aansluitklemmen 1 2 3 4 ..52 2.2  Instructies voor aansluiting  van de kabels IN1 - COM - IN2 ... 53 2.3 ...
  • Page 49 1/ Installatie van de afstandsbediening 1.1 Wandmontage 1.2 Op een vlakke ondergrond...
  • Page 50 2/ Installatie van ontvanger Aanbevelingen OPGELET, de kabels van de besturing zijn niet  geïsoleerd van het lichtnet.  Alle apparatuur die is aangesloten, moet CE- gemarkeerd zijn en voldoen aan de eisen voor  laagspanning en volgens de instructies worden  gemonteerd.  De kabels van de lokale bediening kunnen 10 m worden verlengd (te scheiden van 230V). Gebruik een elektrisch geïsoleerd  gereedschap om de acties op de  configuratieknop van de ontvanger uit  te voeren. 10 A Zekering van 10A verplicht.
  • Page 51 230V~ Verbreek de voeding. U kunt de ontvanger voor een rolluik installeren in  een behuizing achter een schakelaar of een druk- knop, of in een behuizing in het rolluik, uit de buurt  van metalen onderdelen. IPx4...
  • Page 52 2/  Installatie van ontvanger 2.1 Instructies voor aansluiting Ø 0,75 - 1,5 mm van de aansluitklemmen 1 2 3 4 Strip de kabel, met inachtneming van de striplengte  die op het product wordt aangegeven. • • Vaste kabels Flexibele kabels Druk de kabel tot Gebruik het meegeleverde  op het einde van gereedschap of een schroevendraaier  de terminal. van 2,5 mm om op de knop van de klem te drukken om de kabel in te brengen.
  • Page 53 2.2 Instructies voor aansluiting van de kabels IN1 - COM - IN2 Gebruik de meegeleverde  230V kabels. Druk de kabel tot op het einde van de terminal. 0,5 mm KY31A02 Strip de kabels niet wanneer deze zijn  aangesloten op het product om de interne  connector niet te beschadigen. Aanbevelingen voor demontage Draaien door aan de kabel te trekken.
  • Page 54 2/  Installatie van ontvanger 2.3 Aansluiting - Sluit de besturingskabels van de motor op  de aansluitklemmen 3 en 4 aan (de klem onderstrooms van de motor op klem 3, de bovenstroomse kabel op klem 4). - Sluit de schakelaar op de klemmen IN1 - COM - IN2 aan. - Sluit de voeding 230V op de klemmen 1 en 2 aan. - Schakel de voeding in om het koppelen uit te  voeren.
  • Page 55 3/ Radioverbinding In dit hoofdstuk wordt besproken hoe u de afstandsbediening met een draadloze X3D-motor  of X3D-ontvanger voor rolluiken kunt verenigen. U kunt tot 16 ontvangers (of motoren) verbinden. 3.1 Verenigen van motor of ontvanger 3.1.1 Een enkele motor staat onder spanning ❶ Druk 3 seconden op de toets totdat het lampje  knippert. > 3s ..TYXIA TYXIA...
  • Page 56 3/  Radioverbinding ❷ Op de afstandsbediening druk gedurende 3  seconden gelijktijdig op   tot het lampje  knippert. Laat de toets los. Wanneer de ontvanger wordt gedetecteerd, zal het lampje even groen oplichten. ❸ Na enkele seconden wordt het rolluik kortstondig 2 keer geactiveerd om de verbinding  te bevestigen.  > 3s Automatisch verlaten van koppelingsmodus...
  • Page 57 3.1.2 Meerdere ontvangers of motoren wachten op vereniging. ❶ Op de afstandsbediening druk gedurende 3  seconden gelijktijdig op  tot het rode lampje brandt. Laat de toets los. De afstandbediening zoekt naar de verschillende motoren of ontvangers. Het rode lampje knippert, vervolgens wordt het groen wanneer een nieuwe ontvanger wordt gedetecteerd. ❷ Zodra het lampje langzaam rood knippert,  druk zo vaak als nodig op ...
  • Page 58 3/  Radioverbinding 3.2 Meerdere ontvangers of motoren verenigen ❶ Zet de ontvangers in afwachting tot vereniging. ❷ Op de afstandsbediening druk gedurende 3  seconden gelijktijdig op   tot het lampje  knippert. Laat de toets los. De afstandbediening zoekt naar de verschillende motoren of ontvangers. Het rode lampje knippert, vervolgens wordt het groen wanneer een nieuwe ontvanger wordt gedetecteerd.
  • Page 59 4/ Configuratie van de ontvanger TYXIA 5731 Configureer de ontvanger volgens het type onderbreker dat is aangesloten. Modus 1 : Schakelaar Omhoog / Stop / Omlaag Modus 2 (standaard) : Dubbele drukknop Omhoog/omlaag Omhoog + Omlaag: Stop Modus 3 : Drukknop Omhoog / Stop / Omlaag /  Stop...
  • Page 60 4/  Configuratie van de ontvanger TYXIA 5731 Om de configuratie van de ontvanger te wijzigen. ❶ Druk 6 seconden op de knop van de ontvanger.  ❷ Het lampje knippert en gaat vervolgens branden,  laat de knop los. Het aantal flitsen van het lampje komt overeen  met de huidige modus. ❸ Druk kort op de knop van de ontvanger om de  modus te selecteren. Modus 1 Modus 2 Modus 3 TYXIA TYXIA TYXIA ❹ Bevestig de gekozen modus door 3 seconden op  de knop te drukken totdat deze gaat branden.
  • Page 61 5/ Leren van looptijd van luik Voer een volledige cyclus uit, van uiteinde tot uiteinde: ❶ Laat het luik vollledig omhoog/omlaag gaan, tot  het uiteinde. ❷ Voer een tegengesteld manoeuvre uit tot het  andere uiteinde. Onderbreek de werking van het rolluik niet. Opmerking : Het leren van de looptijd van luik wordt automatisch  na elke volledige cyclus van uiteinde tot uiteinde  aangepast.
  • Page 62 5/  Leren van looptijd van luik 5.1 Handmatig instellen van looptijd van luik Het leren van de looptijd van luik wordt automatisch  na elke volledige cyclus van uiteinde tot uiteinde  aangepast.  Als de motor vier kabels heeft (Fase / Neutraal / Omhoog / Omlaag) of als de aangesloten motor- voeding minder is dan 45 W, moet deze handeling  handmatig worden uitgevoerd. 5.1.1 Instellen van looptijd van luik - Voordat u deze aanpassing uitvoert, brengt u het  luik volledig naar boven met de lokale bedrade  bediening, een afstandsbediening of een TYDOM en  drukt u op Stop. - Druk 5 keer kort op de knop en vervolgens nog- maals 6 seconden op de knop, het lampje brandt  continu. Laat de knop los. - Het lampje knippert 6 keer.
  • Page 63 - Laat de rolluik zakken, met behulp van de lokale bediening, een afstandsbediening of TYDOM.  - Druk op Stop zodra het rolluik is gesloten. - De looptijd is opgeslagen. > 6s TYXIA TYXIA TYXIA > 3s TYXIA...
  • Page 64 6/ Aanleren van kanteltijd Deze handeling niet uitvoeren, als de TYXIA 5731 een luifel aandrijft. ❶ Houd de toets van de ontvanger 9 seconden  ingedrukt, het lampje dooft, laat de knop los.  Het luik bevindt zich halverwege. ❷ Houd de  rotatietoets ingedrukt (stap- TYXIA modus) totdat het luik volledig  >9s geroteerd, druk  vervolgens op  stop. ❸ De kanteltijd is  opgeslagen.
  • Page 65 7/ Favoriete posities opslaan U kunt tot 2 favoriete posities opslaan: ❶ ❷ Plaats het rolluik in de gewenste positie (Bijv:  ❸ Druk op  om de richting van de bladen  in te stellen. ❹ Druk 3 seconden op om de positie te registreren.  Het rode lampje wordt groen, dit betekent dat de ontvanger de informatie heeft ontvangen. Het rolluik beweegt even.
  • Page 66 8/ Gebruik • Druk op om het rolluik te bedienen. Het rode lampje wordt groen, dit betekent dat de ontvanger de informatie heeft ontvangen. • Druk op  om de richting van de bladen in  te stellen. • Druk op om de favoriete positie 1 in te stellen (indien opgeslagen).
  • Page 67 9/ Ondersteuning • Het rode lampje knippert meerdere keren bij elke druk op de knop. De batterij is leeg. Vervang de batterij. • Een verbinding verwijderen - Verwijder de voorzijde van CR 2430 de afstandsbediening. - Druk op de knop A. Het rode lampje knippert (flash). - Druk achtereenvolgens op  om de motor die u wilt verwijderen (ontvanger) in te schakelen.
  • Page 68 9/  Ondersteuning • Alle koppelingen wissen - Verwijder de voorzijde van de afstandsbediening. - Druk op de knop A. Het rode lampje knippert (flash). - Druk gelijktijdig 3 seconden op  - Druk op A om te verlaten. • De zender blokkeert in de volgende gevallen Detectie van overbelasting, het product blokkeert  gedurende 30 seconden voordat een nieuwe start  wordt geautoriseerd.  Het lampje knippert snel tijdens deze fase.  Neem contact op met de klantendienst.
  • Page 69 10/ Technische kenmerken Afstandsbediening TYXIA 1705 • Voeding door lithiumbatterij - CR2430 - 3V • Klasse III isolatie • Zendfrequentie X3D: 868,7 MHz tot 869,2 MHz • Maximaal radio vermogen < 10 mW • Categorie receptor II • Zendbereik van 100 tot 300 meter in open veld, afhankelijk van de aangesloten  toestellen (het bereik kan variëren in functie van de plaatsingsomstandigheden en de  elektromagnetische omgeving) • Bevestiging op beugel  • Afmetingen: 46 x 121 x 10,7 mm • Beschermingsindex: IP 40 • Bedrijfstemperatuur: 0 tot +55°C • Opslagtemperatuur: van -10 °C tot +70 °C • Plaatsing in een omgeving met een normale ...
  • Page 70 10/ Technische kenmerken Ontvanger TYXIA 5731 • Voeding: 230 V~ 0,6 VA  • 2 Uitgangen contact onder spanning: 2A • Verbruik in stand-by: 0,06 W • Aantal gekoppelde zenders: maximaal 16 • Opslagtemperatuur: -10°C / +70°C  • Bedrijfstemperatuur: -10 °C / +40 °C  • IP 40 (in behuizing) • Afmetingen: 41 x 36 x 14,5 mm • Radiogestuurde afstandbediening X3D:   868,7 MHz tot 869,2 MHz. • Maximaal radio vermogen < 10 mW • Categorie receptor II...
  • Page 71 Spis treści 1/  Instalacja pilota ..........72 1.1  Mocowanie do ściany ......72 1.2  Montaż na płaskiej powierzchni ..72 2/  Instalacja odbiornika ........73 2.1  Instrukcje podłączania  zacisków 1, 2, 3, 4........75 2.2  Instrukcje podłączania  zacisków IN1, COM, IN2 ....... 76 2.3  Podłączenie  ..........77 3/  Powiązanie radiowe ........78 3.1 ...
  • Page 72 1/ Instalacja pilota 1.1 Mocowanie do ściany 1.2 Montaż na płaskiej powierzchni...
  • Page 73 2/ Instalacja odbiornika Zalecenia • UWAGA, przewody sterowania nie są  odizolowane od zasilania sieciowego. Wszystkie  podłączane urządzenia muszą nosić oznakowanie  CE oraz spełniać wymagania dotyczące urządzeń  niskiego napięcia i zalecenia dotyczące montażu.  Możliwość przedłużenia przewodów sterownika lokalnego do 10 m (prowadzić oddzielnie od  przewodów 230 V). • Dolny i górny ogranicznik rolety należy  wyregulować przed montażem odbiornika. Do naciskania przycisku konfiguracji odbiornika należy  używać narzędzia z izolacją elektryczną.  10 A Wymagany automatyczny  wyłącznik 10A.
  • Page 74 2/  Instalacja odbiornika 230V~ Wyłączyć zasilanie instalacji. Odbiornik rolety można zamontować w puszce  podtynkowej za przełącznikiem lub przyciskiem  sterowania lub w szczelnej obudowie wewnątrz  skrzynki rolety, w oddaleniu od elementów metalowych. IPx4...
  • Page 75 2.1 Instrukcje podłączania Ø 0,75 - 1,5 mm zacisków 1, 2, 3, 4. Usunąć z przewodów izolację  na odcinkach o długości podanej na urządzeniu. • • Przewody sztywne Przewody giętkie Za pomocą narzędzia z  Wsuwać przewody do  zestawu lub wkrętaka 2,5 mm  zacisków do oporu. nacisnąć przycisk zacisku, a  następnie włożyć przewód. Zalecenia dotyczące demontażu - Wyłączyć zasilanie. - Za pomocą narzędzia z  zestawu lub wkrętaka 2,5  mm nacisnąć przedni przycisk  zacisku, a następnie wyjąć  przewód.
  • Page 76 2/  Instalacja odbiornika 2.2 Instrukcje podłączania zacisków IN1, COM, IN2 230V Używać przewodów z  zestawu. Wsuwać przewody do  zacisków do oporu. 0,5 mm KY31A02 Nie usuwać izolacji z przewodów, kiedy są  one podłączone do urządzenia, ponieważ  może to spowodować uszkodzenie złącza  wewnętrznego. Zalecenia dotyczące demontażu Obrócić, pociągając za  przewód.
  • Page 77 2.3 Podłączenie - Podłączyć przewody sterowania napędem do  zacisków 3 i 4 (przewód opuszczania do zacisku 3, a przewód podnoszenia do zacisku 4). - Podłączyć przełącznik do zacisków IN1, COM,  IN2. - Podłączyć zasilanie 230 V do zacisków 1 i 2. - Włączyć zasilanie instalacji w celu wykonania  powiązania. Przełącznik  TYXIA samopowrotny Przycisk podwójny 230 V~ Przycisk 2 3 4...
  • Page 78 3/ Powiązanie radiowe Rozdział ten pozwala powiązać pilot zdalnego  sterowania z napędem sterowanym przez radio  X3D lub odbiornikiem rolety X3D. Do systemu można przypisać maksymalnie 16  odbiorników (lub napędów). 3.1 Powiązywanie napędu lub odbiornika 3.1.1 Włączone zasilanie jednego napędu ❶ Naciskając na 3 sekundy przycisk do momentu,  aż lampka sygnalizacyjna zacznie migać. > 3s ..TYXIA TYXIA...
  • Page 79 ❷ Naciśnij na 3 sekundy równocześnie przyciski   na pilocie do momentu, aż lampka  sygnalizacyjna zacznie migać. Zwolnij. Po wykryciu odbiornika na krótko zapali się zielona lampka sygnalizacyjna. ❸ Po kilku sekundach roleta uruchamia się  2-krotnie, aby potwierdzić przypisanie. Automatyczne wyjście z trybu przypisywania. > 3s...
  • Page 80 3/  Powiązanie radiowe 3.1.2 Kilka odbiorników lub napędów oczekuje na powiązanie. ❶ Naciśnij na 3 sekundy równocześnie przyciski   na pilocie do momentu, aż włączy się  czerwona lampka sygnalizacyjna. Zwolnij. Pilot wyszukuje odbiorniki lub napędy. Lampka sygnalizacyjna miga (błyska) na czerwono, a następnie krótko na zielono, gdy tylko zostanie wykryty nowy odbiornik. ❷ Kiedy lampka sygnalizacyjna miga powoli na  czerwono, naciśnij tyle razy ile potrzeba przycisk  , aby wybrać odbiornik (napęd), który ma  zostać powiązany.  Dana roleta uruchamia się...
  • Page 81 3.2 Powiązywanie kilku odbiorników lub napędów ❶ Ustaw odbiorniki w trybie oczekiwania na powiązanie. ❷ Naciśnij na 3 sekundy równocześnie przyciski   na pilocie do momentu, aż lampka  sygnalizacyjna zacznie migać. Zwolnij. Pilot wyszukuje napędy lub odbiorniki. Lampka sygnalizacyjna miga (błyska) na czerwono, a następnie krótko na zielono, gdy tylko zostanie wykryty nowy odbiornik. ❸...
  • Page 82 4/ Konfiguracja odbiornika Skonfigurować odbiornik w zależności od rodzaju podłączonego przełącznika. Tryb 1: Przełącznik  samopowrotny podnoszenie/stop/ opuszczanie Tryb 2 (domyślny): Przycisk  podwójny podnoszenie/ opuszczanie Podnoszenie + opuszczanie: Stop Tryb 3: Przycisk podnoszenie/stop/opuszczanie/stop...
  • Page 83 Zmiana konfiguracji odbiornika ❶ Nacisnąć na 6 sekund przycisk odbiornika.  ❷ Lampka sygnalizacyjna miga, a następnie włącza  się na stałe - zwolnić przycisk.  Liczba mignięć lampki sygnalizacyjnej odpowiada  bieżącemu trybowi działania ❸ Aby wybrać tryb, należy nacisnąć krótko przycisk  odbiornika. Tryb 1 Tryb 2 Tryb 3 TYXIA TYXIA TYXIA ❹ Aby zatwierdzić wybrany tryb, nacisnąć przycisk  na 3 sekundy do momentu, aż włączy się lampka  sygnalizacyjna.
  • Page 84 5/ Uczenie czasów ruchu rolety Wykonać jeden kompletny cykl od ogranicznika do  ogranicznika: ❶ Opuścić całkowicie roletę do ogranicznika. ❷ Wykonać manewr odwrotny do ogranicznika  przeciwstawnego. Uwaga: Nie przerywać ruchu rolety. Uczenie czasów ruchu rolety dostosowuje się  automatycznie podczas każdego kompletnego cyklu  od ogranicznika do ogranicznika.
  • Page 85 5.1 Ręczna regulacja czasów ruchu rolety Uczenie czasów ruchu rolety reguluje się auto- matycznie podczas każdego kompletnego cyklu od  ogranicznika do ogranicznika.  Jeżeli napęd jest wyposażony w 4 przewody  (fazowy, zerowy, podnoszenia, opuszczania) lub jeżeli moc podłączonego napędu jest niższa niż  45 W należy wykonać tę czynność ręcznie. 5.1.1 Regulacja czasu ruchu rolety - Przed przystąpieniem do tej regulacji należy  całkowicie podnieść roletę za pomocą lokalnego ste- rownika przewodowego, pilota zdalnego sterowania  lub aplikacji TYDOM, a następnie nacisnąć przycisk  Stop. - Nacisnąć krótko przycisk 5 razy, a następnie  nacisnąć przycisk na 6 sekund — lampka sygnaliza- cyjna włącza się na stałe. Zwolnić przycisk. - Lampka sygnalizacyjna miga 6 razy. - Nacisnąć na 3 sekundy przycisk odbiornika, aby  zatwierdzić — lampka sygnalizacyjna gaśnie.
  • Page 86 5/ Uczenie czasów ruchu rolety - Za pomocą sterownika lokalnego, pilota zdalnego  sterowania lub aplikacji TYDOM włączyć  opuszczanie rolety. - Natychmiast po zamknięciu rolety nacisnąć  przycisk Stop. - Czas ruchu zostaje zarejestrowany. > 6s TYXIA TYXIA TYXIA > 3s TYXIA...
  • Page 87 6/ Uczenie czasu nachylania Jeżeli odbiornik TYXIA 5731 steruje markizą, czynności tej nie należy wykonywać. ❶ Nacisnąć na 9 sekund przycisk odbiornika do  momentu, aż lampka sygnalizacyjna zgaśnie -  zwolnić przycisk.  Roleta ustawia się w połowie  TYXIA wysokości. ❷ Nacisnąć  >9s przycisk obrotu (tryb krokowy) i przytrzymać  do momentu pełnego  obrotu rolety, a następnie  nacisnąć  przycisk zatrzymania. ❸ Czas nachylania zostaje zarejestrowany.
  • Page 88 7/ Zapamiętywanie położeń ulubionych Można zapisać do 2 położeń ulubionych:  ❶ ❷ Ustaw roletę w żądanym położeniu (np.  ❸ Aby wyregulować ustawienie lameli, naciśnij  przycisk ❹ Aby zapamiętać to położenie, naciśnij na 3  sekundy przycisk Lampka sygnalizacyjna czerwona, a następnie zielona, jeśli odbiornik otrzymał informację. Roleta uruchamia się na krótko. Zwolnij. > 3s...
  • Page 89 8/ Obsługa • Aby sterować roletą, naciśnij przycisk  Lampka sygnalizacyjna czerwona, a następnie zielona, jeśli odbiornik otrzymał informację. • Aby wyregulować ustawienie lameli, naciśnij  przycisk • Aby ustawić roletę w położeniu ulubionym 1  (jeżeli zostało zapamiętane), naciśnij przycisk  • Aby ustawić roletę w położeniu ulubionym 2  (jeżeli zostało zapamiętane), naciśnij przycisk ...
  • Page 90 9/ Pomoc • Przy każdym naciśnięciu przycisku czerwona lampka sygnalizacyjna miga wielokrotnie. Bateria jest rozładowana. Wymień baterię. • Usuwanie powiązania — Zdejmij pokrywę przednią pilota zdalnego  sterowania. — Naciśnij przycisk A. Miga (błyska) czerwona lampka CR 2430 sygnalizacyjna. — Aby włączyć odbiornik  (napęd), który ma zostać  usunięty, naciskaj kolejno przycisk  — Naciśnij przycisk  Roleta uruchamia się. Aby wyjść, naciśnij przycisk A...
  • Page 91 • Usuwanie wszystkich powiązań — Zdejmij pokrywę przednią pilota zdalnego  sterowania. — Naciśnij przycisk A. Miga (błyska) czerwona lampka sygnalizacyjna. — Naciśnij równocześnie na 3 sekundy przyciski — Aby wyjść, naciśnij przycisk A.  • Odbiornik blokuje się w stanie zatrzymania. Po wykryciu przeciążenia urządzenie blokuje  się w stanie zatrzymania na 30 sekund przed  zezwoleniem na ponowne uruchomienie. Podczas tej fazy lampka sygnalizacyjna miga krótkimi  błyśnięciami.  Skontaktować się z działem obsługi klienta.
  • Page 92 10/ Dane techniczne Zdalnego sterowania TYXIA 1705 • Zasilanie: bateria litowa 3 V, CR2430 • Izolacja klasa III • Częstotliwość emisji X3D:  od 868,7 MHz do 869,2 MHz • Moc radio maksymalna < 10 mW • Kategoria receptor II • Zasięg radiowy od 100 do 300 metrów w wolnym  polu, zmieniający się w zależności od przypisanego  sprzętu (na zasięg mogą mieć wpływ warunki  montażu i środowisko elektromagnetyczne) • Mocowanie na uchwycie • Wymiary: 46 x 121 x 10,7 mm • Wskaźnik zabezpieczenia: IP 40 • Temperatura działania: od 0 do +55°C • Temperatura przechowywania: od –10 do +70°C • Montaż w środowisku normalnie  zanieczyszczonym...
  • Page 93 Odbiornik TYXIA 5731 • Zasilanie: 230 V~, 0,6 VA  • 2 wyjścia stykowe zasilane: 2 A • Pobór mocy w trybie czuwania: 0,06 W • Liczba powiązanych nadajników: maks. 16 • Temperatura przechowywania: od −10°C do  +70°C • Temperatura działania: od −10°C do +40°C  • IP 40 (w puszce podtynkowej) • Wymiary: 41 x 36 x 14,5 mm • Radiowe urządzenie do zdalnego sterowania X3D:    868,7 MHz – 869,2 MHz. • Moc radio maksymalna < 10 mW • Kategoria receptor II...
  • Page 96 www.deltadore.com...

Ce manuel est également adapté pour:

Tyxia 1705Tyxia 5731