HOMCOM A90-246 Manuel De L'utilisateur

Manuels Connexes pour HOMCOM A90-246


Sommaire des Matières pour HOMCOM A90-246
- Page 1 INapb001V02_FR Tapis roulant Manuel de l'utilisateur IMPORTANT : A LIRE ATTENTIVEMENT ET À CONSERVER POUR CONSULTATION ULTÉRIEURE. INSTRUCTIONS D’ASSEMBLAGE...
- Page 2 SOMMAIRE CONSIGNES DE SÉCURITÉ ........................2 SPÉCIFICATIONS DE PRODUITS ......................3 SPÉCIFICATIONS DU PAQUET ......................... 3 INSTRUCTIONS DE MONTAGE ......................... 4 INSTRUCTIONS DE FONCTIONNEMENT DE LA COMMANDE ÉLECTRIQUE ........5 INSTRUCTIONS POUR L'ENTRETIEN ...................... 8 LUBRIFIANTS .............................. 9 ERREURS ET DÉPANNAGE ........................10 DIRECTIVES RELATIVES À...
- Page 3 CONSIGNES DE SÉCURITÉ Pour la sécurité de tous les utilisateurs, veuillez lire attentivement tout le contenu de ce manuel avant la mise en service. Nous ne sommes pas responsables des blessures causées suite à une mauvaise utilisation. AVERTISSEMENT Veuillez suivre les instructions ci-dessous afin d'éviter tout accident pour vous ou pour les autres. 1.
- Page 4 20. Ne pas brancher d'aiguilles, de déchets ou d'eau sur la prise de courant. ---Il peut causer un choc électrique ou un court-circuit, un incendie. Ne pas utiliser avec des mains mouillées. 21. Lorsque vous ne l'utilisez pas, veuillez débrancher la fiche de la prise de courant. --La poussière et l'humidité...
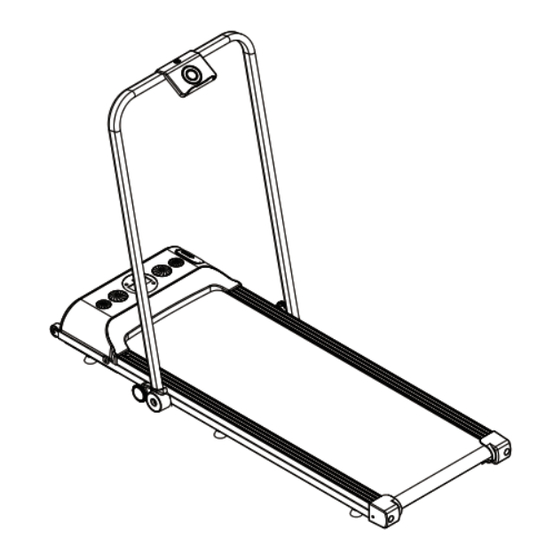
- Page 5 INSTRUCTIONS DE MONTAGE Étape 1: Retirez le cadre principal du carton. Étape 2 : Comme illustré ci-dessous, tenez la colonne avec les deux mains et tirez doucement vers le haut. Fixez la colonne sur le cadre principal à l'aide du bouton rond (n° 6). Étape 3 : Utilisez ensuite le 8# (M6*15) pour verrouiller le 7# support de téléphone portable sur la colonne correspondant à...
- Page 6 INSTRUCTIONS DE FONCTIONNEMENT DE LA COMMANDE ÉLECTRIQUE Avant d'utiliser le tapis roulant : veuillez d'abord brancher le courant, allumer l'interrupteur (l'interrupteur est rouge), attendre que l'écran s'allume et entrer dans l'interface de démarrage. Interrupteur d'alimentation 5.1. Présentation de l'affichage électronique. 5.1.1 "SPEED"...
- Page 7 5.1.5 Fenêtre "MILEAGE" du kilométrage total : Affiche la distance accumulée après l'exercice (enregistrer les données de cette distance d'exercice en état d'arrêt normal, Effacé si arrêt anormal) 5.1.6 La plage de chaque donnée affichée est la suivante : TEMPS : 5:00 - 99.59(MIN) DISTANCE : 1.0 - 99.0(KM) CALORIES : 20.0 - 990(C) VITESSE : 0.5 - 6 .5(MPH)
- Page 8 90° 90° Battery PRESS ~ 7 ~...
- Page 9 INSTRUCTIONS POUR L'ENTRETIEN Un entretien approprié permet de maintenir votre tapis roulant dans un état optimal. Un mauvais entretien peut entraîner une blessure ou réduire la durée de vie du tapis roulant. Avertissement : Débranchez toujours le tapis de course avant de nettoyer ou d'entretenir l'appareil ! 6.1 Des inspections fréquentes sont nécessaires pour s'assurer que toute usure et tout dommage sont détectés à...
- Page 10 Ajustement de la bande de course Si la bande de course est trop lâche, descendez du tapis de course, insérez une clé hexagonale dans le trou de réglage de la garde gauche et tournez d'un quart de tour dans le sens des aiguilles d'une montre, puis tournez d'un quart de tour dans le sens des aiguilles d'une montre sur le pied droit.
- Page 11 Comment ajouter du lubrifiant Veuillez respecter scrupuleusement les instructions suivantes. Ouvrez la barre latérale située à l'avant gauche du couvercle décoratif du réservoir. Insérez la bouteille dans l'ouverture pour en mesurer la taille, utilisez une paire de ciseaux ou un couteau d'art pour couper le bout de la bouteille à la taille voulue.
- Page 12 8.2 Problèmes courants et méthodes de dépannage. 8.2.1 Certains ou tous les boutons ne fonctionnent pas correctement. Découvrez la boîte supérieure de la montre électronique et vérifiez si les boutons fonctionnent. Vérifiez ou remplacez la carte électronique. Vérifiez que le bouton peut fonctionner après la remise sous tension. 8.2.2 La montre électronique est sans affichage.
- Page 13 Buvez beaucoup d'eau pendant l'exercice. Vous devez reconstituer l'humidité perdue à la suite d'un exercice excessif pour éviter la déshydratation. Évitez de boire beaucoup d'eau ou de boissons glacées, et la température de votre eau ou boisson est égale à la température ambiante. EXERCICES D'ECHAUFFEMENT Exercice d'échauffement et de détente : Un programme d'exercice réussi doit comprendre des exercices d'échauffement, d'aérobic et d'apaisement.