Télécharger Imprimer la page

Publicité

Les langues disponibles

Les langues disponibles

Liens rapides

Operating Instructions
VC-AL100N
Automatic charger 1 A
Item No. 2637720
Page 2 - 13
Notice d'emploi
VC-AL100N
Chargeur automatique de 1A
N° de commande 2637720
Page 14 - 25
Gebruiksaanwijzing
VC-AL100N
Automatische lader 1A
Bestelnr. 2637720
Pagina 26 - 37

Publicité

loading

Sommaire des Matières pour VOLTCRAFT VC-AL100N

  • Page 1 Operating Instructions VC-AL100N Automatic charger 1 A Item No. 2637720 Page 2 - 13 Notice d’emploi VC-AL100N Chargeur automatique de 1A N° de commande 2637720 Page 14 - 25 Gebruiksaanwijzing VC-AL100N Automatische lader 1A Bestelnr. 2637720 Pagina 26 - 37...
  • Page 2 Table of contents Page Introduction ................................3 Explanation of symbols ............................3 Intended use ................................4 Package contents ..............................4 Features and functions ............................5 Safety information ..............................5 a) General information ............................5 b) Connected devices ............................6 c) Electrical safety .............................6 d) Persons and product .............................7 e) Rechargeable batteries ..........................7 Operating elements .............................8 a) Meaning of LED indicators ..........................8...
  • Page 3 1. Introduction Dear customer, Thank you for purchasing this product. This product complies with statutory national and European regulations. To ensure that the product remains in this state and to guarantee safe use, always follow the instructions in this manual. These operating instructions are part of this product.
  • Page 4 3. Intended use This compact charger automatically charges lead-acid batteries with a 6 V or 12 V terminal voltage and a capacity of 1.2–24 Ah. Compatible battery types include lead-acid, lead-fleece (AGM) and gel batteries. The charger can be used to charge batteries mounted in vehicles.
  • Page 5 5. Features and functions • Charges 6 V or 12 V lead-based motorcycle batteries with a current of up to 1 A • Automatically selects the previous charging mode when switched on • Detects faulty batteries • Compact and lightweight design •...
  • Page 6 b) Connected devices • Always observe the safety instructions and operating instructions of other devices (vehicle, batteries) which are connected to the product. c) Electrical safety • Before connecting the product to the mains, check that your local A/C mains voltage matches the speci- fications on the nameplate.
  • Page 7 d) Persons and product • Always comply with the accident prevention regulations for electrical equipment when using the product in commercial facilities. • In schools, educational facilities, computer and DIY workshops, the product must be used under the supervision of qualified personnel. •...
  • Page 8 7. Operating elements 1 MODE button Charging LED 3 12 V mode LED indicator 4 6 V mode LED indicator Fault LED indicator 6 Red and black terminal (black = negative terminal, red = positive terminal). 7 Eyelet connector (black = negative terminal, red = positive terminal). a) Meaning of LED indicators Meaning Charging indicator Flashes when the battery is charging and stays constant when the bat-...
  • Page 9 8. Setup The charger heats up during use. Ensure that there is sufficient ventilation. Do not cover the housing! Never charge lead batteries in a closed container. Ensure there is sufficient ventilation during the charging process and avoid naked flames! Explosive gases may be generated during the charging process.
  • Page 10 • Use the MODE button (1) to select a charging mode. Press the button until the LED/LEDs indicate the desired function (6 V or 12 V mode). For details on individual charging modes, refer to the next section ("b) Charging modes and functions").
  • Page 11 Restore function • This function is designed to restore overdischarged batteries. It cannot be selected manually. Restore mode starts automatically when an overdischarged battery is connected to the charger. A low charging current is used to re- store the battery to a normal voltage. When the battery reaches its normal voltage, the charger continues to charge the battery using the normal charging process.
  • Page 12 9. Care and cleaning Never use aggressive detergents, rubbing alcohol or other chemical solutions, as these may damage the casing or stop the product from functioning properly. • Before cleaning, disconnect the product from the mains and remove any connected batteries. •...
  • Page 13 b) (Rechargeable) batteries Remove batteries/rechargeable batteries, if any, and dispose of them separately from the product. According to the Battery Directive, end users are legally obliged to return all spent batteries/rechargeable batteries; they must not be disposed of in the normal household waste. Batteries/rechargeable batteries containing hazardous substances are labelled with this symbol to indi- cate that disposal in household waste is forbidden.
  • Page 14 Table des matières Page Introduction ................................15 Explication des symboles ..........................15 Utilisation prévue ...............................16 Contenu ................................16 Caractéristiques et fonctions ..........................17 Consignes de sécurité ............................17 a) Généralités ..............................17 b) Appareils raccordés .............................18 c) Sécurité électrique ............................18 d) Personnes et produit ...........................19 e) Accumulateurs .............................19 Éléments de fonctionnement ..........................20 a) Signification des LED d'affichage ........................20 Mise en service ..............................21...
  • Page 15 1. Introduction Chers clients, Nous vous remercions d’avoir choisi ce produit. Ce produit est conforme aux exigences des normes européennes et nationales en vigueur. Afin de maintenir l’appareil en bon état et d’en assurer un fonctionnement sans danger, l’utilisateur doit impérative- ment respecter ce mode d’emploi ! Ce mode d’emploi fait partie intégrante du produit.
  • Page 16 3. Utilisation prévue Le chargeur compact est destiné à la charge automatique d'accus plomb-acide ayant une tension aux bornes de 6 V ou 12 V et une capacité de 1,2 à 24 Ah. Les types d'accus compatibles sont plomb-acide, plomb-feutre (AGM) ou les accus au gel.
  • Page 17 5. Caractéristiques et fonctions • Pour recharger des accus de moto au plomb avec une tension de 6 V ou 12 V jusqu'à 1 A • Réglage automatique du dernier mode de charge sélectionné après remise en service • Détection d'accus défectueux •...
  • Page 18 b) Appareils raccordés • Respectez également les consignes de sécurité et le mode d’emploi des autres appareils (véhicule, accu(s)) raccordés au produit. c) Sécurité électrique • Avant de brancher l'appareil, assurez-vous que les spécifications de la plaque signalétique corres- pondent à celles des prises de courant de votre domicile. •...
  • Page 19 d) Personnes et produit • Dans des sites industriels, il convient d’observer les consignes de prévention d’accidents relatives aux installations électriques et aux matériels prescrites par les syndicats professionnels. • Dans les écoles, centres de formation, ateliers de loisirs et de réinsertion, la manipulation d'appareils doit être surveillée par du personnel formé...
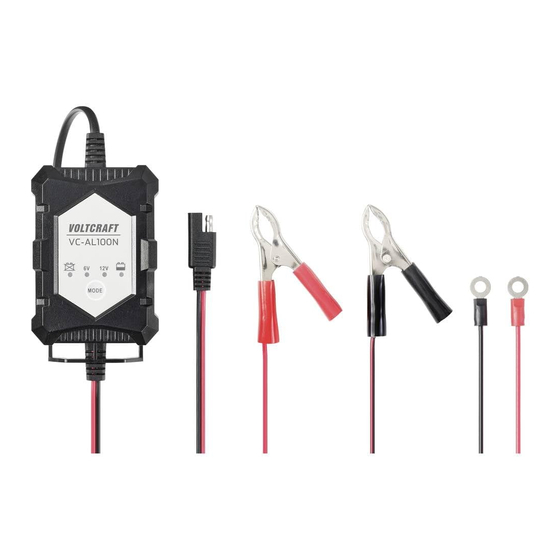
  • Page 20 7. Éléments de fonctionnement 1 Touche MODE 2 LED de charge 3 LED d’affichage de mode 12V 4 LED d’affichage de mode 6V 5 LED d’affichage de dysfonctionnement 6 Borne rouge et noire (noir = pôle négatif, rouge = pôle positif) 7 Raccord à...
  • Page 21 8. Mise en service L'appareil chauffe pendant son fonctionnement. Veillez à une ventilation suffisante ; ne recouvrez pas le boîtier ! Ne rechargez jamais les accus au plomb dans un récipient clos. Veillez à une bonne aération lors de la recharge, évitez tout feu nu. Des gaz explosifs peuvent être dégagés pendant la charge.
  • Page 22 • Branchez la fiche secteur du chargeur dans une prise de courant (100-240 V/AC, 50/60 Hz). Le chargeur s’initia- lise et vérifie chacune des fonctions de charge. Les voyants LED s'allument brièvement. Ce chargeur possède une fonction de sauvegarde automatique, c'est-à-dire qu'il passe automatiquement au dernier mode de charge sélectionné...
  • Page 23 2. Mode auto 12V (14,4 ± 0,25 V) • Ce mode est conçu spécialement pour batteries 12 V d'une capacité inférieure à 24 Ah, par exemple les accus 12V de voiture. • Pour sélectionner ce mode, appuyez sur la touche MODE (5) jusqu'à ce que la LED d’affichage de mode 12V (3) s'allume.
  • Page 24 Protection automatique contre la surchauffe • La protection contre la surchauffe permet d’éviter que le chargeur ne subisse des dommages en cas de tempéra- tures ambiantes anormales ou de dysfonctionnement de composants. Veuillez noter que la protection anti-surchauffe intégrée au chargeur surveille constamment la température d’utilisation du système électronique.
  • Page 25 b) Piles/accumulateurs En tant qu‘utilisateur final, vous êtes légalement tenu (Ordonnance relative à l‘élimination des piles usagées) de rap- porter toutes les piles/accumulateurs usagés ; il est interdit de les jeter avec les ordures ménagères. Les piles/accumulateurs qui contiennent des substances toxiques sont caractéri- sées par les symboles ci-contre qui indiquent l’interdiction de les jeter dans les ordures ménagères.
  • Page 26 Inhoudsopgave Pagina Inleiding ................................27 Verklaring van de symbolen ..........................27 Doelmatig gebruik ..............................28 Inhoud van de verpakking ..........................28 Eigenschappen en functies ..........................29 Veiligheidsinstructies ............................29 a) Algemeen ..............................29 b) Aangesloten apparaten ..........................30 c) Elektrische veiligheid ...........................30 d) Personen en product ...........................30 e) Accu’s ................................31 Bedieningselementen ............................32 a) Betekenis van de weergave-led’s ........................32 Ingebruikname ..............................33...
  • Page 27 1. Inleiding Geachte klant, Hartelijk dank voor de aankoop van dit product. Dit product voldoet aan alle wettelijke, nationale en Europese normen. Om deze situatie te behouden en een veilig gebruik te garanderen, moet u als gebruiker deze gebruiksaanwijzing in acht nemen! Deze gebruiksaanwijzing behoort bij dit product.
  • Page 28 3. Doelmatig gebruik De compacte lader is bestemd voor het automatisch laden van loodzuur-accu’s met 6 V en 12 V-klemspanning en een vermogen van 1,2 Ah tot 24 Ah. Mogelijke accutypes zijn loodzuur-, loodvlies (AGM)- of gelaccu’s. Het laden van ingebouwde accu’s in voertuigen is mogelijk.
  • Page 29 5. Eigenschappen en functies • Voor het opladen van op lood gebaseerde motorfietsaccu’s met 6 V of 12 V spanning tot 1 A stroom • Automatisch instellen van de laatst gekozen laadmodus na een hernieuwde ingebruikname • Herkenning van defecte accu’s •...
  • Page 30 b) Aangesloten apparaten • Neem ook de veiligheidsinstructies en gebruiksaanwijzingen van alle andere apparaten (voertuig, ac- cu’s) in acht die met het product zijn verbonden. c) Elektrische veiligheid • Controleer vóór het aansluiten op het stroomnet of de aansluitwaarden op het typeplaatje van het pro- duct overeenstemmen met die van uw stroomnet.
  • Page 31 • Het product mag niet in explosiegevaarlijke bereiken (Ex) worden gebruikt. • Neem ook de veiligheidsinstructies in de afzonderlijke hoofdstukken in acht. • Controleer hiervoor het opschrift op het apparaat. - Waarschuwing! Explosieve gassen - open vuur en vonken vermijden. - Stekker voor het aansluiten/loskoppelen van de accu eruit trekken.
  • Page 32 7. Bedieningselementen 1 Knop MODE 2 Laad-led 3 Modusweergave-led 12V 4 Modusweergave-led 6V 5 Storingsindictie-led 6 Rode en zwarte klem (zwart = minpool, rood = pluspool) 7 Ringoog-aansluiting (zwart = minpool, rood = pluspool a) Betekenis van de weergave-led’s Betekenis Oplaadindicator.
  • Page 33 8. Ingebruikname Het apparaat wordt warm tijdens het gebruik. Zorg voor voldoende ventilatie; de behuizing mag niet afge- dekt worden! Laad loodaccu’s nooit op in een afgesloten houder. Zorg bij het opladen voor voldoende ventilatie en voorkom open vuur! Bij het opladen kunnen explosieve gassen ontstaan. Houd kinderen uit de buurt! Open voor het opladen van accu’s met vloeibaar zuur de sluitstoppen van de afzonderlijke cellen.
  • Page 34 Deze oplader heeft een automatische opslagfunctie; d.w.z. hij gaat automatisch terug naar de laatst geko- zen laadmodus, als hij wordt aangesloten op wisselstroom van het openbaar stroomnet. • Kies vervolgens met de knop MODE (1) een laadfunctie uit. Druk zo vaak op de knop totdat de led of led’s van de gewenste functie (6V-modus of 12V-modus) beginnen te branden.
  • Page 35 2. 12 V auto-modus (14,4 ±0,25 V) • Deze modus is speciaal bestemd voor 12V-accu’s met een capaciteit van minder dan 24 Ah, bijv. voor 12V-au- toaccu’s. • Om deze modus te selecteren, drukt u op de MODE-knop (5) tot de modusindicatie-led 12V (3) begint te branden. Het laadproces start automatisch (1 A ±10 %).
  • Page 36 Laadstroombegrenzing • Deze beschermingsfunctie voorkomt oververhitting en schade door een korte of buitensporige lasten. Automatische overtemperatuurbeveiliging • De overtemperatuurbeveiliging voorkomt schade aan de oplader als gevolg van abnormale omgevingstempera- turen of componentenfouten. Houd er rekening mee dat de in de oplader geïntegreerde hittebescherming de bedrijfstemperatuur van de elektronica voortdurend bewaakt.
  • Page 37 b) Batterijen/accu’s Verwijder eventueel geplaatste batterijen/accu‘s en gooi ze apart van het product weg. U als eindgebruiker bent wettelijk verplicht (batterijverordening) om alle gebruikte batterijen/accu‘s in te leveren; het weggooien bij het huisvuil is verboden. Batterijen/accu’s die schadelijke stoffen bevatten, zijn gemarkeerd met nevenstaand symbool. Deze mo- gen niet via het huisvuil worden afgevoerd.
  • Page 38 This is a publication by Conrad Electronic SE, Klaus-Conrad-Str. 1, D-92240 Hirschau (www.conrad.com). All rights including translation reserved. Reproduction by any method, e.g. photocopy, microfilming, or the capture in electronic data processing systems require the prior written approval by the editor. Reprinting, also in part, is prohibited. This publication represent the technical status at the time of printing.

Ce manuel est également adapté pour:

Vc-13188600