EcoFlow DELTA Pro Guide Rapide
Masquer les pouces
Voir aussi pour DELTA Pro:
- Manuel de l'utilisateur ,
- Manuel d'utilisation (120 pages) ,
- Mode d'emploi (6 pages)
Les langues disponibles
Les langues disponibles
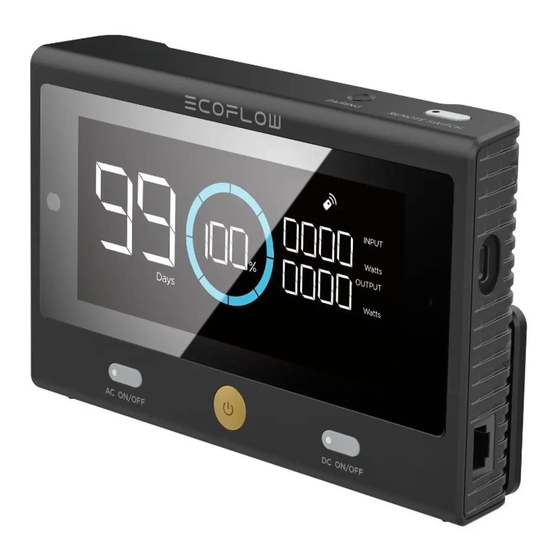
Product illustration
EcoFlow DELTA Pro
(Remote Control)
Display
AC output
power button
Product information
● Model number: EFD500-RC
● Battery supply voltage: 3.0–4.5 V
● Product battery type: AAA (No. 7)
Wired connection
Special tip: After connecting successfully, the remote control screen will
display the same content as the DELTA Pro screen.
Wireless connection
● Connection steps
Frequency pairing button
Power button
1. Press the power button to turn on the machine;
2. Press and hold the remote control's frequency pairing button until
Remote control icon
the remote control icon flashes;
USB-C power port
3. Press and hold the DELTA Pro frequency pairing button until the
remote control icon flashes.
Standby indicator
4. The remote control icon will stay illuminated when the connection is
successful.
Network port
Frequency pairing button
AC
ON/OFF
DC
ON/OFF
12 V DC output
power button
Main power button
Display
● USB-C power voltage: 5.0 V
● Network port power voltage: 12 V
(DELTA Pro only)
AC ON/OFF
● Operating temperature: -10°C–45°C
Main power button
Power on: Press the power button
Power o : Press and hold the power button
Illuminate LCD screen: Press the main power button
Tip: The Bluetooth standby feature requires a dial test with the
DELTA Pro
● The three statuses of the remote control are shown in the following
figure
1. The remote control is not connected;
2. The remote control has connected to the machine successfully;
3. The remote control has connected to the machine successfully and
the machine is turned o ;
1
Power button
Remote control icon
Standby indicator
DC
ON/OFF
2
3
How to install
FCC STATEMENT
This device complies with Part 15 of the FCC Rules. Operation is subject
to the following two conditions:
(1) This device may not cause harmful interference, and
(2) This device must accept any interference received, including
interference that may cause undesired operation.
Warning:
Changes or modifications not expressly approved by the party
responsible for compliance could void the user's authority to operate
the equipment.
NOTE:
Holder front
This equipment has been tested and found to comply with the limits for
Screw holes x4
a Class A digital device, pursuant to part 15 of the FCC Rules. These
limits are designed to provide reasonable protection against harmful
interference when the equipment is operated in a commercial environ-
Method 1: Screw the holder to the wall, then simply attach the remote
control to the holder.
ment. This equipment generates, uses, and can radiate radio frequency
Tips: 1. If the wall is made of wood, you can screw it in directly. 2. If the wall is made of
energy and, if not installed and used in accordance with the instruction
concrete, a wall plug is required.
manual, may cause harmful interference to radio communications.
Operation of this equipment in a residential area is likely to cause
harmful interference in which case the user will be required to correct
the interference at his own expense.
A x 3M
Holder back
adhesive here
Method 2: Use 3M adhesive to a x the holder to the wall, then simply
attach the remote control to the holder.
Special tips: ● The remote control enables the DELTA Pro to be
powered on remotely;
● The DELTA Pro's Standby Switch needs to be
switched to the ON position and the machine must be
paired with the remote control before shutting down;

Manuels Connexes pour EcoFlow DELTA Pro


Sommaire des Matières pour EcoFlow DELTA Pro
- Page 3 (Télécommande) maintenez-le enfoncé jusqu'à ce que l'icône de la télécommande clignote télécommande 3. Appuyez sur le bouton de couplage de fréquence de la DELTA Pro et Port USB-C maintenez-le enfoncé jusqu'à ce que l'icône de la télécommande clignote A chage Voyant de veille 4.