Table des Matières
Publicité
Liens rapides
NAYA
Shower panel
User Manual
Colonne de douche
Guide de l'utilisateur
DO NOT RETURN THIS PRODUCT TO STORE, CONTACT US. We're there if you need help
NE RETOURNEZ PAS CE PRODUIT AU MAGASIN, CONTACTEZ-NOUS.
Nous sommes à vos côtés si vous avez besoin d'aide
1 844 666-0155 • question@dimex360.com
1 844 666-0155
ANTICALCAIRE
NON-CLOGGING
Store/Magasin
1 2
3 4
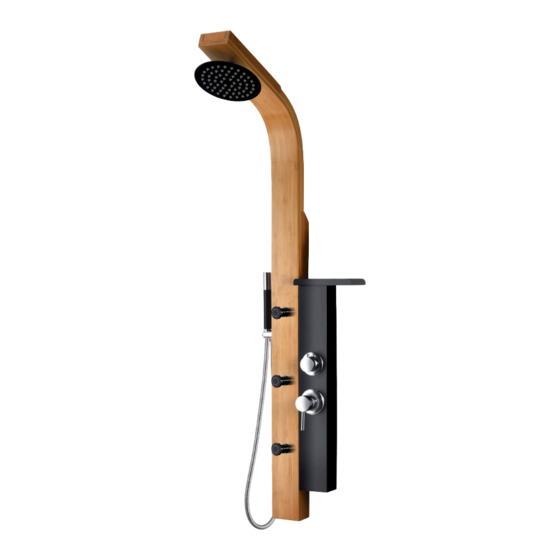
Model/Modèle : SPB 9332
2019-08
Publicité
Table des Matières

Manuels Connexes pour Akuaplus NAYA SPB 9332


Sommaire des Matières pour Akuaplus NAYA SPB 9332
- Page 1 NAYA Shower panel User Manual Store/Magasin Colonne de douche Guide de l’utilisateur 1 844 666-0155 Model/Modèle : SPB 9332 ANTICALCAIRE NON-CLOGGING DO NOT RETURN THIS PRODUCT TO STORE, CONTACT US. We’re there if you need help NE RETOURNEZ PAS CE PRODUIT AU MAGASIN, CONTACTEZ-NOUS. Nous sommes à...
-
Page 2: Recommended Tools For Installation / Outils Recommandés Pour I'installation
été utilisé de façon non recommandée ou s’il a fait l’objet de négligence. akuaplus®... - Page 3 35 36 HJ-40 TD-83 83 mm 80 mm...
-
Page 4: Parts List/Liste De Pièces
Parts list/Liste de pièces N°/No. Description N°/No. Description 1 Bamboo section Section de bambou 26 Zinc knob Poignée fait en zinc 2 Nylon washer Rondelle de nylon 27 Finishing locknut Contre-écrou de finition 3 Locknut Contre-écrou 28 Finishing flange Bride de finition 4 Elbow fitting of head shower Raccord coudé... - Page 5 Recommended preparation of your wall / Préparation recommandé de votre mur 2x6 in. Piece of wood reinforcement Pièce de renforcement fait de 2x6 po Not included Non inclus 1/2” NPT You will need to reinforce your wall with 2 x 6 inches pieces of wood as shown (2), to do this, place the shower panel against the wall at the desired height (1) to measure and mark the position of the top bracket for the 2 x 6 (A), bottom bracket position for the 2 x 6 (C), and the 2 x 6 position of the 90˚drop ear elbow (B).
- Page 6 Place and mark the upper shower panel bracket (F), measure the distance between the both shower panel brackets (H) in order to place and mark at the right position the support of the bottom (G). Placez et marquez le support de la colonne de douche du haut (F), /- 29 po/in.
-
Page 8: Impurity Filter Washer Rondelle D'étanchéité Avec Filtre À Impureté
Put on one washers provided (A+B). Apply Teflon tape to the nipples (C). Install the 90° connectors firmly on the nipples and add ¼ turn with a wrench. Connect the hoses to the shower panel making sure they are not twisted. Install the shower panel on the wall brackets. It is recommended not to apply silicone seal around the panel. - Page 9 Reverse this process when putting the cartridges in place. Effectuez le processus inverse pour remettre les cartouches en place. You may need to clean your cartridges if they accumulate limescale. Brush them under running water with a toothbrush, let them soak for a minimum of eight hours in undiluted white vinegar, brush again and rinse under running water.
-
Page 10: Troubleshooting Guide
TROUBLESHOOTING GUIDE PROBLEM PROBABLE CAUSE SOLUTION Cold water and hot water are Bad connection of hot and cold water supplies Invert the hot and cold water supplies tube reversed Water supply close Open water supply The water supply hose are twisted Replace hose Hot or cold water only There is dirt in the pipes or in the valve...