GE Profile JGS905 Instructions D'installation
Table des Matières
Les langues disponibles
Les langues disponibles
Liens rapides
Installation
Instructions
Questions? Call 800.GE.CARES (800.432.2737) or Visit our Website at: ge.com
In Canada, call 1.800.361.3400 or Visit our Website at: www.geappliances.ca
IN THE COMMONWEALTH OF
MASSACHUSETTS:
• This product must be installed by a
licensed plumber or gas fitter.
• When using ball-type gas shut-off valves,
they shall be the T-handle type.
• A flexible gas connector, when used, must
not exceed 3 feet.
BEFORE YOU BEGIN
Read these instructions completely
and carefully.
IMPORTANT
•
instructions for local inspector's use.
IMPORTANT
•
governing codes and ordinances.
• Note to Installer – Be sure to leave these
instructions with the Consumer.
• Note to Consumer – Keep these
instructions for future reference.
• Product failure due to improper installation
is not covered under the Warranty.
WARNING
be properly grounded.
IMPORTANT
•
appliance shall be conducted according to
the manufacturer's instructions.
• Proper installation is the responsibility
of the installer and product failure due to
improper installation is NOT covered under
warranty.
31-10665
10-07 JR
— Save these
— Observe all
— This appliance must
— Leak testing of the
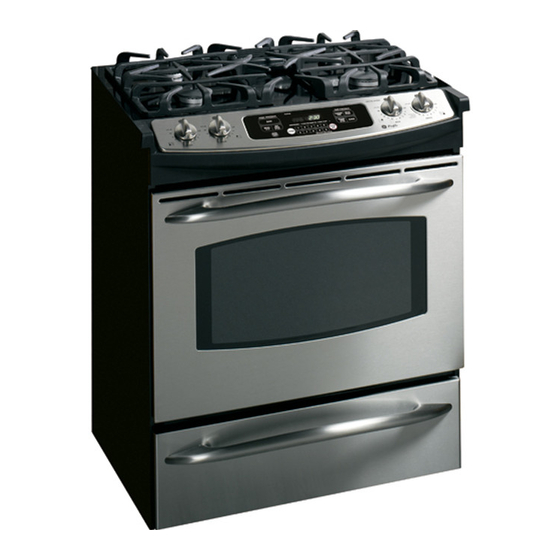
Gas Slide-In Range
JGS905, JGS968, PGS968
PARTS INCLUDED
Rear Filler
2 Screws
MATERIALS YOU MAY NEED
Joint Sealant
CSA-Approved Flexible Gas Line
3/8" Min. ID, 1/2" NPT Connection,
3-foot Maximum Length (Massachusetts Only)
TOOLS YOU WILL NEED
1/4" Nut Driver
Phillips Head
Screwdriver
Tape Measure
Safety Glasses
1
Screws
Anti-Tip Bracket
Pipe Fittings
Shut Off Valve
Level
Pipe Wrench
Wrench or Pliers
(for 1-7/16" Nut)
Drill
Table des Matières

Manuels Connexes pour GE Profile JGS905


Sommaire des Matières pour GE Profile JGS905
- Page 17 Instructions Cuisinière encastrée au gaz d’installation JGS905, JGS968, PGS968 Si vous avez des questions, appelez le 1.800.361.3400 ou visitez notre site Web à l’adresse : www.electromenagersge.ca AVANT DE COMMENCER MATÉRIAUX DONT VOUS POUVEZ AVOIR BESOIN Lisez ces instructions complètement et avec soin.
-
Page 18: Conseils De Sécurité Importants
Instructions d’installation CONSEILS DE SÉCURITÉ IMPORTANTS VOTRE SÉCURITÉ : La conception de cette cuisinière a été certifiée par les UNDERWRITERS AVERTISSEMENT LABORATORIES du Canada. Vous trouverez — des précautions de sécurité dans votre Si vous ne suivez pas exactement les Manuel du propriétaire. -
Page 19: Exigences Électriques
Instructions d’installation EXIGENCES ÉLECTRIQUES MÉCANISME ANTI-BASCULANT Cet appareil ménager doit être livré avec le AVERTISSEMENT — Pour réduire bon voltage et la bonne fréquence et branché le risque de basculement, vous devez fixer votre à son propre circuit de dérivation bien mis à appareil en installant bien le support anti- la terre, protégé... -
Page 20: Liste De Vérification Avant L'installation
Pour obtenir les trousses : FAITES BASCULER AVEC SOIN a. Visitez le site Web GE (voir page 1) LA CUISINIÈRE POUR AVOIR b. Appelez le centre de réponse GE ACCÈS AUX PIEDS (voir page 1) D’INCLINAISON DE LA... -
Page 21: Enlevez Les Matériaux D'emballage
Instructions d’installation ENLEVEZ LA PORTE SI C’EST ENLEVEZ LA PORTE SI C’EST NÉCESSAIRE NÉCESSAIRE (suite) Il n’est pas indispensable d’enlever la porte ENLEVEZ LA PORTE EN LA pour installer votre cuisinière, mais cela SOULEVANT peut vous faciliter la tâche. Pour enlever la porte : Enlevez la porte en la soulevant et en la faisant sortir jusqu’à... -
Page 22: Installation Normale
Instructions d’installation LISTE DE VÉRIFICATION AVANT L’INSTALLATION (SUITE) DÉCOUPE AVANT L’INSTALLATION INSTALLATION NORMALE ET DÉGAGEMENT REQUIS Si la construction ou votre armoire ne peut Si les armoires sont placées à moins de fournir une surface plate de 6 mm (1/4″) à 76,2 cm (30’’) au-dessus de la cuisinière, l’arrière de l’ouverture du comptoir, envisagez consultez la section d’autre construction,... -
Page 23: Installation- Branchement Électrique
Instructions d’installation BRANCHEMENT ÉLECTRIQUE INSTALLATION— BRANCHEMENT ÉLECTRIQUE À cause des risques de sécurité dans certaines conditions, nous vous recommandons fortement de ne pas utiliser de rallonge. Cependant, si vous décidez tout de même d’utiliser une rallonge, il est absolument nécessaire que cette rallonge soit une rallonge pour appareil électroménager à... -
Page 24: Branchement Du Gaz
Instructions d’installation BRANCHEMENT DU GAZ BRANCHEMENT BRANCHEMENT (suite) Installez l’adaptateur évasé de 13 mm (1/2″) au coude NPT de 13 mm (1/2″) sur le régulateur de pression. 7,6 cm (3″) 17,8 cm (7″) Branchez le raccord flexible d’appareil ménager à l’adapteur. 38,1 cm (15″) ″) 8,9 cm (3... -
Page 25: Installation De La Cuisinière
Instructions d’installation INSTALLATION DE LA CUISINIÈRE INSTALLEZ LE SUPPORT INSTALLEZ LE SUPPORT ANTI-BASCULEMENT ANTI-BASCULEMENT (suite) TROUVEZ LE SUPPORT INSTALLEZ LE SUPPORT DANS DU a. Décidez si vous devez installer le support BOIS OU DANS DU CIMENT du côté droit ou du côté gauche de l’ouverture pour la cuisinière. - Page 26 Instructions d’installation INSTALLATION DE LA CUISINIÈRE (SUITE) FAITES GLISSER LA CUISINIÈRE FAITES GLISSER LA CUISINIÈRE DANS L’OUVERTURE DANS L’OUVERTURE (suite) Branchez le cordon de la cuisinière dans le Placez la cuisinière en face de l’ouverture réceptacle. Placez le cordon à l’arrière de la de l’armoire.
- Page 27 Instructions d’installation REMETTEZ EN PLACE LA REMETTEZ EN PLACE LE TIROIR PORTE DE LA CUISINIÈRE DE RANGEMENT Placez les rails du tiroir sur les guides. NOTE : La porte de la cuisinière est lourde. Vous aurez peut-être besoin d’aide pour Poussez le tiroir à...
-
Page 28: Brûleurs De La Table De Cuisson
Instructions d’installation INSTALLATION DE LA CUISINIÈRE (SUITE) VÉRIFIEZ QU’IL N’Y A PAS DE FUITE BRÛLEURS DE LA TABLE DE CUISSON Allumez l’alimentation de gaz et utilisez un détecteur de fuite liquide (solution savonneuse) sur tous les joints et les connexions pour ASSEMBLAGE DES BRÛLEURS vérifier qu’il n’y a pas de fuite. - Page 29 • Le robinet du brûleur doit s’allumer et ne sont pas de bonne longueur, appelez le quand il y a du gaz dans le brûleur. service GE. • Une fois que le brûleur s’allume, il faut 13 mm à 19 mm l’enlever de la position LITE (allumer).
- Page 30 Instructions d’installation INSTALLATION DE LA CUISINIÈRE (SUITE) AJUSTEZ LE VOLET À AIR BRÛLEURS DE CUISSON ET DE GRILLADE BRÛLEUR ARRIÈRE 1. Enlevez le couvercle recouvrant l’orifice. Si les brûleurs de cuisson et/ou de grillade ont des flammes «paresseuses» (flottantes) 2. Utilisez un tournevis pour desserrer la vis ou des montées de flammes ou si leurs du volet à...
- Page 31 Instructions d’installation Quand la garniture est posée dans la bonne PRÉPARATION POUR UNE position, serrez les 2 vis de montage. Le haut AUTRE CONSTRUCTION de la garniture doit se trouver au-dessous de la surface du haut du verre pour empêcher TROUSSE DE REMPLISSAGE DU les casseroles, les poelles et les ustensiles de HAUT OU TROUSSE D’APPUI EN...
- Page 32 Instructions d’installation INSTALLATION DE LA CUISINIÈRE (SUITE) Veuillez consulter les instructions de PRÉPARATIONS POUR UNE AUTRE conversion au gaz de pétrole liquéfié fournies CONSTRUCTION (suite) avec cette cuisinière quand vous utilisez du gaz de pétrole liquéfié. POUR LES OUVERTURES D’ARMOIRE NOTE : Les instructions sont fixées au support D’ENVIRON 77,2 CM (30-3/8″) de régulateur.