
Manuels Connexes pour CAME BPT XTS 7 WH WIFI


Sommaire des Matières pour CAME BPT XTS 7 WH WIFI
- Page 1 Videocitofono vivavoce Wi-Fi touch screen FB00982M04 XTS 7 WH WIFI XTS 7 BK WIFI IT Italiano XTS 7 WH WFBF EN English FR Français MANUALE PER L’UTENTE RU Pусский...
-
Page 2: Avvertenze Generali
AVVERTENZE GENERALI Leggere attentamente le istruzioni prima di utilizzare il dispositivo. • L’installazione, la programmazione, la messa in servizio e la manutenzione del prodotto devono essere effet- • tuate soltanto da personale tecnico qualificato ed opportunamente formato nel rispetto delle normative vigenti ivi comprese le osservanze sulla prevenzione infortuni e lo smaltimento imballaggi. - Page 3 Comandi e segnalazioni presenti sulla home page L’aspetto della home page può variare a seconda della configurazione dell’impianto o dell’interfaccia Utente. Preferiti Posti esterni Contatti Segreteria video Lista Aux Registro chiamate 19:02 Giovedì Info Indietro Home 01 Feb 2018 A Comando esclusione suonerie chiamate; quando H L’icona di colore bianco, indica che il dispositivo il comando è...
-
Page 4: Utilizzo Del Dispositivo
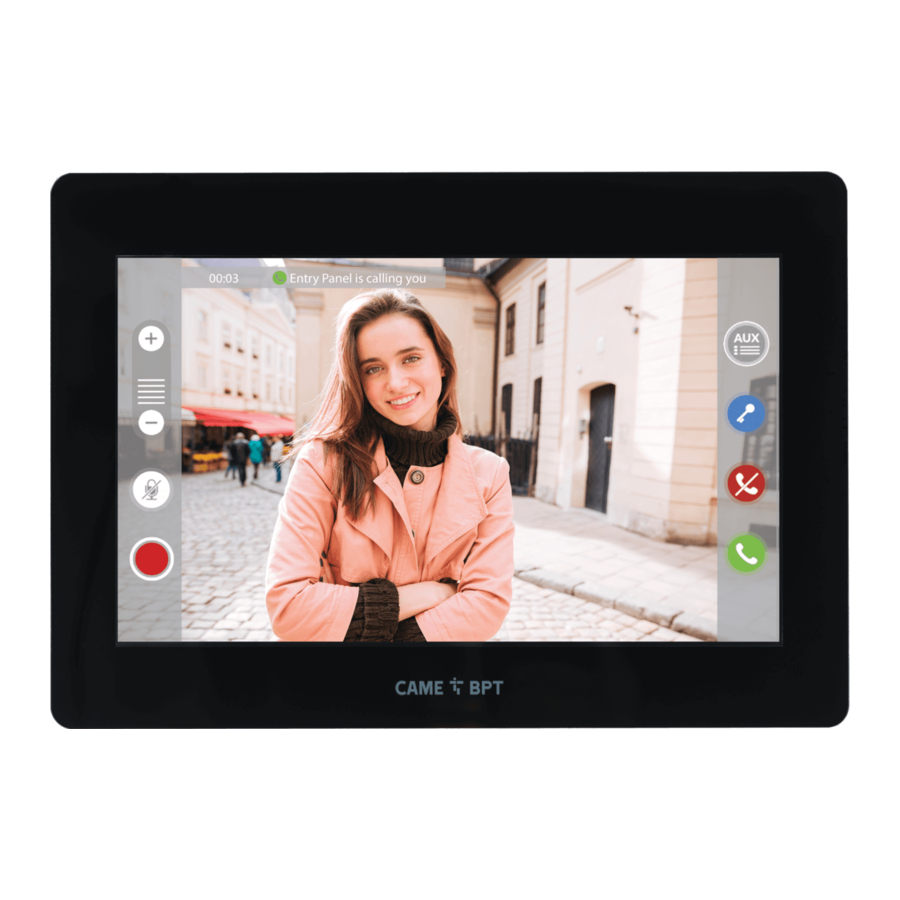
UTILIZZO DEL DISPOSITIVO Rispondere ad una chiamata Chiamata da Posto Esterno Sullo schermo viene visualizzata l’immagine del chiamante (se disponibile). L’audio da e verso il chiamante non è attivo. A Toccare il pulsante per rispondere alla chiamata e abilitare la comunicazione audio. B Toccare il pulsante per rifiutare la chiamata e tornare alla home page. -
Page 5: Effettuare Una Chiamata
Effettuare una chiamata Dal dispositivo è possibile effettuare chiamate verso altri derivati (intercomunicazione), verso dispositivi connessi attraverso la rete Wi-Fi (App) oppure verso posti esterni. Chiamare un contatto dalla lista preferiti A Toccare l’icona per accedere Preferiti Posti esterni Contatti alla lista dei contatti preferiti. - Page 6 Aprire la comunicazione verso il posto esterno Preferiti Posti esterni Contatti B Toccare l’icona per accedere alla lista dei posti esterni. per popolare la lista dei po- sti esterni, consultare il capitolo "Contatti" a pagina 7. Segreteria video Lista Aux Registro chiamate 19:02 Giovedì...
- Page 7 Contatti Toccare l’icona per accedere alla lista dei contatti. Preferiti Posti esterni Contatti Segreteria video Lista Aux Registro chiamate 19:02 Giovedì 01 Feb 2018 Info Indietro Home L’elenco contiene tutti i dispositivi che possono essere contattati. Unità Posto esterno Intercomunicante 1 Intercomunicante 2 Intercomunicante 3 Intercomunicante 4...
-
Page 8: Posto Esterno
Unità A Unità abitativa (comprende il Unità derivato interno e le app associate). ESTENSIONI B Il derivato interno. Ricevitore XTS C Possibili utenti connessi all’im- App Mobile 1 pianto attraverso app. in locale o in App Mobile 2 remoto. Toccare uno dei contatti, per avvia- App Mobile 3 re la chiamata. - Page 9 Concierge G Posto di portineria (presente se previsto dall’impianto). Toccare il contatto per avviare la chiamata. Toccare l’icona per modificare il nome del contatto. Segreteria video A Toccare l’icona per attivare/di- sattivare la segreteria. Preferiti Posti esterni Contatti Per configurare correttamen- te la segreteria, consultare il ca- pitolo "Segreteria video"...
-
Page 10: Registro Chiamate
Lista Aux A Toccare l’icona per accedere alla lista dei contatti ausiliari. Preferiti Posti esterni Contatti I comandi ausiliari (AUX) permetto- no l’attivazione di contatti adegua- tamente programmati per eseguire comandi aggiuntivi alla classica apertura della porta di ingresso. Segreteria video Lista Aux Registro chiamate per popolare la lista dei con-... - Page 11 Tipologia delle chiamate Chiamata ricevuta. 29 gen 2018 19:55 Posto esterno Chiamata effettuata. 28 gen 2018 11:23 Posto esterno Chiamata persa. 07 gen 2018 21:03 Posto esterno Le chiamate che non hanno ricevu- 05 gen 2018 14:21 to risposta sono evidenziate . Posto esterno Cancella tutto Toccare la riga desiderata per chia-...
-
Page 12: Impostazioni Generali
IMPOSTAZIONI GENERALI Toccare l’icona per accedere alla lista delle impostazioni. TVCC Impostazioni 19:02 Giovedì 01 Feb 2018 Info Indietro Home Informazioni di sistema La finestra contiene una serie di informazioni tecniche utili ad Informazioni di sistema identificare le caratteristiche del dispositivo, la versione hardware e Lingue software. - Page 13 Data/ora La finestra permette di impostare data e ora del derivato interno. Modalità Manuale Auto A Data e ora vengono impostate Server NTP manualmente dall’Utente. B Data e ora vengono sincronizza- Data/ora 01 feb 2018 19:02 te automaticamente da un opportu- Continente no servizio internet;...
- Page 14 B Toccare l’area per assegnare un nome al comando AUX che si sta Descrizione Apri cancello per aggiungere. Comando Aux 3 C Scegliere dall’elenco il comando al quale associare l’AUX. Destinazione Posto Esterno D Scegliere dall’elenco la destina- zione del comando AUX. Salvare la configurazione toccando il pulsante Salva.
- Page 15 Segreteria video Se l’impianto prevede la presenza di un posto esterno videocitofonico, in caso di assenza dell’utente chiamato, il dispositivo permette al chiamante di registrare un videomessaggio. Il chiamante può essere avvisato di tale opportunità da un messaggio messaggio di cortesia (es. «L’utente non è al momento disponibile, potete lasciare un messaggio dopo il bip»).
- Page 16 B Toccare l’area per assegnare un nome alla telecamera IP che si sta Descrizione per aggiungere. Connessione in tempo reale URI C Toccare l’area e digitare la strin- ga URI che permette la connessio- Collegamento URI per l'immagine fissa ne con la telecamera. D Toccare l’area e digitare la strin- ga URI che permette di acquisire dalla telecamera l'immagine statica...
-
Page 17: A Regola La Luminosità Dello
Schermo A Regola la luminosità dello schermo durante l’uso. Luminosità B Regola la luminosità dello Luminosità in stand-by schermo in stand-by. C Rende insensibile al tocco lo Pulizia schermo schermo per 20 secondi, in modo da permetterne la pulizia. Toccare il pulsante Indietro per tornare all’elenco dei parametri da configurare. -
Page 18: Configurazioni Avanzate
Configurazioni avanzate questa sezione richiede delle conoscenze specifiche del funzio- Messaggio di cortesia namento dell’impianto videoci- Configurazione Aux tofonico. L’errata configurazione potrebbe causare dei malfunzio- Telecamere IP namenti parziali o totali; per que- Sfondi sto motivo la modifica di alcuni parametri è... - Page 19 Rete C Il pulsante permette di abilitare la comunicazione Wi-Fi. Tipo connessione WiFi L’icona indica che la modalità Abilitato di connessione Wi-Fi è attiva e ven- Configura WiFi gono abilitate le sezioni sottostanti relative alla configurazione di rete. Modalità DHCP Statico Indirizzo IP Netmask...
- Page 20 3 La pagina visualizza le reti rile- vate; per eseguire una scansione Wi-Fi CASA SMITH manuale toccare il pulsante J. Non protetta Wi-Fi PUBBLICA Selezionare una rete per procedere Protetta alla connessione. Aggiungi rete WiFi Se la rete non è protetta la connes- sione è...
-
Page 21: Multimedia
Multimedia La finestra permette di configurare il massimo BITRATE che il dispo- Audio codec sitivo può gestire, scegliendo tra i valori disponibili. Video codec maggiori sono i valori di BI- App Video Bitrate (Kbps) TRATE, migliore è la qualità video, ma maggiore è... - Page 22 C Toccare le sezioni vuote e at- traverso il pop-up impostare l’ora Ora inizio di inizio e fine della fascia oraria di attivazione della funzione. Ora fine Giorni della settimana Salva 19:02 Giovedì 01 Feb 2018 Info Indietro Home D Toccare i giorni della settimana nel corso dei quali la fascia oraria Ora inizio 08:30...
- Page 23 Configurazione interfaccia utente Questa sezione permette di per- sonalizzare l’aspetto della pagina Home page attiva Predefinita Personalizzata principale. A Scegliere il tipo di home page Personalizza funzioni della Home page che si vuole visualizzare. B Toccare il pulsante per creare una home page personalizzata.
- Page 24 Manutenzione (password amministratore richiesta; default password 112233). Riavvia dispositivo A Toccare il pulsante per riavviare il derivato interno. Riavvia applicazione B Toccare il pulsante per riavviare Imposta modalità slave solo l’applicazione che gestisce il de- Ripristina impostazioni predefinite rivato interno. 19:02 Giovedì...
- Page 25 Wifi touch-screen speaker video-intercom FB00982-EN XTS 7 WH WIFI XTS 7 BK WIFI XTS 7 WH WFBF USER MANUAL EN English...
-
Page 26: General Precautions
GENERAL PRECAUTIONS Carefully read the instructions before using the device. • The installation, programming, commissioning and maintenance of the product must only be carried out by • qualified technicians, properly trained in compliance with the regulations in force, including health and safety measures and the disposal of packaging. - Page 27 Commands and notifications found on the home page The appearance of the homepage may vary according to the system configuration or the user interface. Favourites Entry panels Contacts Video Recording Aux List Call register 19:02 Thursday 01 Feb 2018 Info Back Home A Command to exclude call ringer;...
-
Page 28: Answering A Call
HOW TO USE THE DEVICE Answering a call Call from Entry Panel An image of the caller appears on the screen. The audio from and towards the caller is turned off. A Touch the button to answer the call and to turn on the audio communication. B Touch the button to refute the call and to return to the homepage. -
Page 29: Making A Call
Making a call This device lets you call other indoor receivers (intercommunication), any devices connected over the Wifi network or, any entry panels. Calling a contact on the favorites list A Touch the icon to access the list Favourites Entry panels Contacts of favorite contacts. - Page 30 Turn on communication to entry panel Favourites Entry panels Contacts B Touch the icon to access the list of entry panels. to fill the list of entry panels, see the "Contacts" chapter on page 7. Video Recording Aux List Call register 19:02 Thursday 01 Feb 2018...
- Page 31 Contacts Touch the icon to access the con- tacts list. Favourites Entry panels Contacts Video Recording Aux List Call register 19:02 Thursday 01 Feb 2018 Info Back Home The list contains all the devices that can be contacted. Unit Entry panel Intercom 1 Intercom 2 Intercom 3...
- Page 32 Unit A Household (includes the indoor Unit receiver and any associated apps). EXTENSIONS B the indoor receiver. XTS receiver C Possible users connected to the Mobile App 1 system via app, either locally or Mobile App 2 from a remote location. Touch one of the contacts to initiate Mobile App 3 a call.
-
Page 33: Video Recording
Concierge G Concierge panel, if the system features this. Touch the contact to initiate the call. Touch the icon to edit the con- tact's name. Video Recording A Touch the icon the turn the an- swering service on or off. Favourites Entry panels Contacts... -
Page 34: Call Register
Aux List A Touch the icon to access the list of auxiliary contacts. Favourites Entry panels Contacts The auxiliary commands (AUX) let you activate suitably programmed contacts to carry out additional commands to the classic opening of the entry door. Video Recording Aux List Call register... - Page 35 Types of calls Incoming call. 29 Jan 2018 19:55 Entry panel Outgoing call. 28 Jan 2018 11:23 Entry panel Missed call. 07 Jan 2018 21:03 Entry panel Any missed calls are highlighted . 05 Jan 2018 14:21 Entry panel Touch the line you want to call your Delete all contact.
-
Page 36: General Settings
GENERAL SETTINGS Touch the icon to return to the list of settings. CCTV Settings 19:02 Thursday 01 Feb 2018 Info Back Home System information This window gives technical infor- mation that is useful for identifying System information the device's characteristics and the hardware and software versions. - Page 37 Date/time This window is for setting the date and time on the indoor receiver. Mode Manual Auto A The date and time are manually NTP server set by the user. B The date and time are auto- Date/time 01 Feb 2018 19:02 matically synchronized by a cor- Continent responding internet service;...
- Page 38 B Touch the area to assign a name to the AUX command that you are Description Gate opener going to add. Command Aux 3 C Choose the command to asso- ciate the AUX to, from the list. Destination Entry panel D Choose the destination of the AUX command from the list.
- Page 39 Video Recording If the system has a video intercom entry panel installed, if the called user is not in, the device lets the caller record a video message. The caller may be notified of this by a courtesy message, for example, "The user is not available at the moment, please leave a message after the beep".
- Page 40 B Touch the area to assign a name to the IP video camera that you are Description going to add. Real-time URI connection C Touch the area and type the URI string for connecting the video URI connection for the fixed image camera.
- Page 41 Display A Adjusts the brightness of the screen during use. Brightness B Adjusts the brightness of the Brightness in stand-by screen in standby. C This makes the screen insensi- Clean screen tive to the touch for 20 seconds, to enable cleaning over it. Touch the Back button to return to the list of settable parameters.
-
Page 42: Advanced Settings
Advanced settings This section requires speci- fic know-how in operating the Courtesy message video-intercom system. Wrong Auxiliary setting settings may cause partial or even total malfunctions; that is IP video cameras why the editing of some parame- Backdrops ters is allowed only after entering the installer password;... - Page 43 Network C This button is for enabling WiFi communication. Type of connection WiFi This icon shows that the WiFi Enabled connection is active, enabling the Configure WiFi network-settings sections below. Mode DHCP Static IP address Netmask Gateway Address MAC Save 19:02 Thursday 01 Feb 2018...
- Page 44 3 The page shows any detected networks; to manually scan for Smith home WiFi networks, touch this button J. Unprotected Public WiFi Select a network to connect to. Protected If the network is unprotected the Add WiFi network connection will be immediate. Scan If the network is protected, enter the password for the WiFi network...
-
Page 45: Multimedia
Multimedia This window lets you configure the maximum BITRATE that the device Audio codec can handle, while choosing among the available values. Video codec The greater the BITRATE va- Video App Bitrate (Kbps) lues, the better the video quality, but also the greater the data ban- dwidth occupied in UPLINK. - Page 46 C Touch the empty sections and in the pop-up window set the start Start time and finish time of the time-slot for activating the function. Start time Days of the week Save 19:02 Thursday 01 Feb 2018 Info Back Home D Touch the days of the week du- ring which the time-slot needs to Start time...
- Page 47 Configuring the user interface This section is for customizing the appearance of the homepage. Homepage active Preset Customized A Select the type of homepage that you wish to see. Customize Homepage functions B Touch the button to create a cu- stomized homepage.
- Page 48 Maintenance (administrator password required; the default password is 112233). Reboot device A Touch the button to reboot the in- door receiver. Restart application B Touch the button to reboot only Set slave mode the application that runs the indoor Restore preset settings receiver.
-
Page 49: Portier Vidéo Mains Libres Wi-Fi À Écran Tactile
Portier vidéo mains libres Wi-Fi à écran tactile FB00982-FR XTS 7 WH WIFI XTS 7 BK WIFI XTS 7 WH WFBF MANUEL POUR L’UTILISATEUR FR Français... -
Page 50: Instructions Générales
INSTRUCTIONS GÉNÉRALES Lire attentivement les instructions avant d’utiliser le dispositif. • L’installation, la programmation, la mise en service et la manutention du produit ne doivent être effectuées • que par des techniciens qualifiés et dans le strict respect des normes en vigueur, y compris des règles sur la prévention des accidents et l'élimination des emballages. -
Page 51: Commandes Et Signalisations Présentes Sur La Page D'accueil
Commandes et signalisations présentes sur la page d’accueil L’aspect de la page d’accueil peut varier en fonction de la configuration de l’installation ou de l’interface utilisateur. Favoris Postes externes Contacts Répondeur vidéo Liste Aux Registre d'appels 19:02 Jeudi Info Précédent Home 01 févr. -
Page 52: Utilisation Du Dispositif
UTILISATION DU DISPOSITIF Répondre à un appel Appel provenant d’un poste externe L’écran visualise l’éventuelle image de l’appelant. L’audio depuis/vers l’appelant n’est pas activé. 1 Appuyer sur le bouton pour répondre à l’appel et activer la communication audio. 2 Appuyer sur le bouton pour refuser l’appel et revenir à la page d’accueil. Indications visualisées à... -
Page 53: Effectuer Un Appel
Effectuer un appel Le dispositif permet d’effectuer des appels vers d’autres postes (intercommunication), vers des dispositifs connec- tés via le réseau Wi-Fi (App) ou vers des postes externes. Appeler un contact dans la liste des favoris A Appuyer sur l’icône pour accé- Favoris Postes externes Contacts... - Page 54 Établir l'audio avec le poste externe Favoris Postes externes Contacts 2 Appuyer sur l’icône pour accé- der à la liste des postes externes. Pour remplir la liste des postes externes, consulter le cha- pitre "Contatti" a pagina 7. Répondeur vidéo Liste Aux Registre d'appels 19:02...
-
Page 55: Commandes Associées Aux Contacts
Contacts Appuyer sur cette icône pour accé- der à la liste des contacts. Favoris Postes externes Contacts Répondeur vidéo Liste Aux Registre d'appels 19:02 Jeudi 01 févr. 2018 Info Précédent Home La liste contient tous les dispositifs pouvant être contactés. Unité... -
Page 56: Poste Externe
Unité 1 Unité d’habitation (à savoir le Unité poste interne et les applications EXTENSIONS associées). Récepteur XTS 2 Le poste interne. App Mobile 1 3 Éventuels utilisateurs connectés App Mobile 2 à l’installation par app. localement ou à distance. App Mobile 3 Appuyer sur l’un des contacts pour App Mobile 4 lancer l’appel. -
Page 57: Répondeur Vidéo
Concierge 7 Poste de conciergerie (éventuel- lement prévu sur l’installation). Appuyer sur le contact pour lancer l’appel. Appuyer sur cette icône pour modifier le nom du contact. Répondeur vidéo 1 Appuyer sur cette icône pour activer/désactiver le répondeur. Favoris Postes externes Contacts Pour configurer correctement le répondeur, consulter le chapitre... -
Page 58: Registre D'appels
Liste Aux 1 Appuyer sur cette icône pour accéder à la liste des contacts au- xiliaires. Favoris Postes externes Contacts Les commandes auxiliaires (AUX) permettent l'activation de contacts dûment programmés pour exécuter d’autres commandes outre l'ouver- Répondeur vidéo Liste Aux Registre d'appels ture classique de la porte d'entrée. -
Page 59: Type D'appel
Type d’appel Appel reçu. 29 jan 2018 19:55 Poste externe Appel effectué. 28 jan 2018 11:23 Poste externe Appel manqué. 07 jan 2018 21:03 Poste externe Les appels sans réponse sont mis 05 jan 2018 14:21 en évidence. Poste externe Tout effacer Appuyer sur la ligne souhaitée pour 03 jan 2018 16:31... -
Page 60: Configurations Générales
CONFIGURATIONS GÉNÉRALES Appuyer sur cette icône pour accé- der à la liste des configurations. CCTV Réglages 19:02 Jeudi Info Précédent Home 01 févr. 2018 Informations de système La fenêtre contient une série d'in- formations techniques utiles à Informations de système l'identification des caractéristiques du dispositif, la version ordinateur Langues... -
Page 61: La Sélection De La Modalité
Date/heure Cette fenêtre permet de configurer la date et l’heure du poste interne. Modalité Manuelle Auto 1 La date et l’heure sont configu- Serveur NTP rées manuellement par l’utilisateur. 2 La date et l’heure sont synchro- Date/heure 01 févr. 2018 19:02 nisées automatiquement par un ser- Continent vice Internet spécifique ;... -
Page 62: Commandes Rapides
2 Appuyer sur cette zone pour at- tribuer un nom à la commande AUX Description Ouverture portail à ajouter. Commande Aux 3 3 Choisir dans la liste la com- mande à laquelle associer l'AUX. Destination Poste externe 4 Choisir dans la liste la destina- tion de la commande AUX. -
Page 63: Sauvegarder La Configuration En Appuyant Sur Le Bouton Sauvegar
Répondeur vidéo Si l’installation prévoit la présence d'un poste externe avec portier vidéo, en cas d'absence de l'utilisateur appelé, le dispositif permet à l'appelant d’enregistrer un message vidéo. L'appelant peut être informé de cette opportunité par un message de courtoisie (ex. : « L’utilisateur n'est pas disponible pour le moment, veuillez laisser un message après le bip »). -
Page 64: Fonds D'écran
2 Appuyer sur cette zone pour attribuer un nom à la caméra IP à Description ajouter. Connexion en temps réel URI 3 Appuyer sur cette zone et sai- sir la chaîne URI permettant la Connexion URI pour l'image fixe connexion à la caméra. 4 Appuyer sur cette zone et saisir la chaîne URI permettant d’obtenir de la caméra l’image statique né-... - Page 65 Écran 1 Permet de régler la luminosité de l’écran durant l’utilisation. Luminosité 2 Permet de régler la luminosité Luminosité en mode veille de l’écran en mode veille. 3 Permet de rendre l’écran in- Effacer écran sensible au toucher pendant 20 secondes de manière à...
-
Page 66: Configurations Avancées
Configurations avancées Cette section requiert des connaissances spécifiques sur Message de courtoisie le fonctionnement du système Configuration Aux. portier-vidéo. Une configuration incorrecte pourrait provoquer des Caméras IP mauvais fonctionnements partiels Fonds d’écran ou complets, raison pour laquelle la modification de certains para- Écran mètres requiert la saisie du mot Tons... -
Page 67: Après Avoir Choisi La Modalité De Connexion, Ce Bouton Permet De Choisir Et De Configurer Le Réseau
Réseau 3 Ce bouton permet d’activer la communication Wi-Fi. Type de connexion WiFi L’icône indique que la modalité Activé de connexion Wi-Fi est activée avec Configurer WiFi activation des sections inférieures liées à la configuration de réseau. Modalité DHCP Statique Adresse IP Masque réseau Passerelle... - Page 68 3 La page visualise les réseaux détectés ; pour effectuer un ba- Wi-Fi MAISON DURANT layage manuel, appuyer sur le bou- Non protégé Wi-Fi PUBLIC ton J. Protégé Sélectionner un réseau pour établir Ajouter réseau WiFi la connexion. La connexion est immédiate lorsque Balayage le réseau n’est pas protégé.
-
Page 69: Si La Vidéo Sur L'application N'est Pas Fluide Ou Qu'elle Est Détério
Multimédia Cette fenêtre permet de configurer le maximum de BITRATE que le Codec audio dispositif peut gérer en choisissant parmi les valeurs disponibles. Codec vidéo Plus les valeurs de BITRATE sont App Bitrate Vidéo (Kbps) élevées, meilleure est la qualité vi- déo et plus est importante l’occupa- tion de la base de données dans la LIAISON MONTANTE (UPLINK). -
Page 70: Appuyer Sur Les Sections Vides Et Configurer, Dans La Fenêtre
3 Appuyer sur les sections vides et configurer, dans la fenêtre Heure début contextuelle, l’heure de début et de fin de la plage horaire d’activation Heure fin de la fonction. Jours de la semaine Sauvegarder 19:02 Jeudi 01 févr. 2018 Info Précédent Home... -
Page 71: Configuration Interface Utilisateur
Configuration interface utilisateur Cette section permet de personna- liser l’aspect de la page principale. Page d'accueil activée Prédéfinie Personnalisée 1 Choisir le type de page d’accueil à visualiser. Personnalisation fonctions page d’accueil 2 Appuyer sur le bouton pour créer une page d’accueil person- nalisée. -
Page 72: Entretien
Entretien (mot de passe administrateur requis ; mot de passe par défaut 112233). Redémarrer dispositif 1 Appuyer sur le bouton pour re- mettre en marche le poste interne. Redémarrer application 2 Appuyer sur le bouton pour ne Configuration modalité slave relancer que l’application gérant le Restaurer paramètres par défaut poste interne. - Page 73 Абонентское видеоустройство с сенсорным FB00982-RU экраном, громкой связью и Wi-Fi XTS 7 WH WIFI XTS 7 BK WIFI XTS 7 WH WFBF РУКОВОДСТВО ПОЛЬЗОВАТЕЛЯ RU Русский...
-
Page 74: Общие Предупреждения
ОБЩИЕ ПРЕДУПРЕЖДЕНИЯ Внимательно прочитайте инструкции перед использованием устройства. • Установка, программирование, ввод в эксплуатацию и обслуживание продукта должны выполняться • только квалифицированным и специально обученным персоналом с соблюдением действующих стандар- тов, включая требования по охране труда, технике безопасности и утилизации упаковки. Устройство... - Page 75 Элементы управления и сигнализации на главной странице Внешний вид главной страницы может меняться в зависимости от конфигурации системы или интерфейса пользователя. Избранные Вызывные панели Контакты Автоответчик с Список Aux Журнал вызовов видеосвязью 19:02 Четверг Информация Назад Главная 1 февраля 2018 г. A Отключение...
-
Page 76: Использование Устройства
ИСПОЛЬЗОВАНИЕ УСТРОЙСТВА Ответ на вызов Вызов с вызывной панели На экране появляется изображение вызывающего (при наличии). Входящий и исходящий звук не работает. A Нажмите кнопку для ответа на вызов и включите аудиосвязь. B Нажмите кнопку для отклонения вызова и возврата на главную страницу. Индикация... - Page 77 Осуществление вызова С этого устройства можно осуществлять вызов других абонентских устройств (интерком), вызывных пане- лей, а также устройств, подключенных к сети Wi-Fi (через приложение). Вызов контакта из списка «Избранные» A Коснитесь иконки для доступа Избранные Вызывные панели Контакты к списку избранных контактов. О...
- Page 78 Установка соединения с другой вызывной панелью Избранные Вызывные панели Контакты B Коснитесь иконки для доступа к списку вызывных панелей. О процедуре добавления вызывных панелей в соответ- ствующий список можно про- Автоответчик видео Список Aux Журнал вызовов читать в разделе "Contatti" a pagina 7.
- Page 79 Контакты Коснитесь иконки для доступа к списку контактов. Избранные Вызывные панели Контакты Автоответчик видео Список Aux Журнал вызовов 19:02 Четверг 1 февраля 2018 г. Информация Назад Главная Список содержит все устройства, с которыми можно связаться. Помещение Вызывная панель Интерком 1 Интерком...
- Page 80 Помещение A Жилое помещение (с або- Помещение нентским устройством и присво- РАСШИРЕНИЯ енными ему приложениями). Радиоприемник XTS B Абонентское устройство. Мобильное приложение 1 C Возможные пользователи, Мобильное приложение 2 подключенные к системе по- средством приложения, локаль- Мобильное приложение 3 но или дистанционно. Мобильное...
- Page 81 Консьерж G Место консьержа (присут- ствует, если должность пред- усмотрена системой). Выберите контакт для начала вызова. Коснитесь иконки для изме- нения имени контакта. Автоответчик видео A Коснитесь иконки для вклю- чения/выключения автоответчи- ка. Избранные Вызывные панели Контакты О правильной настройке ав- тоответчика...
- Page 82 Список Aux A Коснитесь иконки для досту- па к списку вспомогательных контактов. Избранные Вызывные панели Контакты Вспомогательные команды (AUX) позволяют активировать долж- ным образом запрограммиро- ванные контакты для выполне- Автоответчик видео Список Aux Журнал вызовов ния дополнительных команд, помимо стандартного открыва- ния...
- Page 83 Тип вызовов Принятый вызов. 29 января 2018 19:55 Вызывная панель 0 с Выполненный вызов. 28 января 2018 11:23 Вызывная панель 0 с Пропущенный вызов. 07 января 2018 21:03 Вызывная панель Пропущенные вызовы выделяют- 0 с 05 января 2018 14:21 ся в списке. Вызывная...
-
Page 84: Общие Настройки
ОБЩИЕ НАСТРОЙКИ Коснитесь иконки для доступа к списку настроек. Видеонаблюдение Настройки 19:02 Четверг Информация Назад Главная 1 февраля 2018 г. Информация о системе В этом окне содержится ряд по- лезной технической информации Информация о системе для определения характеристик устройства, версии программ- Языки... - Page 85 Дата/Время В этом окне можно установить дату и время для абонентского Автоматиче- Режим Ручной устройства. ский NTP-сервер A Дата и время устанавливают- ся вручную пользователем. Дата/Время 1 февраля 2018 19:02 B Дата и время синхронизи- Континент руются автоматически через Страна/Город интернет;...
- Page 86 B Коснитесь зоны для присва- ивания имени добавляемой ко- Описание Открыть ворота манде AUX. Управление Aux 3 C Выберите из списка команду для присвоения AUX. Назначение Вызывная панель D Выберите из списка назначе- ние команды AUX. Сохраните настройки, нажав кнопку Сохранить. Сохранить...
- Page 87 Автоответчик видео Если в системе предусмотрена вызывная видеопанель, в случае отсутствия абонента устройство позволяет вызывающему записать видеосообщение. Вызывающий может узнать об этой возможности посредством служебного сообщения (например: «В на- стоящее время абонент недоступен, вы можете оставить ему сообщение после звукового сигнала»). Видеосообщение...
- Page 88 B Коснитесь зоны для присвое- ния имени добавляемой IP-виде- Описание окамере. Подключение в режиме реального C Коснитесь зоны и введите время URI Подключение URI для фиксированного строку URI, позволяющую уста- изображения новить соединение с видеока- мерой. D Коснитесь зоны и введите строку...
- Page 89 Экран A Регулирует яркость экрана во время использования. Яркость B Регулирует яркость экрана в Яркость в режиме ожидания режиме ожидания. C Блокирует экран на 20 секунд Чистка экрана для выполнения чистки. Нажмите кнопку Назад для воз- врата к списку настраиваемых параметров.
-
Page 90: Дополнительные Настройки
Дополнительные настройки Этот раздел требует нали- чия специальных знаний о рабо- Служебное сообщение те видеодомофонной системы. Настройка Aux Неправильная настройка может привести к частичной или пол- IP-видеокамеры ной неисправности системы; Фоновые изображения поэтому изменение некоторых параметров разрешено только Экран после ввода пароля установщи- Тоны... - Page 91 Сеть C Кнопка позволяет включать соединение Wi-Fi. Тип соединения Wi-Fi Иконка указывает на то, что Включено ДА НЕТ режим беспроводного соедине- Настроить Wi-Fi ния включен и доступны распо- ложенные ниже разделы, касаю- Режим DHCP Статический щиеся настроек сети. IP-адрес Маска сети Шлюз...
- Page 92 3 На странице отображаются найденные сети; для выполнения СЕТЬ Wi-Fi ДОМА СМИТ поиска вручную нажмите кнопку Открыто ПУБЛИЧНАЯ СЕТЬ WI-FI Защищено Выберите сеть, к которой хотите Добавить сеть WI-FI подключиться. Если сеть не защищена паролем, Поиск подключение будет произведено мгновенно. Сохранить...
- Page 93 Мультимедиа Окно позволяет настроить мак- симальный БИТРЕЙТ, поддер- Аудиокодек живаемый устройством, выбрав одно из доступных значений. Видеокодек Чем больше значения БИ- Битрейт видео для приложе- ния (кб/сек) ТРЕЙТА, тем лучше качество ви- део и тем более загружен канал связи UPLINK. Если...
- Page 94 C Коснитесь пустых разделов и в открывшемся окне установите Время начала время начала и окончания дей- ствия функции. Время окончания Дни недели Пн Вт Ср Чт Пт Сб Вс Сохранить 19:02 Четверг 1 февраля 2018 г. Информация Назад Главная D Коснитесь дней недели, когда заданный...
- Page 95 Настройка пользовательского интерфейса Этот раздел позволяет персона- лизировать внешний вид главной Персонализиро- Главная страница активна По умолчанию страницы. ванная A Выберите отображаемый тип Выберите функции главной страницы главной страницы. B Нажмите кнопку для создания персонализированной главной страницы. 19:02 Четверг 1 февраля 2018 г. Информация...
-
Page 96: Техобслуживание
Техобслуживание (требуемый пароль администрато- ра; пароль по умолчанию: 112233). Перезагрузка устройства A Нажмите кнопку для переза- грузки абонентского устройства. Перезагрузка приложения B Нажмите кнопку для переза- Установить управляемый режим грузки только того приложения, Восстановить настройки по умолчанию которое управляет абонентским устройством.