
Manuels Connexes pour Cameo AUROBEAM 150 UNLIMITED MOVING HEAD WITH 7 X 15W RGBW LEDS CLABEAM150


Sommaire des Matières pour Cameo AUROBEAM 150 UNLIMITED MOVING HEAD WITH 7 X 15W RGBW LEDS CLABEAM150
- Page 1 USER´S MANUAL BEDIENUNGSANLEITUNG MANUEL D`UTILISATION MANUAL DE USUARIO INSTRUKCJA OBSŁUGI MANUALE D‘ USO UNLIMITED ROTATION AUROBEAM 150 UNLIMITED MOVING HEAD WITH 7 X 15W RGBW LEDS CLABEAM150...
-
Page 2: Preventive Measures
Questo dispositivo è stato sviluppato e prodotto in conformità con elevati standard qualitativi che ne garantiscono il regolare funzionamento per molti anni. Leggete attentamente questo manuale d‘uso per utilizzare al meglio il vostro nuovo prodotto Cameo Light. Per maggiori informazioni su Cameo Light consultare la nostra pagina Web WWW.CAMEOLIGHT.COM. -
Page 3: Sicherheitshinweise
ment. If the equipment has a voltage selection switch, connect the equipment to the power outlet only if the equipment values and the mains power values match. If the included power cord or power adapter does not fit in your wall outlet, contact your electrician. 25. -
Page 4: Mesures Préventives
18. Wenn Ihr Gerät nicht mehr ordnungsgemäß funktioniert, Flüssigkeiten oder Gegenstände in das Geräteinnere gelangt sind, oder das Gerät anderweitig beschädigt wurde, schalten Sie es sofort aus und trennen es von der Netzsteckdose (sofern es sich um ein aktives Gerät handelt). Dieses Gerät darf nur von autorisiertem Fachpersonal repariert werden. - Page 5 5. N‘utilisez l‘appareil que pour des applications et de la façon appropriées. 6. Utilisez exclusivement des pieds et des dispositifs de fixation stables et adaptés lorsque l‘appareil est utilisé en installation fixe. Assurez-vous que les fi- xations murales ont été montées correctement, et qu‘elles sont sécurisées. Vérifiez que l‘appareil est installé en toute sécurité, et qu‘il ne peut pas tomber. 7.
-
Page 6: Medidas De Seguridad
ATTENTION ! NIVEAUX SONORES ÉLEVÉS SUR LES PRODUITS AUDIO Cet appareil a été conçu en vue d‘une utilisation professionnelle. L‘utilisation commerciale de cet appareil est soumise aux réglementations et directives en vigueur dans votre pays en matière de prévention d‘accident. En tant que fabricant, Adam Hall est tenu de vous avertir formellement des risques relatifs à... -
Page 7: Środki Ostrożności
33. La acumulación de polvo y otras partículas en el interior del equipo puede causar daños. Dependiendo de las condiciones ambientales (polvo, nicotina, niebla, etc.), deberá realizarse periódicamente el mantenimiento o la limpieza del equipo por personal especializado, para evitar cualquier sobrecalentamiento o fallo de funcionamiento (mantenimiento y limpieza no cubiertos por la garantía). -
Page 8: Misure Precauzionali
24. Przed podłączeniem urządzenia do gniazda elektrycznego należy sprawdzić, czy napięcie i częstotliwość sieci elektrycznej odpowiada wartościom podanym na urządzeniu. Jeśli urządzenie jest wyposażone w przełącznik napięcia, należy podłączyć je do gniazda tylko wówczas, gdy wartości urządzenia odpowiadają wartościom sieci elektrycznej. Jeśli dołączony kabel sieciowy lub dołączony adapter sieciowy nie pasuje do gniazda elektrycznego, należy skontaktować... - Page 9 13. Assicurarsi che non sia possibile la caduta di oggetti nel dispositivo. 14. Azionare il dispositivo esclusivamente con gli accessori appositamente consigliati e previsti dal produttore. 15. Non aprire né modificare il dispositivo. 16. Una volta collegato il dispositivo, verificare tutti i cavi per evitare danni o incidenti, ad esempio per inciampo. 17.
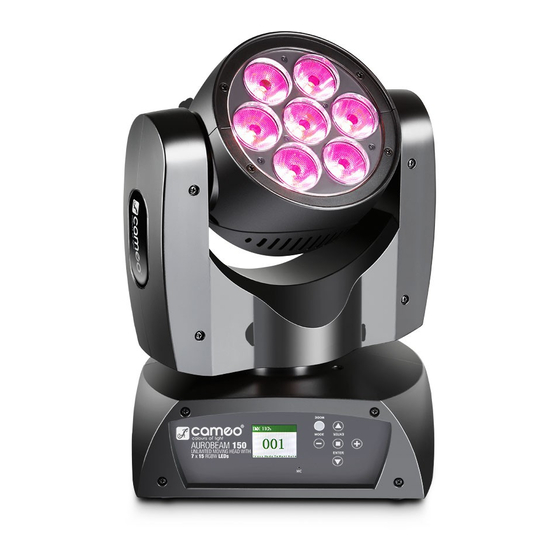
- Page 10 Hz, puissance consommée 130 W, livré avec support de montage en omega. El AuroBeam 150 de Cameo es una cabeza móvil ultrarrápida con movimiento sin fin en horizontal (pan) y vertical (tilt), una resolución de 16 bits y una frecuencia de refresco de 3600 Hz. Está provista de siete LEDs de cuatro colores y 15 W que ofrecen intensos colores RGBW, suaves tonos pastel y luminosos tonos de color blanco, un ángulo de dispersión de 12°...
- Page 11 Urządzenie Cameo AuroBeam 150 to wyjątkowo szybki reflektor Moving Head o nieograniczonym ruchu PAN i TILT, z rozdzielczością 16 bitów i stopniem powtórzeń wynoszącym 3600 Hz. Siedem diod LED Quad o mocy 15 W zapewnia nasycone kolory RGBW, świeże odcienie pasteli i żywą...
- Page 12 Presa di uscita Neutrik powerCON. Serve per l’alimentazione elettrica di altri fari CAMEO. Assicurarsi che il totale della potenza assorbita di tutti i dispositivi collegati all’apparecchio non superi il valore indicato in ampere (A). FUSE HOLDER / SICHERUNGSHALTER / PORTE-FUSIBLE / PORTAFUSIBLES / PODSTAWA BEZPIECZNIKA / PORTAFUSIBILI IMPORTANT INFORMATION: Replace the fuse only with a fuse of the same type and rating.
- Page 13 ENTER: Pressing the ENTER button takes you to the menu level to make changes in the values and to access the sub-menus. Confirm the value changes by pressing ENTER again. Allows you to change the value of a menu item, such as the DMX address, as required. MODE: Durch Drücken der MODE-Taste gelangen Sie in das Auswahl-Menü...
- Page 14 When the spot is properly connected to the mains, the following information appears successively on the display during the startup process: “Software Update, Please Wait...” (for service purposes only), the cameo logo and “Motor Reset Please wait...”. After the motors have been reset, the spotlight is ready for use and changes to the mode that was previously selected.
- Page 15 F. ADVANCED SETTINGS (Advanced Settings) Pressing the MODE button will take you to the selection menu for system settings. Using the arrow buttons , select the menu item “Advanced.Set” (dark background) and confirm by pressing ENTER. You will then be taken to the sub-menu to set the following sub-menu items “Edit Scenes“...
- Page 16 = red LEDs 000 - 255 0 - 100% Green = green LEDs 000 - 255 0 - 100% Blue = blue LEDs 000 - 255 0 - 100% White = white LEDs 000 - 255 0 - 100% 000 - 001 no function Strobe = Strobe Effect...
- Page 17 Sobald der Scheinwerfer korrekt am Stromnetz angeschlossen ist, werden während des Startvorgangs nacheinander verschiedene Informationen im Display angezeigt: „Software Update Please Wait...“ (nur für Servicezwecke), das cameo Logo und „Motor Reset Please wait...“. Nachdem die Motoren zurückgesetzt sind, ist der Scheinwerfer betriebs- bereit und wechselt in die Betriebsart, die zuvor angewählt war.
- Page 18 E. GERÄTEEINSTELLUNGEN (Settings) Durch Drücken der MODE-Taste gelangen Sie in das Auswahl-Menü für Systemeinstellungen (System Settings). Mit Hilfe der Pfeiltasten wählen Sie nun den Menü-Punkt „Settings“ aus (dunkel hinterlegt) und bestätigen mit ENTER. Daraufhin gelangen Sie in das Untermenü zum Einstellen folgender Untermenü-Punkte: Settings Auto Mode LED Geschwindigkeitskontrolle der Licht-Sequenzen in der Auto-...
- Page 19 BETRIEBSARTEN (Operating Mode) H. DMX-BETRIEBSART (DMX) Vier verschiedene DMX-Betriebsarten stehen zur Auswahl: DMX 5-Kanal, 11-Kanal, 19-Kanal und 41-Kanal (DMX 05CH, 11CH, 19CH, 41CH). Die Einstellung erfolgt wie zuvor unter Punkt D. BETRIEBSART EINSTELLEN beschrieben. DMX-Tabellen mit Kanalbelegungen finden Sie auf gesonderten Seiten dieser Anleitung unter DMX-STEUERUNG. I.
- Page 20 Edit Program Hold Time 000 - 255 = Zeitdauer der Szenen, kurz -> lang Step 1 Scene00 - Scene10 = Auswahl Scene00 - Scene10 Step 2 Scene00 - Scene10 = Auswahl Scene00 - Scene10 Step 3 Scene00 - Scene10 = Auswahl Scene00 - Scene10 Step 4 Scene00 - Scene10 = Auswahl Scene00 - Scene10...
-
Page 21: Précision
Dès que le projecteur est correctement relié au secteur, différentes informations se succèdent à l’écran après la mise sous tension : «Software Update Please Wait...» (uniquement pour maintenance), puis le logo Cameo et «Motor Reset Please wait...». Une fois les moteurs réinitialisés, le projecteur est prêt à fonctionner, et se replace dans le mode d’utilisation dans lequel il se trouvait lors de l’extinction. - Page 22 E. PARAMÈTRES SYSTÈME (Settings) Appuyez sur la touche MODE pour passer en mode de sélection de paramètres système (System Settings). Avec les touches Flèche choisissez l’élément de menu «Settings» (il passe en surbrillance sur fond noir), puis vali- dez en appuyant sur ENTER. Vous pouvez dès lors accéder au sous-menu, afin d’intervenir sur les éléments suivants: Paramètres Auto Mode LED AM LedSpd...
- Page 23 System Info Time.Info = Durée totale de fonctionnement en heures Head.Temp = Température en °C/°F Temp.Info Temp.C/F = Celsius / Fahrenheit Software.V = Sofware Version MODES DE FONCTIONNEMENT (Operating Mode) H. MODE DMX (DMX) Quatre modes DMX différents sont à votre disposition : DMX 5 canaux, 11 canaux, 19 canaux et 41 canaux (DMX 05CH, 11CH, 19CH, 41CH).
- Page 24 Dès que le nombre de Scènes désiré (10 différentes au maximum) est atteint, vous pouvez enregistrer cette succession comme Programme Utilisateur (User). Avec les touches Flèche, choisissez l’élément de menu «Advanced.Set» (il passe en surbrillance sur fond noir), puis validez en appuyant sur ENTER. L’écran indique alors les mentions «Edit Scenes» et «Edit Program».
- Page 25 Una vez conectado el foco a la red eléctrica, durante el proceso de arranque se mostrarán los siguientes mensajes en la pantalla: «Software Update Please Wait...» (sólo para mantenimiento), el logotipo de Cameo y «Motor Reset Please wait...». Al terminar el proceso de reinicio de los motores, el foco estará operativo y volverá al modo previamente seleccionado.
- Page 26 E. CONFIGURACIÓN DEL SISTEMA (Settings) Pulse el botón MODE para acceder al menú de configuración del sistema (System Settings). Con los botones de flecha seleccione la opción de menú «Settings» (quedará resaltada) y confirme con el botón ENTER. Accederá al submenú...
- Page 27 MODO OPERATIVO (Operating Mode) H. MODO DMX (DMX) Puede elegir entre cuatro modos DMX: DMX 5 canales, 11 canales, 19 canales y 41 canales (DMX 05CH, 11CH, 19CH, 41CH). Para realizar los ajustes, siga el procedimiento descrito anteriormente en el apartado D. AJUSTE DEL MODO OPERATIVO.
- Page 28 Edit Program Hold Time 000 - 255 = Duración de las escenas, corta -> larga Step 1 Scene00 - Scene10 = Seleccionar Scene00 - Scene10 Step 2 Scene00 - Scene10 = Seleccionar Scene00 - Scene10 Step 3 Scene00 - Scene10 = Seleccionar Scene00 - Scene10 Step 4 Scene00 - Scene10...
- Page 29 Po prawidłowym podłączeniu reflektora do sieci elektrycznej podczas procedury uruchamiania na wyświetlaczu kolejno pojawiają się różne informacje: „Software Update Please Wait...” (tylko do celów serwisowych), logo Cameo oraz „Motor Reset Please wait...”. Po zresetowaniu silników reflektor jest gotowy do pracy i przełącza się na tryb, który ostatnio wybrano.
- Page 30 Settings Auto Mode LED Kontrola prędkości sekwencji świetlnych w automatycznym AM LedSpd 000–255 Speed trybie pracy Auto Mode Kontrola prędkości sekwencji ruchu w automatycznym trybie AM MotorSpd 000–255 Motor Speed pracy Pan.Rev = Pan Reverse NO/YES Odwrócenie kierunku ruchu PAN Tilt.Rev = Tilt Reverse NO/YES...
- Page 31 TRYBY PRACY (Operating Mode) H. TRYB PRACY DMX (DMX) Dostępne są cztery różne tryby pracy DMX: DMX 5-kanałowy, 11-kanałowy, 19-kanałowy i 41-kanałowy (DMX 05CH, 11CH, 19CH, 41CH). Tryb należy ustawić zgodnie z opisem podanym w punkcie D. USTAWIANIE TRYBU PRACY. Tabele DMX z przyporządkowaniem kanałów podano na osobnych stronach niniejszej instrukcji w części STEROWANIE DMX.
- Page 32 Edit Program Hold Time 000–255 = czas trwania scen, krótko -> długo Step 1 Scene00–Scene10 = wybór Scene00–Scene10 Step 2 Scene00–Scene10 = wybór Scene00–Scene10 Step 3 Scene00–Scene10 = wybór Scene00–Scene10 Step 4 Scene00–Scene10 = wybór Scene00–Scene10 Step 5 Scene00–Scene10 = wybór Scene00–Scene10 Step 6 Scene00–Scene10 = wybór Scene00–Scene10...
- Page 33 brak funkcji 001–008 Zaciemnienie makra kolorów, zmiana 009–188 Makra kolorów kolorów Chase Przenikanie kolorów 189–211 Zmiana kolorów Sterowanie muzyką 212–232 Przenikanie kolorów 233–255 Sterowanie muzyką Chase.Sp = Prędkość programu 000–255 0–100% 000–010 brak funkcji Obracanie w przód, szybko -> Funkcja zapętlenia ruchu PAN 011–125 wolno PANConRot...
- Page 34 Settings Velocità LED, Controllo della velocità delle sequenze luminose nella modalità AM LedSpd 000 - 255 modo Auto di funzionamento automatica Velocità motore, Controllo della velocità delle sequenze di movimento nella AM MotorSpd 000 - 255 modo Auto modalità di funzionamento automatica Pan.Rev = Inversione pan NO / YES...
- Page 35 I. FUNZIONAMENTO SLAVE (Slave) L’impostazione viene effettuata nel modo descritto in precedenza al punto D. IMPOSTAZIONE DELLA MODALITÀ DI FUNZIONAMENTO. Collegare le unità slave e master (dello stesso modello) utilizzando un cavo DMX. Nell’unità Master attivare una delle modalità di funzionamento standalone (Auto, User, Sound, Static). Ora l’unità slave segue l’unità master. J.
- Page 36 Edit Program Hold Time 000 - 255 = Durata delle scene, breve -> lunga Step 1 Scene00 - Scene10 = Selezione Scene00 - Scene10 Step 2 Scene00 - Scene10 = Selezione Scene00 - Scene10 Step 3 Scene00 - Scene10 = Selezione Scene00 - Scene10 Step 4 Scene00 - Scene10 = Selezione Scene00 - Scene10...
- Page 37 Non operativo 001 - 008 Oscuramento Macro colori, cambio colore, 009 - 188 Macro colori Chase dissolvenza colori, 189 - 211 Cambio colore controllo tramite musica 212 - 232 Dissolvenza colori 233 - 255 controllo tramite musica Chase.Sp = Velocità programma 000 - 255 0 - 100% 000 - 010...
- Page 38 no movement Movement Pattern 1 (eight ) Movement Pattern 2 (ellipse) Auto Mode Movement Pattern 3 (random) Sound Mode Auto Mode Motor Speed (slow to fast) / Sensitivity 11-CH Mode Pan Rotation no function clockwise pan rotation (fast to slow) no movement counter clockwise pan rotation (slow to fast) Mechanic...
- Page 39 Strobe open Strobe closed Puls Random, slow -> fast Ramp up Random, slow -> fast CH13 Strobe Ramp down Random, slow -> fast Random Strobe Effect, slow fast Strobe Break Effekt, 5s…..1s (Very Short Flash) Strobe slow -> fast 0Hz - 30Hz Strobe open no function green...
- Page 40 41-CH Mode Pan Rotation no function clockwise pan rotation (fast to slow) no movement counter clockwise pan rotation (slow to fast) Tilt Rotation Mechanic no function Control clockwise tilt rotation (fast to slow) no movement counter clockwise tilt rotation (slow to fast) Pan Fine Tilt Fine Motor Running Speed (fast to slow)
- Page 41 no function green blue bright blue cyan turquoise cold green warm green Colour Macro CH38 pink Mode magenta purple orange yellow warm white cold white auto colour change auto colour fading Sound Mode (Colour change) no function Auto Program 1 Auto Program 2 Auto Program 3 Auto Program 4...
-
Page 42: Dmx Connection
DMX TECHNOLOGY / DMX-TECHNIK / TECHNIQUE DMX / TECNOLOGÍA DMX / TECHNIKA DMX / TECNOLOGIA DMX DMX-512 DMX (Digital Multiplex) is the designation for a universal transmission protocol for communications between corresponding devices and controllers. A DMX controller sends DMX data to the connected DMX device(s). - Page 43 DMX-512 DMX (Digital Multiplex) ist die Bezeichnung für ein universelles Übertragungsprotokoll für die Kommunikation zwischen entsprechenden Geräten und Controllern. Ein DMX-Controller sendet DMX-Daten an das/die angeschlossene(n) DMX-Gerät(e). Die DMX-Datenübertragung erfolgt stets als serieller Datenstrom, der über die an jedem DMX-fähigen Gerät vorhandenen DMX IN- und DMX OUT- Anschlüsse (XLR-Steckverbinder) von einem angeschlossenen Gerät an das nächste weitergeleitet wird, wobei die maximale Anzahl der Geräte 32 nicht überschreiten darf.
- Page 44 DMX-512 Le terme DMX (Digital Multiplex) désigne un protocole de transport universel permettant la communication entre des appareils et des contrôleurs à ce format. Un contrôleur DMX envoie des données DMX aux appareils DMX qui lui sont connectés. Les données DMX sont transportées sous forme d'un flux série, renvoyé...
- Page 45 DMX512 DMX (Digital Multiplex) es el nombre de un protocolo universal utilizado como medio de comunicación entre dispositivos y controladores. El controlador DMX envía datos DMX a los equipos DMX conectados. Los datos DMX se envían como datos serie que se transmiten de equipo a equipo a través de los conectores XLR «DMX IN»...
- Page 46 DMX-512 DMX (Digital Multiplex) to nazwa uniwersalnego protokołu transmisji do komunikacji między odpowiednimi urządzeniami a kontrolerami. Kontroler DMX wysyła dane DMX do podłączonych urządzeń DMX. Transmisja danych DMX następuje zawsze w formie szeregowego strumienia danych, który jest przekazywany z jednego urządzenia do następnego przez znajdujące się w każdym urządzeniu obsługującym standard DMX złącza „DMX IN”...
-
Page 47: Collegamento Dmx
DMX512 DMX (Digital Multiplex) è la sigla di un protocollo di trasmissione universale per la comunicazione tra dispositivi e controller. Un controller DMX invia dati DMX ai dispositivi DMX collegati. I dati DMX vengono sempre trasmessi come flusso di dati seriale, che viene inoltrato da un dispositivo collegato al successivo attraverso le connessioni (connettori XLR) DMX IN e DMX OUT presenti per ogni dispositivo DMX compatibile, per un massimo di 32 dispositivi. - Page 48 SETTING UP AND MOUNTING / AUFSTELLUNG UND MONTAGE / MISE EN PLACE ET MONTAGE / INSTALACIÓN Y MONTAJE / USTAWIENIE I MONTAŻ / INSTALLAZIONE E MONTAGGIO Thanks to the integrated rubber feet, the spot can be placed in a suitable place on the stage floor etc. Mounting on a truss is performed with the help of the supplied omega mounting bracket (truss clamp not in- cluded).
- Page 49 Modellbezeichnung: CLABEAM150 Produktart: LED Moving Light Typ: Moving Head Farbspektrum: RGBW LED Anzahl: LED Typ: 15 W Wiederholrate: 3600 Hz Abstrahlwinkel: 12° DMX-Eingang: 3-Pol XLR männlich 5-Pol XLR männlich DMX-Ausgang: 3-Pol XLR weiblich 5-Pol XLR weiblich DMX-Modus: 5-Kanal, 11-Kanal, 19-Kanal, 41-Kanal DMX Funktionen: Pan/Tilt, Pan/Tilt fein, Endlos Pan/Tilt, Pixel Control Auto Programme, Musiksteuerung, Farbmakros, Stroboskop, RGBW, Pixel Control...
- Page 50 Angle de TILT : illimité Contrôles : Mode, Enter, Up, Down, +, - Indicateurs : Écran LCD rétro-éclairé Tension Secteur : 100 - 240 Volts, 50/60 Hz Consommation Électrique : 130 W Éclairement lumineux (à 1 m) : 50000 lux Branchement secteur : entrée et renvoi sur connecteur Neutrik PowerCon Fusible :...
- Page 51 Oznaczenie modelu: CLABEAM150 Rodzaj produktu: LED Moving Light Typ: Moving Head Spektrum kolorów: RGBW Liczba diod LED: Typ diod LED: 15 W Stopień powtórzeń: 3600 Hz Kąt wiązki światła: 12° Wejście DMX: 3-stykowe XLR męskie 5-stykowe XLR męskie Wyjście DMX: 3-stykowe XLR żeńskie 5-stykowe XLR żeńskie Tryb DMX:...
- Page 52 Angolo del giro orizzontale (pan): Continuo Angolo del giro verticale (tilt): Continuo Elementi di comando: Mode, Enter, Su, Giù, +, − Indicatori: Display LCD illuminato Tensione di esercizio: 100 - 240 V AC / 50 - 60 Hz Potenza assorbita: 130 W Potenza di illuminazione (a 1 m): 50.000 lx...
- Page 53 GARANTÍA DEL FABRICANTE Y LIMITACIÓN DE RESPONSABILIDAD Consulte nuestras condiciones de garantía y limitaciones de responsabilidad en: http://www.adamhall.com/media/shop/downloads/documents/ma- nufacturersdeclarations.pdf. En caso de necesitar servicio técnico, póngase en contacto con Adam Hall GmbH, Daimlerstraße 9, 61267 Neu Anspach (Alemania); correo electrónico Info@adamhall.com; +49 (0)6081 / 9419-0. ELIMINACIÓN CORRECTA DE ESTE PRODUCTO (Aplicable en la Unión Europea y en los países europeos que dispongan de un sistema de recogida selectiva) El símbolo que aparece sobre el producto o en la documentación adjunta indica que al final de la vida útil del equipo, no deberá...
- Page 56 WWW.CAMEOLIGHT.COM Adam Hall GmbH | Daimlerstrasse 9 | 61267 Neu-Anspach | Germany REV: 02 Tel. +49(0)6081/9419-0 | Fax +49(0)6081/9419-1000 web : www.adamhall.com | e-mail : mail@adamhall.com...