Table des Matières

Publicité

Les langues disponibles
  • FR

Les langues disponibles

Liens rapides

ZAPTEC Pro
USER MANUAL
MANUEL D'UTILISATION
BEDIENUNGSANLEITUNG
MANUALE D'USO
GEBRUIKERSHANDLEIDING

Publicité

Table des Matières
loading

Sommaire des Matières pour ZAPTEC Pro

  • Page 1 ZAPTEC Pro USER MANUAL MANUEL D’UTILISATION BEDIENUNGSANLEITUNG MANUALE D’USO GEBRUIKERSHANDLEIDING...
  • Page 3 Use your ZAPTEC Pro with a charging pass or through our ZAPTEC app to approve users in the installation. This will provide you with an overview of your charging history via our cloud-based service (ZAPTEC Portal).
  • Page 4: Table Des Matières

    How to Start Charging with Authentication How to Stop Charging Connecting a Charging Pass to your User How to Monitor the Charging Station (ZAPTEC Portal) Adding Users to the Installation Locking the Charging Cable for the Charging Stations Set Lighting Strength for the Status Indicator...
  • Page 5: Safety Instructions

    If you fail to follow and implement all the specified instructions and procedures, you will invalidate the warranty and Zaptec Charger AS will not be liable for any claims for compensation. Read these instructions carefully and examine the equipment to familiarise yourself with the product prior to use.
  • Page 6: Technical Specifications

    Protection class II (4kV AC and 6kV impulse, insulation) Theft protection Overvoltage category III (4kV) The front cover of the ZAPTEC Pro can only be opened using a special tool. The charging cable Integration services can be locked permanently to the charging Third-party integration alternatives station.
  • Page 7 OCPP 1.6J Message subscription *32A is available but may be restricted by the condition of the vehicle’s battery and temperature increases at the charging station.
  • Page 8: Zaptec Pro

    ZAPTEC Pro Open the front cover here Status indicator (Z) SmartKey RFID sone SmartKey Column Electrical outlet IEC62196-1/2, Mode 3 Type 2 Self-closing protective cover Status Indicators on the Charging Station The status of the charging station is shown by the status indicator (Z) using the following colours:...
  • Page 9: How To Start Charging

    5. The status indicator (Z) will now flash yellow to indicate that it is awaiting authentication. 6. Hold the charging pass up to the RFID zone; see the illustration in the section ZAPTEC Pro. 7. The status indicator will flash green once authentication is approved.
  • Page 10: How To Stop Charging

    How to Monitor the Charging Station (ZAPTEC Portal) You can log in via ZAPTEC Portal to see all your charging stations and all the charging stations that you are registered to use. If you are the owner of an installation, you can monitor all use, and you can use this information to share the electricity cost fairly.
  • Page 11: Locking The Charging Cable For The Charging Stations

    The charging cable can be locked permanently to the charging station. This feature is activated via the ZAPTEC app. 1. Log in to the ZAPTEC app (can be downloaded from App Store/Google Play). 2. Go to settings and select the desired charging station.
  • Page 12: Troubleshooting

    • Check that the SSID and the password for the WiFi are correct. • Make sure 2.4 GHz is activated so that ZAPTEC Pro obtains a network connection. See Installation requirements, page 1 1. • Enter the SSID and password manually by selecting Other in the network list..
  • Page 13 • Authentication failed – Check that the RFID tag/charging card is connected to your user profile. • Authentication failed – Check in the ZAPTEC Portal that your user has access to charge on the charging station and/or installation concerned. Steady red light •...
  • Page 14: Checking The Fuses In The Charging Station

    3. If any of the fuses have tripped, remove the fuse cover and flip the fuses up again. Fit the fuse cover as in step 2 and attach the front cover again. * If the charging station is mounted on a ZAPTEC Column, use SmartKey Column (supplied with the charging column) to open the charging station.
  • Page 15: Warranty

    Support and Repairs If you discover an issue, please read the Troubleshooting section prior to contacting your distributor/ installer. Zaptec Charger AS collects data from the product via the network. More information on our privacy guidelines can be found at zaptec.com/privacy.
  • Page 17 Utilisez votre ZAPTEC Pro avec une carte de recharge ou via notre application ZAPTEC pour autoriser les utilisateurs dans l’installation. Vous obtiendrez ainsi un aperçu de votre historique de facturation via notre...
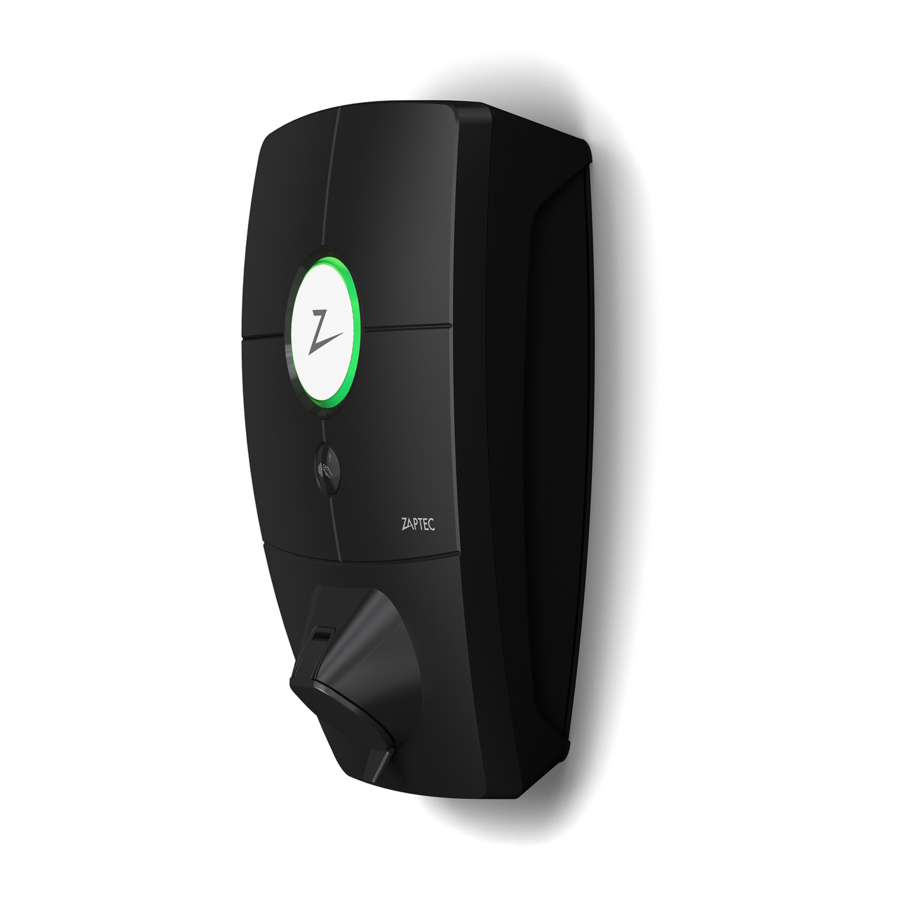
  • Page 18 Consignes de sécurité Caractéristiques techniques ZAPTEC Pro Indicateurs d’état sur la borne de recharge Type de câble pour le ZAPTEC Pro Comment démarrer la recharge Comment démarrer la recharge avec l’authentification Comment arrêter la recharge Association d’une carte de recharge à votre profil d’utilisateur 24 Comment superviser la borne de recharge (Portail ZAPTEC) Ajout d’utilisateurs à...
  • Page 19: Consignes De Sécurité

    La non-observation et la non-mise en œuvre de toutes les prescriptions et procédures annule toute garantie et libère la société Zaptec Charger AS de toute responsabilité et de toute réclamation. Nous vous invitons à lire attentivement et dans leur intégralité...
  • Page 20: Caractéristiques Techniques

    Protection antivol H : 392 mm, L : 258 mm, P : 1 12 mm Le capot avant du ZAPTEC Pro ne peut être Poids : environ 5 kg (plaque arrière comprise) ouvert qu’avec un outil spécial. Le câble de recharge peut être verrouillé...
  • Page 21 Caractéristiques techniques Classe de protection IP54, intérieur et extérieur IK 10, protection contre les chocs UL94 – 5VB,indice d’inflammabilité Résistance aux UV Protection électrique Classe de protection II (impulsions 4kV CA et 6kV, isolement) Catégorie de surtension III (4 kV) Services d’intégration Options d’intégration de tiers (API, Webhooks) OCPP 1.6J...
  • Page 22: Zaptec Pro

    L’authentification a échoué (pour en savoir plus, ROUGE reportez-vous à la section Dépannage) reportez-vous à la section Dépannage) Démarrage du système JAUNE En attente d’authentification En attente du portail ZAPTEC Véhicule ajouté à la file d’attente Mise à jour du firmware VIOLET...
  • Page 23: Comment Démarrer La Recharge

    Pour effectuer la recharge avec authentification, il est nécessaire que vous ayez enregistré un profil d’utilisateur via le portail ZAPTEC et que votre profil d’utilisateur ait eu accès (via le portail ZAPTEC) à la borne/l’installation de recharge. La carte de recharge est associée à votre profil d’utilisateur.
  • Page 24: Comment Arrêter La Recharge

    Association d’une carte de recharge à votre profil d’utilisateur ZAPTEC Pro prend en charge les cartes de recharge les plus couramment utilisées (Mifare Classic). Si vous disposez d’un code lisible visuellement, celui-ci peut être ajouté via le portail ZAPTEC ou en scannant la carte de recharge à...
  • Page 25: Ajout D'utilisateurs À L'installation

    3. Saisissez le code PIN de la borne de recharge concernée, puis activez le verrouillage du câble pour cette borne de recharge. Cette fonction n’est actuellement disponible que dans la version Android de l’application ZAPTEC. Réglage de la luminosité de l’indicateur d’état •...
  • Page 26: Dépannage

    Dépannage Les avertissements/messages d’erreur sont affichés dans le portail ZAPTEC/l’application ZAPTEC. Problème Solution Impossible de se connecter Réinitialisez le mot de passe en cliquant sur ‘Mot de passe oublié’ au portail ZAPTEC Impossible de créer l’installa- Contactez l’assistance ZAPTEC pour accéder à la création d’instal- tion via le portail ZAPTEC lations.
  • Page 27 Couleur Signification INDICATEUR La borne de recharge n’a pas été activée dans le portail ZAPTEC, aucune ÉTEINT alimentation du circuit d’alimentation, connexion incorrecte ou produit défectueux. Vérifiez la protection série dans l’armoire de distribution. Pas de mise à jour effectuée pendant la recharge.
  • Page 28: Contrôle Des Fusibles Dans La Borne De Recharge

    Placez le couvercle des fusibles comme décrit à l’étape 2 et remettez le capot avant en place. * Si la borne de recharge est installée sur une colonne ZAPTEC, utilisez la SmartKey Column (fournie avec la colonne de recharge) pour ouvrir la borne de recharge.
  • Page 29: Garantie

    Si vous rencontrez un problème avec votre installation, nous vous invitons à consulter au préalable la section Dépannage avant de contacter votre distributeur/installateur. Zaptec Charger AS recueille des données sur le produit via le réseau. Des informations supplémentaires sur nos directives en termes de protection de la vie privée sont disponibles sur...
  • Page 31 Ein norwegisches Ladesystem. Das System ist mit allen Stromnetzen und mit allen Arten von wiederaufladbaren Fahrzeugen kompatibel.* Mit ZAPTEC Pro können Sie Ihr Fahrzeug sicher, einfach und effizient aufladen. Die Ladestation verteilt den verfügbaren Ladestrom an alle Ladestationen. Nutzen Sie Ihre ZAPTEC Pro mit einem Ladepass oder über unsere ZAPTEC App, um Benutzer in der Installation...
  • Page 32 Inhaltsverzeichnis Sicherheitshinweise Technische Spezifikationen ZAPTEC Pro Statusanzeigen an der Ladestation Kabeltyp für ZAPTEC Pro Beginn des Ladevorgangs Beginn des Ladevorgangs mit Authentifizierung Stoppen des Ladevorgangs Verbinden eines Ladepasses mit Ihrem Benutzer Überwachung der Ladestation (ZAPTEC Portal) Hinzufügen von Benutzern zur Installation Verriegelung des Ladekabels für die Ladestationen...
  • Page 33: Sicherheitshinweise

    Bevor Sie dieses Produkt verwenden oder warten, ist es wichtig, die folgenden Sicherheitshinweise zu lesen. Wenn Sie nicht alle spezifizierten Anweisungen und Verfahren befolgen und umsetzen, erlischt die Garantie und Zaptec Charger AS ist nicht haftbar für jegliche Schadensersatzansprüche. Lesen Sie diese Hinweise sorgfältig durch und prüfen Sie das Gerät, um sich vor der Verwendung mit dem Produkt vertraut...
  • Page 34: Technische Spezifikationen

    Technische Spezifikationen Diebstahlschutz ZAPTEC Pro ist eine Wand- oder Säulenladestation mit Wechselstrom nach IEC Die Frontabdeckung des ZAPTEC Pro lässt sich 61851-1, EVSE-Modus 3. nur mit einem Spezialwerkzeug öffnen. Das Ladekabel kann mit der Ladestation dauerhaft Abmessungen und Gewicht verriegelt werden.
  • Page 35 Technische Spezifikationen IP54, für den Innen- und Außenbereich. IK10 Schlagschutz UL94 - 5VB Brennbarkeitsklasse UV-beständig Elektrischer Schutz Schutzklasse II (4kV AC und 6 kV Stossspannung, Isolierung) Überspannungskategorie III (4 kV) Integrationsdienste Optionen für die Anbindung an Drittsysteme (API, Webhooks) OCPP 1,6J Message Subscription *32A ist verfügbar, kann aber durch den Zustand der Fahrzeugbatterie und...
  • Page 36: Zaptec Pro

    Laden Fehler (weitere Informationen Authentifizierung fehlgeschlagen (weitere Informationen finden Sie im Abschnitt Fehlerbe- finden Sie im Abschnitt hebung) Fehlerbehebung) Inbetriebnahme des Systems GELB Warten auf Authentifizierung Warten auf ZAPTEC Portal Fahrzeug zur Warteschlange hinzugefügt Aktualisierung der Firmware LILA...
  • Page 37: Beginn Des Ladevorgangs

    1. Befolgen Sie die Schritte 1–4 in Beginn des Ladevorgangs. 5. Die Statusanzeige (Z) blinkt nun gelb, um anzuzeigen, dass sie auf die Authentifizierung wartet. 6. Halten Sie den Ladepass an die RFID-Zone; siehe Abbildung im Abschnitt ZAPTEC Pro. 7. Die Statusanzeige blinkt grün, sobald die Authentifizierung genehmigt wurde.
  • Page 38: Stoppen Des Ladevorgangs

    Verbinden eines Ladepasses mit Ihrem Benutzer ZAPTEC Pro unterstützt die am häufigsten verwendeten Ladepässe (Mifare Classic). Wenn Sie einen optisch lesbaren Code haben, kann dieser über das ZAPTEC Portal oder durch Scannen des Ladepasses über die Ladestation wie unten beschrieben hinzugefügt werden. Ihr Benutzerprofil muss Zugriff auf die Installation haben, die Sie verwenden möchten.
  • Page 39: Festlegen Der Beleuchtungsstärke Für Die Statusanzeige

    Das Ladekabel kann dauerhaft an der Ladestation verriegelt werden. Diese Funktion wird über die ZAPTEC App aktiviert. 1. In der ZAPTEC App einloggen (kann im App Store / Google Play heruntergeladen werden). 2. Zu den Einstellungen gehen und die gewünschte Ladestation auswählen.
  • Page 40: Fehlerbehebung

    Breitbandgeschwindigkeit verzögern können. • Überprüfen, ob die SSID und das Passwort für das WLAN korrekt sind. • Sicherstellen, dass 2,4 GHz aktiviert ist, damit ZAPTEC Pro eine Netzwerkverbindung erhält. Siehe Installationsanforderungen, Seite 1 1. • SSID und Passwort manuell eingeben, durch Auswahl von Sonstiges in der Netzwerkliste.
  • Page 41 Farbe Bedeutung KEIN LICHT Ladestation wurde im ZAPTEC Portal nicht aktiviert, kein Strom aus dem Stromkreis, falscher Anschluss oder Produktfehler. Seriellen Schutz im Verteilerschrank überprüfen. Während des Ladevorgangs nicht aktualisiert. LILA • Überprüfen, ob das Ladekabel korrekt in die Ladestation gesteckt wurde.
  • Page 42: Überprüfen Der Sicherungen In Der Ladestation

    Sicherungen wieder nach oben drücken. Die Sicherungsabdeckung wieder wie in Schritt 2 anbringen und die Frontabdeckung wieder andrücken. * Wenn die Ladestation an einer ZAPTEC Säule montiert ist, verwenden Sie die SmartKey Säule (mit der Ladesäule geliefert), um die Ladestation zu öffnen.
  • Page 43: Garantie

    Wenn Sie ein Problem feststellen, lesen Sie bitte den Abschnitt Fehlerbehebung, bevor Sie sich an Ihren Händler / Installateur wenden. Zaptec Charger AS sammelt Daten aus dem Produkt über das Netzwerk. Weitere Informationen zu unseren Datenschutzrichtlinien finden Sie unter zaptec.com/privacy.
  • Page 45 Ciò consente di ottenere una cronologia delle proprie ricariche attraverso il nostro servizio basato su cloud (portale ZAPTEC). Con ZAPTEC Pro viene fornita anche una stazione di ricarica che riceve regolarmente gli aggiornamenti del software dal nostro servizio cloud, in modo da mantenere sempre aggiornato il caricabatterie.
  • Page 46 Indice dei contenuti Istruzioni di sicurezza Specifiche tecniche ZAPTEC Pro Indicatori di stato della stazione di ricarica Tipo di cavo per ZAPTEC Pro Avviamento della ricarica Avviamento della ricarica con autenticazione Interruzione della ricarica Collegare la scheda RFID per l’autentificazione al sistema Monitoraggio della stazione di ricarica (portale ZAPTEC) Aggiunta di utenti all’installazione...
  • Page 47: Istruzioni Di Sicurezza

    è importante leggere le seguenti istruzioni di sicurezza. Il mancato rispetto e la mancata esecuzione di tutte le istruzioni e procedure prescritte invalidano la garanzia ed esonerano Zaptec Charger AS da qualsiasi rivendicazione di responsabilità. Leggere attentamente le presenti istruzioni ed esaminare l’apparecchio per acquisire familiarità...
  • Page 48: Specifiche Tecniche

    Protezione antifurto IEC 61851-1, EVSE Mode 3. Il coperchio anteriore di ZAPTEC Pro può essere Dimensioni e peso aperto solo mediante un apposito utensile. Il A: 392 mm, L: 258 mm, P: 1 12 mm cavo di ricarica può...
  • Page 49 Specifiche tecniche Protezione elettrica Classe di protezione II (4 kV CA e 6 kV impulsi, isolamento) Categoria di sovratensione III (4 kV) Servizi integrativi Opzioni di integrazione per terzi (API, Webhooks) OCPP 1.6J Iscrizione a servizio di messaggistica *opzione 32A disponibile, potrebbe però essere limitata dalle condizioni della batteria del veicolo e da aumenti di temperatura in corrispondenza della stazione di ricarica.
  • Page 50: Zaptec Pro

    Autenticazione non riuscita (vedere il capitolo ROSSO Risoluzione dei problemi per ulteriori dettagli) ione dei problemi per ulteriori dettagli) Avviamento del sistema GIALLO In attesa di autenticazione In attesa del portale ZAPTEC Veicolo aggiunto alla coda Aggiornamento del firmware VIOLA...
  • Page 51: Avviamento Della Ricarica

    Cavo Per poter effettuare la ricarica, è necessario un cavo con spina di tipo 2 per poter essere collegato alla stazione ZAPTEC Pro dotata di una presa di tipo 2. Avviamento della ricarica (senza autenticazione) 1. Verificare che l’indicatore di stato (Cerchio) si accenda in verde.
  • Page 52: Interruzione Della Ricarica

    Il modello ZAPTEC Pro supporta schede RFID più comunemente utilizzati (Mifare Classic). Se si dispone di un codice leggibile, questo può essere aggiunto attraverso il portale ZAPTEC o scansionando il pass di ricarica utilizzando la stazione di ricarica come descritto di seguito. Il profilo utente deve avere accesso all’installazione che si desidera utilizzare.
  • Page 53: Aggiunta Di Utenti All'installazione

    3. Digitare il codice PIN della stazione di ricarica desiderata e attivare il blocco del cavo per questa stazione. Questa funzione è attualmente disponibile solo nella versione Android dell’app ZAPTEC. Impostazione dell’intensità di illuminazione dell’indicatore di stato • Accedere all’app ZAPTEC.
  • Page 54: Risoluzione Dei Problemi

    • Verificare che l’SSID e la password del WiFi siano corretti. • Assicurarsi che l’opzione 2.4 GHz sia attivata in modo da ottenere la connessione di rete di ZAPTEC Pro. Vedere Requisiti di installazione, a pag. 1 1. • Immettere manualmente l’SSID e la password selezionando Other (Altro) nell’elenco di reti.
  • Page 55 Colore Significato NESSUNA LUCE La stazione di ricarica non è stata attivata nel Portale ZAPTEC, nessuna alimentazione dal circuito di alimentazione, connessione errata o guasto del prodotto. Controllare la protezione seriale nell’armadio di distribuzione. Non aggiornato durante la ricarica. LIOLA •...
  • Page 56: Controllo Dei Fusibili Della Stazione Di Ricarica

    Montare il coprifusibile come indicato nel passaggio 2 e applicare nuovamente il coperchio anteriore. * Se la stazione di ricarica è montata su una colonnina ZAPTEC, utilizzare la Colonnina SmartKey (in dotazione con la colonnina di ricarica) per aprire la stazione di ricarica.
  • Page 57: Garanzia

    Assistenza e riparazioni Qualora si dovessero riscontrare problemi, consultare il capitolo Risoluzione dei problemi prima di contattare il distributore/installatore. Zaptec Charger AS raccoglie dati dal prodotto tramite la rete. Per maggiori informazioni sulle nostre linee guida sulla privacy consultare l’indirizzo zaptec.com/privacy.
  • Page 59 Een Noors oplaadsysteem. Het systeem is compatibel met alle elektriciteitsnetten en met alle soorten oplaadbare voertuigen.* De ZAPTEC Pro stelt u in staat om uw voertuig veilig, eenvoudig en efficiënt op te laden. Het laadstation verdeelt de beschikbare laadstroom over een aantal laadstations.
  • Page 60 Hoe laadt u op met authenticatie Hoe stopt u met opladen Een laadpas aansluiten op uw gebruiker Hoe controleert u het laadstation (ZAPTEC Portal) Gebruikers toevoegen aan de installatie De laadkabel voor de laadstations vergrendelen Lichtsterkte voor de statusindicator instellen...
  • Page 61: Veiligheidsvoorschriften

    Lees onderstaande veiligheidsinstructies door alvorens dit product te gebruiken of te onderhouden. Als u niet alle gespecificeerde instructies en procedures volgt en uitvoert, vervalt de garantie en is Zaptec Charger AS niet langer aansprakelijk voor eventuele schadeclaims. Lees deze instructies zorgvuldig door en bestudeer de apparatuur om het product vóór gebruik te leren kennen.
  • Page 62: Technische Specificaties

    Technische specificaties Geïntegreerde vermogensmeter De ZAPTEC Pro is een oplaadstation voor wisselstroom met wand- of kolombevestiging MID-getest en gekalibreerd. in overeenstemming met IEC 61851-1, EVSE Diefstalbeveiliging mode 3. De voorkap van de ZAPTEC Pro kan Afmetingen en gewicht uitsluitend worden geopend met een speciaal H: 392 mm, B: 258 mm, D: 1 12 mm gereedschap.
  • Page 63 Technische specificaties UL94 - 5VB ontvlambaarheidsklasse UV-bestendig Elektrische bescherming Beschermingsklasse II (4 kV AC en 6 kV impuls, isolatie) Overspanningscategorie III (4 kV) Integratiediensten 3e deel integratieopties (API, Webhooks) OCPP 1.6J Abonnement op berichten *Er is 32 A beschikbaar, maar dit kan worden beperkt door de conditie van de batterij van het voertuig en temperatuurstijgingen bij het laadstation.
  • Page 64: Zaptec Pro

    Fout (zie de paragraaf Problee- Authenticatie mislukt (zie de paragraaf Problee- ROOD moplossing voor meer informatie) moplossing voor meer informatie) Het systeem start op GEEL In afwachting van authenticatie In afwachting van ZAPTEC Portal Voertuig toegevoegd aan wachtrij Firmware wordt bijgewerkt PAARS...
  • Page 65: Hoe Start U Met Opladen

    Kabel De ZAPTEC Pro heeft een Type 2-laadpunt nodig om u te kunnen laten opladen Hoe start u met opladen 1. Controleer of de statusindicator (Z) groen verlicht is. 2. Verwijder de beschermkap om toegang te krijgen tot het stopcontact.
  • Page 66: Hoe Stopt U Met Opladen

    Hoe controleert u het laadstation (ZAPTEC Portal) U kunt inloggen via de ZAPTEC Portal om al uw laadstations en alle laadstations waar u voor gebruik bent geregistreerd te bekijken. Als u de eigenaar bent van een installatie, kunt u al het gebruik controleren en u kunt deze informatie gebruiken om de elektriciteitskosten eerlijk te delen.
  • Page 67: De Laadkabel Voor De Laadstations Vergrendelen

    De laadkabel kan permanent aan het laadstation worden vergrendeld. Deze functie wordt geactiveerd via de ZAPTEC- app. 1. Log in op de ZAPTEC-app (te downloaden in de App Store/Google Play). 2. Ga naar instellingen en selecteer het gewenste laadstation. 3. Voer de pincode in voor het betreffende laadstation en activeer Kabel vergrendelen voor dit laadstation.
  • Page 68: Probleemoplossing

    • Controleer of de SSID en het wachtwoord voor de WiFi correct zijn. • Zorg ervoor dat 2,4 GHz is geactiveerd, zodat de ZAPTEC Pro een netwerkverbinding krijgt. Zie de Installatievereisten, pagina 1 1. • Voer de SSID en het wachtwoord handmatig in door Overige in de netwerklijst te selecteren.
  • Page 69 Kleur Betekenis GEEN LICHT Het laadstation is niet geactiveerd in de ZAPTEC Portal, geen stroom van het stroomcircuit, een onjuiste aansluiting of een productfout. Controleer de seriële bescherming in de verdeelkast Niet bijgewerkt tijdens het opladen. PAARS • Controleer of de laadkabel juist in het laadstation is aangebracht.
  • Page 70: De Zekeringen In Het Laadstation Controleren

    3. Als een van de zekeringen is geactiveerd, verwijder dan de zekeringkap en zet de zekeringen weer omhoog. Plaats de zekeringkap als in stap 2 en bevestig de voorkap weer. * Als het laadstation op een ZAPTEC Column is gemonteerd, gebruikt u de SmartKey Column (meegeleverd met de laadkolom) om het laadstation te openen.
  • Page 71: Garantie

    Support en reparaties Als u een probleem ontdekt, lees dan de paragraaf Probleemoplossing voordat u contact opneemt met uw distributeur/installateur. Zaptec Charger AS verzamelt via het netwerk gegevens van het product. Meer informatie over onze privacyrichtlijnen is te vinden op zaptec.com/privacy.
  • Page 72 ZAPTEC Charger Zaptec Charger AS Richard Johnsensgate 4 4021 Stavanger, Norway MADE IN NORWAY...

Table des Matières