Waldbeck Halley Mode D'emploi
Station météo professionnelle

Manuels Connexes pour Waldbeck Halley


Sommaire des Matières pour Waldbeck Halley
- Page 1 10032926 Halley Professionelle Wetterstation Professional Weather Station Estación meteorológica profesional Station météo professionnelle Stazione meteo professionale...
- Page 3 Sehr geehrter Kunde, wir gratulieren Ihnen zum Erwerb Ihres Gerätes. Lesen Sie die folgenden Hinweise sorgfältig durch und befolgen Sie diese, um möglichen Schäden vorzubeugen. Für Schäden, die durch Missachtung der Hinweise und unsachgemäßen Gebrauch entstehen, übernehmen wir keine Haftung. Scannen Sie den QR-Code, um Zugriff auf die aktuellste Bedienungsanleitung und weitere Informationen rund um das Produkt zu erhalten.
-
Page 4: Technische Daten
TECHNISCHE DATEN Artikelnummer 10032926 Stromversorgung Basisstation 5 V DC Netzteil Stromversorgung Innen-Sensor 2 AA Batterien (nicht im Lieferumfang enthalten) Stromversorgung Außen-Sensor 2 AA Batterien (nicht im Lieferumfang enthalten) Max. Übertragungsdistanz (außen) 100 m Messumfang Temperatur (außen) -40 °C bis 60 °C (+/- 1 ˚C) Messumfang relative Luftfeuchtigkeit 10-99 % (+/- 5 %) Messumfang Regenmenge... -
Page 5: Sicherheitshinweise
SICHERHEITSHINWEISE Blitze werden von Metallobjekten, die Befestigungsstange Ihrer Wetterstation eingeschlossen, angezogen und könnten darin einschlagen. Montieren Sie die Befestigungsstange niemals während eines Gewitters. WARNUNG Verletzungsgefahr! Die Installation der Wetterstation an einem hohen Ort kann zu schweren Verletzungen oder dem Tode führen. Überprüfen Sie so viel wie möglich vom Boden aus oder dem Inneren eines Gebäudes oder Ihres Zuhauses. -
Page 6: Geräteübersicht Und Funktionstasten
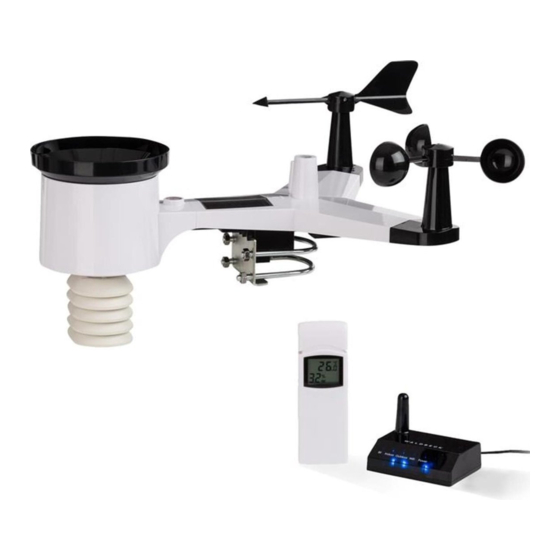
GERÄTEÜBERSICHT UND FUNKTIONSTASTEN Windfahne Solarzelle Wind- U-Bolzen Geschwindigkeitssensor UV-Sensor/ Lichtsensor Batteriefach Thermo-/ Hygromesser Reset-Taste Regensammler LED-Anzeige: leuchtet für 4 Sekunden, wenn das Gerät eingeschaltet wird. Blinkt dann einmal alle 16 Sekunden (Aktualisierungszeit der Sensorübertragung) Wasserwaage... - Page 7 INSTALLATION Temporäre Installation Wir empfehlen Ihnen, die Wetterstation vor der endgültigen Montage, an einem leicht zugänglichen Ort zu betreiben und zu testen. Dadurch haben Sie die Möglichkeit, alle Funktionen zu testen, einen einwandfreien Betrieb zu gewährleisten und sich mit der Wetterstation und allen Einstellungsmöglichkeiten vertraut zu machen.
- Page 8 Installation der Windfahne Drücken Sie die Windfahne, wie in Abbildung 1 gezeigt, in den Schaft hinein. Ziehen Sie die Schraube, wie in Abbildung 2 gezeigt, fest. Stellen Sie sicher, dass sich die Windfahne frei drehen kann. Abbildung 1 Abbildung 2 Vier Buchstaben des Alphabets „N“, „E“, „S“...
-
Page 9: Batterieinstallation
Batterieinstallation Legen Sie zwei Batterien des Typs AA in das Batteriefach ein. Die LED-Anzeige auf der Rückseite des Senders leuchtet für 4 Sekunden auf und blinkt dann einmal alle 16 Sekunden (Aktualisierungszeit der Sensorübertragung). Abbildung 6 Abbildung 7 Überprüfen Sie, wenn keine LED-Anzeige aufleuchtet oder die LED-Anzeige permanent an ist, ob die Batterien richtig in das Batteriefach eingelegt wurden oder ob das Gerät auf Werkseinstellungen zurückgesetzt wurde. - Page 10 Installation des Außensensors Bringen Sie den Sensor mithilfe der U-Bolzen, wie in Abbildung 8 gezeigt, auf der Montagestange (nicht im Lieferumfang enthalten) an. Abbildung 8 Abbildung 9 Verwenden Sie die Wasserwaage um sicherzustellen, dass die Sensoren eben sind. Reset-Taste und Übertragungs-LED Setzen Sie den Sensor zurück, wenn dieser nicht ordnungsgemäß...
- Page 11 Reset-Taste Abbildung 10 Transmitter des Innenraum Thermo-Hygrometer-Barometers Achten Sie beim Einlegen der Batterien auf die richtige Polarität, um permanente Schäden am Gerät zu vermeiden. • Nehmen Sie die Batteriefachtür auf der Rückseite des Sensors ab. • Legen Sie zwei Batterien des Typs AA ein.
- Page 12 • Wir empfehlen bei kaltem Klima Lithiumbatterien, aber Alkalibatterien sind bei den meisten Wetterverhältnissen ausreichend. Wir raten von der Verwendung von aufladbaren Batterien ab, da diese eine niedrigere Voltanzahl haben, nicht auf große Temperaturschwankungen ausgelegt sind und nicht lange halten, was zu einem schlechten Empfang führt. •...
- Page 13 Die folgende Tabelle zeigt die Empfangsdämpfung gegenüber dem Übertragungsmedium. Jede „Wand“ oder jedes Hindernis verringert die Reichweite um den unten angegebenen Faktor. Medium Reduzierung der Signalstärke Glas (unbehandelt) 5-15% Plastik 10-15% Holz 10-40% Backstein 10-40% Beton 40-80% Metall 90-100% Empfänger (Receiver) Hardwareanforderungen: •...
- Page 14 Abbildung 13 Beschreibung Eingeschaltet, wenn der Frequenzempfänger richtig funktioniert Innenbereich Eingeschaltet, wenn der Innenbereichssensor erreicht wird Außenbereich Eingeschaltet, wenn der Außenbereichssensor erreicht wird. WLAN Eingeschaltet, wenn via App eine Verbindung zum WLAN-Router hergestellt wurde. Eingeschaltet, wenn mit Internet-Hosting-Diensten verbunden Power Der Netzstromadapter ist mit der Steckdose verbunden...
- Page 15 Abbildung 14 Taste/ Anschluss Beschreibung Reset Drücken Sie diese Taste für 5 Sekunden, um das Gerät zurückzusetzen; Drücken Sie kurz auf diese Taste, um das Internet zu rekonfigurieren. Netzstromanschluss Anschluss des Netzstromadapters...
- Page 16 LIVE-INTERNETVERÖFFENTLICHUNG Sie können mit Ihrem Gerät Daten an ausgewählte Wetterdienste im Internet senden. Die unterstützten Dienste sind in der folgenden Tabelle aufgeführt: Hosting-Service Website Beschreibung Ecowitt Weather https://www.ecowitt.net Bei Ecowitt handelt es sich um einen neuen Server, der mehrere Sensoren hosten kann, die von anderen Anbietern nicht unterstützt werden.
-
Page 17: App-Download
Die Wetterstation mit dem Internet verbinden (WLAN) Um Wetterdaten an ausgewählte Wetterdienste online senden zu können, muss die Konsole der Wetterstation via WLAN mit dem Internet verbunden werden. Die Konsole kann sich nur dann mit dem WLAN verbinden, wenn der externen Netzadapter angeschlossen ist und in eine Steckdose eingesteckt wurde. - Page 18 Gerät konfigurieren Wählen Sie Ihr Gerät aus Führen Sie den Vorgang Wählen Sie Das Gerät der Geräteliste aus und wie beschrieben durch. mit dem Namen EasyWeather-WIFI aus. drücken Sie dann auf Markieren Sie dann das Next. Kästchen Completed operation und drücken Sie auf Next.
- Page 19 Drücken Sie auf Scan und Verbinden Sie über wählen Sie Ihre SSID aus Ihr mobiles Endgerät der Liste aus. Geben Sie die Wetterstation EasyWeather-WIFI mit dann Ihr WiFi-Passwort ein und drücken Sie auf Ihrem Router. Wurde die Next. Verbindung erfolgreich hergestellt, werden Wenn Sie einen Dual- anschließend automatisch...
- Page 20 Upload-Einstellungen Mit Ihrem Gerät können die Daten Ihres Sensors an ausgewählte, internetbasierte Wetterdienste, wie beispielsweise ecowitt.net, wunderground.com, weathercloud.net, wow.metoffice.gov.uk und Ihre selbst erstellte Website, gesendet werden. Nutzer müssen sich auf der entsprechenden Website registrieren, um eine Stations-ID (oder MAC- Adresse) für Ihre Wetterstation und ein Passwort zu erhalten. Hinzufügen von Wetterdiensten Möglicherweise haben Sie die Wetterdienste bereits bei der Erstkonfiguration konfiguriert oder Sie können dies später tun.
- Page 22 ECOWITT WEATHER Es wird empfohlen, den Ecowitt Weather Server zu verwenden, um die Daten Ihrer Sensoren zu überwachen und aufzuzeichnen. Konfigurieren Sie ihn wie folgt: Aktivieren Sie auf der Seite ecowitt.net Upload die Schaltfläche ON und • stellen Sie die Intervallzeit für das Hochladen ein. •...
- Page 23 Die WS View Plus App unterstützt nur die Einstellung der Einheiten. Um alle Einstellungen vollständigen vornehmen zu können, besuchen Sie die ecowitt- Webseite in Ihrem Browser oder auf einem Computer. Wenn Sie sich nicht in der WS View Plus App registrieren konnten, gehen Sie bitte auf die ecowitt- Website, um sich zu registrieren und das Gerät hinzuzufügen.
- Page 24 Grafische Ansicht Listenansicht...
- Page 25 Wetterkarte E-Mail-Warnungen...
- Page 26 WEATHER UNDERGROUND Wenn Sie wunderground.com nutzen möchten, müssen Sie ein Konto haben und Ihre neue Wetterstation registrieren. Sie können dies auf der Seite Wunderground Upload in der WS View Plus Anwendung tun: Drücken Sie auf Register at Wunderground.com und schließen Sie die Registrierung auf der Seite ab.
- Page 27 Wählen Sie Add New Device aus. Suchen Sie Ihre Wetterstation aus der Liste aus oder wählen Sie other und klicken Sie auf Next.
- Page 28 Wählen Sie die Option Adress oder Manual, und suchen Sie Ihren Standort. Drücken Sie dann Next. Dieses Mal werden Sie nach Details zu Ihrer Wetterstation gefragt. Füllen Sie das Formular aus und klicken sie zum Schluss auf Next.
- Page 29 Nach der Fertigstellung werden Stations-ID und Passwort angezeigt. • Notieren Sie sich die Stations-ID und das Passwort, das für Sie generiert wurde. • Gehen Sie zurück zur App und geben Sie die Stations-ID und das Passwort ein. Drücken Sie Save. •...
- Page 30 Anzeige der Daten auf wunderground.com Sie können die Daten Ihrer Wetterstation auch auf der Website wunderground.com einsehen. Sie verwenden eine URL wie diese, wobei Ihre Stations-ID den Text STATIONID ersetzt. http://www.wunderground.com/personal-weather-station/ dashboard?ID=STATIONID Es wird eine Seite wie diese angezeigt, auf der Sie die aktuellen Daten und auch die historischen Daten einsehen können.
- Page 31 Weather Underground Forecast: iOS- und Android-Anwendung für Wetter- Vorhersagen: https://itunes.apple.com/us/app/weather-underground-forecast/ id486154808 https://play.google.com/store/apps/details?id=com.wunderground.android. weather&hl=en...
- Page 32 PWS Weather Station Monitor: Zeigen Sie die Wetterbedingungen in Ihrer Nachbarschaft oder sogar in Ihrem eigenen Garten an. Verbindet sich mit wunderground.com: https://itunes.apple.com/us/app/pws-weather-station-monitor/ id713705929...
- Page 33 VERWALTEN VON GERÄTEN UND EINSTELLUNGEN Wenn Sie sich auf dem WU-Dashboard- Bildschirm befinden, können Sie die Taste Menu (oben rechts) drücken und Device List auswählen, um alle Ihre Geräte anzuzeigen. Sie können auf Ihr Gerät drücken, um die Einstellungen anzuzeigen oder zu ändern.
- Page 34 Einstellungen Sie können die gewünschten Display- Einheiten oder die Standard-Startseite für die App einstellen, indem Sie im Untermenü Settings wählen. Sobald Sie Ihr Ecowitt-Konto erfolgreich in der WS View Plus App erstellt haben, können Sie im Untermenü Manage Ecowitt auswählen, um Ihr Gerät zu verwalten. Ecowitt verwalten Sie können die Daten Ihrer Wetterstation anzeigen, indem Sie auf...
-
Page 36: Reinigung Und Pflege
REINIGUNG UND PFLEGE Die folgenden Schritte sollten für eine ordnungsgemäße Wartung Ihrer Station durchgeführt werden: Regenmesser reinigen Überprüfen Sie den Regenmesser alle 3 Monate. Drehen Sie den Trichter gegen den Uhrzeigersinn und heben Sie ihn an. Reinigen Sie den Trichter und den Sammelbehälter mit einem feuchten Tuch, um Schmutz, Ablagerungen und Insekten zu entfernen. -
Page 37: Fehlersuche Und Fehlerbehebung
FEHLERSUCHE UND FEHLERBEHEBUNG Problem Lösung Der Außensensor Überprüfen Sie, ob die Außenbereich- stellt keine Übertragungs-LED normal blinkt (entsprechend Verbindung mit dem Sensor-Meldeintervall). der Konsole (dem Wenn die Batterien vor kurzem eingelegt oder Gateway) her. ausgetauscht wurden, überprüfen Sie, ob die Polarität richtig ist, bzw. - Page 38 Problem Lösung Der relative Luftdruck Der relative Luftdruck bezieht sich auf die stimmt nicht mit äquivalente Meeresspiegeltemperatur und sollte der offiziellen im Allgemeinen eng mit der offiziellen Station Messstation überein. abgestimmt sein. Wenn es Abweichungen gibt, stellen Sie sicher, dass Sie nicht den absoluten Luftdruck betrachten, insbesondere wenn sich Ihre Station nicht in der Nähe des Meeresspiegels befindet.
- Page 39 Problem Lösung Es werden Stellen Sie sicher, dass Datum, Uhrzeit und keine Daten an Zeitzone in der WS View-App korrekt eingestellt Wunderground.com sind. Falls diese nicht falsch sind, ist es eventuell übertragen. möglich, dass Sie Daten für einen Zeitpunkt in der Vergangenheit oder Zukunft melden, die Ihnen möglicherweise nicht dort angezeigt werden, wo Sie sie erwarten.
- Page 40 Problem Lösung Keine WLAN- Sie können auch die folgenden Methoden Verbindung / ausprobieren, um das Gateway einzurichten: Gateway- Methode eins: Konfiguration fehlgeschlagen 1. Schalten Sie das Gateway aus und warten Sie einige Minuten. 2. Schalten Sie das Gateway ein und halten Sie die schwarze Taste 5 Sekunden lang gedrückt, bis die rote LED schnell blinkt.
- Page 41 BEGRIFFSERKLÄRUNG Begriff Definition Absoluter Luftdruck Unter absolutem Duftdruck versteht man den gemessenen atmosphärischen Druck und ist eine Höhenfunktion, welche sich in geringem Maß auch auf Veränderungen der Wetterbedingungen bezieht. Der absolute Luftdruck ist nicht auf den Meeresspiegel korrigiert. Siehe hierfür „relativer Luftdruck“.
- Page 42 Begriff Definition Kondensationspunkt Der Kondensationspunkt ist die Temperatur, bei der ein bestimmtes Paket feuchter Luft bei konstantem Luftdruck gekühlt werden muss, damit Wasserdampf zu Wasser kondensiert. Das Kondenswasser wird als Tau bezeichnet. Der Kondensationspunkt ist eine Sättigungstemperatur. Der Kondensationspunkt ist mit der relativen Luftfeuchtigkeit verbunden. Eine hohe relative Luftfeuchtigkeit zeigt an, dass der Kondensationspunkt näher an der aktuellen Lufttemperatur liegt.
- Page 43 Begriff Definition Sonnenstrahlung Ein Solarstrahlungssensor misst die Sonnenenergie der Sonne. Sonnenstrahlung ist Strahlungsenergie, welche von der Sonne durch eine Kernfusionsreaktion, welche elektromagnetische Energie erzeugt, emittiert wird. Das Spektrum der Sonnenstrahlung liegt nahe dem eines schwarzen Körpers mit einer Temperatur von etwa 5800 K. Etwa die Hälfte der Strahlung befindet sich im sichtbaren kurzwelligen Teil des elektromagnetischen Spektrums.
- Page 44 SPEZIELLE ENTSORGUNGSHINWEISE FÜR VERBRAUCHER IN DEUTSCHLAND Entsorgen Sie Ihre Altgeräte fachgerecht. Dadurch wird gewährleistet, dass die Altgeräte umweltgerecht verwertet und negative Auswirkungen auf die Umwelt und menschliche Gesundheit vermieden werden. Bei der Entsorgung sind folgende Regeln zu beachten: • Jeder Verbraucher ist gesetzlich verpflichtet, Elektro- und Elektronikaltgeräte (Altgeräte) sowie Batterien und Akkus getrennt vom Hausmüll zu entsorgen.
- Page 45 • Bei einem Vertrieb unter Verwendung von Fernkommunikationsmitteln ist die unentgeltliche Abholung am Ort der Abgabe auf Elektro- und Elektronikgeräte der Kategorien 1, 2 und 4 gemäß § 2 Abs. 1 ElektroG, nämlich „Wärmeüberträger“, „Bildschirmgeräte“ (Oberfläche von mehr als 100 cm²) oder „Großgeräte“ (letztere mit mindestens einer äußeren Abmessung über 50 Zentimeter) beschränkt.
-
Page 46: Konformitätserklärung
Importeur für Großbritannien: Berlin Brands Group UK Ltd PO Box 1145 Oxford, OX1 9UW United Kingdom Hiermit erklärt Chal-Tec GmbH, dass der Funkanlagentyp Halley der Richtlinie 2014/53/ EU entspricht. Der vollständige Text der EU- Konformitätserklärung ist unter der folgenden Internetadresse verfügbar: use.berlin/10032926... - Page 47 Dear Customer, Congratulations on purchasing this device. Please read the following instructions carefully and follow them to prevent possible damages. We assume no liability for damage caused by disregard of the instructions and improper use. Scan the QR code to get access to the latest user manual and more product information.
-
Page 48: Technical Data
TECHNICAL DATA Item number 10032926 Power supply base station 5 V DC Adapter Power supply indoor sensor 2 AA batteries (not included in the scope of delivery) Power supply outdoor sensor 2 AA batteries (not included in the scope of delivery) Max. -
Page 49: Safety Instructions
SAFETY INSTRUCTIONS Any metal object may attract a lightning strike, including your weather station mounting pole. Never install the weather station in a storm. WARNING Risk of injury! Installing your weather station in a high location may result in injury or death. Perform as much of the initial check out and operation on the ground and inside a building or home. -
Page 50: Product Overview And Button Functions
PRODUCT OVERVIEW AND BUTTON FUNCTIONS Wind Vane Solar panel Wind Speed Sensor U-Bolt UV sensor/ Light sensor Battery compartment Thermo-hygro sensor Reset button Rain collector LED Indicator: light on for 4s if the unit power up. Then the LED will flash once every 16 seconds (the sensor transmission update period). - Page 51 INSTALLATION Pre Installation Checkout Before installing your weather station in the permanent location, we recommend operating the weather station for one week in a temporary location with easy access. This will allow you to check out all of the functions, insure proper operation, and familiarize you with the weather station and calibration procedures.
- Page 52 Install wind vane Push the wind vane into the shaft. as shown in figure 1. Tighten the set screw with as shown in figure 2. Make sure the wind vane spin freely. Figure 1 Figure 2 There are four alphabet letter of “N”, ” E”, ” S”and “W” around the wind direction, representing for the direction of North, East, South and West.
- Page 53 Install Batteries Insert 2XAA batteries in the battery compartment. The LED indicator on the back of the transmitter will turn on for four seconds and normally flash once every 16 seconds (the sensor transmission update period). Figure 6 Figure 7 If no LED light up or is lighted permanently, make sure the battery is inserted the correct way or a proper reset is happened.
- Page 54 Mount outdoor sensor Mounting outdoor sensor to your mounting pole (purchased separately) with the U-bolts as shown in Figure 8. Figure 8 Figure 9 Use the bubble level beside the rain sensor as a guide to verify that sensors are level.
- Page 55 Reset button Figure 10 Indoor Thermo-Hygrometer-Barometer Transmitter To avoid permanent damage, please take note of the battery polarity before inserting the batteries. • Remove the battery door on the back of the sensor. • Insert two AA batteries. Figure 11 Figure 12...
-
Page 56: Getting Started
• We recommend lithium batteries for cold weather climates, but alkaline batteries are sufficient for most climates. • We do not recommend rechargeable batteries. They have lower voltages, do not operate well at wide temperature ranges, and do not last as long, resulting in poorer reception. - Page 57 The following is a table of reception loss vs. the transmission medium. Each “wall” or obstruction decreases the transmission range by the factor shown below. Medium RF Signal Strength Reduction Glass (untreated) 5-15% Plastics 10-15% Wood 10-40% Brick 10-40% Concrete 40-80% Metal 90-100%...
- Page 58 Figure 13 Ref. Description On when radio frequency receiver is operating properly Indoor On when indoor sensor received Outdoor On when outdoor sensor array received WIFI On when connect to WIFI router via APPs. On when connected to internet hosting service Power AC Power connected...
- Page 59 Figure 14 Ref. Description Beschreibung Reset button. Press this Drücken Sie diese Taste für 5 Sekunden, um das button to reset the device Gerät zurückzusetzen; Drücken Sie kurz auf diese for 5 seconds; short press Taste, um das Internet zu rekonfigurieren. to re-configure the internet AC Power connection Anschluss des Netzstromadapters...
-
Page 60: Live Internet Publishing
LIVE INTERNET PUBLISHING Your console is capable of sending your sensor data to select internet-based weather services. The supported services are shown in the table below: Hosting Service Website Description Ecowitt Weather https://www.ecowitt.net Ecowitt is a new weather server that can host a bunch of sensors that other services don’t support. - Page 61 Connecting the Weather Station Console to WiFi To send weather data to these services you must connect your console to the internet via Wi-Fi. The console can only operate using Wi-Fi when the external power adapter is connected and plugged in! Note: If you are testing the setup with the outdoor sensor package nearby and indoor, you may want to consider connecting to Wi-Fi, but not yet configuring any of the weather services.
- Page 62 Configure Device Select the device you Operate as per the Choose the device named EasyWeather- have from the device list, information, tick the box then press Next to confirm Completed WIFI. operation, press Next.
- Page 63 Press Scan and select you Connect the EasyWeather- WIFI weather station to SSID from the list, then enter your WiFi password your router via your mobile and press Next. device. If the connection was established successfully, If you own a dual band the upload settings will be router (2.4 GHz and displayed automatically.
- Page 64 Upload settings Your device can be used to send data from your sensor to selected internet-based weather services, such as ecowitt.net, wunderground.com, weathercloud.net, wow.metoffice.gov.uk, and your self-created website. Users must register on the appropriate website to receive a station ID (or MAC address) for your weather station and a password.
- Page 66 ECOWITT WEATHER It is recommended to use Ecowitt Weather Server to monitor and record data from your sensors. Configure it as follows: On the ecowitt.net Upload page, enable the ON button and set the upload • interval time. • Press Save on the page. Click Register at ecowitt.net and complete the registration on the page.
- Page 67 The WS View Plus app only supports setting the units. To make all settings complete, visit the ecowitt website in your browser or on a computer. If you could not register in WS View Plus App, please go to ecowitt website to register and add the unit.
- Page 68 Graph display List display...
- Page 69 Weather Map Email Alerts...
- Page 70 WEATHER UNDERGROUND If you want to use wunderground.com, you must have an account and register your new weather station. You can do this on the Wunderground Upload page in the WS View Plus application: Press Register at Wunderground.com and complete the registration on the page.
- Page 71 Select Add New Device. Select your weather station from the list or select other and click Next.
- Page 72 Select the Address or Manual option and find your location. Then press Next. This time you will be asked for details about your weather station. Fill in the form and click Next to finish.
- Page 73 After completion, the station ID and password are indicated. • Make a note of the station ID and password that was generated for you. • Go back to the app and enter the station ID and password. Press Save. • Go back to the menu page and select WU Dashboard (for the Android •...
- Page 74 Indication of the data on wunderground.com You can also view your weather station data on the wunderground.com website. You use a URL like this, with your station ID replacing the text STATIONID. http://www.wunderground.com/personal-weather-station/ dashboard?ID=STATIONID A page like this is indicated, where you can view the current data and also the historical data.
- Page 75 Weather Underground Forecast: iOS and Android application for weather forecasts: https://itunes.apple.com/us/app/weather-underground-forecast/ id486154808 https://play.google.com/store/apps/details?id=com.wunderground.android. weather&hl=en...
- Page 76 PWS Weather Station Monitor: Indicate weather conditions in your neighborhood or even in your own backyard. Connects to wunderground.com: https://itunes.apple.com/us/app/pws-weather-station-monitor/ id713705929...
- Page 77 MANAGE DEVICES AND SETTINGS When you are on the WU Dashboard screen, you can press the Menu button (top right) and select Device List to view all your devices. You can press on your device to view or change its settings. Note: This feature requires that your smartphone and console are on the same network.
- Page 78 Settings You can set the desired display units or default home page for the app by selecting Settings in the submenu. Once you have successfully created your Ecowitt account in the WS View Plus app, you can select Manage Ecowitt in the submenu to manage your device.
-
Page 80: Cleaning And Care
CLEANING AND CARE The following steps should be taken for proper maintenance of your station: Clean Rain Gauge Check the rain gauge every 3 months. Rotate the funnel counter-clockwise and lift it up. Clean the funnel and bucket with a damp cloth to remove any dirt, debris and insects. - Page 81 TROUBLESHOOTING Problem Solution Outdoor sensor is not Check that the outdoor transmission LED is reporting to base unit flashing normally (according to the sensor (gateway). reporting interval). If the batteries were recently (re)placed, check Dashes (--) on the app correct polarity was used and/or reseat the or website.
- Page 82 Problem Solution Relative pressure Relative pressure refers to sea-level equivalent does not agree with temperature and should generally agree closely official reporting with the official station. If there is a disagreement, station. make sure you are not looking at absolute pressure, in particular if your station is not near sea level.
- Page 83 Problem Solution No Wi-Fi connection/ Check for Wi-Fi light on the gateway. If wireless Gateway configured connectivity is operational, the Wi-Fi light will be failed. steady. If you have never been able to configure Wi-Fi to a working state, make sure your Wi-Fi supports 2.4 GHz signals (801 type B or G, or N).
-
Page 84: Glossary Of Terms
GLOSSARY OF TERMS Term Definition Absolute Barometric Absolute pressure is the measured atmospheric Pressure pressure and is a function of altitude, and to a lesser extent, changes in weather conditions. Absolute pressure is not corrected to sea- level conditions. Refer to Relative Barometric Pressure. - Page 85 Term Definition Hygrometer A hygrometer is a device that measures relative humidity. Relative humidity is a term used to describe the amount or percentage of water vapor that exists in air. Inches of Mercury Pressure in Imperial units of measure. 1 inch of (inHg) mercury = 33.86 millibars Rain Gauge...
-
Page 86: Disposal Considerations
For Great Britain: Hereby, Chal-Tec GmbH declares that the radio equipment type Halley is in compliance with the relevant statutory requirements. The full text of the declaration of conformity is available at the following... - Page 87 Estimado cliente: Le felicitamos por la adquisición de este producto. Lea atentamente el siguiente manual y siga cuidadosamente las instrucciones de uso con el fin de evitar posibles daños. La empresa no se hace responsable por los daños causados por el incumplimiento de las instrucciones y el uso indebido.
-
Page 88: Datos Técnicos
DATOS TÉCNICOS Número del artículo 10032926 Estación base de alimentación Fuente de alimentación de 5 V DC Alimentación del sensor interior 2 pilas AA (no incluidas en el envío) Alimentación del sensor exterior 2 pilas AA (no incluidas en el envío) Distancia máx. -
Page 89: Indicaciones De Seguridad
INDICACIONES DE SEGURIDAD Los rayos son atraídos por los objetos metálicos, incluida la barra de montaje de su estación meteorológica, y podrían golpearlos. Nunca monte el poste durante una tormenta eléctrica. ADVERTENCIA ¡Riesgo de lesiones! La instalación de la estación meteorológica en un lugar alto puede provocar lesiones graves o la muerte. - Page 90 VISTA GENERAL DEL DISPOSITIVO Y TECLAS DE FUNCIÓN Veleta Célula solar Sensor de velocidad del viento Perno en U Sensor UV/ Sensor de luz Compartimento de la batería Termohigrómetro Botón de reinicio Colector de lluvia Indicador LED: se ilumina durante 4 segundos cuando se enciende la unidad.
- Page 91 INSTALACIÓN Instalación temporal Le recomendamos que ponga en marcha y pruebe la estación meteorológica en un lugar de fácil acceso antes de la instalación definitiva. Esto le da la oportunidad de probar todas las funciones, asegurar el buen funcionamiento y familiarizarse con la estación meteorológica y todas las opciones de ajuste.
- Page 92 Instalación de la veleta Encaje la veleta en el eje como se muestra en la figura 1. Apriete el tornillo como se muestra en la figura 2. Asegúrese de que la veleta gire libremente. Figura 1 Figura 2 Cuatro letras del alfabeto "N", "E", "S" y "W" indican la dirección del viento, respectivamente, y significan norte, este, sur y oeste.
- Page 93 Instalación de la pila Introduzca dos pilas del tipo AA en el compartimento de las pilas. El indicador LED de la parte posterior del emisor se enciende durante cuatro segundos y luego parpadea una vez cada 16 segundos (período de actualización de la transmisión del sensor).
- Page 94 Instalación del sensor exterior Fije el sensor a la varilla de montaje (no incluida) utilizando los tornillos en U como se muestra en la figura 8. Figura 8 Figura 9 Utilice el nivel de burbuja para asegurarse de que los sensores estén nivelados. Botón de reinicio y LED de transmisión Reinicie el sensor si no transmite correctamente.
- Page 95 Botón de reinicio Figura 10 Transmisor del termohigrómetro y barométro de interior Asegúrese de que la polaridad de las pilas sea correcta al insertar la nueva pila para evitar daños en el aparato. • Retire la tapa de la batería en la parte posterior del sensor.
- Page 96 • Recomendamos las pilas de litio en climas fríos, pero las pilas alcalinas son suficientes en la mayoría de las condiciones climáticas. No recomendamos el uso de pilas recargables porque tienen un voltaje inferior, no están diseñadas para soportar grandes fluctuaciones de temperatura y no duran mucho, lo que provoca una mala recepción.
- Page 97 La siguiente tabla muestra la merma de la recepción en comparación con el medio de transmisión. Cada "pared" u obstáculo reduce el alcance en el factor indicado a continuación. Medio Reducción de la intensidad de la señal Vidrio (sin tratar) 5-15 % Plástico 10-15 %...
- Page 98 Figura 13 Núm. Descripción Se enciende cuando el receptor de frecuencia funciona correctamente Interior Se enciende cuando se alcanza el sensor interior Zona exterior Se enciende cuando se alcanza el sensor interior WLAN Se enciende cuando se ha establecido una conexión con el router WLAN a través de la aplicación.
- Page 99 Figura 14 Núm. Botón/Conexión Descripción Reset Pulse este botón durante 5 segundos para reiniciar el aparato; pulse brevemente este botón para reconfigurar Internet. Conexión a la red eléctrica Conectar el adaptador de red...
- Page 100 PUBLICACIÓN EN DIRECTO EN INTERNET Puede utilizar su dispositivo para enviar datos a servicios meteorológicos seleccionados en Internet. Los servicios compatibles aparecen listados en la siguiente tabla: Servicio de Sitio web Descripción alojamiento Ecowitt Weather https://www.ecowitt.net Ecowitt es un nuevo servidor que puede albergar múltiples sensores que no son compatibles con otros proveedores.
- Page 101 Conectar la estación meteorológica a Internet (WLAN) Para poder enviar los datos meteorológicos a los servicios meteorológicos online seleccionados, la consola de la estación meteorológica debe estar conectada a Internet mediante WLAN. La consola solo puede conectarse a la WLAN cuando el adaptador de corriente externo esté conectado y enchufado a una toma de corriente.
- Page 102 Configurar el aparato Seleccione su dispositivo Realice el procedimiento Seleccione el dispositivo de la lista de dispositivos como se describe. A con el nombre y pulse Next. EasyWeather-WIFI. continuación, marque la casilla Completed operation y pulse Next.
- Page 103 Pulse Scan y seleccione Conecte la estación su SSID de la lista. A meteorológica EasyWeather-WIFI a continuación, introduzca su contraseña de WiFi y su router a través de su pulse Next. dispositivo móvil. Si la conexión se ha establecido Si tiene un router de doble con éxito, los ajustes banda (2,4 GHz y 5,0 GHz), de subida se muestran...
- Page 104 Ajustes de subida Su dispositivo puede utilizarse para enviar los datos de su sensor a determinados servicios meteorológicos basados en Internet, como ecowitt. net, wunderground.com, weathercloud.net, wow.metoffice.gov.uk y su sitio web de creación propia Los usuarios deben registrarse en el sitio web correspondiente para recibir un ID de estación (o dirección MAC) para su estación meteorológica y una contraseña.
- Page 106 ECOWITT WEATHER Se recomienda utilizar el servidor meteorológico de Ecowitt para supervisar y registrar los datos de sus sensores. Configúrelo de la siguiente manera: En la página ecowitt.net Upload, active el botón ON y establezca el tiempo • de intervalo de subida. •...
- Page 107 La aplicación WS View Plus solo admite el ajuste de las unidades. Para realizar todos los ajustes por completo, visite el sitio web de ecowitt en su navegador o en un ordenador. Si no ha podido registrarse en la aplicación WS View Plus, vaya a la página web de ecowitt para registrarse y añadir el dispositivo.
- Page 108 Vista gráfica Vista de la lista...
- Page 109 Mapa del tiempo Avisos por correo electrónico...
- Page 110 WEATHER UNDERGROUND Si desea utilizar wunderground. com, debe tener una cuenta y registrar su nueva estación meteorológica. Puede hacerlo en la página Wunderground Upload en la aplicación WS View Plus: Haga clic en Register at Wunderground.com y complete el registro en la página.
- Page 111 Seleccione Add New Device. Seleccione su estación meteorológica de la lista o seleccione other y haga clic en Next.
- Page 112 Seleccione la opción Adress o Manual y busque su ubicación. A continuación, pulse Next. Esta vez se le pedirán detalles sobre su estación meteorológica. Rellene el formulario y haga clic en Next cuando haya terminado.
- Page 113 Una vez completado, se muestra el ID de la estación y la contraseña. • Anote el identificador y la contraseña de la estación generados para usted. • Vuelva a la aplicación e introduzca el ID y la contraseña de la estación. Pulse Save.
- Page 114 Visualización de los datos en wunderground.com También puede ver los datos de su estación meteorológica en el sitio web wunderground.com. Utilice esta URL donde el ID de su estación sustituye el texto STATIONID. http://www.wunderground.com/personal-weather-station/ dashboard?ID=STATIONID Aparece una página como esta en la que se pueden ver los datos actuales y también los históricos.
- Page 115 Weather Underground Forecast: aplicación para iOS y Android de previsión meteorológica: https://itunes.apple.com/us/app/weather-underground-forecast/ id486154808 https://play.google.com/store/apps/details?id=com.wunderground.android. weather&hl=en...
- Page 116 PWS Weather Station Monitor: consulte las condiciones meteorológicas de su barrio o incluso de su propio jardín. Se conecta con wunderground.com: https://itunes.apple.com/us/app/pws-weather-station-monitor/ id713705929...
- Page 117 GESTIONAR LOS DISPOSITIVOS Y AJUSTES Cuando esté en la pantalla del panel de control de WU, puede pulsar el botón Menu (arriba a la derecha) y seleccionar Device List para ver todos sus dispositivos. Puede pulsar en su dispositivo para ver o cambiar los ajustes.
- Page 118 Ajustes Puede establecer las unidades de visualización deseadas o la página de inicio predeterminada de la aplicación seleccionando Settings en el submenú. Una vez que haya creado correctamente su cuenta de Ecowitt en la aplicación WS View Plus, puede seleccionar Manage Ecowitt en el submenú...
-
Page 120: Limpieza Y Cuidado
LIMPIEZA Y CUIDADO Deben seguirse los siguientes pasos para el correcto mantenimiento de su estación: Limpiar el pluviómetro Compruebe el pluviómetro cada 3 meses. Gire el embudo en sentido antihorario y levántelo. Limpie el embudo y el recipiente colector con un paño húmedo para eliminar la suciedad, los residuos y los insectos. -
Page 121: Detección Y Reparación De Anomalías
DETECCIÓN Y REPARACIÓN DE ANOMALÍAS Anomalía Solución El sensor exterior Compruebe que el LED de transmisión exterior no se conecta a la parpadee con normalidad (según el intervalo de consola (gateway). notificación del sensor). Si las pilas se han colocado o sustituido Aparece indicado en recientemente, compruebe que la polaridad sea la aplicación o en el... - Page 122 Anomalía Solución La presión La presión atmosférica relativa se refiere a la atmosférica relativa temperatura equivalente al nivel del mar y, por no coincide con la lo general, debería coincidir con la estación estación de medición oficial. Si hay discrepancias, asegúrese de que no oficial.
- Page 123 Anomalía Solución No se transfieren Asegúrese de que la fecha, la hora y la zona horaria datos a estén configuradas correctamente en la aplicación Wunderground.com. WS View. Si los datos no son incorrectos, es posible que esté informando de datos para un momento pasado o futuro que no se muestren en el lugar que usted espera.
- Page 124 Anomalía Solución No hay conexión También puede probar los siguientes métodos para WLAN / Fallo en la configurar la puerta de enlace: configuración de la Método uno: puerta de enlace 1. Apague la puerta de enlace y espere unos minutos. 2.
-
Page 125: Explicación De Los Términos
EXPLICACIÓN DE LOS TÉRMINOS Término Definición Presión atmosférica La presión atmosférica absoluta es la presión absoluta atmosférica medida y es una función de la altitud que también se relaciona en cierta medida con los cambios en las condiciones meteorológicas. La presión atmosférica absoluta no está... - Page 126 Término Definición Punto de El punto de condensación es la temperatura a la condensación que debe enfriarse una determinada parcela de aire húmedo a una presión atmosférica constante para que el vapor de agua se condense en agua. El agua de condensación se llama rocío. El punto de condensación es una temperatura de saturación.
- Page 127 Término Definición Radiación solar Un sensor de radiación solar mide la energía solar del sol. La radiación solar es la energía radiante emitida por el sol mediante una reacción de fusión nuclear que produce energía electromagnética. El espectro de la radiación solar se aproxima al de un cuerpo negro con una temperatura de aproximadamente 5800 K.
-
Page 128: Retirada Del Aparato
Oxford, OX1 9UW United Kingdom Por la presente, Chal-Tec GmbH declara que el tipo de equipo radioeléctrico Halley es conforme con la Directiva 2014/53/UE. El texto completo de la declaración UE de conformidad está disponible en la dirección Internet siguiente: use.berlin/10032926... - Page 129 Cher client, chère cliente, Toutes nos félicitations pour l’acquisition de ce nouvel appareil. Lisez attentivement les indications suivantes et suivez-les pour éviter d'éventuels dommages. Nous ne saurions être tenus pour responsables des dommages dus au non-respect des consignes et à la mauvaise utilisation de l’appareil.
-
Page 130: Fiche Technique
FICHE TECHNIQUE Numéro d'article 10032926 Alimentation électrique de la station de adaptateur secteur 5 V CC base Alimentation électrique du capteur 2 piles AA (non fournies). intérieur Alimentation électrique du capteur 2 piles AA (non fournies). extérieur Distance max. de transmission (à 100 m l'extérieur) Plage de mesure de la température... -
Page 131: Consignes De Sécurité
CONSIGNES DE SÉCURITÉ La foudre est attirée par les objets métalliques, y compris la barre de fi xation de votre station météo qu'elle pourrait frapper. Ne montez jamais la barre de fi xation pendant un orage. MISE EN GARDE Risque de blessure ! L'installation de la station météo à un endroit élevé... -
Page 132: Aperçu De L'appareil Et Touches De Fonctions
APERÇU DE L'APPAREIL ET TOUCHES DE FONCTIONS Girouette Cellule solaire capteur d'anémomètre Boulon en U Capteur UV/ Capteur de Compartiment à piles luminosité Thermo-/ Hygromètre Touche de réinitialisation Collecteur d'eau de pluie Voyant LED : s'allume pendant 4 secondes au démarrage de l'appareil. - Page 133 INSTALLATION Installation temporaire Nous vous recommandons de faire fonctionner et de tester la station météo dans un endroit facilement accessible avant son installation définitive. Vous pouvez ainsi tester toutes les fonctions, garantir un fonctionnement parfait et vous familiariser avec la station météo et toutes les possibilités de réglage. Cela vous permet également de tester la portée radio de la station météo.
- Page 134 Installation de la girouette Enfoncez la girouette dans le manche, comme indiqué sur la figure 1. Serrez la vis comme indiqué sur la figure 2. Vérifiez que la girouette peut tourner librement. Figure 1 Figure 2 Quatre lettres de l'alphabet « N », « E », « S » et « W » indiquent respectivement la direction du vent et représentent le nord, l'est, le sud et l'ouest.
- Page 135 Installation des piles Insérez deux piles de type AA dans le compartiment des piles. Le voyant LED à l'arrière de l'émetteur s'allume pendant 4 secondes, puis clignote une fois toutes les 16 secondes (période de mise à jour de la transmission des capteurs).
- Page 136 Installation du capteur extérieur Fixez le capteur sur la barre de montage (non fournie) à l'aide des boulons en U, comme indiqué dans la figure 8. Figure 8 Figure 9 Utilisez le niveau à bulle pour vous assurer que les capteurs sont de niveau. Touche de réinitialisation et LED de transmission Réinitialisez le capteur s'il ne transmet pas correctement.
- Page 137 Touche de réinitialisation Figure 10 Transmetteur du baromètre thermo-hygrométrique d'intérieur Lorsque vous insérez la pile, veillez à respecter la polarité pour éviter d'endommager définitivement l'appareil. • Retirez la porte du compartiment à piles à l'arrière du capteur. • Insérez deux piles de type AA.
-
Page 138: Mise En Marche Et Utilisation
• Nous recommandons les piles au lithium pour les climats froids, mais les piles alcalines sont suffisantes dans la plupart des conditions météorologiques. Nous déconseillons l'utilisation de piles rechargeables, car elles ont un voltage inférieur, ne sont pas conçues pour supporter de grandes variations de température et ne durent pas longtemps, ce qui entraîne une mauvaise réception. - Page 139 Le tableau suivant montre l'atténuation de la réception par rapport au support de transmission. Chaque « mur » ou obstacle réduit la portée du facteur indiqué ci-dessous. Medium Réduction de la puissance du signal Verre (non traité) 5-15% Plastique 10-15% Bois 10-40% Brique...
- Page 140 Figure 13 N° Description Allumé lorsque le récepteur de fréquence fonctionne correctement Intérieur Activé lorsque le capteur intérieur est atteint Extérieur Activé lorsque le capteur extérieur est atteint. Wi-Fi Activé lorsqu'une connexion au routeur Wifi a été établie avec l'application. Activé si connecté à des services d'hébergement Internet Alimentation L'adaptateur secteur est connecté...
- Page 141 Figure 14 N° Touche / Connexion Description Reset Appuyez sur cette touche pendant 5 secondes pour réinitialiser l'appareil ; appuyez brièvement sur cette touche pour reconfigurer Internet. Raccordement au réseau Connexion de l'adaptateur secteur électrique...
-
Page 142: Publication En Direct Sur Internet
PUBLICATION EN DIRECT SUR INTERNET Vous pouvez utiliser votre appareil pour envoyer des données à une sélection de services météorologiques sur Internet. Les services pris en charge sont indiqués dans le tableau ci-dessous : Service Site Web Description d'hébergement Ecowitt Weather https://www.ecowitt.net Ecowitt est un nouveau serveur capable d'héberger plusieurs... - Page 143 Connexion de la station météo à Internet (Wifi) Pour pouvoir envoyer des données météorologiques en ligne à des services météorologiques sélectionnés, la console de la station météo doit être connectée à Internet par Wifi. La console ne peut se connecter au réseau sans fil que si l'adaptateur secteur externe est connecté...
- Page 144 Configuration de l'appareil Sélectionnez votre Effectuez la procédure Sélectionnez L'appareil nommé EasyWeather- appareil dans la liste des décrite. Cochez ensuite la case Completed operation WIFI. appareils, puis appuyez sur Next. et appuyez sur Next.
- Page 145 Appuyez sur Scan et Connectez la station météo EasyWeather-WIFI sélectionnez votre SSID dans la liste. Saisissez à votre routeur avec votre ensuite votre mot de passe terminal mobile. Une fois WiFi et appuyez sur Next. la connexion établie avec succès, les paramètres de Si vous possédez un téléchargement s'affichent routeur bi-bande (2,4 GHz...
- Page 146 Paramètres de téléchargement Votre appareil permet d'envoyer les données de votre capteur à certains services météorologiques basés sur Internet, tels que ecowitt.net, wunderground.com, weathercloud.net, wow.metoffice.gov.uk et votre site web personnel. Les utilisateurs doivent s'inscrire sur le site web correspondant pour obtenir un ID de station (ou adresse MAC) pour leur station météo et un mot de passe.
- Page 148 ECOWITT WEATHER Il est recommandé d'utiliser le serveur Ecowitt Weather pour surveiller et enregistrer les données de vos capteurs. Configurez-le comme suit : Sur la page ecowitt.net Upload, activez le bouton ON et définissez • l'intervalle de temps pour le téléchargement. •...
- Page 149 L'application WS View Plus ne prend en charge que le réglage des unités. Pour pouvoir effectuer tous les réglages de manière complète, visitez le site web ecowitt dans votre navigateur ou sur un ordinateur. Si vous n'avez pas pu vous enregistrer dans l'application WS View Plus, veuillez vous rendre sur le site web ecowitt pour vous enregistrer et ajouter l'appareil.
- Page 150 Vue graphique Vue en liste...
- Page 151 Carte météo Alertes par e-mail...
- Page 152 WEATHER UNDERGROUND Pour utiliser wunderground.com, vous devez avoir un compte et enregistrer votre nouvelle station météo. Vous pouvez le faire sur la page Wunderground Upload de l'application WS View Plus : Cliquez sur Register at Wunderground.com et terminez l'enregistrement sur la page.
- Page 153 Sélectionnez Add New device. Choisissez votre station météo dans la liste ou sélectionnez other et cliquez sur Next.
- Page 154 Sélectionnez l'option Adresse ou Manual et recherchez votre emplacement. Appuyez ensuite sur Next. Cette fois-ci, on vous demande des détails sur votre station météo. Remplissez le formulaire et cliquez sur Next.
- Page 155 Une fois terminé, l'ID de la station et le mot de passe s'affichent. • Notez l'ID de la station et le mot de passe généré pour vous. • Retournez à l'application et saisissez l'ID de la station et le mot de passe. Appuyez sur Save.
- Page 156 Affichage des données sur wunderground.com Vous pouvez également consulter les données de votre station météo sur le site wunderground.com. Utilisez cette URL, en remplaçant le texte STATIONID par votre ID de station. http://www.wunderground.com/personal-weather-station/ dashboard?ID=STATIONID Une page comme celle-ci s'affichera, sur laquelle vous pouvez consulter les données actuelles, mais aussi les données historiques.
- Page 157 Weather Underground Forecast : application iOS et Android de prévisions météorologiques : https://itunes.apple.com/us/app/weather-underground-forecast/ id486154808 https://play.google.com/store/apps/details?id=com.wunderground.android. weather&hl=en...
- Page 158 PWS Weather Station Monitor : affichez les conditions météorologiques dans votre quartier ou même dans votre propre jardin. Se connecte à wunderground.com : https://itunes.apple.com/us/app/pws-weather-station-monitor/ id713705929...
-
Page 159: Gestion Des Appareils Et Paramètres
GESTION DES APPAREILS ET PARAMÈTRES Lorsque vous êtes sur l'écran du tableau de bord WU, vous pouvez appuyer sur la touche Menu (en haut à droite) et sélectionner Device List pour afficher tous vos appareils. Vous pouvez appuyer sur votre appareil pour afficher ou modifier les paramètres. - Page 160 Paramètres Vous pouvez définir les unités d'affichage souhaitées ou la page d'accueil par défaut pour l'application en sélectionnant Settings dans le sous- menu. Une fois que vous avez créé avec succès votre compte Ecowitt dans l'application WS View Plus, vous pouvezsélectionner Manage Ecowitt dans le sous-menu pour gérer votre appareil.
-
Page 162: Nettoyage Et Entretien
NETTOYAGE ET ENTRETIEN Les étapes suivantes doivent être suivies pour une maintenance correcte de votre station : Nettoyage du pluviomètre Vérifiez le pluviomètre tous les 3 mois. Tournez l'entonnoir dans le sens inverse des aiguilles d'une montre et soulevez-le. Nettoyez l'entonnoir et le collecteur avec un chiffon humide pour enlever la saleté, les dépôts et les insectes. - Page 163 IDENTIFICATION ET RÉSOLUTION DES PROBLÈMES Problème Solution Le capteur extérieur Vérifiez que la LED de transmission extérieure n'établit pas de clignote normalement (en fonction de l'intervalle connexion avec la de signalement du capteur). console (la passerelle). Si les piles ont été récemment insérées ou remplacées , vérifiez que la polarité...
- Page 164 Problème Solution La pression La pression atmosphérique relative se réfère à atmosphérique la température équivalente au niveau de la mer relative ne et doit généralement correspondre étroitement correspond pas à la avec la station officielle. En cas d'écarts, vérifiez station de mesure que vos n'avez pas pris en compte la pression officielle.
- Page 165 Problème Solution Aucune donnée Assurez-vous que la date, l'heure et le fuseau n'est transmise à horaire sont correctement réglés dans l'application Wunderground.com. WS View. Si elles ne sont pas fausses, il est possible que vous déclariez des données pour un moment passé...
- Page 166 Problème Solution Pas de connexion Vous pouvez également essayer les méthodes Wifi / Échec de la suivantes pour configurer la passerelle : configuration de la Méthode 1 : passerelle 1. Éteignez la passerelle et attendez quelques minutes. 2. Allumez la passerelle et maintenez la touche noire pendant 5 secondes jusqu'à...
-
Page 167: Explication Des Termes
EXPLICATION DES TERMES Terme Définition Pression Par pression atmosphérique absolue, on entend la atmosphérique pression atmosphérique mesurée ; il s'agit d'une absolue fonction d'altitude qui se rapporte également, dans une moindre mesure, aux changements des conditions météorologiques. La pression atmosphérique absolue n'est pas corrigée en fonction du niveau de la mer. - Page 168 Terme Définition Point de rosée Le point de rosée est la température à laquelle un paquet donné d'air humide doit être refroidi à pression atmosphérique constante pour que la vapeur d'eau se condense en eau. L'eau de condensation s'appelle la rosée. Le point de rosée est une température de saturation.
- Page 169 Terme Définition Rayonnement solaire Un capteur de rayonnement solaire mesure l'énergie solaire du soleil. Le rayonnement solaire est de l'énergie rayonnante émise par le soleil lors d'une réaction de fusion nucléaire qui produit de l'énergie électromagnétique. Le spectre du rayonnement solaire est proche de celui d'un corps noir dont la température est d'environ 5 800 K.
-
Page 170: Conseils Pour Le Recyclage
PO Box 1145 Oxford, OX1 9UW United Kingdom Le soussigné, Chal-Tec GmbH, déclare que l’équipement radioélectrique du type Halley est conforme à la directive 2014/53/UE. Le texte complet de la déclaration UE de conformité est disponible à l’adresse internet suivante : use.berlin/10032926... - Page 171 Gentile cliente, La ringraziamo per l'acquisto del dispositivo. La preghiamo di leggere attentamente le seguenti indicazioni e di seguirle per prevenire eventuali danni. Non ci assumiamo alcuna responsabilità per danni scaturiti da una mancata osservanza delle avvertenze di sicurezza e da un uso improprio del dispositivo.
-
Page 172: Dati Tecnici
DATI TECNICI Numero articolo 10032926 Alimentazione della stazione base Alimentatore da 5 V DC Alimentazione del sensore interno 2 batterie AA (non incluse nel volume di consegna) Alimentazione del sensore esterno 2 batterie AA (non incluse nel volume di consegna) Distanza massima di trasmissione 100 m (all'esterno) -
Page 173: Avvertenze Di Sicurezza
AVVERTENZE DI SICUREZZA I fulmini sono attratti dagli oggetti metallici, compresa l'asta di fi ssaggio della stazione meteorologica, e potrebbero colpirli. Non montare mai l'asta di fi ssaggio durante un temporale. AVVERTIMENTO Pericolo di lesioni! L'installazione della stazione meteorologica in posizione elevata può provocare lesioni gravi o la morte. Controllare il più... -
Page 174: Descrizione Del Dispositivo E Tasti Funzione
DESCRIZIONE DEL DISPOSITIVO E TASTI FUNZIONE Segnavento Cella solare Sensore della velocità del Bullone a U vento Sensore UV/Sensore della Vano della batteria luce Termo-/igrometro Tasto Reset Collettore della pioggia Indicazione LED: si illumina per 4 secondi quando il dispositivo viene acceso. Poi il LED lampeggia una volta ogni 16 secondi (intervallo di aggiornamento della... - Page 175 INSTALLAZIONE Installazione temporanea Si consiglia di utilizzare e testare la stazione meteorologica in un luogo facilmente accessibile prima dell'installazione definitiva. Questo permette di testare tutte le funzioni, garantire il corretto funzionamento e familiarizzare con la stazione meteorologica e tutte le possibilità di impostazione. Inoltre, permette anche di testare la portata radio della stazione meteorologica.
- Page 176 Installazione del segnavento Spingere il segnavento sul supporto come mostrato nell'immagine 1. Stringere la vite come mostrato nell'immagine 2. Assicurarsi che il segnavento possa ruotare liberamente. Immagine 1 Immagine 2 Quattro lettere dell'alfabeto "N", "E", "S" e "W" indicano rispettivamente la direzione del vento e rappresentano nord, est, sud e ovest.
- Page 177 Installazione delle batterie Inserire due batterie AA nel vano. L'indicazione LED sul retro del trasmettitore si illumina per 4 secondi e lampeggia poi una volta ogni 16 secondi (intervallo di aggiornamento della trasmissione del sensore). Immagine 6 Immagine 7 Se nessuna indicazione LED si accende o l'indicazione LED è permanentemente accesa, controllare se le batterie sono state inserite correttamente nel vano o se il dispositivo è...
- Page 178 Installazione del sensore esterno Fissare il sensore all'asta di montaggio (non inclusa) usando i bulloni a U come mostrato nell'immagine 8. Immagine 8 Immagine 9 Usare la livella per assicurarsi che i sensori siano in piano. Tasto Reset e LED di trasmissione Resettare il sensore se non trasmette correttamente.
- Page 179 Tasto Reset Immagine 10 Trasmettitore del termoigrometro-barometro da interno Quando si inseriscono le batterie, prestare attenzione alla polarità corretta per evitare danni permanenti al dispositivo. • Rimuovere lo sportello del vano delle batterie sul retro del sensore. • Inserire due batterie AA.
-
Page 180: Messa In Funzione E Utilizzo
• Per climi freddi, raccomandiamo le batterie al litio, anche se le batterie alcaline sono sufficienti nella maggior parte delle condizioni climatiche. Non raccomandiamo l'uso di batterie ricaricabili perché hanno una tensione inferiore, non sono progettate per resistere a grandi sbalzi di temperatura e non durano a lungo, con conseguente scarsa ricezione. - Page 181 La seguente tabella mostra l'attenuazione di ricezione rispetto al mezzo di trasmissione. Ogni "parete" o ostacolo riduce la portata del fattore indicato qui sotto. Mezzo Riduzione dell'intensità del segnale Vetro (non trattato) 5-15% Plastica 10-15% Legno 10-40% Mattoni 10-40% Calcestruzzo 40-80% Metallo 90-100%...
- Page 182 Immagine 13 Descrizione Acceso se il ricevitore di frequenza funziona correttamente Area interna Acceso se viene raggiunto il sensore interno Area esterna Acceso se viene raggiunto il sensore esterno WiFi Acceso se è stata stabilita una connessione al router WiFi tramite l'app. Acceso se è collegato ai servizi di hosting su Internet Power L'adattatore di rete è...
- Page 183 Immagine 14 Tasto/Connessione Descrizione Reset Premere questo tasto per 5 secondi per resettare il dispositivo; premerlo brevemente per riconfigurare Internet. Collegamento alla rete Collegamento dell'adattatore di rete elettrica...
- Page 184 PUBBLICAZIONE SU INTERNET IN TEMPO REALE Il tuo dispositivo può essere utilizzato per inviare dati a servizi meteo selezionati su Internet. I servizi supportati sono elencati nella tabella seguente: Servizio di Sito web Descrizione hosting Ecowitt Weather https://www.ecowitt.net Ecowitt è un nuovo server che può...
- Page 185 Collegamento della stazione meteorologica a Internet (WiFi) Per poter inviare i dati ai servizi meteo online selezionati, la console della stazione meteo deve essere collegata a Internet tramite WiFi. La console può connettersi al WiFi solo quando l'adattatore esterno è collegato e inserito in una presa di corrente.
- Page 186 Configurare il dispositivo Selezionare il proprio Eseguire la procedura Selezionare il dispositivo chiamato EasyWeather- dispositivo dall'elenco, come descritto. Spuntare poi premere Next. la casella Completed WIFI. operation e premere Next.
- Page 187 Premere Scan e Collegare la stazione meteo EasyWeather-WIFI al selezionare l'SSID corretto dalla lista. Inserire poi la router tramite il dispositivo password WiFi e premere portatile. Se la connessione Next. è stata stabilita con successo, le impostazioni di Se si ha un router dual- upload vengono mostrate band (2.4 GHz e 5.0 GHz), automaticamente.
- Page 188 Impostazioni di upload Il dispositivo può essere utilizzato per inviare dati dal sensore a servizi meteo online selezionati, come ecowitt.net, wunderground.com, weathercloud.net, wow.metoffice.gov.uk e il sito web creato personalmente. Gli utenti devono registrarsi sul relativo sito web per ricevere un ID (o indirizzo MAC) per la stazione meteorologica e una password.
- Page 190 ECOWITT WEATHER Si raccomanda di utilizzare il server Ecowitt Weather per monitorare e registrare i dati dei sensori. Configurarlo in questo modo: Sulla pagina di ecowitt.net Upload, attivare il tasto ON e impostare il • tempo dell'intervallo di caricamento. • Premere Salva nella pagina.
- Page 191 L'app WS View Plus supporta solo l'impostazione delle unità. Per realizzare completamente tutte le impostazioni, visitare il sito web ecowitt nel browser o su un computer. Se la registrazione nell'app WS View Plus non ha avuto successo, visitare il sito web ecowitt per registrarsi e aggiungere il dispositivo. Visualizzazione dei dati su ecowitt.net I dati del sensore possono essere visualizzati sul sito web ecowitt.net.
- Page 192 Vista grafica Vista elenco...
- Page 193 Mappa delle condizioni meteo Avvertimenti via e-mail...
- Page 194 WEATHER UNDERGROUND Per usare wunderground.com, è necessario avere un account e registrare la nuova stazione meteo. Questo può essere fatto nella pagina Wunderground Upload nell'applicazione WS View Plus: Cliccare su Register at Wunderground.net e completare la registrazione sulla pagina. Visitare Wunderground.com e cliccare su Join, come indicato dalla freccia in alto a destra, e selezionare l'opzione Sign up for free.
- Page 195 Selezionare Add New Device. Selezionare la stazione meteorologica dalla lista o selezionare other e cliccare su Next.
- Page 196 Selezionare l'opzione Adress o Manual e trovare la propria posizione. Premere poi Next. Questa volta verranno chiesti i dettagli della stazione meteorologica. Compilare il modulo e cliccare poi Next.
- Page 197 Al termine, vengono visualizzati l'ID della stazione e la password. • Prendere nota dell'ID della stazione e della password generati. • Tornare all'app e inserire l'ID della stazione e la password. Premere Save. • Tornare alla pagina del menu e selezionare WU Dashboard (per la •...
- Page 198 Visualizzare i dati su wunderground.com I dati della stazione meteo possono essere visualizzati anche sul sito wunderground.com. Usare un URL come questo, con l'ID della stazione al posto del testo STATIONID. http://www.wunderground.com/personal-weather-station/ dashboard?ID=STATIONID Viene mostrata una pagina come questa in cui è possibile visualizzare i dati attuali e anche quelli storici.
- Page 199 Weather Underground Forecast: applicazione per iOS e Android per le previsioni del tempo: https://itunes.apple.com/us/app/weather-underground-forecast/ id486154808 https://play.google.com/store/apps/details?id=com.wunderground.android. weather&hl=en...
- Page 200 PWS Weather Station Monitor: visualizzare le condizioni meteorologiche nel quartiere o anche in giardino. Si collega a wunderground.com: https://itunes.apple.com/us/app/pws-weather-station-monitor/ id713705929...
- Page 201 GESTIRE I DISPOSITIVI E LE IMPOSTAZIONI Quando ci si trova nella schermata WU Dashboard, è possibile premere il tasto Menu (in alto a destra) e selezionare Device List per visualizzare tutti i dispositivi. È possibile premere sul dispositivo per visualizzare o modificare le impostazioni.
- Page 202 Impostazioni È possibile impostare le unità del display desiderate o la pagina iniziale predefinita dell'applicazione selezionando Settings nel sottomenu. Una volta che è stato creato con successo l'account Ecowitt nell'app WS View Plus, è possibile selezionare Manage Ecowitt dal sottomenu pergestire il dispositivo.
-
Page 204: Pulizia E Manutenzione
PULIZIA E MANUTENZIONE I seguenti passaggi sono necessari per una corretta manutenzione della stazione: Pulire il pluviometro Controllare il pluviometro ogni 3 mesi. Ruotare l'imbuto in senso antiorario e sollevarlo. Pulire l'imbuto e il contenitore di raccolta con un panno umido per rimuovere sporco, detriti e insetti. -
Page 205: Ricerca E Correzione Degli Errori
RICERCA E CORREZIONE DEGLI ERRORI Problema Soluzione Il sensore esterno non Controllare che il LED di trasmissione per la si collega alla console zona esterna lampeggi normalmente (secondo (gateway). l'intervallo di segnalazione del sensore). Se sono state recentemente inserite o sostituite le Questo viene indicato batterie , controllare che la polarità... - Page 206 Problema Soluzione La pressione La pressione atmosferica relativa si riferisce relativa dell'aria alla temperatura equivalente al livello del mare non corrisponde e dovrebbe generalmente essere strettamente alla stazione di in linea con la stazione ufficiale. Se ci sono misurazione ufficiale. discrepanze, assicurarsi di non osservare la pressione assoluta dell'aria, specialmente se la stazione in questione non è...
- Page 207 Problema Soluzione Nessun dato Assicurarsi che la data, l'ora e il fuso orario siano viene trasferito a impostati correttamente nell'app WS View. Se non Wunderground.com. sono errati, è possibile che si stiano riportando dati per un momento nel passato o nel futuro, che potrebbe non essere mostrato dove ci si aspetta.
- Page 208 Problema Soluzione Nessuna connessione Si possono anche provare i seguenti metodi per WiFi/Configurazione impostare il gateway: del gateway non Metodo uno: riuscita 1. Spegnere il gateway e aspettare qualche minuto. 2. Accendere il gateway e tenere premuto il tasto nero per 5 secondi finché il LED rosso lampeggia velocemente.
-
Page 209: Spiegazione Dei Termini
SPIEGAZIONE DEI TERMINI Termine Definizione Pressione assoluta La pressione assoluta dell'aria è la pressione dell'aria atmosferica misurata ed è una funzione dell'altitudine che si riferisce anche, in piccola misura, ai cambiamenti delle condizioni meteorologiche. La pressione assoluta dell'aria non viene corretta sul livello del mare. A tal fine, v. "pressione relativa dell'aria". - Page 210 Termine Definizione Punto di Il punto di condensazione è la temperatura alla condensazione quale una data porzione di aria umida deve essere raffreddata a pressione dell'aria costante perché il vapore acqueo si condensi in acqua. L'acqua di condensazione è definita rugiada. Il punto di condensazione è...
- Page 211 Termine Definizione Radiazione solare Un sensore di radiazione solare misura l'energia del sole. La radiazione solare è energia radiante emessa dal sole attraverso una reazione di fusione nucleare che produce energia elettromagnetica. Lo spettro della radiazione solare è vicino a quello di un corpo nero con una temperatura di circa 5800 K.
-
Page 212: Smaltimento
PO Box 1145 Oxford, OX1 9UW United Kingdom Il fabbricante, Chal-Tec GmbH, dichiara che il tipo di apparecchiatura radio Halley è conforme alla direttiva 2014/53/UE. Il testo completo della dichiarazione di conformità UE è disponibile al seguente indirizzo Internet: use.berlin/10032926...