Korg GT-12 Manuel Du Propriétaire
Table des Matières
Les langues disponibles
Les langues disponibles
Liens rapides
J E F G 1
Owner's Manual
Precautions
Location
Using the unit in the following locations can result in a malfunction.
• In direct sunlight
• Locations of extreme temperature or humidity
• Excessively dusty or dirty locations
• Locations of excessive vibration
Power supply
Please connect the designated AC adaptor to an AC outlet of the correct voltage. Do
not connect it to an AC outlet of voltage other than that for which your unit is
intended.
Interference with other electrical devices
This product contains a microcomputer. Radios and televisions placed nearby may
experience reception interference. Operate this unit at a suitable distance from
radios and televisions.
Handling
To avoid breakage, do not apply excessive force to the switches or controls.
Care
If the exterior becomes dirty, wipe it with a clean, dry cloth. Do not use liquid
cleaners such as benzene or thinner, or cleaning compounds or flammable polishes.
Keep this manual
After reading this manual, please keep it for later reference.
Keeping foreign matter out of your equipment
• N
ever set any container with liquid in it near this equipment. If liquid gets into
the equipment, it could cause a breakdown, fire, or electrical shock.
• Be careful not to let metal objects get into the equipment. If something does slip
into the equipment, unplug the AC adaptor from the wall outlet. Then contact
your nearest Korg dealer or the store where the equipment was purchased.
CE mark for European Harmonized Standards
CE mark which is attached to our company's products of AC mains operated
apparatus until December 31, 1996 means it conforms to EMC Directive (89/
336/EEC) and CE mark Directive (93/68/EEC). And, CE mark which is attached
after January 1, 1997 means it conforms to EMC Directive (89/336/EEC), CE
mark Directive (93/68/EEC) and Low Voltage Directive (73/23/EEC).
Also, CE mark which is attached to our company's products of Battery operated
apparatus means it conforms to EMC Directive (89/336/EEC) and CE mark
Directive (93/68/EEC).
THE FCC REGULATION WARNING (for U.S.A.)
This equipment has been tested and found to comply with the limits for a Class
B digital device, pursuant to Part 15 of the FCC Rules. These limits are designed
to provide reasonable protection against harmful interference in a residential
installation. This equipment generates, uses, and can radiate radio frequency
energy and, if not installed and used in accordance with the instructions, may
cause harmful interference to radio communications. However, there is no
guarantee that interference will not occur in a particular installation. If this
equipment does cause harmful interference to radio or television reception,
which can be determined by turning the equipment off and on, the user is
encouraged to try to correct the interference by one or more of the following
measures:
• Reorient or relocate the receiving antenna.
• Increase the separation between the equipment and receiver.
• Connect the equipment into an outlet on a circuit different from that to which
the receiver is connected.
• Consult the dealer or an experienced radio/TV technician for help.
Unauthorized changes or modification to this system can void the user's
authority to operate this equipment.
Thank you for purchasing
the Korg GT-12 guitar/bass
chromatic tuner. Before you
use the GT-12, please read
this owner's manual care-
fully, and use the GT-12 as
directed. Keep this manual
for future reference.
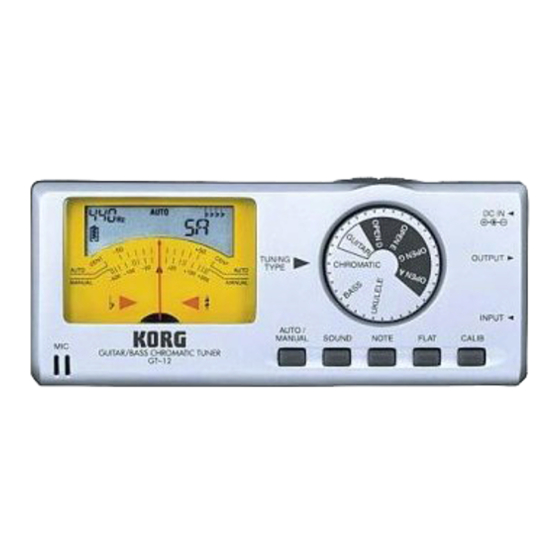
Par ts of the GT-12
LCD display Meter
Power switch
(
Built-in mic
Tuning guide
[SOUND] switch
[AUTO/MANUAL] switch
Tuning procedure
The GT-12 has two tuning modes: Meter mode (auto/manual) in which
you tune while watching a meter, and Sound mode (manual) in which
you tune to an audible reference tone.
Meter mode
1. If you are using an instrument with a pickup (such as an electric
guitar) or a mic, connect the instrument or mic to the INPUT jack of
the GT-12. (If you connect the GT-12's OUTPUT jack to your amp
etc., the sound will be output thru the tuner. During your perfor-
mance however, you may want to turn the GT-12 power switch
OFF to avoid noise.)
If a plug is inserted into the INPUT jack or OUTPUT jack, the built-in
mic cannot be used. Both jacks are mono. They cannot be used with
stereo plugs.
If you wish to tune your instrument using the built-in mic, do not
connect a plug to the INPUT jack or OUTPUT jack. In steps 5 and 6,
place your instrument as close as possible to the built-in mic.
2. Turn the power switch to the ON or
the power will be on, and in addition the display will be illumi-
nated.)
When the power is turned on, the previously-selected reference
pitch (default setting: A=440 Hz) will be selected, and the GT-12
will be in Meter mode (Auto)
3. If you wish to change the reference pitch (calibration), press the
[CALIB] switch. Each time you press it, the reference pitch will rise
1 Hz. If you continue holding it, the pitch will rise continuously.
The available range is 438 Hz–445 Hz.
4. Rotate the [TUNING TYPE] dial to select the appropriate instru-
ment or set to CHROMATIC.
Move the appropriate instrument name to the
Each setting allows the following tuning.
GUITAR
: 6E, 5A, 4D, 3G, 2B, 1E (6E)
OPEN D
: 6D, 5A, 4D, 3F , 2A, 1D (6D)
OPEN E
: 6E, 5B, 4E, 3G , 2B, 1E (6E)
OPEN G
: 6D, 5G, 4D, 3G, 2B, 1D (6D)
OPEN A
: 6E, 5A, 4E, 3A, 2C , 1E (6E)
BASS
: LB, 4E, 3A, 2D, 1G, HC (LB)
UKULELE
: 4G, 3C, 2E, 1A (4G)
CHROMATIC : C, C , D, E , E, F, F , G, G , A, B , B
5. Specify the note name.
When using AUTO
Play a single note on your instrument, and the name of the nearest
note will appear in the LCD display. Tune your instrument so that
the correct note name is shown in the LCD display.
When using MANUAL
Press the [NOTE] switch until the note you wish to tune (C–B)
appears in the LCD display.
• Each time you press the [AUTO/MANUAL] switch, the setting will
switch between AUTO and MANUAL.
[TUNING TYPE] dial
/ON/OFF )
DC IN jack
(connect to AC adapter)
OUTPUT jack
INPUT jack
[CALIB] switch
[FLAT] switch
[NOTE] switch
position. (At the
position,
mark.
( ): Default values for MANUAL
LB: Low B, HC: High C
(A, sound output: A4)
Table des Matières

Manuels Connexes pour Korg GT-12


Sommaire des Matières pour Korg GT-12
- Page 3 Sol OUVERT : 6D, 5G, 4D, 3G, 2B, 1D (6D) La OUVERT : 6E, 5A, 4E, 3A, 2C , 1E (6E) La fente située au dos du GT-12 permet de l’incliner pour plus de facilité BASSE : LB, 4E, 3A, 2D, 1G, HC (LB) LB=Si bas, HC=Do haut d’utilisation.
-
Page 4: Remplacement Des Piles Et Fonction De Mémoire
3. Appuyer sur le sélecteur [NOTE] jusqu’à ce que la note que vous souhaitez accorder s’affiche à l’écran LCD. Spécifications techniques 4. Ecouter la hauteur de la note produite par le GT-12 et accorder l’instrument sur cette note. Echelle : 12 tempéraments égaux •... -
Page 9: Remarque Concernant Le Mode Sound Du Gt
Hinweis zum Sound- Note regarding Sound Modus des GT-12 mode on the GT-12 When you use the GT-12 for the Bei der ersten Inbetriebnahme first time or after a period of des GT-12 bzw. wenn Sie es non-use, the reference tone may längere Zeit nicht verwendet...