Rola 59043 Mode D'emploi
Table des Matières
Les langues disponibles
Les langues disponibles
Liens rapides
These instructions contain IMPORTANT safety information. Please read and keep for future reference.
The user must read and understand these Instruction Sheets and the Warranty.
Installation is the end user's responsibility and beyond Horizon Global's control. Therefore, Horizon Global exclusively limits its Warranty to
the repair or replacement of a defective product. Damage to your vehicle, your cargo or any person or property is excluded.
•
Your rooftop basket must be inspected for signs of wear, corrosion and fatigue before each use. DO NOT use if bent or deformed.
•
Make sure your rooftop basket is secure before every trip. Check at each stop to ensure your rooftop basket is secure.
•
DO NOT exceed your vehicle's rated roof capacity, the capacity of your vehicle's cross bars, or 160lb. (73 kg) capacity of the rooftop
basket. Consult the owner's manual for your vehicle.
Basket Weight: 38 lbs. (17 kg)
•
If your vehicle does not have cross bars, DO NOT attempt to install rooftop basket.
•
DO NOT attempt to drill, weld, or modify your rooftop basket or any of the system components.
•
DO NOT use your rooftop basket for purposes other than those for which it was designed.
•
DO NOT use your rooftop basket to transport people, animals, or flammable liquids.
•
Check local and state laws governing projection of objects beyond the perimeter of a vehicle. Be aware of the width and height of
your cargo since low clearance branches, bridges, and parking garages can affect the load.
•
ALWAYS use caution when opening sunroof, tailgate or hatch when using your rooftop basket to transport cargo to prevent damage
to vehicle.
•
NEVER use elastic straps or belts to secure cargo.
•
Tie down LONG LOADS to the front and rear bumpers or tow hooks of the vehicle.
•
ALWAYS obey all posted speed limits and be aware of traffic conditions. Adapt your speed to the conditions of the road and the load
being carried.
•
REDUCE YOUR SPEED. Your vehicle can handle differently when transporting cargo.
•
FREQUENTLY check your rooftop basket and make sure the cargo is secure. Cargo can shift or your rooftop basket can loosen during
travel. Readjust as needed. If movement continues, stop use.
•
ALWAYS unload all objects before removing your rooftop basket from your roof.
•
Remove your rooftop basket when not in use and before entering automatic car washes.
•
As with any metal equipment, it is recommended that you keep the unit clean and remove road salt and debris.
•
Do not allow harsh chemicals, road salt, or mud to accumulate on the product for an extended period of time.
•
Wash the product with mild soap and water only, and use a non-abrasive cloth.
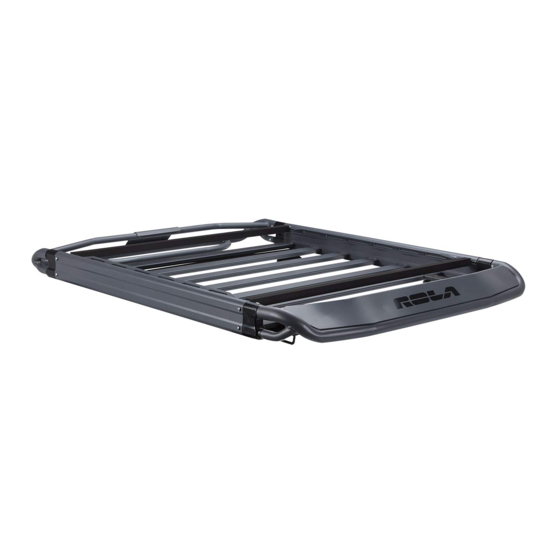
INSTRUCTION GUIDE FOR:
ATLAS ROOFTOP BASKET
59043
Date of Purchase:
WARNING
Weight of cargo:
Max.: 160 lbs. (73 kg)
PAGE 1
PAGE 1
59043_IN Rev A • Questions? (800) 234-6992 • ROLAProducts.com
/
/
Max. Load Limit: 198 lbs. (89 kg)
Check to be sure this is less than your vehicle's rated
roof capacity and the capacity of your cross bars.
Consult the owner's manual for your vehicle.
Table des Matières

Manuels Connexes pour Rola 59043


Sommaire des Matières pour Rola 59043
-
Page 7: Porte-Bagages De Toit
MODE D'EMPLOI POUR : PORTE-BAGAGES DE TOIT 59043 Date d'achat : Ces instructions contiennent des consignes de sécurité IMPORTANTES. Lisez-les et conservez-les pour référence future. AVERTISSEMENT WARNING L'utilisateur doit lire et comprendre ces fiches d'instructions et la garantie. Il incombe à l'utilisateur final de faire l'installation. Horizon Global n'en est aucunement responsable. Donc, Horizon Global limite sa garantie exclusivement à... -
Page 8: Liste Des Pièces
AVERTISSEMENT 1. Il est crucial pour son bon fonctionnement que le produit soit bien accroché, et ce, conformément aux instructions incluses. Voir les instructions pour l'accrochage et l'utilisation appropriées et pour d'importantes consignes de sécurité. Horizon Global n'a aucun contrôle sur, ni aucune responsabilité... -
Page 9: Instructions D'assemblage
INSTRUCTIONS D'ASSEMBLAGE Outils requis pour l’assemblage : Tournevis cruciforme, ruban à mesurer et lubrifiant sans danger pour le caoutchouc. Section centrale Retirez toutes les pièces de la boîte et assurez-vous que vous les avez toutes retirées et qu’elles sont toutes en bon état. Connecteur d’extrémité... - Page 10 INSTRUCTIONS D'INSTALLATION N’accrochez pas les cales d’espacement dans la zone Traverse ombragée. arrière Positionner le panier sur les traverses du véhicule 1. Centrez le panier à fret sur les traverses de votre véhicule. FIG 5. 2. Insérez les cales d’espacement dans le panier à fret et positionnez-les aussi loin l’une de l’autre que le permet votre véhicule FIG 5, 6.
- Page 11 INSTRUCTIONS D'INSTALLATION Accrocher les supports de fixation 1. Placez un support de fixation sur chaque cale d'espacement. Alignez les trous carrés des supports de fixation avec les deux carrés sur les Cache d’étrier en U cales d'espacement. Fig. 8. Support de fixation Poignée de blocage en plastique 2.
- Page 12 INSTRUCTIONS D'INSTALLATION Barres transversales accessoires 1. Votre panier porte-bagages de toit est livré avec deux barres transversales préinstallées. 2. Pour utiliser ces barres transversales, attachez-y votre accessoire de dessus de toit comme vous le feriez avec une barre transversale de toit standard.